Have you ever bitten into a baked apple hoping for a tender, sweet bite only to find it disappointingly hard? Or perhaps the opposite – a sad, collapsed pile of applesauce in a dish? Achieving that perfect, yielding texture in baked apples can feel like a culinary mystery.
We’ve all been there! It’s a common frustration for home bakers and dessert lovers alike. But what if I told you there’s a simple, foolproof method to get consistently tender baked apples every single time, without them dissolving into oblivion? It’s not about fancy techniques or secret ingredients; it’s about understanding how heat and moisture work together.
After years of experimenting, I finally cracked the code to making simple baked apples that are beautifully soft all the way through, holding their shape perfectly. This recipe relies on one key step that makes all the difference, transforming standard baked apples into a truly delightful dessert or breakfast treat. Ready to banish mushy or dry baked apples from your kitchen forever? Let’s dive in!
Why You’ll Fall in Love with These Simple Baked Apples
These aren’t just any baked apples; they’re designed for success and maximum enjoyment. Here are a few reasons why this recipe will become your go-to:
- Guaranteed Tender Texture: The special technique ensures the apples cook through evenly, becoming soft without turning into mush.
- Deep, Rich Flavor: A simple blend of sugars, spices, and butter creates a luscious syrup that coats each apple beautifully.
- Easy to Make: With minimal prep and straightforward steps, this recipe is perfect for beginners and experienced cooks alike.
- Versatile Serving: Enjoy them on their own, with ice cream, yogurt, or as a warming side dish.
- Perfect Seasonal Comfort: There’s nothing quite like the aroma of cinnamon and baked apples filling your home, especially on a crisp autumn day.
Gathering Your Ingredients for Perfect Baked Apples
Creating the ideal baked apple starts with selecting the right fruit and pairing it with classic, comforting flavors. Each ingredient plays a crucial role in achieving that balance of tenderness, sweetness, and spice.
Our base is, of course, the apples. Choosing the right variety is paramount for success. We need apples that will hold their shape well during baking but still become tender. Avoid varieties that are overly soft or turn to mush quickly. Firm baking apples like Honeycrisp, Granny Smith (if you prefer a tarter result), Fuji, Gala, or Jonagold are excellent choices. Using medium-sized apples ensures relatively uniform baking time.
For the sweet and spicy coating that forms that irresistible syrup, we combine granulated sugar and packed light brown sugar. The granulated sugar provides sweetness, while the brown sugar adds depth of flavor with its subtle molasses notes and helps create a richer sauce. Ground cinnamon and ground nutmeg are the essential warming spices that pair perfectly with apples, evoking cozy feelings with every bite.
Unsalted butter, cut into small pieces and dotted over the apples, melts as they bake, adding richness and helping to create a lovely glazed finish on the apples. Lastly, a little hot water or apple juice poured into the dish provides the essential liquid needed for our key steaming technique, preventing the apples from drying out and helping to form the sauce.
Here’s the simple list of what you’ll need:
- 4-6 medium firm baking apples (like Honeycrisp or Granny Smith)
- 1/2 cup granulated sugar
- 1/4 cup packed light brown sugar
- 1 teaspoon ground cinnamon
- 1/4 teaspoon ground nutmeg
- 1/4 cup unsalted butter, cut into small pieces
- 1/2 cup hot water or apple juice
Crafting Your Perfect Baked Apples: Step-by-Step Guide
Now that we have our ingredients ready, let’s walk through the process. This method includes a game-changing step that ensures your baked apples are cooked through and tender without losing their structure. Follow along closely, and you’ll be enjoying perfectly baked apples in no time!
- Prepare Your Oven and Apples: Begin by preheating your oven to 375 degrees F (190 degrees C). Getting the oven to temperature first ensures the apples start baking immediately upon entering, promoting even cooking. Next, prepare your apples. Peel each apple using a vegetable peeler. Then, carefully core them using an apple corer or a small paring knife to remove the seeds and fibrous core. You have the flexibility here – you can leave the apples whole for a classic presentation, or slice them in half lengthwise if you prefer a faster cooking time or easier portioning. Arrange the prepared apples snugly in a small baking dish. A dish that holds them relatively close together helps the liquid and flavors surround them effectively.
- Create the Flavorful Coating: In a separate small bowl, measure out your granulated sugar, light brown sugar, ground cinnamon, and ground nutmeg. Whisk these dry ingredients together until they are well combined. This ensures the spices and sugars are evenly distributed. Once mixed, sprinkle this sweet and spicy mixture generously and evenly over the tops of the prepared apples in the baking dish. Try to get some sugar into the cavities where the cores were removed, as this is where the flavors will melt and penetrate.
- Add Butter and Liquid: Dot the tops of the apples with the small pieces of unsalted butter you prepared earlier. The butter will melt as the apples bake, adding richness and helping to create that beautiful glossy finish we’re aiming for. Then, carefully pour the hot water or apple juice into the bottom of the baking dish, around the apples, not directly over them. This liquid is vital for the next step.
- The Secret to Tenderness: Cover and Steam: This is the most crucial step for achieving that perfect, never-mushy texture! Tightly cover the baking dish with aluminum foil. Make sure the seal is secure all around the edges. By covering the dish, you create a steaming environment in the oven. The hot liquid in the bottom of the dish turns to steam, which gently permeates the apples, cooking them evenly from the inside out. This slow, moist heat softens the pectin in the apples without causing them to dry out or collapse too quickly, which is the common culprit for mushy or hard results.
- Initial Covered Bake: Place the tightly covered baking dish into your preheated oven. Bake for 30 minutes. During this time, the apples are primarily steaming, beginning to soften while retaining their shape, and the sugars and butter are starting to melt and mingle with the liquid.
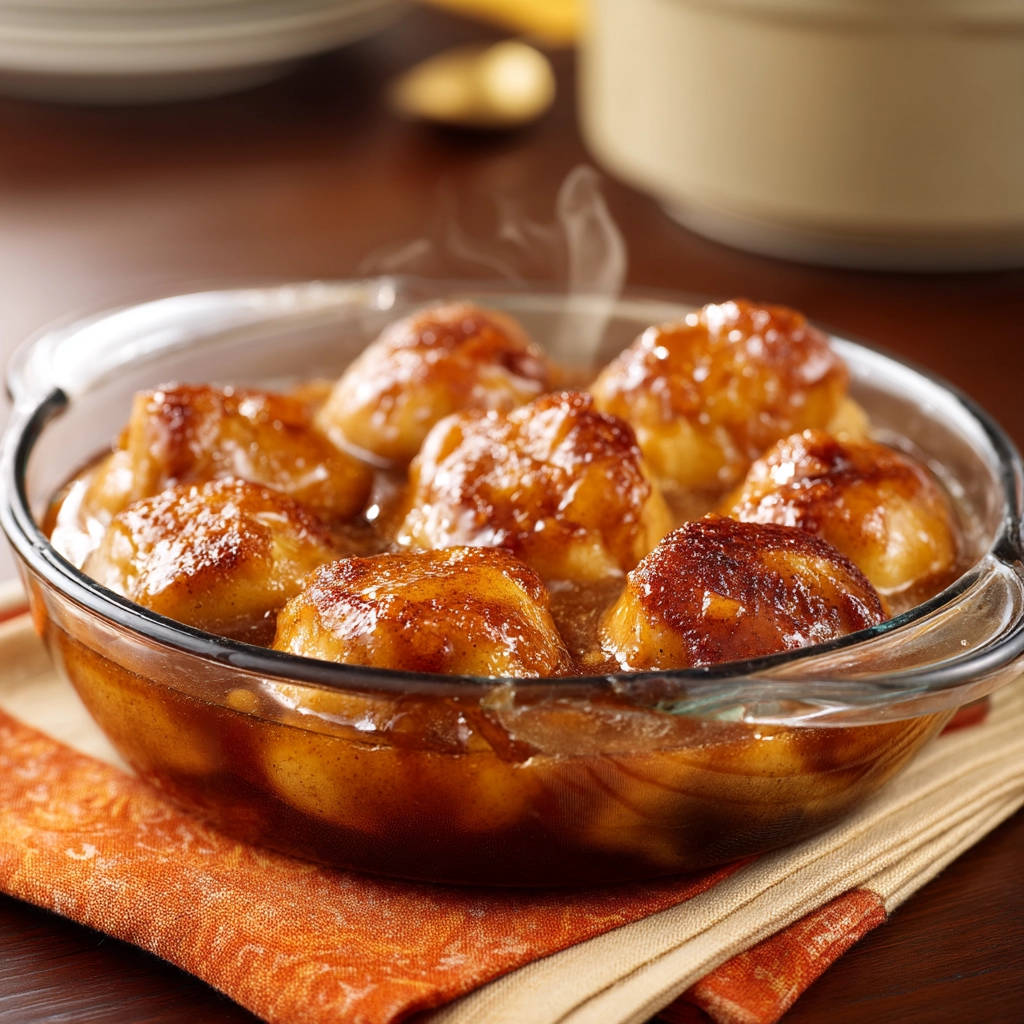
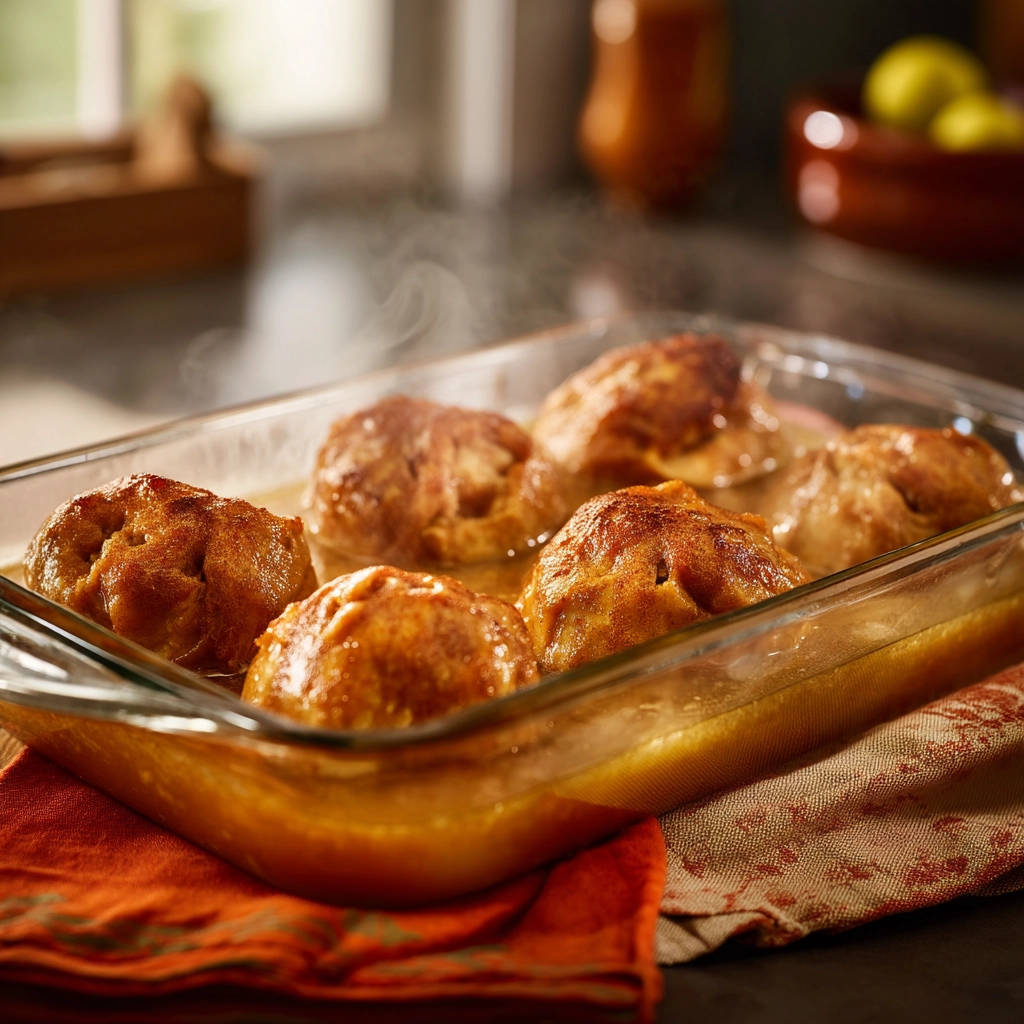
- Uncover and Finish Baking: After 30 minutes, carefully remove the foil from the baking dish. The apples should be partially tender by now, and the liquid in the dish will be starting to look more like a sauce. Return the uncovered dish to the oven and continue baking for another 15 to 30 minutes. The exact time needed will vary depending on the size and variety of your apples. Keep an eye on them – you’re looking for the apples to be fork-tender, meaning a fork can easily pierce them with little resistance. At this stage, the uncovered heat allows the sauce in the bottom of the dish to reduce slightly and become bubbly and slightly thickened, and the tops of the apples will start to get a lovely glaze. For an even more beautiful glaze, you can gently baste the apples with the warm sauce from the bottom of the dish a couple of times during this final uncovered baking period.
- Rest and Serve: Once the apples are perfectly tender and the sauce is ready, remove the baking dish from the oven. Let the apples rest in the dish for a few minutes before serving. This resting time allows the juices to settle and the sauce to thicken slightly more. When ready to serve, spoon that warm, delicious sauce from the bottom of the dish over each apple. They are best served warm.
Tips for Perfect Baked Apples Every Time
Even with a foolproof method, a few extra tips can elevate your simple baked apples from great to absolutely sublime.
- Apple Selection is Key: As mentioned, choose firm apples. Using a mix of varieties can add complexity to the flavor and texture, but ensure they all require roughly similar baking times. Honeycrisp and Granny Smith are often combined for a balance of sweetness and tartness.
- Don’t Overcrowd the Dish: While you want the apples to be snug, don’t pack them in so tightly that there’s no room for the liquid to bubble and steam effectively around them. A little space is necessary.
- Adjust Sugar to Your Taste (and Apples): If using naturally sweeter apples like Honeycrisp or Gala, you might reduce the sugar slightly. If using tarter apples like Granny Smith, you might want the full amount or even a touch more.
- Spice It Up (or Down): Adjust cinnamon and nutmeg amounts to your preference. A pinch of ground cloves or ginger can also add wonderful warmth. You could even try a homemade spice blend for a twist, though stick to warming dessert spices here!
- Substitution for Liquid: If you don’t have apple juice, water works just fine. For added richness, you could use a bit of melted butter mixed with water or juice, though the butter dotted on top is usually sufficient.
- Check for Doneness: Apples vary. Always check for fork-tenderness towards the end of the baking time. If they still feel firm after the recommended uncovered time, cover them again and bake for another 5-10 minutes before checking again.
Recipe Variations
Once you master the basic technique for these simple baked apples, you can easily experiment with variations:
- Add Dried Fruit or Nuts: Before baking, stuff the cored cavities with raisins, dried cranberries, chopped walnuts, or pecans for added texture and flavor.
- Streusel Topping: After the covered baking period, top the apples with a simple streusel topping (flour, sugar, cold butter, cinnamon) before returning to the oven uncovered. This will create a delicious crunchy crust.
- Orange or Lemon Zest: Add a bit of finely grated orange or lemon zest to the sugar and spice mixture for a brighter flavor note.
- Different Spices: Experiment with cardamom, allspice, or star anise for a different twist on the spice blend.
Storage and Reheating
Leftover baked apples can be stored in an airtight container in the refrigerator for up to 3-4 days. To reheat, gently warm them in the microwave for a minute or two, or place them back in a baking dish in a 300°F (150°C) oven until heated through.
What to Serve With Your Simple Baked Apples
These tender baked apples are wonderfully versatile. They can be enjoyed on their own, of course, spooning that warm, syrupy sauce over them. But they also pair beautifully with a variety of accompaniments.
For a classic dessert experience, serve them warm with a scoop of vanilla ice cream. The contrast of the warm apples and cold ice cream is pure bliss. A dollop of whipped cream or even Greek yogurt makes for a lighter option.
Baked apples also make a fantastic addition to breakfast or brunch. Serve them alongside creamy oatmeal, baked French toast, or warm cinnamon rolls for an extra touch of sweetness and fruit. They can even be a delightful, slightly sweet side dish for certain meals.
Your Simple Baked Apple Questions Answered (FAQ)
Can I make baked apples ahead of time?
Yes, you can bake the apples fully, let them cool, and store them in the refrigerator. Reheat gently before serving for the best texture and flavor.
What if my apples aren’t getting tender after the recommended time?
Apple sizes and oven temperatures can vary. If your apples are still firm after the uncovered baking time, cover the dish tightly with foil again and return it to the oven. Check for tenderness every 5-10 minutes until they reach the desired softness. Covering helps them cook through without the sauce reducing too much.
Can I use fewer apples?
Absolutely! This recipe is easily halved. Just use a smaller baking dish so the apples are still relatively snug.
Why do my baked apples sometimes turn mushy?
Mushiness often happens when apples are overcooked or cooked uncovered for too long at a high temperature. The steaming method used in this recipe, achieved by covering the dish initially, helps prevent this by cooking the apples gently and evenly before exposing them to direct heat for glazing.
Can I use unsweetened apple juice instead of hot water?
Yes, unsweetened apple juice is a great alternative to hot water and will add a little extra apple flavor to the sauce. The amount of sugar in the recipe is typically enough to sweeten the apples and the resulting sauce even with unsweetened juice.
Enjoy Your Perfectly Simple Baked Apples!
There you have it – the secret to baked apples that are consistently tender, sweet, and perfectly spiced, without the guesswork. This simple technique of covering the dish during the initial bake truly makes all the difference, locking in moisture and ensuring even cooking.
Whether you serve them as a comforting dessert, a warm breakfast side, or just a delicious snack, these simple baked apples are sure to become a favorite. The aroma alone as they bake is worth making them!
Give this recipe a try and see the difference the steaming method makes. We’d love to hear how yours turn out!
Happy Baking!
Simple Baked Apples

Ingredients
- 4-6 medium firm baking apples (like Honeycrisp or Granny Smith)
- 1/2 cup granulated sugar
- 1/4 cup packed light brown sugar
- 1 teaspoon ground cinnamon
- 1/4 teaspoon ground nutmeg
- 1/4 cup unsalted butter, cut into small pieces
- 1/2 cup hot water or apple juice
Directions
- Preheat oven to 375 degrees F (190 degrees C).
- Peel and core each apple. You can leave them whole or slice them in half lengthwise. Arrange the apples snugly in a small baking dish.
- In a small bowl, whisk together the granulated sugar, brown sugar, cinnamon, and nutmeg. Sprinkle this sugar mixture evenly over the apples.
- Dot the tops of the apples with the small pieces of butter.
- Pour the hot water or apple juice carefully into the bottom of the baking dish.
- Here’s the key step for tenderness without mush: Tightly cover the baking dish with foil. This steams the apples gently in the oven, ensuring they soften evenly from core to edge without drying out or collapsing too quickly.
- Bake for 30 minutes covered.
- Remove the foil and continue baking for another 15-30 minutes, or until the apples are fork-tender and the sauce is bubbly and slightly thickened. The exact time will depend on the size and variety of your apples. Basting the apples with the sauce a couple of times during this uncovered stage helps build that beautiful glaze.
- Let the apples rest for a few minutes before serving. Spoon the warm sauce over each apple.