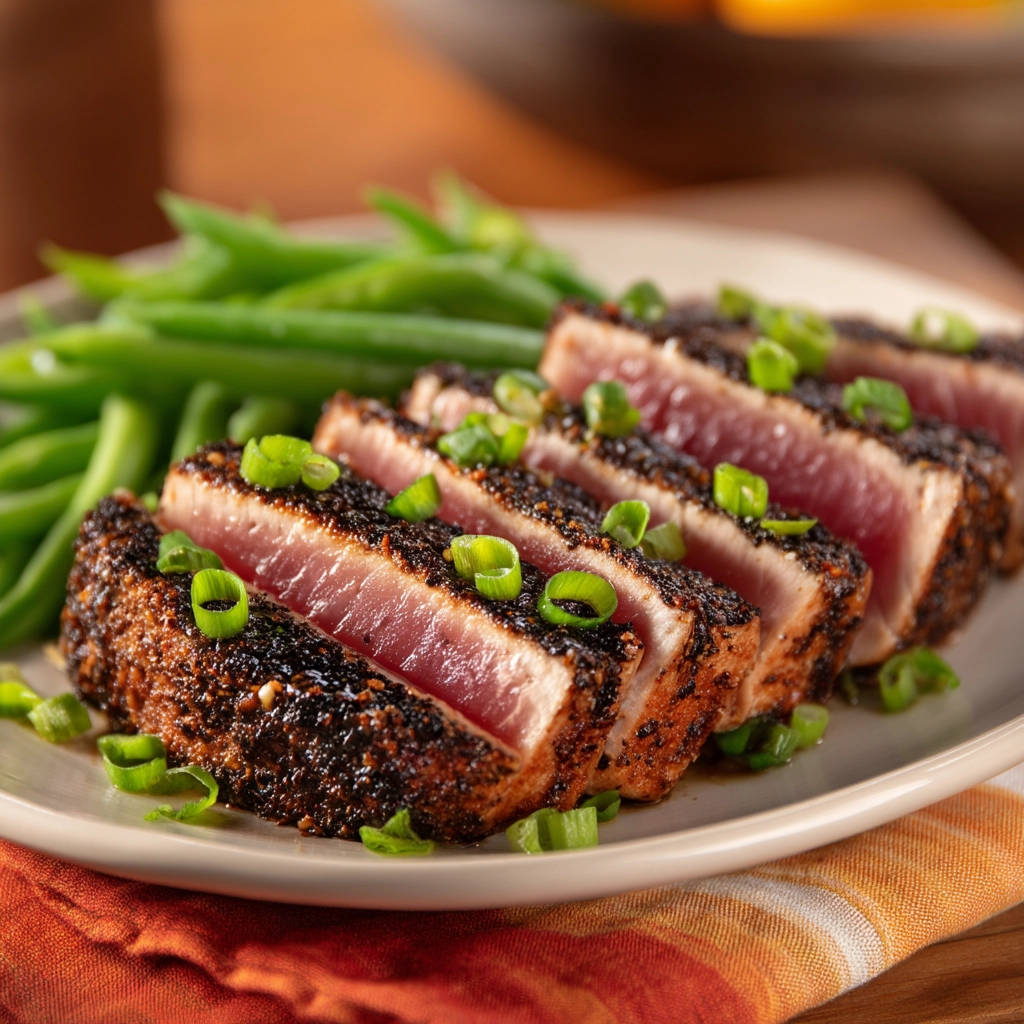
There’s something truly special about perfectly seared tuna. You know the kind – a beautiful, dark crust on the outside giving way to a stunningly rare, vibrant pink center that practically melts in your mouth. It feels fancy, like something you can only get at a great restaurant, right?
For the longest time, mastering simple seared tuna at home felt intimidating. Would it end up overcooked and dry? Would the crust burn before the middle was done? I struggled to consistently achieve that restaurant-quality rare center. It was honestly hit or miss for ages until I finally locked down one simple method. And let me tell you, it changed everything!
Now, every single time I make seared tuna, it turns out exactly how it should be. The exterior is perfectly seared, packed with flavor from a unique crust, and the inside is beautifully pink, tender, and juicy. This isn’t just a recipe; it’s the technique that takes the guesswork out of preparing this delicate fish.
If you’ve been hesitant to tackle searing tuna, this guide is for you. We’re going to break down exactly what makes this method foolproof, from selecting the right ingredients to hitting that perfect pan temperature. Get ready to impress yourself!
Why You’ll Love This Simple Seared Tuna
So, what makes this particular simple seared tuna recipe a game-changer? It boils down to a few key factors that guarantee success and deliver incredible flavor with minimal effort.
- Speedy & Simple: Tuna cooks incredibly fast, making this a perfect weeknight meal. Once you’ve got the technique down, you can have dinner on the table in under 20 minutes!
- Restaurant Quality at Home: Achieve that sought-after seared exterior and buttery rare interior that rivals your favorite seafood spot.
- Packed with Flavor: The unique seed and peppercorn crust adds fantastic texture and a punch of savory flavor that complements the rich tuna beautifully.
- Naturally Healthy: Tuna is a lean protein packed with omega-3 fatty acids. Served with green beans, it’s a complete, nutritious meal.
- Foolproof Technique: We focus on the critical steps – drying the fish, getting the pan hot, and precise timing – to eliminate the common pitfalls of overcooking.
Gathering Your Ingredients for Perfect Seared Tuna
Creating exceptional simple seared tuna doesn’t require a long list of obscure ingredients. The magic truly lies in the quality of a few key components and how they’re prepared. Let’s talk about what you’ll need and why each element plays its part in achieving that stunning result.
The foundation is, of course, the tuna itself. You want high-quality, fresh tuna steaks. Look for pieces that are vibrant in color, have a clean smell (no strong fishiness), and are roughly the same thickness – about one inch is ideal for getting a good sear without overcooking the inside.
The crust is what elevates this seared tuna. We use a blend of white and black sesame seeds. The white seeds offer a nutty flavor, while the black seeds add a striking visual contrast and a slightly different nutty note. Black peppercorns, slightly crushed, introduce a warm, pungent heat that stands up nicely to the richness of the fish. Sea salt is essential for enhancing all the flavors and helping to draw out just the right amount of moisture for that perfect sear.
For the searing itself, a high smoke point oil is non-negotiable. Oils like vegetable or canola can withstand the high temperatures needed to quickly create a crust before the heat penetrates too deeply into the tuna. Using an oil with a lower smoke point would result in burnt oil and a bitter crust.
To complete the meal, we pair the tuna with simple, steamed green beans for a fresh, vibrant side. A splash of water helps them steam perfectly. Finally, a drizzle of warm soy sauce adds a savory, umami-rich finish, and sliced green onions provide a final pop of freshness and color as a garnish.
- 2 tuna steaks, about 1 inch thick
- 1/4 cup white sesame seeds
- 1/4 cup black sesame seeds
- 1 tablespoon black peppercorns
- 1 teaspoon sea salt
- 2 tablespoons oil with a high smoke point (like vegetable or canola)
- 1 pound fresh green beans
- 1/4 cup water
- 1/4 cup soy sauce
- 1 tablespoon sliced green onions, for garnish
Crafting Your Simple Seared Tuna: Step-by-Step Perfection
Alright, let’s get down to the how-to. Remember, the key to this simple seared tuna is speed and heat. Follow these steps, pay attention to the details, and you’ll achieve that beautiful, restaurant-quality result every single time. Don’t rush it, but be decisive once the pan is hot!
- Begin by preparing your tuna steaks. Moisture is the enemy of a good sear! Pat each steak thoroughly dry using paper towels. This is a critical step that ensures a crisp crust forms quickly and also helps prevent the tuna from sticking to the pan. Take your time with this; get them as dry as possible on all sides.
- Next, prepare your flavor coating. In a shallow dish – one large enough to easily press the tuna into – combine the white sesame seeds, black sesame seeds, black peppercorns, and sea salt. If you like a coarser texture and more intense pepper flavor, you can slightly crush the peppercorns beforehand using the back of a spoon or a mortar and pestle. Stir everything together to create an even mix.
- Now, give your tuna its beautiful crust. Take each thoroughly dried tuna steak and press all sides of it into the sesame seed mixture. Coat them evenly, gently pressing the mixture onto the fish to help the seeds and seasonings adhere. You want a nice, solid layer covering the exterior.
- This step is crucial for achieving that perfect sear without overcooking the inside. Place a heavy-bottomed skillet (cast iron or stainless steel works best) over high heat. Add the high smoke point oil. Heat the oil until it shimmers and is very hot. You might even see wisps of smoke just beginning – that’s when you know it’s ready. The intense heat is what creates that quick, flavorful crust.
- Carefully place the crusted tuna steaks into the screaming hot skillet. Be gentle to avoid splashing hot oil. Now, resist the urge to move them! Sear the tuna for just 1 to 2 minutes per side. This super-short cooking time on high heat rapidly forms a delicious, crunchy crust while leaving the center beautifully pink and tender – anywhere from rare to medium-rare, depending on the exact thickness of your steak and your preference. You’ll see the color of the tuna change up the sides as it cooks; this is a good visual cue.
- Once seared on both sides, immediately remove the tuna from the pan. Place it on a cutting board and let it rest for 5 minutes. This resting period is essential. Just like with steak, letting the tuna rest allows the juices to redistribute throughout the fish, ensuring it stays incredibly juicy when you slice into it instead of having them run all over the board.
- While the tuna rests, it’s the perfect time to cook the green beans. You can use the same skillet (carefully wiping out any excess oil if needed) or a separate pan. Add the green beans and 1/4 cup of water. Bring the water to a simmer, then cover the pan. Let them cook for 5 to 7 minutes, or until they are tender-crisp – still having a slight bite to them. Drain any excess water from the pan once they are done.
- For the finishing touch, briefly heat the soy sauce. You can do this in the same skillet you used for the tuna (it will pick up some great residual flavor) or a small saucepan. You just want it warm, not simmering or boiling.
- Finally, it’s time to assemble and serve your masterpiece! Slice the rested tuna against the grain into 1/2 inch thick pieces. Slicing against the grain ensures the most tender bite. Arrange the sliced tuna and the cooked green beans on a plate. Drizzle the warm soy sauce over the tuna slices. Garnish with the sliced green onions for a touch of freshness and color. Serve immediately and bask in the glory of your perfectly seared tuna!
Tips for Perfect Simple Seared Tuna Every Time
Achieving flawless simple seared tuna isn’t difficult once you understand the core principles. Here are a few extra tips and tricks to ensure your success and maybe even inspire some variations:
- Quality Matters: Start with the freshest, highest-quality tuna you can find. Look for “sushi-grade” if you want it very rare. The better the fish, the better the final result.
- Pan Power: A heavy-bottomed pan, like cast iron or a good quality stainless steel skillet, is crucial. It retains heat exceptionally well, which is vital for that quick, hard sear.
- Know Your Doneness: The 1-2 minute per side rule is for rare to medium-rare. If you prefer your tuna closer to medium, you’ll need to sear it slightly longer, perhaps 2.5 to 3 minutes per side, keeping in mind that the internal pink will shrink. Anything more than medium will likely result in dry tuna.
- Don’t Crowd the Pan: Cook the tuna in a single layer. If you’re cooking more than two steaks, you might need to sear them in batches to keep the pan temperature high. Crowding lowers the temperature and leads to steaming instead of searing.
- Get Creative with the Crust: While the sesame and peppercorn crust is classic and delicious, feel free to experiment. You could add a pinch of garlic powder, onion powder, smoked paprika, or even some crushed red pepper flakes for heat.
- Serving Temperature: Seared tuna is best served immediately after slicing and saucing.
- Prep Ahead (Partially): You can pat the tuna dry and make the seed mixture ahead of time, but don’t coat the tuna until you’re ready to sear it.
What to Serve With Simple Seared Tuna
This simple seared tuna with green beans is a meal in itself, but it pairs beautifully with a variety of sides that complement its fresh, savory profile. Think light, vibrant, or carb-based options that can soak up some of that delicious soy sauce drizzle.
Besides the classic green beans, consider serving your tuna alongside a fluffy grain like fluffy quinoa or some easy Mexican rice. A simple easy kale salad or a crisp, refreshing cucumber salad would also be lovely. For something a little heartier, crispy roasted Brussels sprouts or easy pan-fried potatoes make excellent companions.
Your Simple Seared Tuna Questions Answered (FAQ)
Searing tuna can bring up a few questions, especially if it’s your first time. Let’s address some common ones to help you feel confident in the kitchen.
What kind of tuna should I buy for searing?
Look for fresh, high-quality tuna steaks. Ahi tuna (also known as yellowfin) is a popular choice for searing due to its flavor and texture. For the best results, especially if you want a very rare center, opt for “sushi-grade” tuna from a reputable fishmonger. Ensure the steaks are uniform in thickness, around 1 inch, for even cooking.
How do I know when the tuna is cooked to rare or medium-rare?
With searing, it happens very quickly. The easiest way to tell is by looking at the sides of the steak. As it cooks, the color will change from bright red/pink to a lighter, opaque color, moving inward from the edge. For rare, you want that opaque band to be very thin, maybe just 1/8 inch or less on each side, leaving a wide, vibrant pink center. For medium-rare, the opaque band will be slightly wider, perhaps up to 1/4 inch on each side, with the center still distinctly pink.
Can I use frozen tuna?
Yes, you can use frozen tuna, but ensure it is of good quality and has been properly thawed according to food safety guidelines (ideally slowly in the refrigerator). Flash-frozen tuna can maintain good quality. However, fresh, never-frozen tuna is usually preferred for searing as it tends to have better texture and flavor, especially if aiming for a rare center.
I don’t have black sesame seeds. Can I just use white?
Absolutely! The black sesame seeds add visual appeal and a slightly different nuance of flavor, but using only white sesame seeds will still give you a delicious, nutty crust. The key is using enough seeds to get a good coating.
Can I sear other types of fish using this method?
This high-heat searing method works well for other firm, thick fish steaks or fillets that you intend to serve with a slightly less-cooked interior, such as salmon or swordfish. The cooking time will need to be adjusted based on the thickness and type of fish. The principle of a hot pan and quick sear remains the same. You might find our guide to glazed pan-seared salmon helpful for another similar technique.
Enjoy Your Homemade Simple Seared Tuna!
See? Achieving restaurant-quality simple seared tuna at home isn’t some culinary mystery! With the right technique focusing on drying the fish and maximizing pan heat for just a couple of minutes per side, you can consistently get that gorgeous seared exterior and juicy, rare center.
This recipe is proof that elegant, healthy, and incredibly flavorful meals can be surprisingly quick and easy to prepare. Serve it up, drizzle with that savory soy sauce, and enjoy every bite of your perfectly seared tuna. It’s a dish that’s sure to impress anyone you serve it to, including yourself!
Give this method a try and let me know how it turns out! Leave a comment below or share a photo of your beautiful seared tuna. Happy cooking!
Simple Seared Tuna

Ingredients
- 2 tuna steaks, about 1 inch thick
- 1/4 cup white sesame seeds
- 1/4 cup black sesame seeds
- 1 tablespoon black peppercorns
- 1 teaspoon sea salt
- 2 tablespoons oil with a high smoke point (like vegetable or canola)
- 1 pound fresh green beans
- 1/4 cup water
- 1/4 cup soy sauce
- 1 tablespoon sliced green onions, for garnish
Directions
- Pat the tuna steaks thoroughly dry with paper towels. This is a crucial step for getting a good crust and helps prevent sticking.
- In a shallow dish, combine the white sesame seeds, black sesame seeds, black peppercorns, and sea salt. Crush the peppercorns slightly with the back of a spoon or mortar and pestle if desired.
- Press all sides of each tuna steak into the seed mixture, coating them evenly and pressing gently to help the seeds adhere.
- Heat the oil in a heavy-bottomed skillet over high heat until it shimmers and is very hot. Getting the pan hot before adding the tuna is the key to achieving that perfect sear without overcooking the inside.
- Carefully place the crusted tuna steaks into the hot skillet. Sear for just 1 to 2 minutes per side for rare to medium-rare, depending on the thickness of the steak and your desired doneness. The high heat quickly forms the crust while leaving the center pink and tender. Do not move the tuna while searing each side to ensure a solid crust forms.
- Remove tuna from the pan and let it rest on a cutting board for 5 minutes. This resting period is important for keeping the tuna juicy.
- While the tuna rests, add the green beans and 1/4 cup water to the same skillet or a separate pan. Bring to a simmer, cover, and cook for 5 to 7 minutes, or until tender-crisp. Drain any excess water.
- Briefly heat the soy sauce in the same skillet the tuna was in (or a small saucepan) until warm.
- Slice the rested tuna against the grain into 1/2 inch thick pieces. Arrange sliced tuna and green beans on a plate. Drizzle the warm soy sauce over the tuna. Garnish with sliced green onions. Serve immediately.