There’s nothing quite as satisfying as a perfectly golden, crispy potato dish, yet the frustration of a beautiful tart sticking to the pan can quickly deflate any cooking joy. I’ve been there countless times with a promising Skillet Potato and Mushroom Tart, only for it to fall apart upon serving. But through persistent experimentation, I’ve unlocked the simple, foolproof method to ensure your Skillet Potato and Mushroom Tart slides effortlessly from the pan, perfectly intact and ready to impress.
Why This Skillet Potato and Mushroom Tart is Your New Favorite
The “No-Stick” Promise: Effortless Release Every Time
The number one headache with skillet-based potato dishes is sticking. This recipe meticulously guides you through the exact steps, from proper moisture removal to precise pan preparation, guaranteeing a beautifully released tart. You can finally serve with confidence, avoiding any frustrating pan-scrape mishaps.
Simple Ingredients, Gourmet Results
Despite its elegant presentation, this Skillet Potato and Mushroom Tart relies on incredibly common, accessible ingredients you likely already have. Combining humble potatoes and earthy mushrooms with melting cheese transforms them into a sophisticated, flavor-packed dish that feels truly special without requiring a specialty grocery run.
Quick & Convenient Weeknight Masterpiece
Don’t let the “tart” in the name intimidate you. This recipe is surprisingly quick, coming together in under 40 minutes, making it an ideal choice for a busy weeknight. It delivers gourmet flair with minimal effort, proving that delicious, visually stunning meals are achievable even on the tightest schedules.
Essential Ingredients for Your Perfect Skillet Tart
The Humble Russet: Star of the Show
Russet potatoes are the ideal choice for this tart due to their high starch content. This starch helps them bind together beautifully when shredded, creating a cohesive and sturdy base. It’s also key for achieving that desirable golden crispness that holds up as the foundation of your Skillet Potato and Mushroom Tart.
Shredding the potatoes finely ensures they cook evenly and crisp up perfectly. Crucially, removing excess moisture is non-negotiable for crispiness and preventing the tart from sticking. Skipping this step often leads to a soggy, broken result.
Earthy Cremini Mushrooms: Umami Powerhouse
Cremini mushrooms, often called baby bella mushrooms, offer a deeper, more robust flavor than white button mushrooms. Their earthy notes pair wonderfully with the potato and cheese, adding an essential layer of savory umami to the tart. They soften beautifully when sautéed, providing a tender contrast to the crispy potato base.
The Cheese Factor: Melty Goodness
Shredded mozzarella or a similar good melting cheese is perfect here. It creates a gooey, savory top layer that binds the mushrooms and potatoes together with a comforting richness. The mild flavor of mozzarella complements the other ingredients without overpowering them, allowing the earthy mushroom and crispy potato notes to shine.
Seasonings & Garnish: Elevating Every Bite
Simple seasonings like salt and black pepper are essential to draw out and enhance the natural flavors of the potatoes and mushrooms. A generous drizzle of olive oil not only aids in cooking but also contributes to the golden crisp exterior. Fresh thyme or chives added at the end provide a pop of color, a burst of fresh aroma, and a delicate herbaceous finish that brightens the entire dish.
Equipping Your Kitchen: Tools for Skillet Tart Success
The All-Important Skillet: Non-Stick or Cast Iron?
An oven-safe non-stick skillet is highly recommended for this recipe. Its surface naturally minimizes sticking, making the release of the tart much easier. A well-seasoned cast iron skillet is also an excellent choice, as its superior heat retention ensures even cooking and a fantastic crust. The “oven-safe” aspect is important if you choose to finish the tart under the broiler for quick cheese melting.
Beyond the Pan: Essential Prep Gear
Box Grater or Food Processor: Either tool will efficiently shred your russet potatoes into the fine strands needed for the base. A food processor with a shredding disc will make quick work of it.
Clean Kitchen Towel or Paper Towels: Absolutely essential for squeezing out the moisture from the shredded potatoes. This step is a game-changer for crispness and non-stick success.
Spatula: A sturdy, flat spatula is needed to firmly press the potatoes into an even layer in the pan and to assist with the final release.
Separate Small Pan: For sautéing the mushrooms independently, ensuring they are perfectly cooked without adding excess moisture to your potato base.
Crafting Your Skillet Potato and Mushroom Tart: A Detailed Guide
Step 1: Preparing Your Potatoes for Ultimate Crispness
Begin by shredding your russet potatoes. A box grater works fine, but a food processor with a shredding attachment is incredibly fast. Once shredded, immediately gather the potato strands in a clean kitchen towel or several layers of paper towels. Now, for the most critical step: squeeze out every drop of moisture you possibly can. You’ll be surprised how much liquid comes out!
This aggressive moisture removal is paramount. It’s the secret to achieving that coveted crispy potato base and prevents the starch from becoming gummy or sticking to the pan. Don’t rush this part; squeeze until the potatoes feel significantly drier.
Step 2: The Pan Prep Secret to No-Stick Success
Place your chosen oven-safe non-stick or well-seasoned cast iron skillet over medium heat. Add a generous amount of olive oil or butter-enough to coat the entire bottom and extend up the sides by at least an inch. Let this fat heat up until it’s shimmering but not smoking. You want it hot enough to immediately start cooking the potatoes when they hit the pan.
Proper preheating combined with ample fat creates a crucial barrier and initiates browning rapidly. This early browning is what forms the non-stick crust that allows for easy release later. Overlooking this step often results in a stuck tart.
Step 3: Forming the Perfect Potato Base
Carefully add the squeezed shredded potatoes to the hot skillet. Using a spatula, press them down firmly and evenly across the bottom of the pan to form a compact, flat layer. Ensure there are no significant gaps or thin spots, as these can lead to an unevenly cooked or fragile base. Season the potato layer generously with salt and black pepper.
Pressing firmly ensures good contact with the hot pan, promoting even crisping and helping the potato strands bind together into a solid “crust.” Initial seasoning means flavor is integrated from the start.
Step 4: The Crucial Cook: Achieving Golden Crust Perfection
Cook the potato base undisturbed over medium heat for 10 to 12 minutes. This “undisturbed” period is vital for a deep golden brown, crispy bottom. Resist the urge to poke, prod, or move the potatoes during this initial phase.
After about 8 minutes, you can gently shake the pan to see if the edges are starting to loosen and if the whole base moves slightly. This indicates a solid crust is forming – the ultimate secret to preventing sticking and ensuring easy release. If you find your potatoes tend to stick, consider exploring tips from our guide to easy pan-fried potatoes for more foundational non-stick advice.
Step 5: Adding the Flavorful Toppings
While the potato base is cooking, quickly sauté the sliced cremini mushrooms in a separate small pan with a tablespoon of olive oil. Cook them until they are tender and lightly browned, seasoning with a pinch of salt and pepper. This separate cooking prevents the mushrooms from releasing moisture onto your potato base and making it soggy.
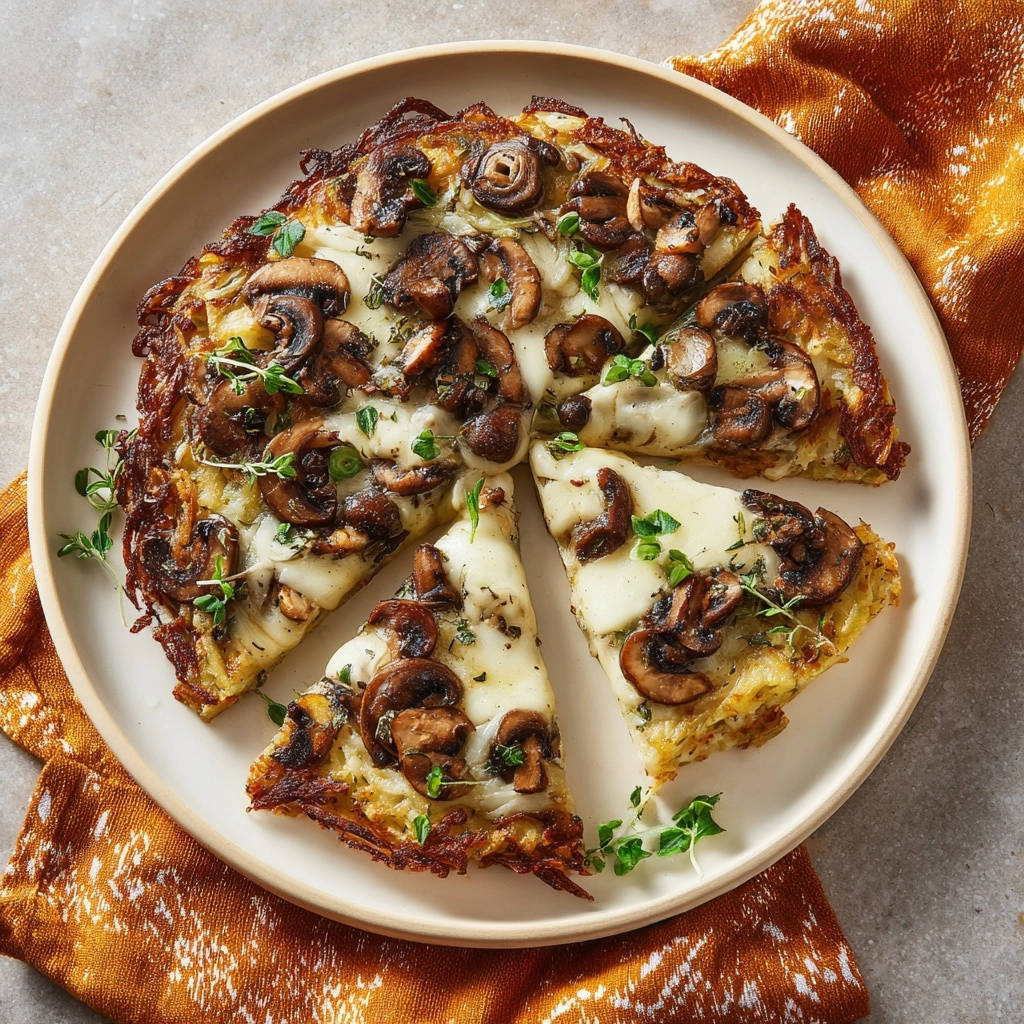
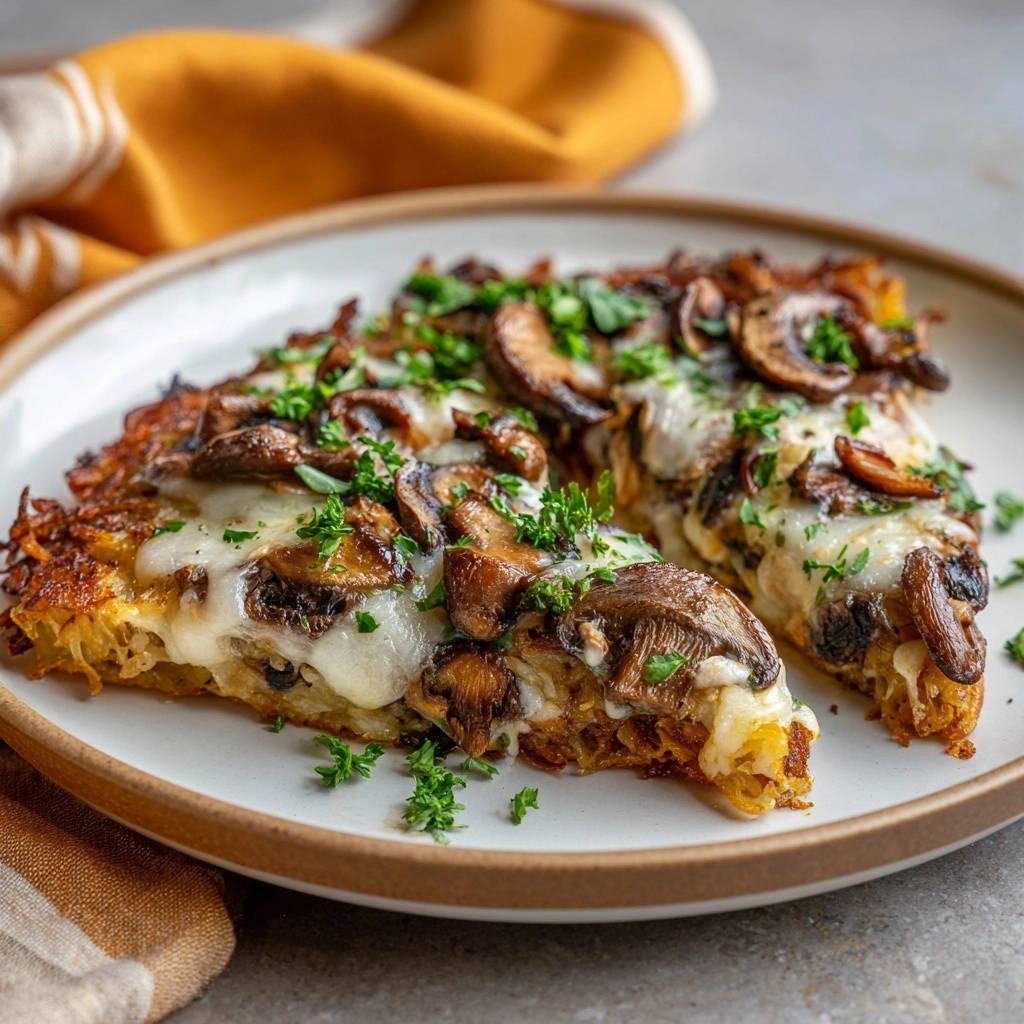
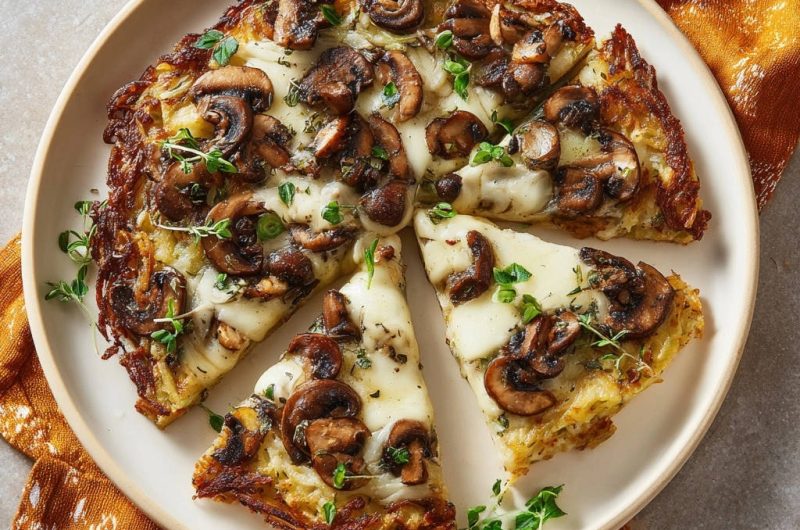
Once your potato base is golden brown and has visibly released from the pan, scatter the sautéed mushrooms evenly over the potato layer. Then, sprinkle the shredded mozzarella cheese generously over the mushrooms. The vibrant green of fresh herbs would also be a lovely addition here for color and aroma.
Step 6: Finishing Touches: Melting the Cheese
To melt the cheese beautifully, you have two excellent options. For a gentler melt, simply cover the skillet with a lid for a few minutes. The residual heat will melt the cheese until it’s bubbly and gooey. This is a great choice if you prefer not to use the broiler.
Alternatively, if your skillet is oven-safe, carefully transfer it to a preheated broiler (watch constantly!). Broiling for 1 to 2 minutes will quickly melt the cheese and give it a lovely, slightly golden, bubbly crust. Be extremely vigilant with the broiler; cheese can go from perfectly melted to burnt in seconds.
Step 7: The Grand Finale: Serving Your Masterpiece
Allow the finished Skillet Potato and Mushroom Tart to rest in the skillet for a minute or two after cooking. This brief rest helps the tart set and makes it even easier to handle. Because you meticulously followed the pan prep and crust formation steps, the tart should now effortlessly slide out onto a serving plate.
Alternatively, you can slice and serve it directly from the skillet, especially if you’re aiming for a more rustic presentation. Garnish with fresh thyme or chives just before slicing to add a burst of freshness and visual appeal to your delicious Skillet Potato and Mushroom Tart.
Chef’s Secrets: Elevate Your Skillet Potato and Mushroom Tart
Moisture is the Enemy: Why Squeezing Potatoes Matters
The science is simple: water turns to steam, which can prevent browning and make starches gluey. By squeezing out as much moisture as possible from the shredded potatoes, you allow them to crisp up beautifully. This ensures a firm, non-soggy base that forms a proper crust, which is essential for easy release and an overall superior texture.
Preheat Like a Pro: The Foundation of Non-Stick
A properly preheated pan with sufficient fat is the first line of defense against sticking. When the oil is shimmering hot, the potatoes immediately begin to sear, forming a protective, non-stick crust. If the pan isn’t hot enough, the potatoes will sit and steam, releasing their starches and causing them to weld to the surface.
Resist the Urge: Let the Crust Form!
Patience is key during the initial cooking of the potato base. Every time you poke or move the potatoes, you disrupt the crucial browning process that creates the solid, non-stick crust. Allow the potatoes to cook undisturbed for the recommended time; this undisturbed cooking is what allows the starches to properly bind and crisp, creating a single, cohesive unit that will easily slide from the pan.
Seasoning Smarts: Layering Flavor
Don’t just season at the end. Season the shredded potatoes before they go into the pan, and season the mushrooms as you sauté them. This layers the flavor throughout the dish, ensuring every bite of your Skillet Potato and Mushroom Tart is perfectly seasoned. A final pinch of salt after cooking can also brighten the flavors.
Broiler vs. Lid: Choosing Your Cheese Melt Method
The lid method provides a gentler, more even melt, perfect for a soft, gooey cheese layer without any crisping. The broiler method, however, delivers a quick, bubbly, and slightly browned cheese crust, adding a textural contrast that some prefer. If using the broiler, keep a close eye on it, as cheese can burn very quickly.
Troubleshooting Your Skillet Potato and Mushroom Tart
“My Tart is Sticking to the Pan!”
This is usually due to insufficient preheating of the pan or not enough fat. Ensure your skillet is shimmering hot before adding potatoes, and don’t be shy with the olive oil or butter. Also, make sure you let the potato base cook undisturbed for the full recommended time; a proper crust needs time to form and release naturally.
“My Potatoes Aren’t Crispy Enough.”
The primary culprit here is often not squeezing enough moisture out of the shredded potatoes. They simply cannot crisp if they are waterlogged. Secondly, ensure you’re cooking them long enough over medium heat to achieve that deep golden brown crust. If your stove runs cool, you might need a minute or two extra cooking time.
“The Cheese Isn’t Melting Evenly.”
If using a lid, ensure your heat is still on low and the pan is truly hot enough to melt the cheese through residual heat. If using a broiler, ensure the tart is positioned evenly under the broiler element, and rotate the pan halfway through if one side seems to be browning faster. Remember, the broiler is intense and requires constant vigilance.
Enjoying Your Skillet Potato and Mushroom Tart: Serving & Storage
Perfect Pairings: What to Serve With It
This Skillet Potato and Mushroom Tart is wonderfully versatile. It pairs beautifully with a fresh, crisp easy kale salad dressed with a simple vinaigrette to cut through the richness. A dollop of sour cream or Greek yogurt on top adds a creamy tang, while a side of roasted asparagus or green beans would make it a complete and satisfying meal.
Storing Leftovers: Keeping it Fresh
Any leftover Skillet Potato and Mushroom Tart should be stored in an airtight container in the refrigerator. It will keep well for up to 2-3 days. While the potatoes might lose a little of their crispness upon reheating, the flavors remain delicious.
Can You Make it Ahead?
While best enjoyed fresh from the skillet for maximum crispness, you can prepare the shredded and squeezed potatoes ahead of time. Store them in an airtight container in the fridge for up to a day. The mushrooms can also be sautéed in advance. Reheat the assembled tart in a skillet over medium-low heat until warmed through and the bottom re-crisps, or in an oven at 350°F (175°C) until hot.
Your Questions Answered: Skillet Potato and Mushroom Tart FAQs
Can I use different types of potatoes?
While russets are ideal for their starch and crisping ability, you can experiment with Yukon Gold or red potatoes. However, you’ll need to be even more diligent about moisture removal, and they may not achieve the same level of crispness or binding. For truly crispy potato dishes, always prioritize moisture removal.
What if I don’t have an oven-safe skillet?
No oven-safe skillet? No problem! After cooking the potato base and adding the toppings, simply cover the skillet with a lid. The residual heat will effectively melt the cheese. This method works perfectly well, though you won’t get the slightly browned, bubbly cheese crust that a broiler provides.
Can I add other vegetables?
Absolutely! This Skillet Potato and Mushroom Tart is highly adaptable. Consider adding thinly sliced onions, bell peppers, or spinach (ensure spinach is well-drained after wilting to avoid excess moisture). Sauté them with the mushrooms before adding to the tart for best results.
Is this recipe gluten-free?
Yes, this Skillet Potato and Mushroom Tart recipe is naturally gluten-free! All the ingredients – potatoes, mushrooms, cheese, olive oil, and seasonings – are naturally free of gluten. It’s a fantastic option for those with gluten sensitivities or preferences.
Ready to Create Your Own Skillet Potato and Mushroom Tart Masterpiece?
You now hold the secrets to crafting a perfectly crispy, non-stick Skillet Potato and Mushroom Tart that will become a go-to in your kitchen. This dish is not just a meal; it’s a celebration of simple ingredients transformed into something extraordinary with just a few expert techniques. Don’t just read about it-grab your skillet and create your own golden, savory triumph!
Skillet Potato and Mushroom Tart
Course: Main CourseCuisine: American CuisineDifficulty: easy4
servings15
minutes20
minutes35
minutesAmerican Cuisine
Ingredients
2 medium russet potatoes shredded
1 tablespoon olive oil plus more for the pan
8 ounces sliced cremini mushrooms
Salt to taste
Black pepper to taste
1 cup shredded mozzarella cheese or similar melting cheese
Fresh thyme or chives for garnish
Directions
- Prepare the potatoes: Shred the russet potatoes using a box grater or food processor. Place the shredded potatoes in a clean kitchen towel or layers of paper towels and squeeze out as much moisture as possible. This step is key for crispiness and helps prevent sticking.
- Prepare the pan: Heat an oven-safe non-stick skillet or a well-seasoned cast iron skillet over medium heat. Add a generous amount of olive oil or butter to coat the bottom and sides well. Let the oil or butter get hot, shimmering but not smoking. A properly preheated pan with enough fat is essential for non-stick success.
- Form the potato base: Add the squeezed shredded potatoes to the hot skillet. Press them down firmly and evenly with a spatula to form a compact layer covering the bottom of the pan. Season the potato base generously with salt and pepper.
- Cook the base: Cook the potato base undisturbed over medium heat for 10 to 12 minutes, or until the bottom is deep golden brown and crispy. Resist the urge to poke or move it initially! You should be able to gently shake the pan after about 8 minutes and see the edges beginning to loosen and the whole base moving slightly. Letting this solid crust form is the secret to preventing it from sticking and ensures easy release.
- Add toppings: While the potato base is cooking, quickly saute the sliced mushrooms in a separate small pan with the tablespoon of olive oil until they are tender and slightly browned. Season the mushrooms with a pinch of salt and pepper. Once the potato base is golden brown and has released from the pan, scatter the sauteed mushrooms evenly over the potato layer. Sprinkle the shredded cheese over the mushrooms.
- Finish cooking: To melt the cheese, you can cover the skillet with a lid for a few minutes until the cheese is bubbly and melted from the residual heat. Alternatively, if your skillet is oven-safe, carefully transfer it to a preheated broiler for 1 to 2 minutes, watching constantly, until the cheese is melted and slightly golden.
- Serve: Let the tart rest in the skillet for a minute or two after cooking. Because you prepped the pan correctly and let that crucial bottom crust form undisturbed, the tart should easily slide out onto a serving plate or you can cut and serve directly from the skillet. Garnish with fresh thyme or chives before slicing and serving.