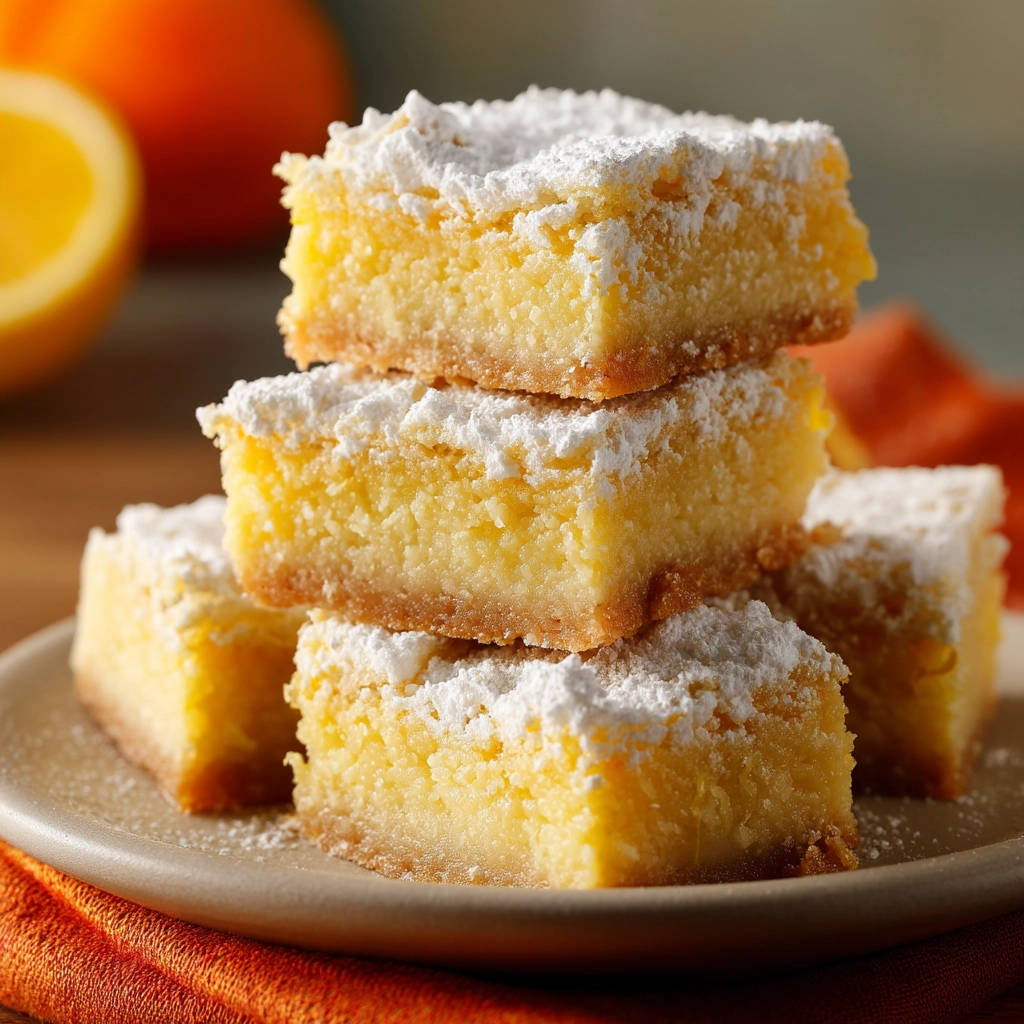
Is there anything more disappointing than biting into a lemon bar only to find a soggy crust? I’ve been there, and I know the frustration! That’s why I’m thrilled to share my recipe for tart lemon bars with a perfectly crisp, never-soggy shortbread crust. After countless tests, I’ve unlocked the secret to achieving lemon bar perfection, and it’s all about one crucial step that makes all the difference.
Why You’ll Love These Tart Lemon Bars
These aren’t your average lemon bars! Here’s why you’ll absolutely adore them:
- Crisp, Buttery Crust: The shortbread crust is perfectly golden and adds a delightful textural contrast to the smooth filling.
- Tangy Lemon Filling: The filling is bursting with fresh lemon flavor – perfectly tart and not overly sweet.
- No More Soggy Bottoms: My secret technique guarantees a firm, crisp crust every single time.
- Easy to Make: Despite the impressive results, this recipe is surprisingly simple and straightforward.
- Perfect for Any Occasion: From afternoon tea to potlucks, these lemon bars are always a crowd-pleaser.
Gathering Your Ingredients for Tart Lemon Bars
Let’s talk ingredients! The key to truly amazing lemon bars lies in using high-quality ingredients. We’re building two distinct layers here: a buttery, crumbly shortbread crust and a vibrant, tangy lemon filling. The interplay of textures and flavors is what makes these bars so irresistible.
Here’s what you’ll need, broken down for clarity and accompanied by some helpful tips:
- For the Crust:
- 1 1/2 cups all-purpose flour: This provides the structure for our shortbread crust. Standard all-purpose flour works great here.
- 1/2 cup powdered sugar: Powdered sugar, also known as confectioners’ sugar, dissolves more easily than granulated sugar, creating a smoother, more tender crust.
- 1/2 cup (1 stick) unsalted butter, cold and cubed: Cold butter is absolutely crucial for a flaky shortbread crust. Cubing it makes it easier to incorporate into the flour mixture.
- 1/4 teaspoon salt: Salt enhances the sweetness and balances the flavors in the crust.
- For the Filling:
- 4 large eggs: Eggs provide structure and richness to the lemon filling.
- 1 1/2 cups granulated sugar: This sweetens the filling and balances the tartness of the lemon juice.
- 1/4 cup all-purpose flour: A small amount of flour helps to thicken the filling and prevent it from being too runny.
- 1/4 teaspoon baking powder: A touch of baking powder gives the filling a slight lift, creating a delicate texture.
- 1/2 cup fresh lemon juice (from about 3-4 lemons): Freshly squeezed lemon juice is essential for the best flavor. Bottled juice simply doesn’t compare.
- 2 tablespoons lemon zest: Lemon zest adds a concentrated burst of lemon flavor. Be sure to zest the lemons before juicing them.
- Powdered sugar, for dusting: This adds a touch of sweetness and a beautiful finishing touch.
Crafting Your Tart Lemon Bars: Step-by-Step
Ready to get baking? Don’t be intimidated! These tart lemon bars are easier to make than you might think. The key is to follow the steps carefully and, most importantly, to par-bake that crust! Let’s walk through it together.
- Preheat the oven to 350 degrees F (175 degrees C). Getting the oven to the correct temperature from the get-go is an easy step that will prevent the recipe from failing later on.
- Make the Crust:
- Combine dry ingredients: In a food processor, combine the flour, powdered sugar, and salt. Pulse a few times to ensure everything is evenly mixed.
- Incorporate the butter: Add the cold, cubed butter to the food processor. Pulse until the mixture resembles coarse crumbs. It’s important to use cold butter to prevent the gluten in the flour from developing too much, which would result in a tough crust. We want it tender!
- Press the crust into the pan: Transfer the crumb mixture to an ungreased 9×13 inch baking pan. Press firmly and evenly to create a solid layer. Use the bottom of a measuring cup to help smooth it out and ensure a consistent thickness.
- The Secret Technique: Par-bake the crust! This is the most important step! Bake the crust for 18-20 minutes, or until it’s lightly golden. Par-baking creates a barrier that prevents the lemon filling from soaking into the crust and causing a soggy bottom. Remove from the oven and let it cool slightly while you prepare the filling. This step will help you get the best lemon bars you have ever eaten.
- Make the Filling:
- Whisk together wet and dry ingredients: In a large bowl, whisk together the eggs and granulated sugar until the mixture is light and fluffy. This incorporates air, which gives the filling a lighter, more delicate texture.
- Add flour and baking powder: Add the flour and baking powder to the egg mixture, whisking until smooth. Be careful not to over-mix, as this can develop the gluten in the flour and make the filling tough.
- Incorporate lemon juice and zest: Stir in the fresh lemon juice and lemon zest. The zest is especially important for that concentrated lemon flavor!
- Assemble and Bake: Pour the lemon filling over the par-baked crust. Bake for 20-25 minutes, or until the filling is set but still slightly jiggly in the center. A slight jiggle is good – it means the filling will be perfectly creamy once cooled.
- Cool Completely: Let the lemon bars cool completely in the pan before cutting into squares. This allows the filling to set properly and prevents it from being too runny. Patience is key!
- Dust and Serve: Once cooled, dust generously with powdered sugar before serving. This adds a touch of sweetness and a beautiful finishing touch.
Tips for Perfect Tart Lemon Bars Every Time
Want to ensure your lemon bars are a smashing success? Here are a few extra tips and tricks:
- Use cold butter: I can’t stress this enough! Cold butter is essential for a flaky, tender shortbread crust.
- Don’t over-mix the crust: Over-mixing develops the gluten in the flour, resulting in a tough crust. Pulse the food processor just until the mixture resembles coarse crumbs.
- Par-bake the crust: This is the secret to a crisp, non-soggy bottom. Don’t skip this step!
- Use fresh lemon juice: Bottled lemon juice simply doesn’t compare in terms of flavor.
- Don’t over-bake the filling: The filling should be set but still slightly jiggly in the center when you remove it from the oven. It will continue to set as it cools.
- Cool completely before cutting: This allows the filling to set properly and prevents it from being too runny.
- For an extra tangy flavor: Add a pinch of salt to the lemon filling. It enhances the tartness of the lemon and balances the sweetness of the sugar.
Looking for other delicious treats?
If you are in the mood for something else sweet and delicious, why not try our easy caramel nut dessert jars recipe? It is also a guaranteed crowd pleaser!
Your Tart Lemon Bars Questions Answered (FAQ)
Why is my lemon bar crust soggy?
The most common reason for a soggy lemon bar crust is that it wasn’t par-baked. Par-baking creates a barrier that prevents the lemon filling from soaking into the crust. Also, make sure you’re using the correct ratio of ingredients for the crust. Too much butter or not enough flour can also contribute to a soggy crust.
Can I use a different type of flour for the crust?
While all-purpose flour is the standard choice for shortbread crusts, you can experiment with other types of flour. Pastry flour will result in an even more tender crust, while whole wheat flour will add a slightly nutty flavor and more substantial texture. Just be aware that using different flours may affect the overall texture and baking time. For more info on this, check out our other article and learn more about substituting flours.
Can I make these lemon bars ahead of time?
Yes! Lemon bars are a great make-ahead dessert. They can be stored in the refrigerator for up to 3 days. In fact, some people think they taste even better the next day! Just be sure to store them in an airtight container to prevent them from drying out.
Can I freeze lemon bars?
Yes, lemon bars can be frozen for up to 2 months. To freeze them, cut them into squares and place them in a single layer on a baking sheet. Freeze for about 30 minutes, or until solid. Then, transfer them to an airtight container or freezer bag. To thaw, simply place them in the refrigerator overnight or at room temperature for a few hours.
How do I prevent the filling from cracking?
To prevent the filling from cracking, avoid over-baking the lemon bars. The filling should be set but still slightly jiggly in the center when you remove them from the oven. Also, let the lemon bars cool completely in the pan before cutting them.
Enjoy Your Homemade Tart Lemon Bars!
There you have it – my foolproof recipe for tart lemon bars with a guaranteed crisp, non-soggy bottom! I hope you enjoy making and sharing these delightful treats as much as I do. Don’t forget to leave a comment below to let me know how they turned out, and be sure to rate the recipe if you loved it! Happy baking!
“Tart Lemon Bars (No More Soggy Bottoms!)”

Ingredients
- For the Crust:
- 1 1/2 cups all-purpose flour
- 1/2 cup powdered sugar
- 1/2 cup (1 stick) unsalted butter, cold and cubed
- 1/4 teaspoon salt
- For the Filling:
- 4 large eggs
- 1 1/2 cups granulated sugar
- 1/4 cup all-purpose flour
- 1/4 teaspoon baking powder
- 1/2 cup fresh lemon juice (from about 3-4 lemons)
- 2 tablespoons lemon zest
- Powdered sugar, for dusting
Directions
- Preheat oven to 350 degrees F (175 degrees C).
- Make the Crust: In a food processor, combine flour, powdered sugar, and salt. Pulse until combined. Add cold, cubed butter and pulse until the mixture resembles coarse crumbs.
- Press the crumb mixture into the bottom of an ungreased 9×13 inch baking pan. Press firmly to create an even layer.
- The Secret Technique: Par-bake the crust for 18-20 minutes, or until lightly golden. This is the key to a crisp, not soggy, bottom. Remove from oven and let cool slightly while you prepare the filling.
- Make the Filling: In a large bowl, whisk together eggs and granulated sugar until light and fluffy. Add flour and baking powder, whisk until smooth. Stir in lemon juice and lemon zest.
- Pour the lemon filling over the partially baked crust.
- Bake for 20-25 minutes, or until the filling is set but still slightly jiggly in the center.
- Let cool completely in the pan before cutting into squares. Dust generously with powdered sugar before serving.