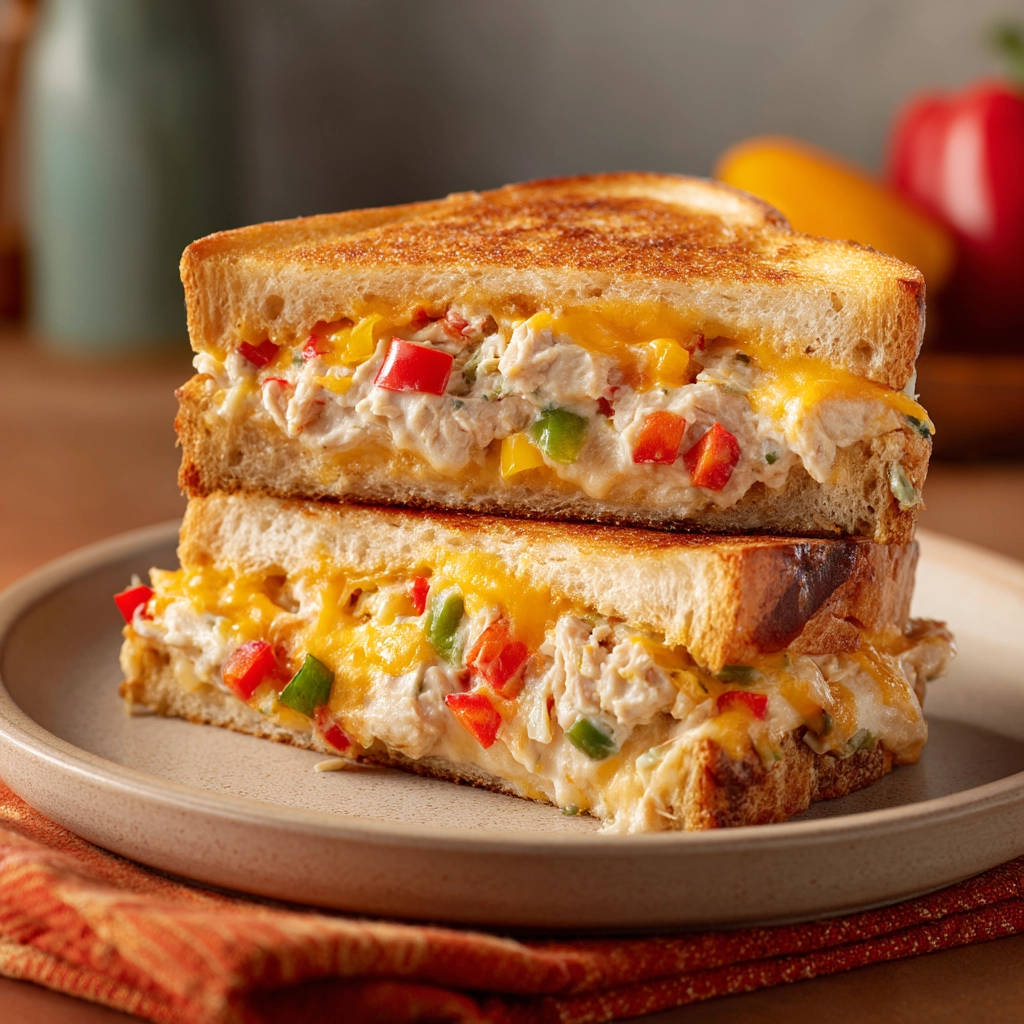
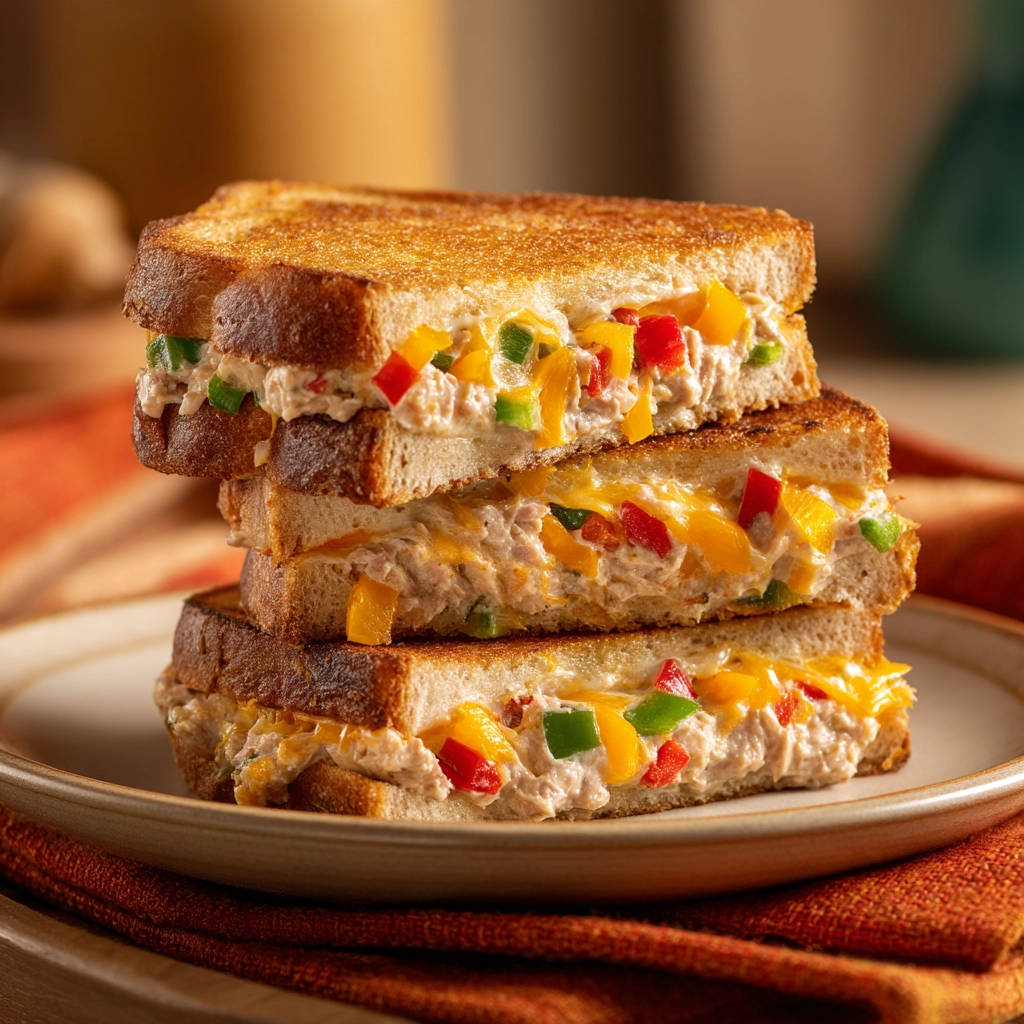
Oh, the humble tuna melt! A classic comfort food, a lunch staple, a quick dinner savior. When done right, it’s a symphony of creamy tuna salad, melted cheese, and perfectly golden, crispy bread. But let’s be honest, who hasn’t experienced the disappointment of biting into a tuna melt only to find the bread soggy and pale while the inside is still cold, or worse, burned on the outside but not melted within? It’s a culinary frustration that can leave you feeling defeated.
For years, I chased that elusive perfect tuna melt – the one that hits all the right notes of crunchy exterior and warm, gooey center. I tried different breads, various cheeses, high heat, low heat… you name it. And then, I finally cracked the code. It’s not complicated, and it doesn’t require fancy equipment. It’s a simple technique that ensures your Tuna Melt is supreme, never soggy, and utterly satisfying. Get ready to elevate your sandwich game!
Why You’ll Absolutely Adore This Tuna Melt Supreme
This isn’t just another tuna melt recipe; it’s the tuna melt recipe you’ve been searching for. Here’s why this version will become your go-to:
- The Non-Soggy Guarantee: We tackle the most common tuna melt problem head-on with a simple, effective cooking method.
- Perfectly Crispy Bread: Say goodbye to pale, flabby bread. This method delivers a consistent, golden crunch from edge to edge.
- Warm, Gooey Center: The cheese melts beautifully, enveloping the flavorful tuna filling in a warm embrace.
- Quick & Easy: Ready in just 20 minutes total, making it perfect for a busy weekday lunch or a speedy dinner.
- Simple Ingredients: You likely have most, if not all, the ingredients in your pantry right now.
Gathering Your Ingredients for the Ultimate Tuna Melt
Creating a truly spectacular tuna melt starts with selecting quality ingredients. While the list is straightforward, each component plays a vital role in building flavor, texture, and ensuring that glorious non-soggy result. Think of these as the building blocks for sandwich perfection.
At the heart of our Tuna Melt is the tuna itself. You’ll need one 5-ounce can. The choice between tuna packed in water or oil is yours – water-packed is leaner, while oil-packed can offer a richer flavor. Regardless of your choice, the absolute most critical step here is draining it exceptionally well. Excess moisture from the tuna is a prime culprit for soggy bread, so press out as much liquid as possible.
For creaminess and binding the filling, you’ll need 2 tablespoons of mayonnaise or plain Greek yogurt. Mayonnaise provides that classic rich tang, while Greek yogurt offers a lighter, tangier profile and a protein boost. Choose whichever you prefer, or even a blend!
To add freshness, crunch, and a pop of vibrant color, we incorporate finely chopped bell peppers – 1 tablespoon each of red, green, and yellow. Finely dicing them is key; you want little bursts of flavor and texture, not large chunks that might make the sandwich unwieldy or create moisture pockets.
Salt and black pepper are essential for seasoning the tuna mixture. Start with a pinch and adjust to your taste. Don’t be shy about seasoning; it makes a big difference in the final flavor.
The bread is paramount. You’ll need two slices of white bread. While other breads can work, classic white bread toasts up beautifully for that iconic tuna melt texture. Look for slices that aren’t overly thick or thin.
To achieve that perfect exterior crispness, you’ll need 2 tablespoons of unsalted butter, softened, or mayonnaise for grilling. Both options work wonderfully, creating a delicious golden crust as the sandwich cooks. Spreading it softened allows for easier, more even coverage.
And finally, the star of the melt: cheese! Half a cup of shredded cheddar cheese is our go-to. Cheddar melts like a dream and has that classic sharp flavor we all love in a tuna melt. Shredding it yourself from a block will often give you a creamier melt than pre-shredded, as pre-shredded can contain anti-caking agents. Consider exploring other cheese options too; a blend of cheddar and Monterey Jack or even Gruyere can be fantastic. If you enjoy classic cheesy dishes, you might appreciate how different cheeses melt in recipes like a Creamy Mac and Cheese or Cheesy Baked Shrimp Scampi.
Crafting Your Tuna Melt Supreme: The Step-by-Step Guide
Ready to turn these simple ingredients into the ultimate Tuna Melt? This process is straightforward, but paying attention to a couple of key steps is what guarantees success and banishes sogginess forever.
- Prepare the Tuna Mixture: In a small bowl, combine your well-drained tuna, the mayonnaise or Greek yogurt, and the finely chopped red, green, and yellow bell peppers. Take your time mixing this; you want everything incorporated evenly. Now is the time to season it! Add salt and black pepper to your liking. Start with a small amount, mix, and then taste a tiny bit to see if it needs more. Remember, the cheese will add saltiness, so don’t overdo it here.
- Butter (or Mayo!) the Bread: Lay your two slices of white bread flat on a clean surface. Grab your softened unsalted butter or mayonnaise and spread it evenly on one side of each slice. This is a crucial step for even browning and achieving that beautiful, crispy golden crust. Make sure you go all the way to the edges!
- Build the Bottom Layer: Place one slice of bread into a cold or room-temperature nonstick skillet or griddle, ensuring the buttered or mayo-ed side is facing down. Starting with a cold pan is part of our non-soggy strategy, allowing the bread to heat up gradually.
- Add the First Layer of Cheese: Sprinkle half of your shredded cheddar cheese evenly over the slice of bread in the skillet. This layer of cheese acts as a barrier, helping to protect the bread from the moisture in the tuna mixture. It’s like building a little shield!
- Spoon on the Tuna: Carefully spoon the prepared tuna mixture over the cheese layer. Use a spoon or spatula to spread it out evenly across the bread, making sure not to pile it too high, which can make flipping difficult.
- Top with More Cheese: Sprinkle the remaining shredded cheddar cheese over the tuna mixture. This second layer helps hold the filling together and creates that incredible gooey cheese pull when you slice the sandwich.
- Complete the Sandwich: Place the second slice of bread on top of the cheese layer. Make sure the buttered or mayo-ed side is facing upwards – this will be the side that hits the pan next.
- The Non-Soggy Cooking Secret – Go Low and Slow: Place the skillet with your assembled sandwich over medium-low heat. This is arguably the most important step! Resist the urge to crank up the heat. Cooking slowly over lower heat allows the heat to gently penetrate the sandwich, warming the tuna filling and, critically, melting the cheese thoroughly before the bread has a chance to burn or become excessively greasy and soggy. Patience is key here!
- Cook Until Golden and Gooey: Let the sandwich cook undisturbed for about 5 to 7 minutes on the first side. You’ll know it’s ready to flip when the bottom is deeply golden brown and crispy, and you can see the cheese starting to melt and ooze around the edges. Gently press down on the sandwich occasionally with a spatula to ensure good contact with the pan. Flip carefully and cook for another 5 to 7 minutes on the second side, or until it matches the golden crispness of the first side and the cheese is fully melted and delightfully gooey. If your bread seems to be browning too quickly at any point, don’t hesitate to reduce the heat slightly.
- Remove and Rest: Once both sides are beautifully golden brown and the cheese is perfectly melted, carefully remove the sandwich from the skillet using a spatula. Place it on a cutting board.
- The Final Touch: Let the Tuna Melt rest for just one minute. This brief resting time allows the heat to distribute evenly and the cheese to set just slightly, making it easier to slice without everything falling apart. Slice it in half with a sharp knife and serve immediately while it’s hot and gooey!
Tips for Tuna Melt Perfection Every Time
Mastering the non-soggy tuna melt is easier than you think, especially with a few insider tips. These little tricks can make a big difference in achieving sandwich nirvana.
First and foremost, the heat is your friend, but also your potential enemy! Stick to medium-low heat as instructed. High heat is the express train to burnt bread and a cold center. Low and slow truly is the way to go for that internal warmth and external crisp.
Draining your tuna isn’t just important; it’s critical. Use a fork or even press it in a fine-mesh sieve to get rid of as much liquid as possible. Less moisture in the filling equals less risk of soggy bread.
Don’t skimp on butter or mayonnaise for the outside of the bread. Getting good, even coverage right to the edges ensures uniform browning and crisping. Think of it as creating a delicious, edible crust.
Experiment with cheese! While cheddar is classic, a mix of cheeses like mozzarella for stretch, provolone for flavor, or a bit of Parmesan for sharpness can elevate your tuna melt. Just make sure they are good melting cheeses.
Finely dice those bell peppers (or any other additions you choose!). Large chunks of veggies can release moisture and make the filling uneven. Small dice integrates better and cooks more evenly within the sandwich.
Pressing gently with a spatula while cooking helps ensure good contact between the bread and the hot pan, leading to better browning. Don’t press too hard, or you’ll squish the filling out!
If you’re making more than one Tuna Melt, cook them one at a time or use a large griddle to give them space. Overcrowding the pan can lower the temperature and lead to steaming instead of crisping.
Feeling adventurous? Try adding a pinch of paprika, a dash of hot sauce to the tuna mixture, or even some finely chopped celery for extra crunch. A little bit of Dijon mustard can also add a lovely tang.
What to Serve With Your Glorious Tuna Melt
A perfect Tuna Melt deserves equally delicious accompaniments. Keep it simple or make it a meal!
- Classic Pairings: A side of potato chips, a pickle spear, or some crispy french fries are timeless choices.
- Soup & Sandwich: Tuna melts are fantastic with a warm bowl of soup. A creamy tomato soup or a hearty vegetable soup would be perfect. If you’re looking for soup ideas, our recipe for Creamy Tomato Tortellini Soup is a reader favorite!
- Fresh Salads: A light, crisp salad cuts through the richness of the sandwich. A simple green salad with vinaigrette or a Creamy Broccoli Salad offers a nice contrast in textures and flavors.
- Other Sides: For a heartier meal, consider Easy Crispy Roasted Potatoes or even some simple roasted vegetables.
Your Tuna Melt Questions Answered (FAQ)
Even with a simple recipe, questions can pop up. Here are some common queries about making the best Tuna Melt:
Can I use different bread for this tuna melt?
Absolutely! While white bread is traditional and toasts up beautifully, you can experiment. Sourdough, rye, or even whole wheat can work. Just be mindful that denser breads might take a little longer to heat through, so be extra patient with the low-and-slow cooking method.
What’s the best cheese for a tuna melt?
Cheddar is classic for its flavor and meltability. However, feel free to try Monterey Jack, Gruyere, Swiss, or even a combination! Provolone melts well and adds a mild, tangy flavor. The goal is a cheese that melts smoothly and tastes great with tuna.
How do I prevent the tuna mixture from making the bread soggy?
This is the core of our recipe! The two main tricks are: 1) Drain your tuna very well. Press out as much liquid as possible. 2) Cook the sandwich over medium-low heat. This allows the bread to crisp up and the cheese to create a barrier and melt before the moisture from the filling has time to steam the bread. Using butter or mayo right to the edges of the bread also helps create a moisture-resistant crust.
Can I add other things to the tuna mixture?
Yes, customize away! Finely chopped celery, red onion, pickles, capers, or a pinch of dried dill are all popular additions that work well. Just remember to keep additions finely chopped to avoid large, wet pieces.
Can I make this ahead of time?
It’s best to assemble and cook tuna melts fresh for the ultimate crispy-gooey experience. If you need to prep ahead, you can mix the tuna salad ingredients (Step 1) a day in advance and keep it covered in the refrigerator. Assemble and cook the sandwich right before serving.
Why start with a cold pan?
Starting the sandwich in a cold or room-temperature pan placed over low heat allows the temperature to rise gradually. This gentle heat gives the cheese ample time to start melting and the inside of the sandwich to warm up before the bread on the bottom gets too brown or burns. If you start in a hot pan, the outside can burn before the inside is ready, leading to the dreaded cold center and soggy bread.
Enjoy Your Homemade Tuna Melt Supreme!
There you have it – the secret to a truly perfect, non-soggy Tuna Melt. It’s a simple adjustment to your cooking technique that yields incredibly delicious results. The combination of warm, savory tuna, gooey melted cheese, and perfectly golden, crispy bread is pure comfort on a plate.
Whether it’s for a quick lunch, a satisfying snack, or an easy dinner, this recipe is sure to become a cherished favorite. Give it a try and taste the difference that patience and a little culinary know-how can make.
Did you try this recipe? What’s your favorite cheese to use in a tuna melt? Let me know in the comments below! And if you loved this easy sandwich, be sure to explore our other simple and delicious recipes!
Tuna Melt Supreme

Ingredients
- 1 can (5 ounces) tuna in water or oil, drained well
- 2 tablespoons mayonnaise or plain Greek yogurt
- 1 tablespoon finely chopped red bell pepper
- 1 tablespoon finely chopped green bell pepper
- 1 tablespoon finely chopped yellow bell pepper
- Salt to taste
- Black pepper to taste
- 2 slices white bread
- 2 tablespoons unsalted butter, softened, or mayonnaise for grilling
- 1/2 cup shredded cheddar cheese
Directions
- In a small bowl, combine the drained tuna, mayonnaise or yogurt, red bell pepper, green bell pepper, and yellow bell pepper. Mix until well combined. Season with salt and pepper to taste.
- Lay the two slices of bread flat. Spread the softened butter or mayonnaise evenly on one side of each slice, going all the way to the edges. This is key for even browning and crisping.
- Place one slice of bread, buttered side down, in a cold or room-temperature nonstick skillet or griddle.
- Layer half of the shredded cheese evenly over the bread in the skillet.
- Spoon the tuna mixture over the cheese, spreading it out evenly.
- Top the tuna mixture with the remaining shredded cheese.
- Place the second slice of bread on top, buttered side facing up.
- Place the skillet over medium-low heat. This is the non-soggy secret: cooking slowly over lower heat allows the inside to heat up and the cheese to melt before the bread burns.
- Cook for 5 to 7 minutes per side, or until the bread is golden brown and crispy and the cheese is fully melted and gooey. Gently press down with a spatula occasionally. If the bread starts browning too fast, reduce the heat slightly.
- Once golden brown on both sides and the cheese is melted, carefully remove the sandwich from the skillet.
- Let it rest for just a minute before slicing in half and serving immediately.