Oh, peanut butter. It’s one of those foods that just brings instant comfort, isn’t it? Whether you smear it on toast, dip fruit into it, or just eat it straight from the spoon (no judgment here!), peanut butter is a pantry staple for so many of us. But have you ever bought a jar of natural peanut butter, excited about the simple ingredients, only to get home and find that familiar layer of oil sitting on top, requiring endless stirring that still leaves you with a somewhat separated mess?
Or maybe you love the classic creamy stuff, but wish it had just a little something extra, a touch of sweetness and a lighter, airier texture? That’s where this incredible Whipped Honey Peanut Butter recipe comes in. It takes that beloved spread and elevates it into something truly special – smooth, perfectly combined, and kissed with the golden sweetness of honey. And the best part? It stays that way, no more oil separation!
Why You’ll Fall in Love with This Whipped Honey Peanut Butter
This isn’t just regular peanut butter with honey mixed in. This is a revelation! The magic lies in the technique, creating a spread that’s wonderfully light and airy, almost like a mousse, while remaining incredibly stable.
Here’s why this recipe is about to become your new favorite:
- Say Goodbye to Separation: The primary reason most homemade or natural nut butter mixes separate is the oil naturally separating from the solids. Our whipping method incorporates air and stabilizes the mixture so the honey blends seamlessly, keeping it smooth and combined.
- Unbelievably Creamy Texture: Whipping transforms dense peanut butter into a fluffy, spreadable dream. It glides onto toast and melts in your mouth.
- Quick and Easy: Seriously, we’re talking just 5 minutes of active time. You can make a batch faster than you can probably find a clean stirring knife for that separated jar!
- Simple Ingredients: You only need two things you likely already have in your pantry.
- Versatile: Perfect for everything from breakfast toast to dipping snacks, or even as a delicious addition to simple desserts.
Gathering Your Ingredients for Whipped Honey Peanut Butter
One of the most delightful aspects of this recipe is its simplicity. You don’t need a long list of obscure items or fancy equipment (beyond a basic electric mixer, which is key!). It’s about taking two humble ingredients and transforming them through a little bit of air and effort.
Here are the essentials you’ll need, along with a little insight into choosing the right ones:
- Peanut Butter: You’ll need 1 cup of creamy peanut butter. And here’s the wonderful secret to this method – it works whether you prefer natural-style peanut butter (the kind that often separates) or a no-stir variety. The trick we’re about to reveal will handle the oil structure beautifully in either case. Make sure it’s creamy, though, as the chunks in chunky peanut butter would interfere with achieving that smooth, whipped texture.
- Honey: We use 1/4 cup of liquid honey. The type of honey you choose can slightly influence the final flavor – a light, floral honey will offer a different nuance than a robust, darker variety. Any liquid honey you have on hand will work perfectly from a technical standpoint, so use your favorite! Honey provides the perfect touch of sweetness and helps create that slightly lighter consistency when whipped into the peanut butter.
That’s it! Just these two simple items stand between you and a jar of incredibly delicious, smooth, and perfectly combined whipped honey peanut butter.
Crafting Your Whipped Honey Peanut Butter: Step-by-Step Magic
Creating this spread is less about complex cooking and more about applying a specific technique to get that signature light and airy texture. The process is straightforward, but paying attention to the whipping steps is crucial for success and, importantly, for preventing that frustrating separation.
Let’s walk through the process together, making sure each step helps you achieve peanut butter perfection:
- Start with Room Temperature Peanut Butter: Before you do anything else, ensure your creamy peanut butter is at room temperature. This is a foundational step and significantly impacts how well the peanut butter whips. Cold peanut butter is stiff and dense, making it difficult for the mixer to incorporate air properly. Setting it out on the counter for an hour or two before you begin makes a world of difference. If you’re in a hurry, you can sometimes microwave it for just a few seconds (like 10-15 seconds max, stir, repeat if needed) in a microwave-safe bowl, but be extremely careful not to overheat it – you just want to soften it slightly, not melt it.
- Place Peanut Butter in a Mixing Bowl: Scoop that lovely, room-temperature peanut butter into a medium-sized mixing bowl. You want a bowl large enough to give your mixer some room to work without splattering peanut butter everywhere as it whips.
- Whip the Peanut Butter Alone: This is the real game-changer! Using an electric mixer (handheld or stand mixer with the whisk or paddle attachment), begin to whip the peanut butter on medium-high speed. You’ll want to let this go for a good 3 to 5 minutes. As you whip, you’ll notice a remarkable transformation. The peanut butter will start to lighten in color, becoming pale and airy. This step is absolutely key because it incorporates air into the peanut butter and helps create a stable emulsion. This airiness and stability are what prevent the oil from separating later, even after you add the liquid honey. Keep scraping down the sides of the bowl as needed to ensure everything gets whipped evenly.
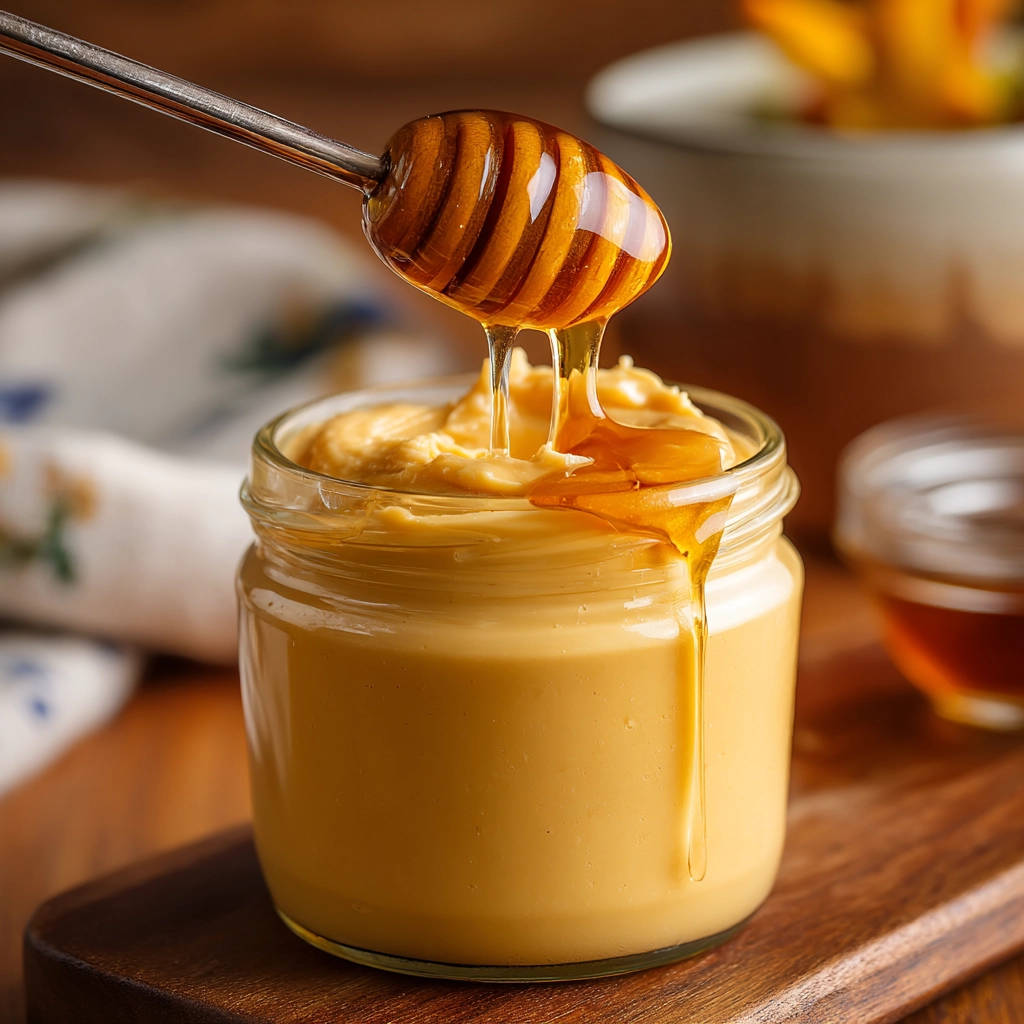
- Slowly Drizzle in the Honey: Once your peanut butter is looking light and fluffy after its initial whip, reduce the mixer speed to low. While the mixer is still running on low, slowly and steadily drizzle in the 1/4 cup of honey. Take your time here – aim for about 30 seconds to a full minute to add all the honey. Drizzling it in slowly allows the honey to integrate gradually into the whipped peanut butter base without deflating the mixture or causing immediate separation. Think of it like adding oil to mayonnaise – a slow stream is essential for emulsification.
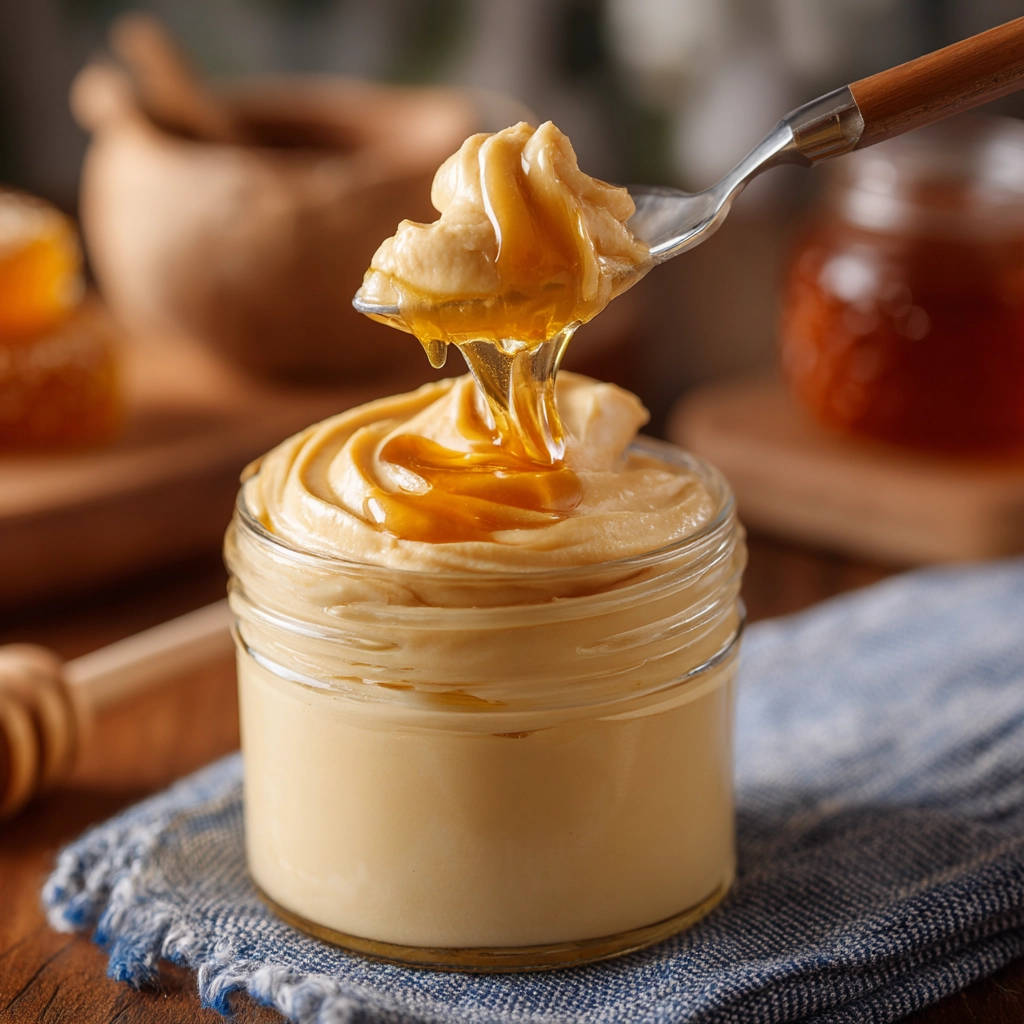
- Whip to Combine and Aerate Further: After all the honey has been added on low speed, increase the mixer speed back up to medium-high. Continue whipping for another 1 to 2 minutes. This final whip ensures the honey is completely and evenly incorporated into the peanut butter, and it gives the mixture one last boost of air for ultimate smoothness and airiness. The final result should be beautifully uniform in color and texture – smooth, creamy, and visibly lighter and fluffier than regular peanut butter.
- Transfer and Store: Spoon the finished whipped honey peanut butter into a clean jar or airtight container. It’s now ready to enjoy! You have a couple of storage options. For a softer, easily spreadable texture that’s perfect for toast or swirling into oatmeal, store it at room temperature in a cool, dry place. If you prefer a slightly firmer consistency, perhaps for dipping or using in certain recipes, you can store it in the refrigerator. Either way, thanks to that essential whipping step, it should stay wonderfully smooth and perfectly combined for easy scooping every time.
See? Just a few minutes and a simple technique are all it takes to transform basic ingredients into this delightful spread!
Pro Tips and Variations for Your Whipped Honey Peanut Butter
While the basic recipe is incredibly simple and yields fantastic results, there are a few extra tips and potential variations you might consider to tailor it to your liking or troubleshoot minor issues.
- The Importance of Room Temp: We mentioned it in the steps, but it bears repeating. This is truly the most critical factor for successful whipping. If your peanut butter is cold and stiff, it simply won’t incorporate air well, and you’ll struggle to get that fluffy texture. Patience here pays off!
- Scrape the Bowl: Don’t forget to pause the mixer and scrape down the sides and bottom of your mixing bowl a couple of times during both the initial peanut butter whipping stage and the final whipping stage after adding honey. This ensures that all the peanut butter is making contact with the beaters and getting properly whipped and combined.
- Adjusting Sweetness: The recipe calls for 1/4 cup of honey, which provides a lovely balance of sweetness. However, taste preferences vary! You can slightly adjust the amount of honey to make it sweeter or less sweet. Start with the recommended amount and taste after the final whip. If you want it sweeter, you can add a tiny bit more (start with a teaspoon) while whipping on low speed, then give it another quick whip on medium-high to fully incorporate. Be mindful that adding too much more liquid may slightly affect the final texture, though honey is quite forgiving.
- Adding Extracts: Want to introduce another layer of flavor? A splash of vanilla extract (start with 1/4 teaspoon) or a pinch of cinnamon can be added during the final whipping stage for delicious variations. Imagine cinnamon honey peanut butter – perfect for apple slices!
- Other Sweeteners? While this recipe is specifically designed for honey, you could experiment with other liquid sweeteners like maple syrup. However, maple syrup has a different viscosity and water content than honey, so the texture might be slightly different, and it may not stay quite as perfectly stable, though it could still be delicious! Agave nectar might perform more similarly to honey.
- Can I Use Crunchy? Yes, you can make whipped honey peanut butter with crunchy peanut butter, but be aware that the texture will not be as uniformly smooth and airy. The nut pieces will remain, preventing it from becoming quite as light and fluffy as with creamy peanut butter. The technique will still help prevent oil separation and create a lighter base texture around the nut pieces, but the overall result will be different.
- Mix-Ins: Once your whipped honey peanut butter is finished, you can gently fold in small mix-ins by hand using a spatula. Think mini chocolate chips, chopped roasted peanuts, or even a swirl of melted chocolate (let it cool slightly first!). Just be careful not to overmix, which could deflate the lovely airy texture you’ve created.
- Storage Texture: Remember the note about storage – room temperature yields a softer, more spreadable result, while refrigeration will firm it up. If you store it in the fridge and find it too hard to spread easily, just let it sit out on the counter for 10-15 minutes to soften slightly.
Delicious Ways to Enjoy Your Whipped Honey Peanut Butter
Now that you have a jar of this dreamy spread, what do you do with it? The possibilities are practically endless! Its creamy texture makes it incredibly versatile.
- Classic Spreading: The most obvious and perhaps most satisfying way! Spread it generously on toast, bagels, English muffins, or rice cakes.
- Fruit Companion: It’s a perfect dip for fresh fruit like apple slices, banana slices, or celery sticks. The combination of fruit and this creamy, sweet peanut butter is just divine. Speaking of apples, have you tried our easy apple fritters? A dollop of this whipped honey peanut butter would be amazing with them!
- Cookie Dipping: Take your cookie experience to the next level! It’s a fantastic dip for classic cookies. If you love peanut butter and chocolate together, it would be incredible with something like our gooey s’mores cookies or chewy peanut butter cookies.
- Pretzel Partner: The sweet and salty contrast is addictive. Use it as a dip for pretzels.
- Swirl into Breakfast: Stir a spoonful into your morning oatmeal or swirl it into plain yogurt for added flavor and creaminess.
- Elevated PB&J: Transform a simple peanut butter and jelly sandwich into something gourmet with this fluffy spread.
- Baking and Desserts: Use it as a filling for cupcakes, a swirl in brownies, or as a layer in no-bake bars. It could be a fantastic component in recipes like our No-Bake Chocolate Layer Bars if you adapted the peanut butter layer!
- On Pancakes or Waffles: Forget syrup! A smear of whipped honey peanut butter on warm pancakes or waffles is heavenly, especially with some fresh berries.
Don’t be afraid to get creative! Its delightful texture and flavor make it a welcome addition to so many sweet and even some savory applications.
Your Whipped Honey Peanut Butter Questions Answered (FAQ)
Got questions about making the perfect batch of whipped honey peanut butter? Here are some common queries and their answers to help you out:
Why is my homemade peanut butter usually separated? How does this recipe prevent that?
Natural peanut butter separates because peanut oil naturally separates from the peanut solids over time. When you mix in a liquid sweetener like honey to regular peanut butter, it can sometimes disrupt the structure even further, leading to more separation or a less creamy texture. This whipped honey peanut butter recipe uses the power of intense whipping to incorporate air into the peanut butter, creating a stable emulsion. This air pockets and the mechanical force of whipping help bind the oils and solids together much more effectively than simple stirring, allowing the honey to be integrated without causing separation.
Can I make this whipped honey peanut butter without an electric mixer?
While you can technically try to make a simple honey peanut butter spread by just stirring, achieving the whipped, light, and airy texture requires an electric mixer. Hand mixing, no matter how vigorous, simply cannot incorporate enough air to create the same fluffy consistency and, crucially, provide the stability needed to prevent separation like the electric mixer does during the key whipping step.
How long will this whipped honey peanut butter last? How should I store it?
Stored in an airtight container, this whipped honey peanut butter should last as long as the ‘best by’ date on the original peanut butter jar, or typically several weeks, whether stored at room temperature or in the refrigerator. Keep an eye out for any changes in smell or texture if storing for an extended period, just as you would with regular peanut butter.
Can I add more or less honey?
Yes, you can adjust the amount of honey to suit your taste preference. The recipe calls for 1/4 cup, which is a good balance, but you can add slightly more if you like it sweeter, or a little less if you prefer it less sweet. Make small adjustments during the final whipping phase. Be aware that significantly altering the liquid ratio could potentially affect the final texture, but minor adjustments are usually fine.
Does the type of peanut butter matter (natural vs. no-stir)?
Happily, this method works well for both natural (oil-separated) and no-stir creamy peanut butter! The key whipping step is effective at stabilizing both. Just ensure you are using creamy peanut butter for the best whipped texture.
What kind of honey works best?
Any liquid honey will work! The flavor of the honey will come through, so choosing a honey whose flavor you enjoy is the most important factor. Lighter honeys often offer a subtle sweetness, while darker honeys can add more robust notes.
Make Creamy Magic with Whipped Honey Peanut Butter!
Seriously, give this whipped honey peanut butter a try. It’s such a simple concept, but the results are truly remarkable. That light, airy texture combined with the comforting flavor of peanut butter and the sweet warmth of honey is just irresistible. It elevates everything you put it on and makes snack time or breakfast feel like a little bit of a treat.
Whip up a batch this week and keep it handy. You’ll find yourself reaching for it again and again. Whether you spread it on toast, dip fruit into it, or find a creative new use, you’ll be amazed at how something so easy can be so utterly delicious and stay perfectly smooth!
Have you tried whipping peanut butter before? What are your favorite ways to enjoy it? Let us know in the comments below! And if you make this recipe, we’d love for you to come back and leave a rating.
Whipped Honey Peanut Butter

Ingredients
- 1 cup creamy peanut butter (natural or no stir will work with this method)
- 1/4 cup honey
Directions
- Make sure your peanut butter is at room temperature. This helps significantly with whipping.
- Place the peanut butter in a medium mixing bowl.
- Using an electric mixer, whip the peanut butter on medium-high speed for 3 to 5 minutes. This step is key. You’ll see it get lighter in color and much fluffier. This incorporates air and stabilizes the base, preventing separation when you add the honey.
- With the mixer running on low speed, slowly drizzle in the honey. Take about 30 seconds to a minute to add it all.
- Once all the honey is added, increase the mixer speed back to medium-high and whip for another 1 to 2 minutes until everything is completely incorporated, smooth, and airy.
- Spoon the whipped honey peanut butter into a clean jar or container. Store at room temperature for easy spreading or refrigerate for a firmer texture. It should stay smooth and combined.