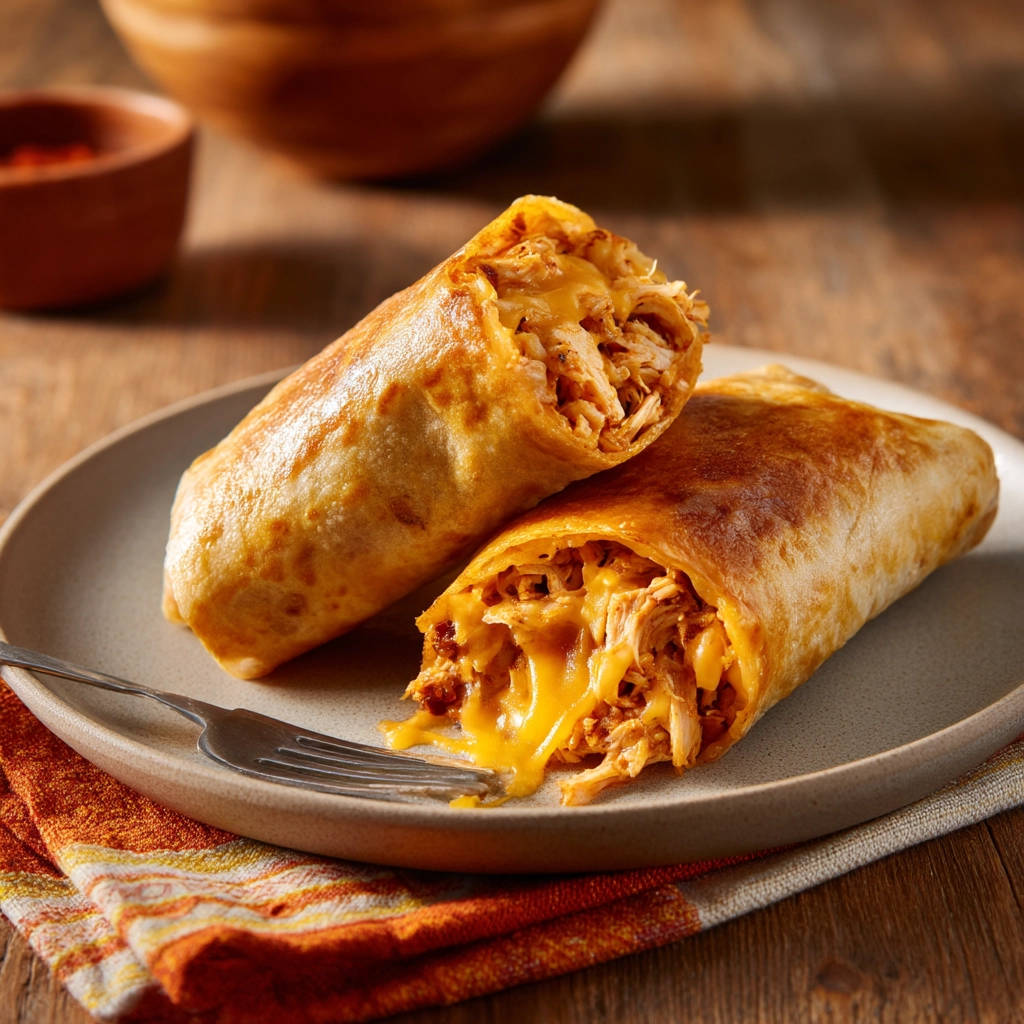
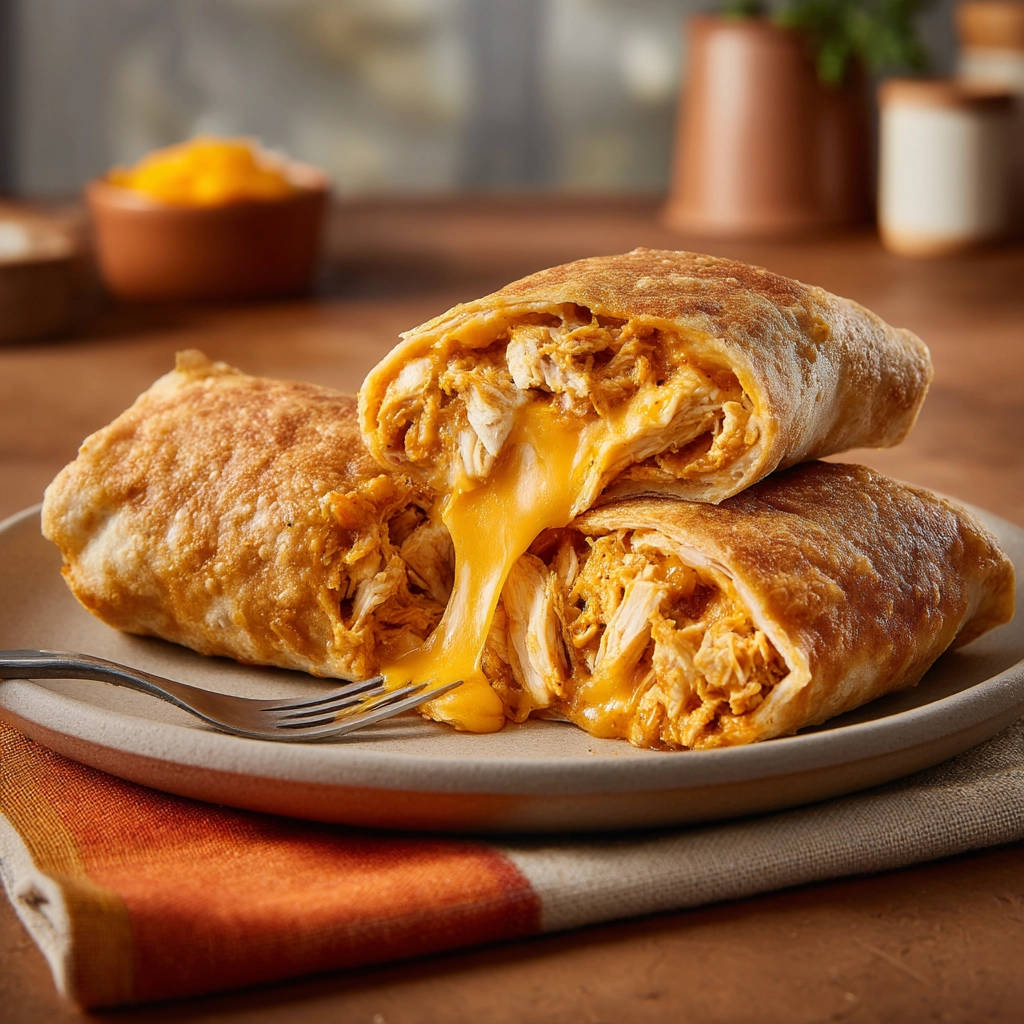
Oh, chimichangas! That magical moment when you bite into a golden, crunchy shell, followed by a warm, savory filling of chicken and melted cheese. Pure bliss, right?
For the longest time, I thought achieving that restaurant-quality crispy shell at home was some kind of culinary myth. Every time I tried, I ended up with greasy, slightly-less-than-crispy wraps that were tasty, sure, but just didn’t have that satisfying crunch. Sound familiar?
Well, fellow home cooks, I’m thrilled to tell you I cracked the code! Making truly crispy chicken chimichangas at home is not only possible, but surprisingly simple once you know the few key tricks. Forget soggy sadness; get ready for golden perfection!
Reasons These Crispy Chicken Chimichangas Are a Keeper
So, what makes this particular recipe stand out? Beyond the guaranteed crispiness (which, let’s be honest, is the main event!), there are several reasons you’ll want to add this to your regular rotation:
- They’re incredibly quick to make! With only 15 minutes of prep and 10 minutes of cook time, you can have these on the table in about 25 minutes.
- Simple ingredients mean you likely have most of what you need already.
- Versatile filling: While we’re using classic chicken and cheese here, you can easily adapt the filling to whatever you have on hand.
- Kid-friendly (and adult-approved!) flavor that’s comforting and satisfying.
- They are a fantastic way to use up leftover cooked chicken.
Gathering Your Ingredients for Crispy Chicken Chimichangas
One of the beauties of these crispy delights is their simplicity. You don’t need a long list of exotic items to create something truly delicious. The magic comes from how these basic components come together and, of course, that frying technique!
Here’s a look at the essential building blocks you’ll need:
- Flour Tortillas: You’ll need 8 small to medium-sized ones. Size matters here – larger ones can be harder to roll and fry evenly. Small or medium work best for that classic chimichanga shape and ensures quick, even crisping.
- Cooked Shredded Chicken: About 2 cups. This is where leftover rotisserie chicken or simply chicken breasts you’ve boiled or baked and shredded really shine. Having the chicken pre-cooked is key to the speedy preparation time. It provides the hearty base for our filling.
- Shredded Cheddar Cheese: 1 cup of sharp or mild cheddar works wonderfully. The cheese melts beautifully, binding the filling together and adding that essential gooey factor we all love in a good chimichanga. Feel free to use a Mexican blend if you prefer, or even Monterey Jack.
- Chili Powder: About 1/2 teaspoon. This is optional but highly recommended! It adds a subtle warmth and depth of flavor that complements the chicken and cheese without making things overly spicy. It’s that little hint of savory spice that makes them irresistible. If you like making your own spice blends, you might enjoy learning how to make a homemade chili powder blend!
- Salt and Black Pepper: To taste. Essential flavor enhancers! Make sure your chicken is seasoned well, and add a pinch of salt and pepper to the filling mixture to bring everything to life.
- Vegetable Oil or Canola Oil: For frying. You’ll need enough to create about 1/2 inch depth in your skillet. These oils are great because they have a high smoke point, which is crucial for getting that crispy exterior without burning the tortillas or creating off-flavors.
See? Nothing too complicated! Just simple, good-quality ingredients ready to be transformed.
Crafting Your Crispy Chicken Chimichangas: Step-by-Step Perfection
Alright, let’s get these chimichangas made! Follow these steps closely, paying special attention to the tips, and you’ll be enjoying perfectly crispy shells in no time. This process is broken down to ensure success, even if you’re new to frying.
- Prepare the Flavorful Filling: Grab a medium-sized bowl. This is where our simple yet delicious filling comes together. Add your 2 cups of cooked shredded chicken. Sprinkle in the 1 cup of shredded cheddar cheese. If you’re using it, add the 1/2 teaspoon of chili powder now. Finally, season with salt and black pepper to your liking. Use a fork or spoon to mix everything together thoroughly. You want the cheese and seasonings to be evenly distributed throughout the chicken so every bite is packed with flavor.
- Make the Tortillas Pliable: This is a crucial little step to prevent frustration! Cold tortillas straight from the package tend to crack and break when you try to roll them tightly. To make them easy to work with, gently warm the stack of 8 tortillas. You can do this in the microwave for just 15-20 seconds, or wrap them in a slightly damp paper towel and then microwave. They should feel warm and flexible, not hot.
- Fill the Tortillas: Lay one warmed tortilla flat on your work surface. Take about 1/4 cup of your chicken and cheese filling. Place this filling slightly off-center, closer to one edge of the tortilla. Don’t overfill, or it will be hard to roll and might burst during frying.
- Fold and Roll Tightly: Now, let’s form those neat little packages! First, fold in the sides of the tortilla over the filling. They should overlap slightly to help contain the filling. Then, starting from the edge closest to the filling, roll the tortilla up tightly into a compact cylinder, like a small burrito. Rolling it tightly is key to preventing the filling from escaping and helps the chimichanga hold its shape.
- Repeat for All Chimichangas: Continue filling and rolling the remaining tortillas with the chicken and cheese mixture until all 8 are prepared. Line them up on a plate or tray, seam-side down to help them stay closed while you prepare for frying.
- Prepare the Frying Oil (The Crispy Secret!): This is arguably the MOST important step for achieving that craveable crispy shell. In a large skillet (one that’s wide enough to hold 2-3 chimichangas comfortably without touching), pour in your vegetable or canola oil. You want about 1/2 inch depth of oil. Place the skillet over medium-high heat. The secret is getting the oil to the right temperature before you add the chimichangas. You’ll know it’s ready when you drop a tiny piece of tortilla or a small drop of water into the oil and it sizzles immediately and vigorously. If it just sits there or barely bubbles, the oil isn’t hot enough, and your chimichangas will absorb oil and be soggy. If it smokes excessively, it’s too hot!
- Carefully Fry in Batches: Using tongs for safety, carefully place 2-3 chimichangas into the hot oil. Always place them seam-side down first – this helps “seal” the seam as it starts to crisp up. Do NOT overcrowd the pan. Frying in batches is absolutely CRUCIAL here. If you put too many in, the oil temperature drops significantly, leading to soggy results instead of crispy ones.
- Fry Until Golden and Crispy: Let the chimichangas fry for about 2-3 minutes on the first side, until they are beautifully golden brown. Then, using your tongs, carefully turn them over and fry the other side for another 2-3 minutes, or until they are evenly golden and crispy all over. Watch them closely, as they can brown quickly once the oil is hot.
- Drain for Maximum Crispiness: Once the chimichangas are golden brown and crispy, use tongs to carefully lift them out of the hot oil. Place them on a wire rack that’s set over a plate or paper towels. The wire rack allows air to circulate around them, letting excess oil drip away and helping them stay wonderfully crispy. Placing them directly on paper towels on a flat surface can sometimes trap steam and make the bottom soggy.
- Serve Hot and Enjoy!: Your crispy chicken chimichangas are now ready! Serve them immediately while they are at their absolute peak crispiness. Pile them high and offer a selection of your favorite dipping sauces or toppings.
Tips for Perfect Crispy Chicken Chimichangas Every Time
Now that you know the core steps, here are a few extra pointers to ensure your chimichangas turn out perfectly crispy and delicious every single time. These are the little things that make a big difference!
- Don’t Skip Warming the Tortillas: Seriously, cold tortillas equal cracked shells and frustration. A quick zap in the microwave makes them pliable and easy to roll.
- Roll Them Tightly: A loose roll means the filling can spill out, and the chimichanga won’t hold its shape as well. A tight roll is essential for a neat, compact package that fries evenly.
- Oil Temperature is King: This is the single most important factor for crispiness! Not hot enough leads to grease, too hot leads to burning. Medium-high heat and testing the oil before adding the chimichangas is your best friend.
- Never Overcrowd the Pan: Frying in batches might take an extra minute, but it’s the difference between crispy perfection and sad, oily wraps. Give them space!
- Drain Properly: Letting them drain on a wire rack allows excess oil to drip off and prevents the bottom from steaming and losing its crispness. Don’t skip the rack if you have one!
- Shred Your Chicken Well: Finely shredded or pulled chicken mixes better with the cheese and seasonings and makes for a more uniform filling that’s easier to roll.
- Consider Your Fryer: While this recipe is designed for a skillet, you can also use a deep fryer if you have one. Just ensure the oil is heated to the correct temperature (around 350-375°F). An air fryer can also make a decent chimichanga, though the texture will be slightly different – more like a very crispy baked one than traditionally fried.
What to Serve With Your Crispy Chicken Chimichangas
These crispy chicken chimichangas are fantastic on their own, but they become a full meal experience when paired with the right accompaniments. Think fresh, cool, and flavorful sides to complement the warm, rich chimichangas.
- Dipping Sauces: Salsa (red or green!), sour cream, guacamole, or even a creamy queso dip are classic choices. A simple hot sauce is also great for a kick!
- Fresh Toppings: Shredded lettuce, diced tomatoes, sliced black olives, or pickled jalapeños add freshness and texture.
- Rice: A side of fluffy rice is always a good idea. Our easy Mexican rice would be a perfect pairing!
- Beans: Refried beans or black beans make for a hearty side dish.
- Salad: A simple, crisp green salad, perhaps with a cilantro-lime dressing, offers a refreshing contrast. You could even serve it alongside an arugula pomegranate salad for something a little different.
Your Crispy Chicken Chimichanga Questions Answered (FAQ)
Got questions about making these crispy wonders? Here are some common ones I get asked:
Can I make the filling ahead of time?
Absolutely! You can mix the chicken and cheese filling up to a day in advance. Store it in an airtight container in the refrigerator. This makes assembly even faster when you’re ready to fry.
Can I use store-bought shredded chicken?
Yes, definitely! Store-bought rotisserie chicken is perfect for this recipe. It’s already cooked, seasoned, and easy to shred, saving you time and effort.
Is there a way to make these without frying? Can I bake them?
While deep frying gives you that authentic, intense crispiness, you can certainly bake them for a lighter option. To bake, brush or spray the rolled chimichangas generously with oil. Place them on a baking sheet lined with parchment paper. Bake in a preheated oven at around 400°F (200°C) for 15-20 minutes, flipping halfway through, until golden brown. They will be crispy, but usually not quite as uniformly crunchy as fried ones.
What’s the best way to reheat leftover chimichangas?
To bring back the crispiness, avoid the microwave! The best way to reheat is in a toaster oven, conventional oven (at around 350°F or 175°C for 10-15 minutes), or even an air fryer until heated through and crispy again.
Can I add other ingredients to the filling?
Yes, feel free to customize! You could add finely diced onion, bell peppers, corn, black beans, or a pinch of cumin or garlic powder to the chicken and cheese mixture. Just make sure any added vegetables are cooked and drained well to avoid adding excess moisture to the filling.
My tortillas are still cracking even after warming. What am I doing wrong?
Sometimes tortillas can be a bit dry. Ensure you’re warming them gently; overheating can make them brittle. If they’re still cracking, try wrapping them in a slightly damp paper towel before warming. This adds a touch of moisture and makes them more pliable. Make sure you’re using small or medium-sized tortillas, as larger ones are inherently harder to roll tightly without tearing.
Enjoy Your Homemade Crispy Chicken Chimichangas!
There you have it! The secret to achieving that perfectly crispy shell on your homemade chicken chimichangas is simple: hot oil and patience (by frying in batches!). With just a few basic ingredients and these straightforward steps, you can recreate a restaurant favorite right in your own kitchen.
Get ready for the satisfying crunch, the gooey cheese, and the flavorful chicken filling. These are perfect for a fun dinner, a game day snack, or just because you’re craving something deliciously crispy.
Give this recipe a try and let me know how yours turn out in the comments below! What are your favorite toppings? Happy cooking!
Crispy Chicken Chimichangas

Ingredients
- 8 small to medium flour tortillas
- 2 cups cooked shredded chicken
- 1 cup shredded cheddar cheese
- 1/2 teaspoon chili powder (optional, based on visual hint)
- Salt to taste
- Black pepper to taste
- Vegetable oil or canola oil for frying
Directions
- In a medium bowl, combine the shredded chicken, shredded cheese, chili powder (if using), salt, and pepper. Mix well.
- Gently warm the tortillas in the microwave for about 15-20 seconds or stack them and wrap in a damp paper towel before warming. This makes them pliable and less likely to crack when rolling.
- Lay a warmed tortilla flat. Place about 1/4 cup of the chicken and cheese filling slightly off center, towards one edge.
- Fold in the sides of the tortilla over the filling. Then, roll the tortilla tightly from the filling side to create a compact cylinder.
- Repeat with the remaining tortillas and filling.
- Now for the key to the crispy shell: Heat about 1/2 inch of oil in a large skillet over medium-high heat. The oil is ready when a small piece of tortilla or a drop of water sizzles immediately. Make sure the oil is hot enough BEFORE you add the chimichangas.
- Carefully place 2-3 chimichangas into the hot oil, seam-side down first. Do NOT overcrowd the pan; this is crucial for keeping the oil temperature high enough to achieve crispness. Cook in batches if necessary.
- Fry for about 2-3 minutes per side, using tongs to turn them, until they are golden brown and crispy all over.
- Using tongs, carefully remove the chimichangas from the oil and place them on a wire rack set over paper towels to drain any excess oil. This also helps them stay crispy.
- Serve hot with your favorite dipping sauces or toppings.