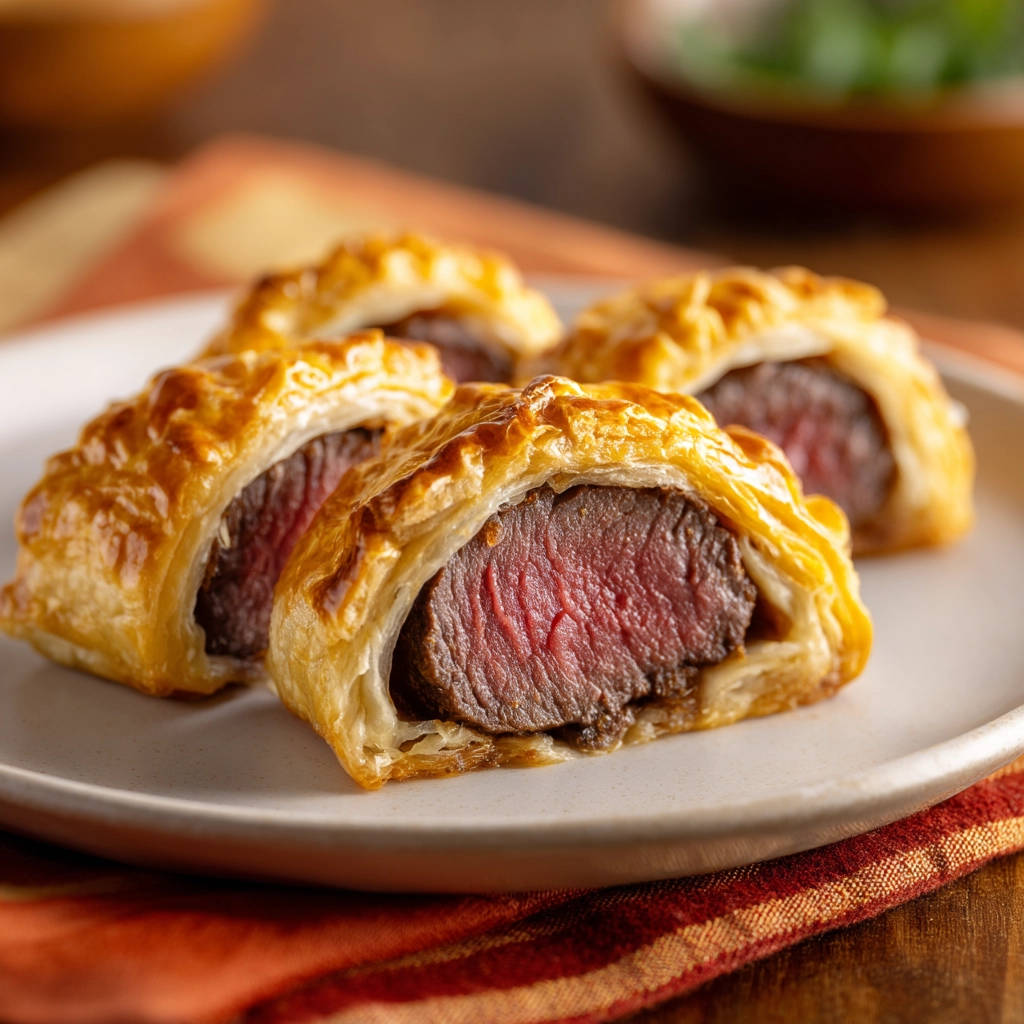
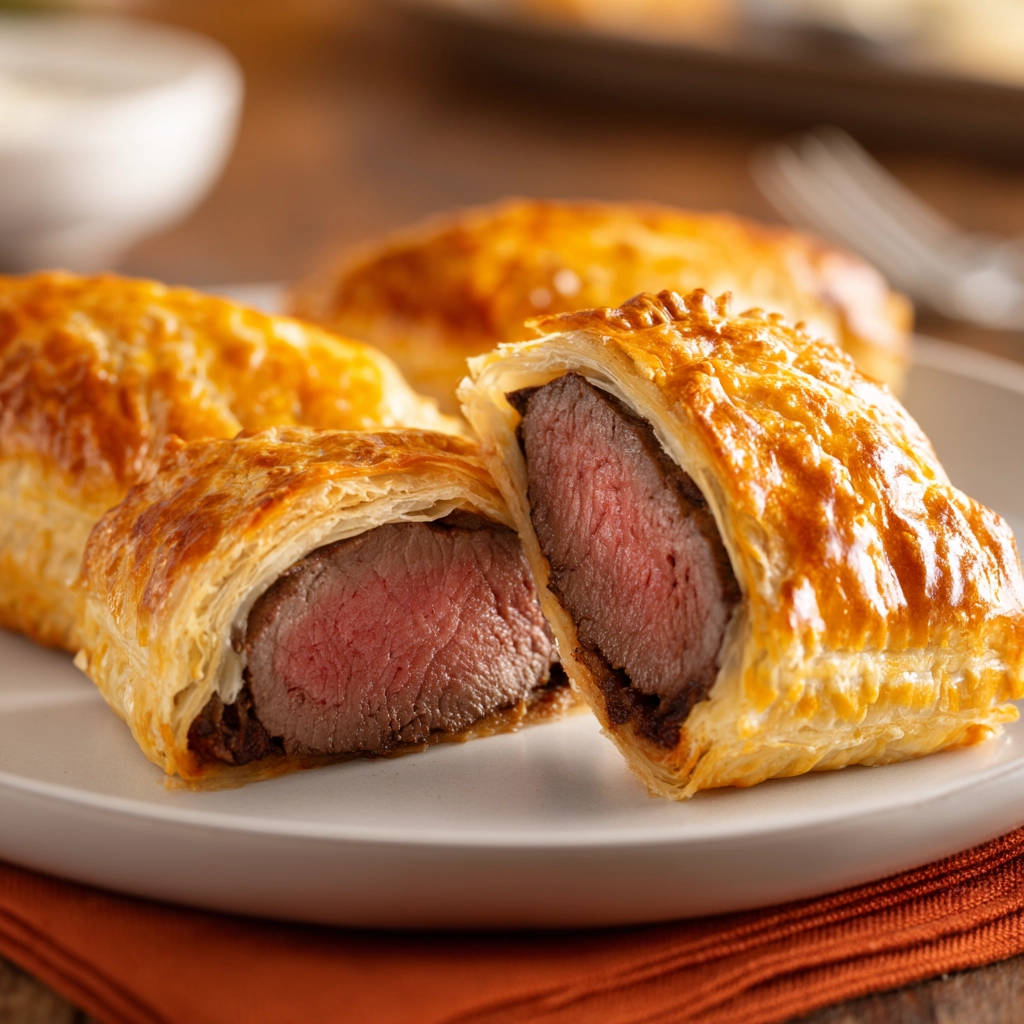
There’s something truly special about a Beef Wellington. It feels fancy, looks impressive, and tastes absolutely divine with that tender beef encased in flaky, golden pastry. But if you’ve ever tried making one, you might know the frustration: the bottom crust turning into a sad, soggy mess while the beef and mushroom filling are perfect. It’s a common challenge, and honestly, it’s happened to me more times than I’d like to admit! I was determined to crack the code for a truly crispy crust every single time, especially for these elegant Mini Beef Wellingtons. Good news: I found the trick, and it’s simpler than you think. Say goodbye to soggy pastry and hello to effortless entertaining!
These individual portions are not only adorable but also make serving a breeze. They retain all the classic flavor of a full-sized Beef Wellington – the perfectly cooked beef, the rich mushroom duxelles, and that essential crispy puff pastry – but are much more manageable to make and serve. Once you master the few key steps I’ll share, you’ll feel confident bringing this luxurious dish to your own table, any night of the week or for a special occasion.
Why You’ll Love These Mini Beef Wellingtons
Beyond solving the dreaded soggy bottom problem, these mini versions offer several fantastic benefits:
- Elegant Presentation: Individual Wellingtons look incredibly sophisticated on a plate, making them perfect for dinner parties or holidays.
- Perfect Portions: Each person gets their own beautiful pastry-wrapped parcel, no carving required.
- Faster Cooking Time: Smaller portions mean less time in the oven compared to a large Wellington, giving you more control over the beef’s doneness and the pastry’s crispness.
- Focus on Crispness: This recipe highlights the crucial techniques specifically designed to ensure that pastry is golden and flaky.
Gathering Your Ingredients for Mini Beef Wellingtons
Creating these delightful parcels requires just a few key ingredients, each playing a vital role in achieving that perfect balance of tender beef, savory mushroom, and flaky pastry. We’re focusing on quality and preparation here to build layers of flavor and texture from the inside out.
Here’s what you’ll need:
- Beef Tenderloin: About 1 pound. This cut is chosen for its incredible tenderness and mild flavor. It cooks relatively quickly, which is ideal for pairing with puff pastry. Look for a piece that is uniform in thickness for even cooking.
- Olive Oil: 2 tablespoons. Used for searing the beef, helping to create a flavorful crust and lock in juices.
- Salt and Black Pepper: Generous amounts. Essential seasoning for both the beef and the mushroom duxelles.
- Mushrooms: 8 ounces. Finely chopped, they form the base of the savory duxelles filling. Cremini (baby bellas) or white button mushrooms work well. The key is removing their moisture.
- Shallot: 1 small one. Finely chopped, the shallot adds a delicate, sweet oniony note to the mushroom mixture without overpowering the beef.
- Butter: 2 tablespoons. Used to sauté the mushrooms and shallot, adding richness and helping them brown and release their moisture.
- Puff Pastry: 1 sheet, thawed according to package directions. This provides the crucial flaky, buttery crust. Ensure it is completely thawed but still cold before working with it.
- Egg: 1 large one. Beaten, this creates the egg wash, which gives the pastry that beautiful golden-brown color and helps create a crisp exterior.
Gathering these simple ingredients is the first step to success. Now, let’s move on to the process, where the magic really happens to keep that pastry crisp!
Crafting Your Mini Beef Wellingtons: Step-by-Step
This recipe isn’t overly complicated, but it does involve a few distinct stages. Each step is important, especially the ones focused on managing moisture, which is the secret weapon against a soggy crust. Follow these instructions carefully, and you’ll be rewarded with perfect, crispy Mini Beef Wellingtons.
- Prepare the Beef: Begin by taking your gorgeous beef tenderloin and cutting it into four equal pieces. Aim for portions that are roughly the same size so they cook evenly. Season each piece generously all over with salt and freshly ground black pepper. Don’t be shy with the seasoning – beef loves flavor! This initial seasoning penetrates the meat as it rests and cooks.
- Sear the Beef: This is one of the crucial steps for locking in flavor and, importantly, creating a barrier that helps protect your pastry from moisture later. Heat the olive oil in a heavy skillet (cast iron is great if you have it!) over high heat until it’s shimmering hot. Carefully place the seasoned beef portions in the hot pan. Sear each side for just 1-2 minutes, until it develops a deep, beautiful brown crust. This searing is quick – you’re not cooking the beef through, just creating that outer layer. Remove the seared beef from the skillet and place it on a plate. It is absolutely essential that the beef cools completely before you wrap it in pastry. Warm beef will steam inside the pastry, leading to sogginess.
- Make the Mushroom Duxelles: While the beef cools, turn your attention to the savory mushroom filling, known as duxelles. Finely chop your mushrooms and shallot. Use the same skillet (no need to wash it, those beefy bits add flavor!) over medium heat. Add the butter, and once it’s melted and slightly foaming, add the chopped mushrooms and shallot. This next part is critical: you need to cook this mixture down, stirring frequently, until all the moisture released by the mushrooms has evaporated. The mixture should become thick, almost paste-like, and look dry, not wet. This process can take 10-15 minutes or even longer depending on your heat and pan. If there’s any excess liquid left, it will migrate to your pastry and make it soggy. Season the finished duxelles with salt and pepper to taste. Just like the beef, the duxelles must cool completely before you use it.
- Prepare the Pastry: Take your thawed sheet of puff pastry. Unfold it gently on a lightly floured surface. Cut the sheet into four equal squares or rectangles. The size needs to be large enough that you can easily wrap one portion of beef and a mound of duxelles inside it without stretching the pastry too thin. If the pastry gets warm and sticky, pop it back in the fridge for a few minutes.
- Assemble the Wellingtons: Now for the fun part! Place about a quarter of the completely cooled mushroom duxelles in the center of each puff pastry piece. Take one of the completely cooled seared beef portions and place it directly on top of the duxelles.
- Wrap the Pastry: Beat the egg in a small bowl to create your egg wash. Brush the edges of each puff pastry piece with a little egg wash – this acts like glue to help seal the pastry. Carefully bring the corners and sides of the pastry up and over the beef and duxelles, wrapping it snugly. Pinch the seams together firmly to seal completely. You can trim away any excessive pastry, but make sure there are no holes or gaps where the filling could escape or moisture could get in. Place each wrapped Wellington seam-side down on a baking sheet that you’ve lined with parchment paper.
- Chill, Chill, Chill! (The Secret Weapon): This step is arguably the MOST important for guaranteeing crispy pastry. Before baking, you must chill the assembled Wellingtons. Brush the tops and sides of each wrapped Wellington generously with more egg wash – this helps with browning and crisping. Then, place the entire baking sheet into the refrigerator for at least 20-30 minutes. Chilling firms up the butter in the puff pastry, which helps it puff beautifully and creates those flaky layers. It also allows the filling and pastry to meld slightly and ensures everything is cold when it hits the hot oven, creating steam that lifts the pastry. You can even make these ahead and chill them for up to 24 hours!
- Preheat the Oven: While the Wellingtons are chilling, preheat your oven to 400 degrees Fahrenheit (200 degrees Celsius).
- Bake to Perfection: Once the oven is preheated and the Wellingtons have chilled sufficiently, transfer the baking sheet directly from the refrigerator to the hot oven. Bake for 20-25 minutes. Keep an eye on them – you want the pastry to be beautifully golden brown and significantly puffed up. The internal temperature of the beef should reach your desired level of doneness: 125°F for rare, 135°F for medium-rare, or 145°F for medium. Use an instant-read thermometer inserted into the thickest part of the beef (through the pastry) to check.
- Rest: Just like any cooked meat, the Wellingtons need a few minutes to rest after coming out of the oven. This allows the juices in the beef to redistribute, keeping it tender. Let them rest for about 5-10 minutes on the baking sheet before serving.
And there you have it! By focusing on searing the beef properly, drying out your duxelles, and giving the assembled Wellingtons a good chill, you’ve successfully navigated the path to perfectly crispy, delicious Mini Beef Wellingtons. They’re ready to impress!
Tips for Perfect Mini Beef Wellingtons Every Time
Want to ensure your Mini Beef Wellingtons are the talk of the table? Here are a few extra tips to help you achieve Wellington perfection:
- Keep Everything Cold: This cannot be stressed enough! Cold beef, cold duxelles, and especially cold puff pastry are crucial for achieving that beautiful, flaky crust. Work quickly when assembling.
- Squeeze the Moisture Out of Mushrooms: After cooking the duxelles, if you’re still worried about moisture, you can press the mixture firmly with the back of a spoon in the pan or even transfer it to a sieve and press lightly once cooled to ensure every drop of excess liquid is gone. This extra step guarantees a dry filling.
- Proper Sealing: Pinch the pastry seams tightly together. Any small gap can allow steam and moisture to escape or soak the pastry, leading to a less than ideal crust.
- Egg Wash is Your Friend: Don’t skip the egg wash, applied both before and after chilling. It’s key to that gorgeous golden color and crispy finish.
- Know Your Oven: Ovens can vary. Use an oven thermometer to ensure your oven is accurately preheated. This impacts cooking time and pastry puff.
- Resting Time Matters: Just a few minutes of rest makes a big difference in the tenderness and juiciness of the beef inside the pastry.
What to Serve With Mini Beef Wellingtons
These rich, individual Wellingtons pair beautifully with a variety of sides. Classic pairings often include potatoes or vegetables that offer a different texture and flavor profile. Consider serving them alongside creamy scalloped potatoes or some easy crispy oven potato wedges. A simple green salad with a light vinaigrette also provides a refreshing contrast.
Your Mini Beef Wellingtons Questions Answered (FAQ)
Got questions about making Mini Beef Wellingtons? Here are some common ones:
Can I make Mini Beef Wellingtons ahead of time?
Absolutely! This is one of their best features. You can assemble the Wellingtons completely, including the egg wash, and store them on the parchment-lined baking sheet in the refrigerator for up to 24 hours before baking. This makes them perfect for entertaining.
What if my pastry still seems soggy?
Sogginess usually comes down to moisture. Ensure your beef was fully cooled after searing, and most importantly, cook your mushroom duxelles until it is very dry. Also, make sure your assembled Wellingtons are properly chilled before baking. If you’re still having trouble, you might need to ensure your oven is hot enough.
Can I use a different cut of beef?
Beef tenderloin is recommended because of its tenderness and quick cooking time, which matches the pastry’s baking time. Other cuts might require different cooking methods or longer cooking times, making them less suitable for wrapping in puff pastry in this manner.
How do I know when the beef is cooked to my liking?
The most accurate way is to use an instant-read meat thermometer. Carefully insert it through the pastry into the thickest part of the beef before the Wellingtons get too brown. Refer to the temperature guide in the recipe instructions (125°F rare, 135°F medium-rare, 145°F medium).
Can I freeze Mini Beef Wellingtons?
Yes, you can! Assemble the Wellingtons but do not egg wash or bake them. Place them on a baking sheet and freeze until solid. Once frozen, wrap them tightly in plastic wrap and then aluminum foil or place them in a freezer-safe bag. To bake, egg wash the frozen Wellingtons and bake from frozen, adding about 10-15 minutes to the baking time, or until golden brown and cooked through. Keep in mind that freezing can sometimes slightly affect the pastry texture.
Enjoy Your Homemade Mini Beef Wellingtons!
Making Mini Beef Wellingtons doesn’t have to be intimidating. By paying attention to a couple of key steps – searing the beef and drying the duxelles thoroughly, and giving them that essential chill time – you can confidently achieve beautiful, crispy results every time. These mini versions are perfect for making a regular dinner feel special or impressing guests without spending hours in the kitchen right before they arrive.
Give this recipe a try and discover how simple it can be to enjoy this classic dish with a perfect, crispy crust. Don’t forget to leave a comment below and let me know how yours turned out! Happy cooking!
Mini Beef Wellingtons

Ingredients
- 1 pound beef tenderloin
- 2 tablespoons olive oil
- Salt
- Black pepper
- 8 ounces mushrooms
- 1 small shallot
- 2 tablespoons butter
- 1 sheet puff pastry, thawed
- 1 egg
Directions
- Cut the beef tenderloin into 4 equal portions. Season all sides generously with salt and pepper.
- Heat olive oil in a heavy skillet over high heat. Sear the beef portions on all sides until deeply browned, about 1-2 minutes per side. This is crucial for locking in flavor and helping prevent soggy pastry later. Remove beef from skillet and let cool completely on a plate.
- While beef cools, make the mushroom duxelles. Finely chop the mushrooms and shallot. Add butter to the same skillet over medium heat. Add chopped mushrooms and shallot. Cook, stirring frequently, until all the moisture from the mushrooms has evaporated and the mixture is thick and dry. This is another critical step to avoid soggy pastry. Season with salt and pepper. Let cool completely.
- Lay out the thawed puff pastry sheet. Cut it into 4 equal squares or rectangles large enough to wrap each piece of beef.
- Place a quarter of the cooled mushroom duxelles in the center of each pastry piece. Place a cooled seared beef portion on top of the duxelles.
- Beat the egg in a small bowl to make an egg wash. Brush the edges of the puff pastry with egg wash. Carefully wrap the pastry around the beef and duxelles, sealing the edges completely. You can trim excess pastry, but ensure there are no gaps. Place the wrapped Wellingtons seam-side down on a baking sheet lined with parchment paper.
- To ensure crispy pastry, brush the tops and sides of each wrapped Wellington with more egg wash. Now, and this is the key step to prevent sogginess, place the baking sheet with the Wellingtons in the refrigerator for at least 20-30 minutes (or up to 24 hours) to chill the pastry and firm up the filling. This chilling step is vital for a crisp, non-soggy crust.
- Preheat oven to 400 degrees Fahrenheit (200 degrees Celsius).
- Bake the chilled Wellingtons for 20-25 minutes, or until the pastry is golden brown and puffed, and the internal temperature of the beef reaches your desired doneness (125F for rare, 135F for medium-rare, 145F for medium).
- Let rest for a few minutes before serving.