I know the struggle: you envision perfectly contained, gooey cheese in a savory bacon wrap, but instead, it all melts out onto the pan. It’s truly disappointing!
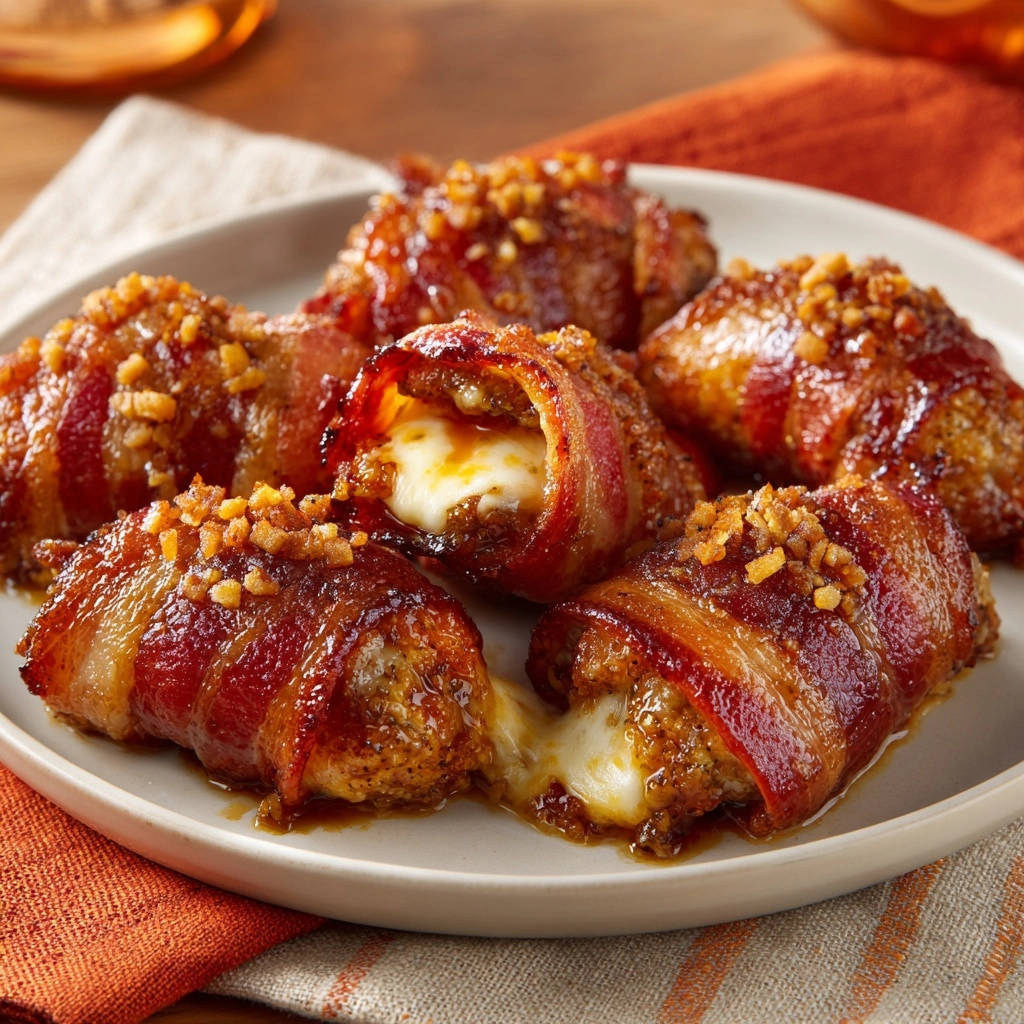
After perfecting countless appetizer recipes, I’ve cracked the code to keeping that delicious cheese right where it belongs, ensuring every one of your Bacon-Wrapped Cheesy Bites is a triumph of flavor and texture. Get ready for a foolproof recipe that delivers perfectly crispy bacon and irresistibly melty cheese, making them the ultimate crowd-pleasing party snack.
Why These Bacon-Wrapped Cheesy Bites Are a Must-Make
This recipe for Bacon-Wrapped Cheesy Bites isn’t just another appetizer; it’s a solution to the common “cheese escape” problem. My careful technique ensures each bite holds its cheesy core perfectly. You get that satisfying pull of melted cheese without any messy puddles on your baking sheet.
Beyond the flawless containment, these bites strike a sublime balance of savory, sweet, and smoky flavors. The seasoned chicken, crispy bacon, and tangy BBQ glaze create an addictive combination that will have everyone reaching for more. They’re surprisingly simple to prepare, making them ideal for any gathering or even a special weeknight treat.
The Essential Building Blocks: Your Ingredient Guide
Quality ingredients are the foundation of truly exceptional food. Selecting the right components for these Bacon-Wrapped Cheesy Bites will elevate them from good to absolutely unforgettable.
Choosing Your Meat Base (Chicken or Turkey)
Ground chicken or turkey provides a lean, neutral canvas that readily absorbs the delicious seasonings. Opt for a good quality ground meat for the best texture and flavor absorption.
The Star of the Show: Mozzarella (and Why Low-Moisture Matters)
Low-moisture mozzarella cheese is absolutely critical for preventing melt-out. Its reduced water content means it melts beautifully without becoming a liquid mess, ensuring a gooey center that stays within the chicken and bacon wrap.
Perfectly Crispy Bacon: Thin Slices Are Key
Thin-sliced bacon is your best friend here. It crisps up evenly around the chicken ball without overcooking the meat, delivering that desirable crunch in every bite. Regular or thick-cut bacon can be challenging to wrap tightly and may not crisp as well in the time allotted.
Crafting the Irresistible BBQ Glaze
Your favorite BBQ sauce, elevated with a touch of brown sugar and apple cider vinegar, creates a sticky, sweet-and-tangy glaze. This combination caramelizes perfectly in the oven, adding a layer of irresistible flavor and a beautiful sheen to your bites.
The Secret Crunch: Crispy Fried Onions
The addition of crushed crispy fried onions at the very end is a game-changer. It provides a fantastic textural contrast and an extra savory note, completing the flavor profile of these delectable Bacon-Wrapped Cheesy Bites.
Essential Tools for Bacon-Wrapped Cheesy Bite Success
Having the right tools on hand streamlines the process and ensures the best outcome for your delicious bites. Here are the essentials:
Baking Sheet with Wire Rack: This setup is non-negotiable. The wire rack allows air to circulate all around the bites, promoting even cooking and crispy bacon, while the foil-lined sheet underneath catches any drips for easy cleanup.
Medium Mixing Bowl: For combining your seasoned ground chicken. A sufficiently sized bowl makes mixing easy without spills.
Small Bowl and Whisk: Perfect for preparing your BBQ glaze. Whisking ensures all glaze ingredients are well combined for an even coating.
Pastry Brush: Essential for evenly applying the BBQ glaze. This ensures every bite gets a generous and consistent coating for optimal caramelization.
Meat Thermometer: For ensuring the chicken reaches a safe internal temperature of 165°F (74°C). This is key for food safety and preventing dry chicken.
Your Step-by-Step Guide to Perfect Bacon-Wrapped Cheesy Bites
Follow these detailed steps to achieve perfectly contained, delicious Bacon-Wrapped Cheesy Bites every time.
Prepare Your Oven and Baking Setup: Preheat your oven to 375°F (190°C). Line a large baking sheet with foil, then place a wire rack on top. This crucial setup ensures uniform crisping of the bacon and simplifies cleanup by catching any rendered fat or glaze drips.
Season the Ground Meat: In a medium bowl, combine the ground chicken (or turkey) with smoked paprika, garlic powder, black pepper, and salt. Gently mix the ingredients until they are just combined. Overmixing can lead to tough, dry chicken, so stop as soon as everything is incorporated.
Form and Seal the Bites: Take about 1.5 to 2 tablespoons of the seasoned ground chicken mixture. Flatten it into a small patty in the palm of your hand. Place one 1/2-inch mozzarella cube in the center. Carefully mold the chicken around the cheese, ensuring the cheese is completely enclosed and the chicken forms a tight, seamless ball. This tight seal is the most crucial step for preventing any cheese from escaping during baking.
Wrap with Bacon: Take one slice of thin bacon and gently stretch it slightly if needed, being careful not to tear it. Tightly wrap each chicken ball with a single slice of bacon, overlapping the ends as little as possible. Place the wrapped bite seam-side down on your prepared wire rack to help hold the bacon in place.
Prepare the Glaze: In a small bowl, whisk together the BBQ sauce, brown sugar, and apple cider vinegar until completely smooth. This creates your savory-sweet glaze that will caramelize beautifully on the bacon.
Initial Bake: Bake the Bacon-Wrapped Cheesy Bites for 20 minutes. At this point, the bacon will begin to crisp, and the chicken will be mostly cooked through, rendering some fat.
Apply the Glaze: Carefully remove the baking sheet from the oven. Generously brush each bacon-wrapped bite with the prepared BBQ glaze. Don’t be shy; a good coat ensures maximum flavor and caramelization.
Final Bake and Crisping: Return the bites to the oven and continue baking for another 5-10 minutes. Bake until the bacon is fully crispy and caramelized, the glaze is bubbly and set, and the internal temperature of the chicken reaches 165°F (74°C) with a meat thermometer. This final bake transforms the glaze into a sticky, glossy coating.
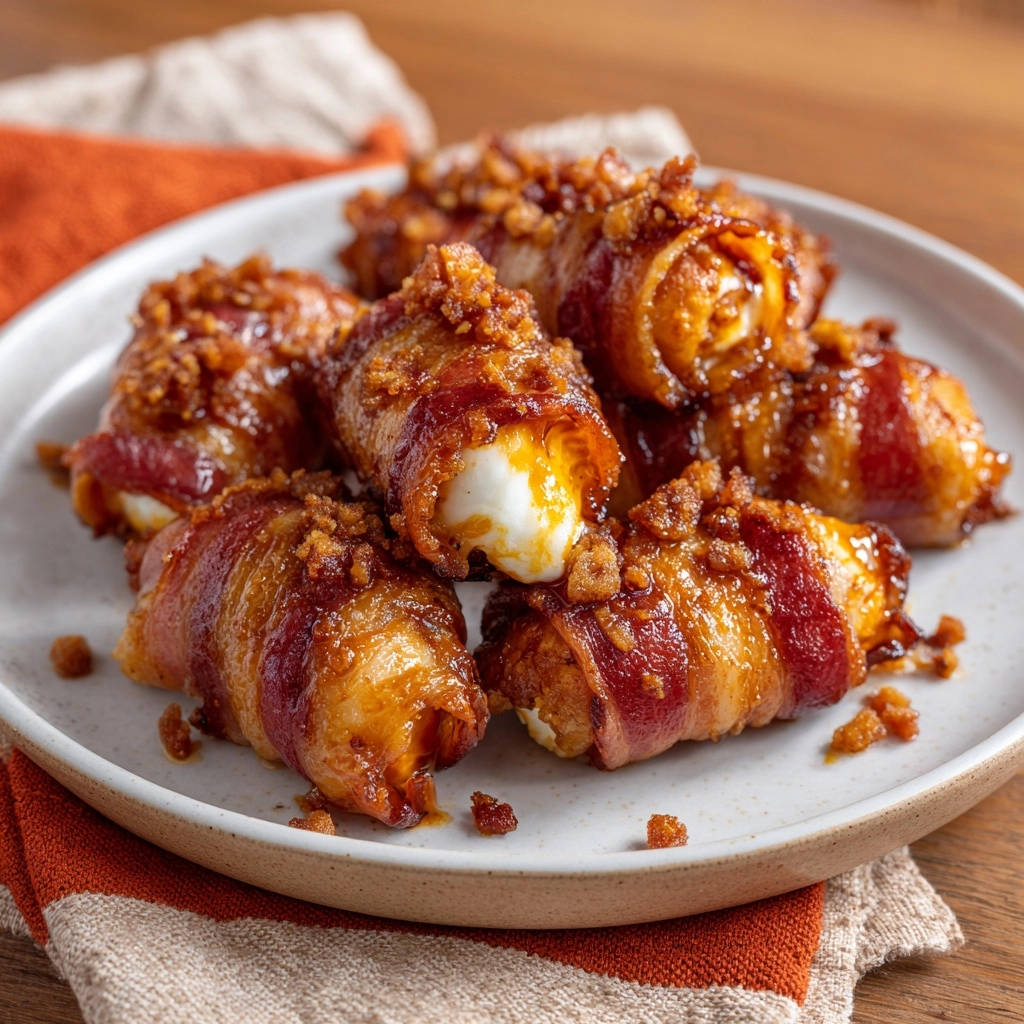
Add the Finishing Crunch: Carefully remove the bites from the oven. Immediately sprinkle the crushed crispy fried onions over the top of the hot bites. The heat will help the onions adhere and infuse their flavor.
Cool and Serve: Let the Bacon-Wrapped Cheesy Bites cool on the rack for a few minutes before serving. This brief resting period allows the cheese to set slightly, ensuring a cleaner, gooey bite without instant explosion, and prevents accidental burns from molten cheese.
Chef’s Secrets: Elevating Your Bacon-Wrapped Cheesy Bites
Achieving truly perfect Bacon-Wrapped Cheesy Bites goes beyond just following the steps. These expert tips will ensure your appetizers are consistently outstanding.
The Unsung Hero: The Wire Rack Setup
The wire rack isn’t optional; it’s essential. It lifts the bites off the baking sheet, allowing hot air to circulate evenly around them. This promotes uniform cooking and, crucially, ensures the bacon crisps up all over, rather than steaming on the bottom. It also lets excess fat drip away, preventing greasy bites.
Mastering the Meat-to-Cheese Seal
The success of gooey, contained cheese hinges entirely on how well you enclose the mozzarella. After placing the cheese cube, meticulously mold the chicken around it, pinching every seam until there are absolutely no gaps. A tight, seamless ball means no escape routes for that precious melted cheese.
Don’t Overmix Your Meat!
When combining the ground chicken and seasonings, mix gently and only until just combined. Overmixing compresses the meat proteins, leading to a dense, tough, and dry texture after cooking. A light hand ensures tender, juicy chicken.
The Art of Glazing for Perfect Caramelization
Apply the BBQ glaze generously, but evenly, to each bite during the second baking phase. The sugars in the glaze will caramelize, creating a beautiful golden-brown crust and a sticky, irresistible finish. This step is about building layers of flavor and texture.
The Crucial Cooling Period
Resist the urge to devour these immediately! Allowing the Bacon-Wrapped Cheesy Bites to cool for just a few minutes after baking serves two vital purposes. It allows the molten cheese to set slightly, preventing it from gushing out when bitten, and ensures you don’t burn your tongue on the incredibly hot filling.
Troubleshooting Your Bacon-Wrapped Cheesy Bites
Even with the best instructions, sometimes things go awry. Here’s how to fix common issues you might encounter.
Why Did My Cheese Melt Out?
The most common culprit is an imperfect seal around the mozzarella. Ensure you’re using low-moisture mozzarella, and meticulously pinch and seal the chicken around the cheese cube. Even a tiny gap can lead to melt-out. Avoid overbaking, as prolonged heat can also cause cheese to burst.
My Bacon Isn’t Crispy Enough!
This often happens if the bacon is too thick or if there isn’t enough air circulation. Always use thin-sliced bacon and ensure you’re using a wire rack for proper airflow. If bacon isn’t crisping after the final bake, you can carefully remove the bites and broil them for 1-2 minutes, watching constantly, until golden and crisp.
The Chicken Tastes Dry. What Happened?
Dry chicken usually results from overmixing the ground meat or overbaking. Mix the chicken and seasonings gently, just until combined. Use a meat thermometer to ensure the chicken reaches 165°F (74°C) and no higher, then remove it promptly from the oven. A tight seal also helps keep moisture in.
Serving, Storing, and Making Ahead: Maximize Your Bites
These Bacon-Wrapped Cheesy Bites are incredibly versatile and perfect for any occasion. Here’s how to get the most out of them.
Perfect Pairings & Creative Serving Ideas
Serve these amazing Bacon-Wrapped Cheesy Bites warm as an appetizer, a game-day snack, or even a fun dinner with a simple side salad. They are fantastic on their own, but also pair wonderfully with dipping sauces like ranch, honey mustard, or an extra drizzle of BBQ sauce. For another crowd-pleasing appetizer, consider serving them alongside a creamy, flavorful cheesy bacon dip.
Can I Make Them Ahead? (Prep Tips)
Yes, you can absolutely prep these bites in advance! Form the chicken and cheese balls, wrap them in bacon, and arrange them on the wire rack. Cover tightly with plastic wrap and refrigerate for up to 24 hours. When ready to bake, apply the glaze and proceed with the baking instructions.
Storing Leftovers (If Any!)
Store any leftover Bacon-Wrapped Cheesy Bites in an airtight container in the refrigerator for up to 3-4 days. This ensures they stay fresh and ready for reheating.
Reheating for Optimal Gooeyness
To reheat, place the bites on a wire rack set over a baking sheet and bake in a preheated oven at 350°F (175°C) for 10-15 minutes, or until heated through and the bacon is crispy again. An air fryer also works wonders for reheating, restoring that perfect crispness in less time.
Flavor Variations to Try Next Time
Get creative with your Bacon-Wrapped Cheesy Bites! For a spicy kick, use pepper jack cheese or mix a pinch of cayenne into the chicken seasoning. You can also experiment with different BBQ sauce flavors, from smoky chipotle to sweet and tangy, or even add finely diced jalapeños to the chicken mixture.
Your Top Questions Answered: Bacon-Wrapped Cheesy Bites FAQ
Can I use different types of ground meat?
Yes, while ground chicken or turkey is recommended for its lean profile, you can experiment with lean ground beef or a chicken/pork blend. Adjust baking times as necessary to ensure the internal temperature reaches 165°F (74°C) and the bacon crisps.
What if I don’t have mozzarella?
Low-moisture mozzarella is ideal, but you can substitute with other low-moisture cheeses that melt well, such as provolone, mild cheddar, or even Monterey Jack. Avoid high-moisture cheeses like fresh mozzarella, as they will release too much water and hinder the cheese containment.
Can I cook these in an air fryer?
Absolutely! An air fryer is a fantastic option for these bites. Preheat your air fryer to 350°F (175°C). Place the bites in a single layer, ensuring they don’t touch. Cook for 15-20 minutes, flipping halfway and applying the glaze after 10-12 minutes, until bacon is crispy and chicken is cooked through. Cooking times may vary, so keep an eye on them.
How can I make these spicier?
To add heat, incorporate a pinch of red pepper flakes or a dash of hot sauce into the chicken mixture. For the glaze, whisk in a teaspoon of sriracha or your favorite hot sauce. Using pepper jack cheese cubes instead of mozzarella will also deliver a noticeable kick to your cheesy chicken bites.
Are these gluten-free?
Yes, these Bacon-Wrapped Cheesy Bites are naturally gluten-free, provided your BBQ sauce is gluten-free. Most ground meats, cheeses, and basic seasonings do not contain gluten, but it’s always wise to check ingredient labels, especially for processed items like BBQ sauce and crispy fried onions.
Ready to Impress? Share Your Bacon-Wrapped Cheesy Bites Masterpiece!
You now possess the secrets to creating truly sensational Bacon-Wrapped Cheesy Bites that consistently deliver on gooey centers and crispy exteriors. Say goodbye to melted cheese messes and hello to the ultimate party finger food!
These savory, sweet, and perfectly contained appetizers are guaranteed to be the star of your next gathering, disappearing faster than you can say “more bacon, please!” They are simple enough for a casual snack yet elegant enough for entertaining.
Don’t keep this delicious recipe to yourself! I’d love to see your creations. Share your Bacon-Wrapped Cheesy Bites on social media and tag us, or leave a comment below with your favorite serving ideas or personal twists. Happy cooking!

Bacon-Wrapped Cheesy Bites
Course: AppetizerCuisine: American CuisineDifficulty: easy6
servings (12-16 bites)20
minutes25
minutes45
minutesAmerican Cuisine
Ingredients
1 pound ground chicken (or turkey)
1 teaspoon smoked paprika
1/2 teaspoon garlic powder
1/4 teaspoon black pepper
1/4 teaspoon salt
8 ounces low moisture mozzarella cheese, cut into 1/2 inch cubes
12-16 slices thin bacon (about 12 ounces)
1/2 cup BBQ sauce (your favorite brand)
2 tablespoons brown sugar
1 tablespoon apple cider vinegar
1/4 cup crispy fried onions, crushed
Directions
- Preheat your oven to 375 degrees F (190 degrees C). Line a baking sheet with foil and place a wire rack on top. This setup is key for even cooking and containing any drips.
- In a medium bowl, combine the ground chicken, smoked paprika, garlic powder, black pepper, and salt. Mix gently until just combined. Do not overmix.
- Take about 1.5 to 2 tablespoons of the seasoned ground chicken mixture and flatten it into a small patty in the palm of your hand. Place one mozzarella cube in the center. Carefully mold the chicken around the cheese, ensuring the cheese is completely enclosed and the chicken forms a tight, seamless ball. This tight seal is crucial for preventing cheese escape.
- Stretch one slice of bacon slightly (if using regular cut, not thin). Wrap each chicken ball tightly with one slice of bacon, overlapping the ends as needed. Secure the bacon end with a toothpick if desired, but a tight wrap usually suffices. Place seam-side down on the prepared wire rack.
- In a small bowl, whisk together the BBQ sauce, brown sugar, and apple cider vinegar to make your glaze.
- Bake for 20 minutes. At this point, the bacon should be starting to crisp and the chicken will be mostly cooked.
- Remove from the oven and carefully brush each bacon-wrapped bite generously with the BBQ glaze.
- Return to the oven and bake for another 5-10 minutes, or until the bacon is fully crisp and caramelized, and the internal temperature of the chicken reaches 165 degrees F (74 degrees C). The glaze should be bubbly and set.
- Carefully remove from the oven. Sprinkle the crushed crispy fried onions over the top of the hot bites for extra crunch and flavor.
- Let them cool for a few minutes before serving. This allows the cheese to set slightly, making for a cleaner, gooier bite without instant explosion.
Notes
- Cooling for a few minutes before serving helps the cheese set slightly, making for a cleaner, gooier bite.