The No-Stick Secret: Why This Recipe Is Your New Go-To
Many `Mini Strawberry Crumble Cheesecakes` recipes leave you battling stuck desserts. This guide focuses on a simple, foolproof technique that ensures every single cheesecake releases cleanly from the pan. The secret lies in a combination of proper liner preparation, a light pre-bake for the crust, and a crucial cooling method. These steps prevent the dreaded sticking, tearing, and cracking that often plague homemade cheesecakes. You’ll achieve beautifully formed, individual desserts with ease. This method builds confidence for any baker, from novice to seasoned pro.Your Essential Kit for Mini Cheesecake Success
Having the right tools makes all the difference for perfect `Mini Strawberry Crumble Cheesecakes`. Each item plays a specific role in ensuring a smooth process and a flawless finish. Gather these before you begin.-
Standard 12-Cup Muffin Tin: This is the foundation for your mini cheesecakes, providing the individual molds.
-
Paper Cupcake Liners: Essential for easy release, they also provide a convenient serving wrapper.
-
Nonstick Cooking Spray: A light mist inside the liners acts as an extra layer of protection against sticking, a key to our “no-stick” promise.
-
Electric Mixer (Handheld or Stand): Crucial for achieving the perfectly smooth and airy cheesecake filling without lumps.
-
Small Saucepan: Needed for simmering the fresh strawberry topping to the right consistency.
-
Pastry Blender or Fingertips: Ideal for effortlessly incorporating cold butter into the flour for your crumble topping.
Gathering Your Delights: Key Ingredients for These Bites
Each component of these `Mini Strawberry Crumble Cheesecakes` is carefully chosen for optimal flavor and texture. Understanding the role of each ingredient helps ensure your success.Crafting the Perfect Graham Cracker Crust
The crust provides a sweet, slightly spiced base for our mini cheesecakes.
Graham cracker crumbs form the bulk of the crust, offering classic flavor and a tender bite. Granulated sugar adds sweetness and helps bind the crumbs. Melted unsalted butter is the crucial binding agent, moistening the crumbs and allowing them to compact firmly.
The Silky Smooth Cheesecake Filling Foundation
The heart of these cheesecakes is their rich, creamy filling.
Softened cream cheese is paramount; cold cream cheese will result in a lumpy filling. Granulated sugar sweetens the cheesecake, balancing the tang of the cream cheese. Large eggs provide structure and richness, helping the cheesecake set. Vanilla extract enhances the overall dessert flavor with its warm, aromatic notes.
Sweet & Tangy Strawberry Topping Essentials
A vibrant, fresh strawberry topping adds a burst of fruitiness.
Fresh strawberries, finely diced, are the star, offering bright flavor and texture. Granulated sugar balances the strawberries’ tartness and aids in thickening. Cornstarch acts as a thickener, ensuring the topping holds its shape without being watery. A small amount of water helps dissolve the cornstarch and create a smooth sauce. Lemon juice brightens the strawberry flavor and adds a touch of acidity.
Crumbly Perfection: The Irresistible Topping
The buttery crumble adds a delightful textural contrast.
All-purpose flour forms the base of the crumble, giving it structure. Granulated sugar provides sweetness and helps with browning. Cold, cubed unsalted butter is essential; it creates pockets of fat that result in a perfectly crumbly, not cakey, texture.
Your Step-by-Step Guide to Mini Strawberry Crumble Cheesecakes Perfection
Crafting these delightful mini cheesecakes is straightforward when you follow these precise steps. Every instruction is designed to ensure success, from the perfectly set crust to the crack-free cheesecake.Crust Preparation & The Smart Pre-Bake Strategy
-
Preheat Oven & Prepare Muffin Tin:
Start by preheating your oven to 325°F (160°C). This ensures a consistent baking environment from the start. Line a 12-cup muffin tin with paper cupcake liners, ensuring each cup is properly seated. For that ultimate easy release, lightly spray the inside of each paper liner with nonstick cooking spray. This is your first line of defense against sticking!
-
Make the Crust Mixture:
In a medium bowl, combine the graham cracker crumbs, ¼ cup granulated sugar, and melted butter. Mix these ingredients thoroughly until everything is evenly moistened and the mixture resembles wet sand. This proper saturation is key for a firm crust.
-
Form and Pre-Bake Crusts:
Divide the crust mixture evenly among the 12 prepared cupcake liners. Use the bottom of a small glass or a spoon to firmly press the mixture down into an even layer in each liner. Bake these crusts for just 5 minutes. This light pre-bake helps set the crust and prevents it from becoming soggy once the filling is added. Remove the tin from the oven and allow the crusts to cool slightly before moving on.
Achieving the Creamy Cheesecake Filling
-
Beat Cream Cheese & Sugar:
In a large bowl, use an electric mixer to beat the softened cream cheese until it’s perfectly smooth and creamy. This step is crucial for lump-free cheesecake. Add ½ cup granulated sugar and continue to beat until the mixture is well combined and visibly lighter in color and texture.
-
Incorporate Eggs & Vanilla:
Beat in the large eggs one at a time, mixing just until each egg is fully incorporated before adding the next. Be very careful not to overmix at this stage; excessive beating can incorporate too much air, which may cause your cheesecakes to crack during baking or cooling. Finally, stir in the vanilla extract.
-
Fill Liners:
Pour the cheesecake filling evenly over the pre-baked crusts in your muffin tin. Fill each liner about two-thirds full, allowing room for the cheesecake to rise slightly and for your delicious toppings later.
Baking & The Crucial Cooling Phase for Crack-Free Cheesecakes
-
Bake Cheesecakes:
Bake the `Mini Strawberry Crumble Cheesecakes` for 18 to 20 minutes, or until the edges appear set but the centers still show a slight jiggle when gently shaken. It’s vital not to overbake, as this is a common cause of cracking and dry cheesecakes.
-
Slow Cooling in Oven:
Once baked, turn off the oven and prop open the oven door slightly (about an inch or two). Let the cheesecakes cool slowly in the oven for 15 minutes. This gradual cooling process helps prevent drastic temperature changes, which are a major culprit for cheesecake cracks.
-
Cool Completely & Chill:
Remove the muffin tin from the oven and transfer it to a wire rack to cool completely at room temperature. Once fully cooled, transfer the entire muffin tin to the refrigerator. This chilling step is absolutely crucial for at least 4 hours, or preferably overnight. Proper chilling solidifies the cheesecakes, making for easy and clean removal from the liners.
Whipping Up the Luscious Strawberry Topping
-
Cook Strawberry Topping:
While your cheesecakes are chilling, combine the diced strawberries, 2 tablespoons granulated sugar, cornstarch, water, and lemon juice in a small saucepan. Cook this mixture over medium heat, stirring frequently. Continue cooking for about 5 to 7 minutes, or until the mixture thickens and the strawberries become soft. Remove from heat and let it cool completely before using.
Creating the Golden Crumble Topping
-
Prepare Crumble Mixture:
In a small bowl, combine the all-purpose flour, ¼ cup granulated sugar, and cold, cubed butter. Use your fingertips or a pastry blender to rub the cold butter into the dry ingredients. Continue until coarse crumbs form, ensuring the butter is well distributed but still in small pieces.
-
Bake Crumble:
Spread the crumble mixture evenly on a small baking sheet. Bake it at 325°F (160°C) for 8 to 10 minutes, or until it turns golden brown and smells fragrant. Let the crumble cool completely before assembling your cheesecakes; this maintains its crisp texture.
The Grand Finale: Assembly & Serving
-
Assemble Cheesecakes:
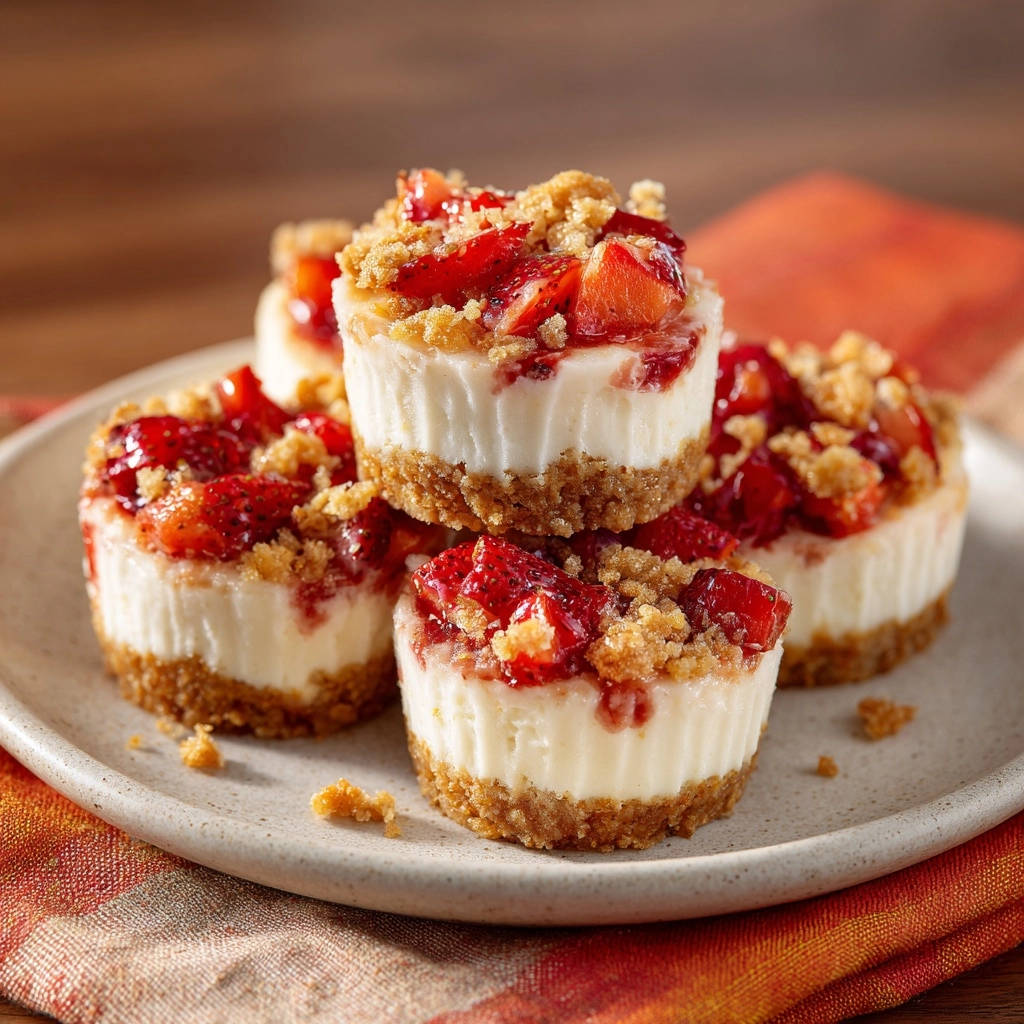
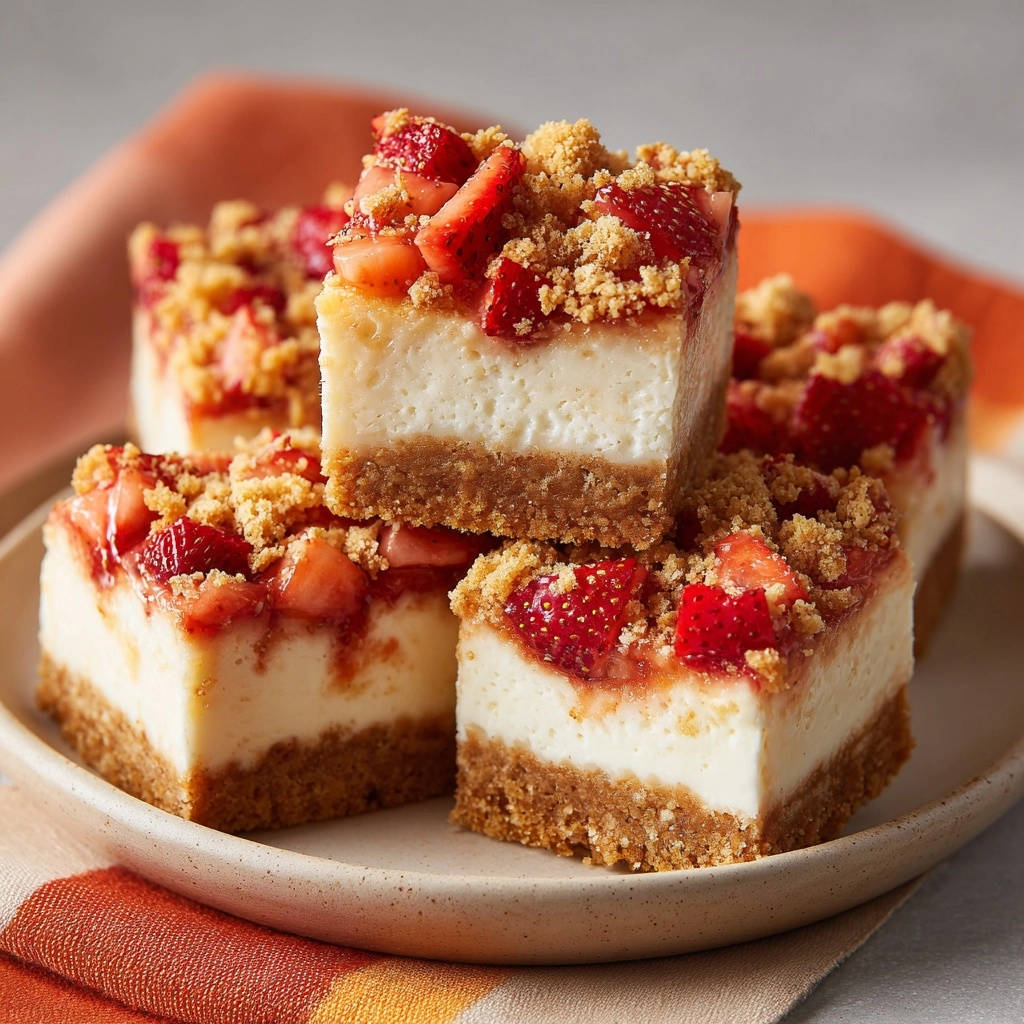
Once the `Mini Strawberry Crumble Cheesecakes` are thoroughly chilled and firm, they will easily peel away from the paper liners. Gently remove each cheesecake from its liner. Spoon a generous amount of the cooled strawberry topping over each cheesecake, then sprinkle generously with the prepared crumble topping. You can see how a similar crumble is used in our Blueberry Crumble Bars recipe for inspiration!
-
Store Leftovers:
Store any leftover `Mini Strawberry Crumble Cheesecakes` in an airtight container in the refrigerator. This keeps them fresh and delicious for future enjoyment.
Chef’s Secrets: Elevate Your Mini Strawberry Crumble Cheesecakes Game
Achieving cheesecake perfection is all about a few key techniques. These expert tips will ensure your `Mini Strawberry Crumble Cheesecakes` are consistently superb.-
Room Temperature Ingredients are Key: Always ensure your cream cheese and eggs are at true room temperature. This allows them to blend smoothly and incorporate air evenly, preventing lumps and ensuring a creamy texture.
-
Do Not Overmix the Filling: Once the eggs are added, mix just until combined. Overmixing incorporates too much air, which expands during baking and then contracts during cooling, leading to cracks.
-
Avoid Overbaking: Cheesecakes continue to cook slightly after removal from the oven. Look for edges that are set but a center that still has a slight wobble. This ensures a moist, creamy interior.
-
The Chilling Step is Non-Negotiable: Rushing the chilling process will result in soft, sticky cheesecakes that are difficult to remove and messy to eat. Patience truly pays off here.
-
Consider a Water Bath (Optional): For an extra layer of crack prevention, especially in larger cheesecakes, a water bath provides a moist, even baking environment. For mini cheesecakes, the slow oven cooling usually suffices, but it’s an option for ultimate smoothness.
Troubleshooting Your Mini Strawberry Crumble Cheesecakes: Common Fixes
Even with the best instructions, sometimes things go awry. Here are solutions to common cheesecake dilemmas.Why Do My Cheesecakes Crack?
Cracking is often a sign of too rapid cooling or overbaking. Ensure you follow the two-step cooling process: first, let them cool slowly in the turned-off oven with the door ajar, then cool completely on a wire rack before chilling. Avoid opening the oven door frequently during baking.
My Crust is Soggy! What Went Wrong?
A soggy crust typically means it wasn’t pre-baked sufficiently or the butter ratio was off. The 5-minute pre-bake is essential to set the crust and create a barrier. Also, ensure you firmly press the crumbs into an even layer, so they don’t absorb too much moisture from the filling.
Cheesecakes Sticking to the Liner? (Despite the initial tips!)
If they’re still sticking even after spraying the liners, it’s likely due to insufficient chilling. The `Mini Strawberry Crumble Cheesecakes` must be completely cold and firm before attempting to remove them. Overnight chilling is truly best for guaranteed easy release.
Filling Too Runny or Dense?
A runny filling might indicate underbaking or not enough chilling. A dense filling often results from overmixing, which develops too much gluten in the eggs, or overbaking. Stick to the visual cues for doneness and the careful mixing instructions for the best texture.
Storing and Making Ahead: Enjoying Your Mini Cheesecakes Longer
Proper storage ensures your `Mini Strawberry Crumble Cheesecakes` remain fresh and delicious. Planning ahead can also make your baking day much smoother. These cheesecakes store beautifully in an airtight container in the refrigerator for up to 3-4 days. For best flavor and texture, add the strawberry and crumble toppings just before serving. You can prepare the crusts and cheesecake filling a day in advance, baking and chilling them overnight. The strawberry topping can also be made a day or two ahead and stored in the fridge. Bake the crumble topping fresh on the day of assembly for maximum crispness.Beyond the Basics: Creative Serving & Flavor Twists
While delicious as is, there are many ways to personalize your `Mini Strawberry Crumble Cheesecakes`. Get creative and make them your own!-
Whipped Cream & Mint: A dollop of fresh whipped cream and a sprig of fresh mint add elegance and a refreshing contrast.
-
Ice Cream Companion: Serve a `Mini Strawberry Crumble Cheesecake` alongside a small scoop of vanilla bean ice cream for a delightful warm-cold dessert experience.
-
Chocolate Drizzle: A light drizzle of melted dark or white chocolate over the finished cheesecakes adds an extra layer of decadence.
-
Lemon Zest Infusion: Add a teaspoon of fresh lemon zest to the cheesecake filling for an even brighter, more vibrant flavor profile.
-
Berry Medley Topping: Instead of just strawberries, use a mix of fresh raspberries, blueberries, and blackberries for your topping. If you love a variety of berry flavors, you might also enjoy our Easy Creamy Berry Crumble Cheesecake Bars.
-
Nutty Crumble: Add finely chopped pecans or walnuts to your crumble topping for an extra layer of crunch and flavor.
Your Mini Strawberry Crumble Cheesecakes Questions Answered
Here are answers to some frequently asked questions about making these delightful mini cheesecakes.Can I Use Frozen Strawberries for the Topping?
Yes, you can use frozen strawberries for the topping. Thaw them first and drain any excess liquid to avoid a watery topping. You may need to cook the topping slightly longer to achieve the desired thickness, as frozen berries release more water.
Is a Special Pan Necessary for These Mini Cheesecakes?
No, a special springform pan is not necessary. A standard 12-cup muffin tin with paper cupcake liners works perfectly for these mini cheesecakes. The specific “no-stick” steps in this recipe ensure easy removal.
Can I Make These Gluten-Free?
Absolutely! To make these `Mini Strawberry Crumble Cheesecakes` gluten-free, substitute gluten-free graham cracker crumbs for the crust. For the crumble topping, use a gluten-free all-purpose flour blend (one that includes xanthan gum works best for texture). No other modifications are typically needed.
How Long Do These Mini Cheesecakes Last in the Refrigerator?
When stored in an airtight container, `Mini Strawberry Crumble Cheesecakes` will stay fresh and delicious in the refrigerator for up to 3-4 days. For optimal taste and texture, consume them within this timeframe.
Why is the Chilling Step So Absolutely Crucial?
The chilling step is paramount because it allows the cheesecake filling to fully set and firm up. Without adequate chilling, the cheesecakes will be soft, difficult to remove cleanly from the liners, and may collapse or spread. Chilling also deepens the flavors and improves the overall texture.
Ready to Impress? Share Your Mini Strawberry Crumble Cheesecakes Masterpiece!
Now that you’re armed with the secrets to perfect, no-stick `Mini Strawberry Crumble Cheesecakes`, it’s time to create your own delightful batch. These little wonders are perfect for parties, gifts, or simply a sweet treat to brighten your day. Don’t be shy – bake them, share them, and watch them disappear! I’d love to hear how yours turn out in the comments below, or feel free to share your culinary creations on social media. Happy baking!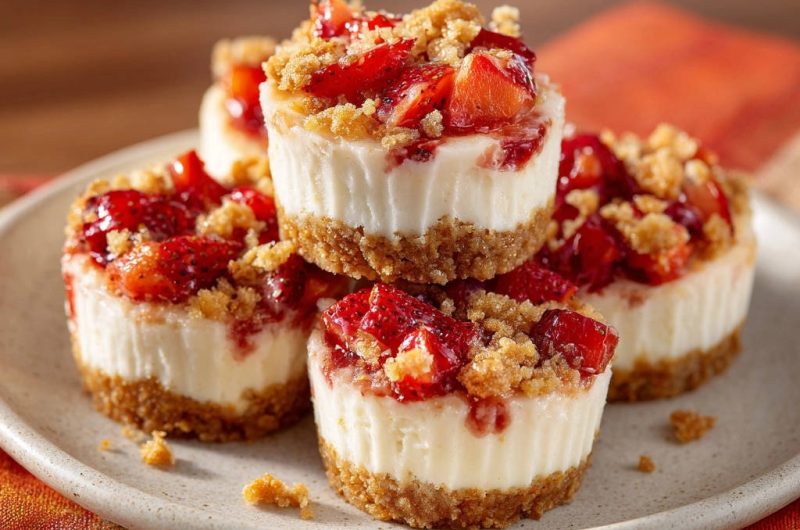
Mini Strawberry Crumble Cheesecakes
Course: DessertCuisine: American CuisineDifficulty: easy12
25
minutes20
minutes45
minutesAmerican Cuisine
Ingredients
For the Crust:
1 ½ cups graham cracker crumbs
¼ cup granulated sugar
6 tablespoons unsalted butter, melted
For the Cheesecake Filling:
16 ounces cream cheese, softened
½ cup granulated sugar
2 large eggs
1 teaspoon vanilla extract
For the Strawberry Topping:
1 cup fresh strawberries, finely diced
2 tablespoons granulated sugar
1 teaspoon cornstarch
1 tablespoon water
1 teaspoon lemon juice
For the Crumble Topping:
½ cup all purpose flour
¼ cup granulated sugar
4 tablespoons unsalted butter, cold and cubed
Directions
- Preheat your oven to 325 degrees F (160 degrees C).
- Prepare your muffin tin: This is key for easy release! Line a 12-cup muffin tin with paper cupcake liners. For extra security against sticking, lightly spray the inside of each paper liner with nonstick cooking spray.
- Make the crust: In a medium bowl, combine the graham cracker crumbs, ¼ cup granulated sugar, and melted butter. Mix well until everything is evenly moistened and resembles wet sand.
- Divide the crust mixture evenly among the 12 prepared cupcake liners. Use the bottom of a small glass or a spoon to firmly press the mixture down into an even layer in each liner.
- Bake the crusts for 5 minutes. This light pre-bake helps set the crust and prevents it from getting soggy later. Remove from oven and let cool slightly.
- Make the cheesecake filling: In a large bowl, using an electric mixer, beat the softened cream cheese until smooth and creamy. Add ½ cup granulated sugar and continue to beat until well combined and light.
- Beat in the eggs one at a time, mixing just until incorporated after each addition. Be careful not to overmix, as too much air can cause cracking. Stir in the vanilla extract.
- Pour the cheesecake filling evenly over the pre-baked crusts in the muffin tin, filling each liner about two-thirds full.
- Bake for 18 to 20 minutes, or until the edges are set but the centers still have a slight jiggle. Do not overbake!
- Once baked, turn off the oven and prop open the oven door slightly. Let the cheesecakes cool in the oven for 15 minutes before removing them. This slow cooling also helps prevent cracking.
- Remove the muffin tin from the oven and let the cheesecakes cool completely on a wire rack. Once fully cooled, transfer the entire muffin tin to the refrigerator and chill for at least 4 hours, or preferably overnight. This chilling step is absolutely crucial for easy and clean removal from the liners.
- Make the strawberry topping: While the cheesecakes are chilling, combine the diced strawberries, 2 tablespoons granulated sugar, cornstarch, water, and lemon juice in a small saucepan. Cook over medium heat, stirring frequently, until the mixture thickens and the strawberries are soft, about 5 to 7 minutes. Let cool completely.
- Make the crumble topping: In a small bowl, combine the flour, ¼ cup granulated sugar, and cold cubed butter. Use your fingertips or a pastry blender to rub the butter into the dry ingredients until coarse crumbs form.
- Bake the crumble on a small baking sheet at 325 degrees F (160 degrees C) for 8 to 10 minutes, or until golden brown. Let cool completely.
- Assemble: Once the mini cheesecakes are thoroughly chilled and firm, they will easily peel away from the paper liners. Gently remove each cheesecake from its liner. Spoon a generous amount of the cooled strawberry topping over each cheesecake, then sprinkle generously with the prepared crumble topping.
- Store any leftover mini cheesecakes in an airtight container in the refrigerator.
Notes
- Requires at least 4 hours of chilling for easy removal.