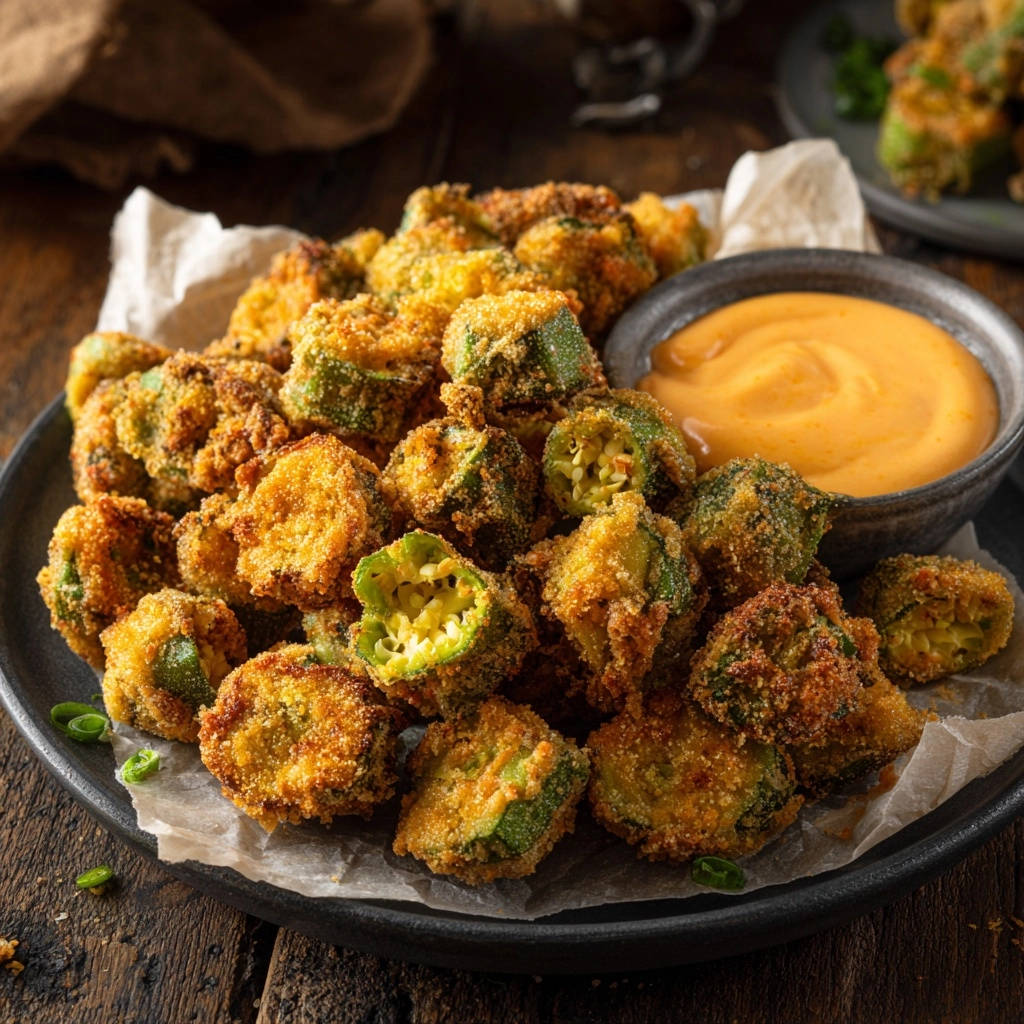
Every home cook has experienced the heartbreak of slimy fried okra, a disappointment I know well. After years of perfecting this side dish, I’ve unlocked the non-negotiable technique that guarantees truly reliable, Crispy Southern Fried Okra every single time. This recipe is built entirely around an acidic buttermilk soak and aggressive drying, eliminating mucilage and resulting in the crunchy, golden perfection the South is famous for.
The Anti-Slime Soak: Why Buttermilk is Non-Negotiable for Perfect Okra
Understanding Mucilage: The Science Behind Okra Slime
Okra naturally contains mucilage, a polysaccharide gel that is harmless but becomes slick and slimy when the pods are sliced and cooked with moisture.
This gel is the source of the gummy texture problem that frustrates so many cooks. Heating okra quickly, especially in oil, usually exacerbates this sticky phenomenon.
How Buttermilk Neutralizes Slime and Boosts Flavor
The secret lies in using an acidic medium like buttermilk before frying. Buttermilk’s lactic acid chemically breaks down the external layer of mucilage, essentially neutralizing the slime-causing compounds.
This critical 15-minute soak is the single most important step for achieving truly crisp results. The buttermilk also slightly tenderizes the okra while imparting a subtle, classic tangy flavor to the final coating.
The Critical Difference Between Soaking and Rinsing
Once the soaking time is complete, the okra must be drained thoroughly using a colander, but never rinsed.
Rinsing would wash away the residual buttermilk, which is essential for binding the cornmeal crust. The remaining thin layer of buttermilk acts as the perfect adhesive for the dry coating ingredients.
Building Blocks of Crispness: Ingredients and Essential Equipment
Ingredient Breakdown: The Ideal Coating Ratio
We use a specific blend of fine yellow cornmeal and all-purpose flour for the best texture. The cornmeal provides the signature coarse texture and maximum crunch factor associated with classic Southern frying.
Flour is necessary solely for binding the mixture to the buttermilk-coated okra pieces, ensuring a sturdy crust that doesn’t fall off in the oil.
Seasoning Profile: Achieving Authentic Southern Flavor
Seasoning must be added directly and liberally into the dry coating mixture. Kosher salt and freshly cracked black pepper are the foundations for boosting the overall flavor profile.
A half-teaspoon of cayenne pepper is optional but highly recommended to provide a necessary warmth and subtle kick without overpowering the okra.
Essential Tools for Maintaining Oil Temperature
-
Deep-Fry Thermometer: Necessary for maintaining the precise 350°F (175°C) temperature.
-
Heavy-Bottomed Pot or Dutch Oven: For heat stability and even frying.
-
Slotted Spoon or Spider Strainer: For efficient and safe removal of the fried okra.
Your Path to Crispy Southern Fried Okra Perfection: A Detailed Guide
-
Preparation and Precision Slicing
Wash the okra and ensure proper preparation by removing the caps and tips. Cutting the okra into uniform 1/2-inch rounds guarantees even cooking time, which is essential for consistent crispness.
-
Execute the 15-Minute Buttermilk Soak (The Secret)
Pour the buttermilk over the sliced okra and stir gently to ensure every piece is thoroughly coated. Allow the full 15 minutes for the acid to begin neutralizing the internal mucilage.
-
Vigorous Drying: Preventing Steam and Soggy Coating
After straining the okra (without rinsing!), immediately transfer it to paper towels. Patting the okra vigorously removes critical surface moisture. This step is second only to the soak in ensuring a super-crispy exterior that adheres properly.
-
Prepping the Cornmeal Crust
Combine all the dry coating ingredients-cornmeal, flour, salt, pepper, and cayenne-in a wide, shallow bowl. Whisking ensures the seasonings are evenly distributed, so every bite is perfectly flavored.
-
The “Press and Toss” Coating Method
Work in small batches to prevent the coating from clumping and to keep the pieces separate. Firmly press the dry mixture onto the buttermilk-coated okra pieces. A thick, even crust is necessary for that satisfying crunch.
-
Setting the Frying Stage: The 350°F Target
Heat the vegetable oil in a deep pot to precisely 350°F. Use a thermometer diligently; this temperature is non-negotiable for achieving a crispy exterior without burning or absorbing excess oil.
-
Batch Frying to a Deep Golden Finish
Add the okra in small, single-layer batches. Overcrowding drops the oil temperature quickly, leading to soggy results. Fry for 3-4 minutes until deeply golden brown and perfectly crisp, stirring gently to ensure even cooking.
-
Finishing Touches and Immediate Seasoning
Remove the okra with a slotted spoon and transfer it to a plate lined with paper towels to drain excess oil. Immediately sprinkle with a final pinch of kosher salt while the okra is piping hot-this ensures the seasoning sticks best.
Mastering the Oil Temperature: Preventing Greasy Fried Okra
Why Oil Temperature Fluctuations Destroy Crispness
When the oil temperature drops below 350°F (175°C), the coating does not seal instantly. This allows the oil to soak into the okra and the crust, resulting in a heavy, soggy, and unappealingly greasy product.
Conversely, if the oil is too hot (above 375°F), the outside burns quickly before the okra is properly cooked through. Precision is mandatory for achieving authentic Southern fried okra.
Tips for Maintaining 350°F Consistency
Always use a thermometer and be patient, allowing the oil to return to 350°F between batches.
Only add enough okra to cover roughly 60% of the oil surface at a time. Frying in small batches is the critical variable you must control to prevent temperature shock.
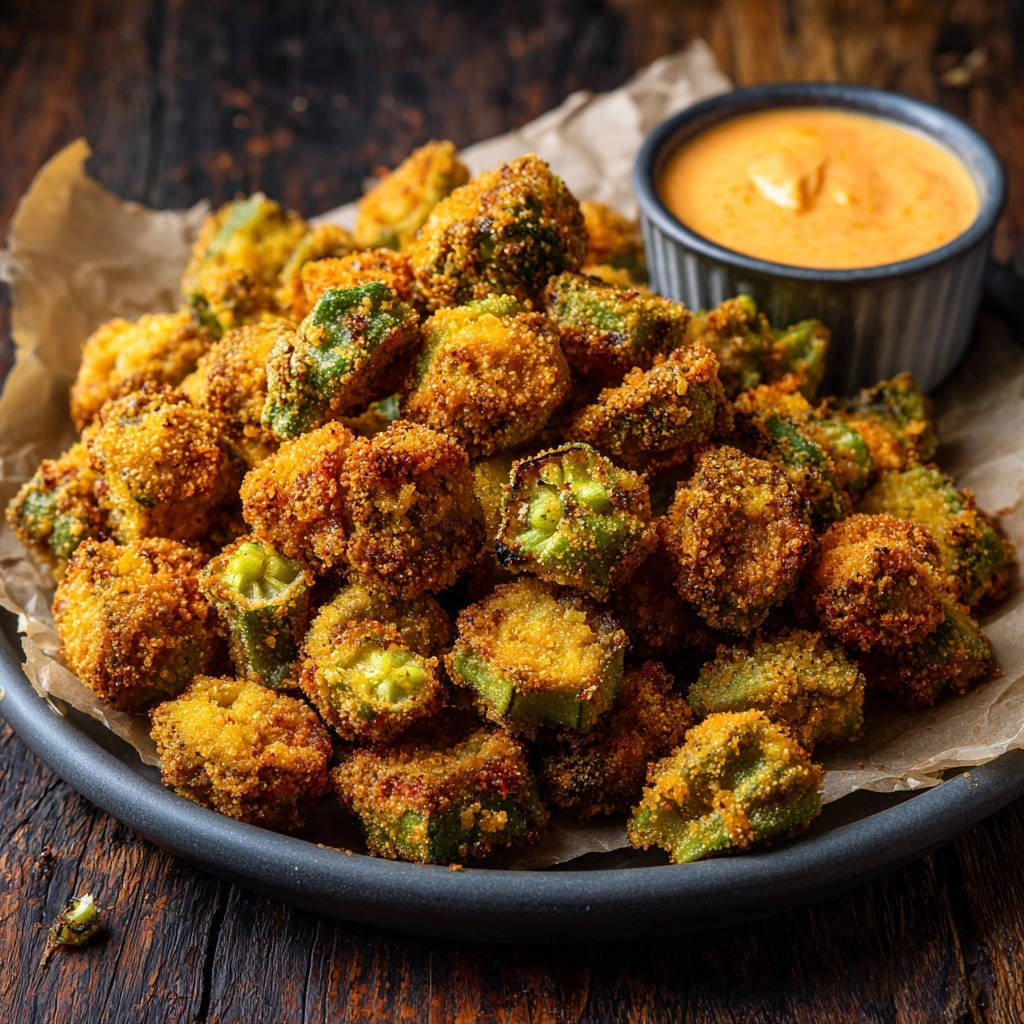
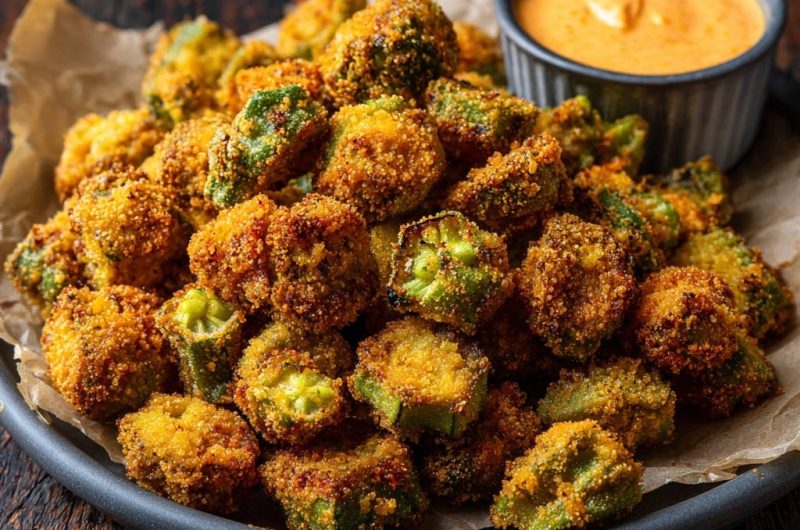
The Ultimate Zesty Dipping Sauce: Ingredients and Assembly
Mayonnaise (The creamy base)
Hot Sauce (For necessary acidity and spice)
Paprika (For color and smoky undertones)
Simply combine the mayonnaise, hot sauce, and paprika in a small bowl. Whisk until the sauce is uniform in color and texture.
Allowing the dip to rest for 10 minutes enhances the flavor depth before serving alongside the hot Crispy Southern Fried Okra.
Troubleshooting Your Fry: Solving Common Fried Okra Problems
“Why Is My Okra Greasy and Soggy?”
This almost always indicates that the frying temperature was too low or the pot was severely overcrowded. Use your deep-fry thermometer religiously and monitor it continuously.
If the oil temperature drops below 325°F (160°C) when adding the okra, remove the pieces and wait for the oil to fully recover before continuing.
The Coating Isn’t Sticking-What Went Wrong?
The issue is usually insufficient drying after the buttermilk soak. Any residual moisture will cause the coating to slide off in the oil.
You must vigorously pat the okra until it feels almost dry before tossing it into the cornmeal mixture for coating.
My Okra Pieces Are Biting into Slimy Centers
The buttermilk soak was likely too brief; 15 minutes is the minimum time needed for the acid to effectively break down the mucilage.
Ensure your okra was sliced uniformly into 1/2-inch rounds to maximize the surface area exposed to the buttermilk.
Chef’s Corner: Pro Tips for Next-Level Crispiness
-
Double-Dipping for Extra Crust: For those who love a thick, sturdy coating, lightly press the okra through the buttermilk/flour mixture a second time before frying. This requires even more aggressive drying afterward.
-
Don’t Forget the Quick Post-Fry Salt: Seasoning immediately after removing the okra is essential. As the surface oil cools, it provides the perfect vehicle for the salt to adhere, maximizing flavor.
-
Selecting the Best Okra: Always choose small to medium, firm, bright green pods. Larger pods tend to be tougher, more fibrous, and may require slightly longer frying times.
Serving, Storing, and Reheating Fried Okra (Keeping the Crunch)
How Long Does Fried Okra Last and Can I Make it Ahead?
Fried okra loses its maximum crispness within a few hours, so it is best consumed immediately upon cooling slightly.
If you must store leftovers, place fully cooled okra in a loosely sealed airtight container in the refrigerator for up to three days. Do not attempt to prepare this recipe completely ahead of time.
The Best Way to Store and Reheat Leftovers
Never reheat fried okra in the microwave, as this will introduce steam and guarantee sogginess.
Reheat leftovers on a wire rack set over a baking sheet at 375°F (190°C) for about 5 to 8 minutes. An air fryer is the best choice, restoring maximum crunch quickly and efficiently.
Perfect Southern Pairings: What to Serve Alongside Crispy Southern Fried Okra?
- Pulled pork BBQ
- Grilled or blackened catfish
- Buttermilk fried chicken
- Creamy coleslaw or potato salad
This delicious fried vegetable side complements nearly any rich, savory Southern meal. Its satisfying crunch provides a wonderful textural contrast to slow-cooked meats and heavy comfort dishes.
Frequently Asked Questions About Deep Frying Okra
Can I make this Crispy Southern Fried Okra recipe gluten-free?
Yes, you can easily substitute the all-purpose flour with a standard cup-for-cup gluten-free flour blend. The structure is mostly provided by the cornmeal, so the switch will not dramatically affect the final crispness.
Is it possible to use an air fryer or oven instead of deep frying?
While deep frying yields the ultimate crunch, you can bake or air-fry this recipe. You should increase the flour slightly to help the coating adhere, and spray the coated okra heavily with cooking oil before cooking.
Be aware that the resulting texture will be closer to roasted, not the heavy, signature fried crunch.
What is the shelf life of the zesty dipping sauce?
Since the dip is mayonnaise-based, it should be stored immediately in an airtight container in the refrigerator. The zesty dipping sauce will keep safely for up to one week.
Ready to Impress? Share Your Crispy Southern Fried Okra Masterpiece!
Mastering fried okra truly comes down to understanding the science of the soak and the rigor of the drying process. Once you apply the techniques detailed here, slimy okra will be a problem of the past.
You are now equipped to create the most reliably delicious Crispy Southern Fried Okra. I encourage you to grab your buttermilk, heat that oil, and share the results of your next-level Southern side dish!
Crispy Southern Fried Okra
Course: Side DishCuisine: American CuisineDifficulty: easy4
servings20
minutes15
minutes35
minutesAmerican Cuisine
Ingredients
1 pound fresh okra, rinsed
1 cup buttermilk
1 cup fine yellow cornmeal
1/2 cup all-purpose flour
1 teaspoon kosher salt
1/2 teaspoon black pepper
1/2 teaspoon cayenne pepper (optional)
3 cups vegetable oil, for frying
For the Dipping Sauce:
1/2 cup mayonnaise
1 tablespoon hot sauce
1 teaspoon paprika
Directions
- Prepare the Okra. Wash the okra well and slice off the caps and tips. Cut the okra into 1/2-inch thick rounds. Place the cut okra into a medium bowl.
- The Anti-Slime Soak (The Secret Step): Pour the buttermilk over the sliced okra. Stir to coat thoroughly. Allow the okra to soak in the buttermilk for exactly 15 minutes. This acidic soak is critical as it helps to break down the natural mucilage that causes the slime.
- Drain and Dry. Strain the okra well using a colander. Do not rinse the okra after soaking. Immediately transfer the drained okra to a baking sheet lined with several layers of paper towels. Pat the okra vigorously with additional paper towels until it is as dry as possible. Removing surface moisture is crucial for the cornmeal to stick and to ensure crisp results.
- Prepare the Coating. In a wide, shallow bowl, whisk together the cornmeal, flour, salt, pepper, and cayenne pepper until fully combined.
- Coat the Okra. Working in small batches, toss the dried, buttermilk-coated okra in the cornmeal mixture. Press the mixture onto the okra pieces firmly to create a thick, even crust. Shake off any excess coating and set the coated pieces aside on a clean plate or tray.
- Heat the Oil. Heat the vegetable oil in a heavy-bottomed pot or a deep fryer to 350 degrees F. Use a thermometer to maintain the temperature. If the oil is too cold, the okra will become greasy and soggy. If it is too hot, it will burn before cooking through.
- Fry to Perfection. Carefully add the coated okra to the hot oil, working in small batches (do not overcrowd the pot). Fry for 3 to 4 minutes, stirring gently, until the okra is deep golden brown and crispy.
- Finish. Remove the fried okra using a slotted spoon and transfer it to a plate lined with paper towels to drain excess oil. Sprinkle immediately with a pinch of salt while hot.
- Make the Dip. While the okra cools slightly, mix the mayonnaise, hot sauce, and paprika together in a small bowl until smooth. Serve the hot, crispy okra alongside the dipping sauce.
Notes
- The 15-minute buttermilk soak is essential to break down mucilage and achieve maximum crispness.