

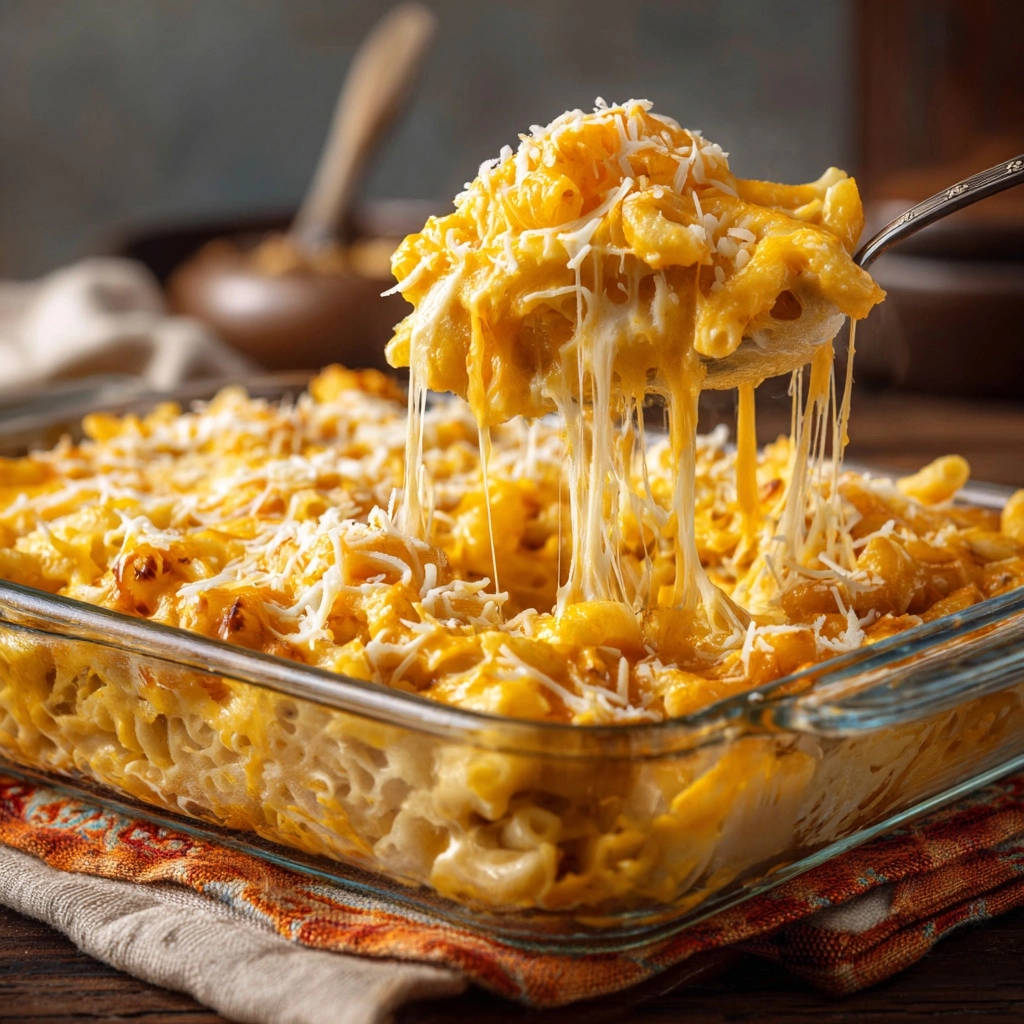
Few dishes evoke such comfort as perfectly prepared Baked Mac and Cheese, yet many home cooks face the disappointment of a dry, clumpy, or grainy outcome. I’ve refined this recipe over years to guarantee a luscious, velvety smooth cheese sauce that remains incredibly creamy even after baking. This method eliminates common pitfalls, ensuring a consistently delicious and deeply satisfying result every time.
Why Our Baked Mac and Cheese Stands Apart: The Creamy Secret
This isn’t just another mac and cheese recipe; it’s a meticulously crafted guide designed to deliver unparalleled creaminess. We tackle the usual culprits of dry or grainy textures head-on, ensuring a truly exceptional culinary experience.
Our approach focuses on precise techniques-from mastering the roux to specific cheese handling-that lock in moisture and flavor. The result is a dish with a rich, decadent sauce that beautifully coats every piece of pasta, topped with an irresistible golden crust.
Prepare to impress your family and friends with a Baked Mac and Cheese that consistently earns rave reviews. This recipe is your secret weapon for the ultimate comfort food, perfect for gatherings or a cozy night in.
The Essential Ingredients for Your Creamy Masterpiece
Pasta Perfection: Choosing Your Base
We recommend using elbow macaroni for its classic shape, which perfectly cradles the rich cheese sauce. Other short pasta varieties, like cavatappi or medium shells, also work wonderfully.
The key is cooking the pasta to an al dente stage, slightly undercooked, as it will finish cooking in the oven. This prevents mushiness and maintains a pleasant bite in the final dish.
Crafting the Roux: Butter & Flour Foundation
Unsalted butter provides a rich, clean flavor base for our roux, avoiding any unnecessary saltiness. All-purpose flour is precisely measured to create the perfect thickening agent.
A properly cooked roux is the bedrock of a smooth, lump-free cheese sauce, ensuring consistent texture and flavor distribution.
Dairy Delights: Milk & The Cheese Blend
Whole milk is crucial for this creamy baked mac and cheese due to its higher fat content, contributing significantly to the luxurious texture. Warming the milk before adding it to the roux helps achieve a perfectly smooth integration.
Our cheese blend combines sharp cheddar for its robust, classic mac and cheese flavor with Monterey Jack, known for its exceptional meltability. This pairing ensures both depth of taste and a wonderfully gooey consistency.
Feel free to experiment with other good melting cheeses like Gruyere, Fontina, or Colby Jack to tailor the flavor profile to your preference.
Flavor Boosters: Spices That Make a Difference
Salt and black pepper are fundamental seasonings, enhancing the overall savory profile of the dish. They bring balance to the rich cheese sauce.
Ground mustard powder, though optional, is highly recommended. It subtly amplifies the cheese flavor without making the dish taste like mustard. A touch of ground nutmeg also deepens the complexity, adding a warm, aromatic note.
The Crispy Topping: Panko & Butter
Panko breadcrumbs are superior for toppings due to their larger, flakier texture, which results in an exceptionally crisp crust. They toast beautifully in the oven.
Melting butter is combined with the panko, allowing it to brown evenly and achieve that irresistible golden, crunchy finish. This topping adds a delightful textural contrast to the creamy interior.
Tools for a Seamless Baked Mac and Cheese Experience
Having the right kitchen tools makes preparing this baked mac and cheese recipe straightforward and enjoyable. Here are the essentials you’ll need:
Large Pot: For boiling the pasta efficiently, ensuring ample room for even cooking.
Large Saucepan or Dutch Oven: Ideal for preparing the roux and cheese sauce, providing even heat distribution.
Whisk: Absolutely critical for achieving a lump-free roux and smoothly incorporating the milk and cheese.
9×13 Inch Baking Dish: The perfect size for this recipe, allowing for optimal baking and a good topping-to-macaroni ratio.
Measuring Cups and Spoons: Essential for precise ingredient quantities, ensuring consistent results.
Box Grater or Food Processor: For freshly shredding cheese, which melts significantly better than pre-shredded varieties.
Step-by-Step Guide to Irresistible Baked Mac and Cheese
- Prepare Your Workspace:
Preheat your oven to 375°F (190°C) to ensure it’s ready for baking. Lightly grease a 9×13 inch baking dish; this prevents sticking and aids in easy serving.
- Cook the Macaroni (Al Dente):
Bring a large pot of heavily salted water to a rolling boil. Add the elbow macaroni and cook according to package directions, but reduce the cooking time by 2 minutes.
The pasta should be al dente, firm to the bite, as it will continue cooking in the oven. Drain it well and set aside, resisting the urge to rinse; the starch helps the sauce cling.
- Craft the Velvety Roux:
While the pasta cooks, melt 1/2 cup unsalted butter in a large saucepan or Dutch oven over medium heat. Once melted, sprinkle in 1/2 cup all-purpose flour, whisking constantly for 2-3 minutes.
This creates a smooth, pale golden roux, which is the essential foundation for a lump-free and incredibly creamy cheese sauce.
- Introduce the Warmed Milk:
Slowly pour in 4 cups of warmed whole milk, whisking continuously to prevent any lumps from forming. Continue to whisk as the sauce gently simmers and thickens, which will take about 5-7 minutes.
Using warmed milk is a key technique here; it helps the milk incorporate smoothly into the roux without shocking the mixture and causing lumps.
- Flavor and Melt the Cheese:
Remove the saucepan from the heat. Stir in 1 teaspoon salt, 1/2 teaspoon black pepper, and the optional ground mustard powder and nutmeg for enhanced flavor. Gradually add 4 cups shredded sharp cheddar and 2 cups shredded Monterey Jack cheeses, stirring until completely melted and smooth.
Adding the cheese off the heat is crucial; it prevents the cheese from separating or becoming grainy, ensuring a luxurious, velvety texture for your baked mac and cheese.
- Combine Pasta and Sauce:
Add the drained, slightly undercooked macaroni to the rich, creamy cheese sauce. Stir gently until every piece of pasta is evenly coated, ensuring maximum flavor in every bite.
- Assemble in Baking Dish:
Pour the macaroni and cheese mixture into the prepared 9×13 inch baking dish. Spread it out evenly to ensure consistent baking and topping coverage.
- Prepare the Crispy Topping:
In a small bowl, combine 1 cup panko breadcrumbs with 2 tablespoons of melted butter. Mix them well until the breadcrumbs are evenly coated.
Sprinkle this buttery panko mixture evenly over the top of the macaroni and cheese. This creates that perfect golden, crispy crust we all crave.
- Bake to Golden Perfection:
Bake for 25-30 minutes, or until the top is golden brown and the cheese sauce is visibly bubbly around the edges. This indicates the sauce is hot and delicious.
For extra crispiness, you can switch to broiler mode for the last 5 minutes, but watch it very carefully to prevent burning; it can brown quickly.
- Rest Before Serving:
Remove from the oven and let rest for 5-10 minutes before serving. This brief resting period is vital.
It allows the sauce to set slightly and become even creamier, preventing it from becoming dry or watery. Enjoy your perfectly creamy, never dry baked mac and cheese!
Unlocking Velvety Smoothness: Chef’s Secrets for Success
Mastering the Roux: The Foundation of Creaminess
The secret to a lump-free sauce begins with whisking your butter and flour mixture (the roux) constantly for 2-3 minutes. This cooking time eliminates the raw flour taste and ensures a perfectly smooth base for your cheese sauce.
A well-made roux is the emulsifying agent that binds everything together, preventing separation and creating that desirable velvety texture in your baked mac and cheese.
The Warm Milk Advantage: No More Lumps!
Warming the milk before adding it to your roux is a game-changer for smoothness. Cold milk can shock the hot roux, causing lumps to form instantly.
Gradually whisking in warm milk allows for a seamless integration, resulting in a perfectly homogeneous and creamy sauce without any undesirable texture issues.
Adding Cheese Off-Heat: A Silky Texture Guarantee
It’s crucial to remove the saucepan from the heat before stirring in the cheeses. High heat can cause cheese proteins to seize, leading to a grainy or separated sauce.
Allowing the residual heat to melt the cheeses slowly ensures they melt smoothly and evenly, guaranteeing a luxurious, silky texture for your baked mac and cheese.
The Underdone Pasta Trick: Avoiding Mushy Macaroni
Cooking your pasta 2 minutes shy of al dente is a non-negotiable step for the best baked mac and cheese. The pasta continues to absorb moisture and cook in the oven.
This technique prevents your macaroni from becoming mushy or overly soft, ensuring it retains a satisfying chewiness even after baking, contributing to the dish’s overall appeal.
The Critical Rest: Why Patience Pays Off
Allowing your baked mac and cheese to rest for 5-10 minutes after it comes out of the oven is a small step with a huge impact. During this time, the sauce thickens and sets.
This resting period prevents the sauce from being watery or runny upon serving, resulting in a beautifully creamy, cohesive dish that holds its structure and flavor perfectly.
Beyond the Classic: Delicious Variations & Customizations
Spice It Up: Adding Heat & Herbs
For a touch of warmth, incorporate a pinch of cayenne pepper or smoked paprika into the cheese sauce. Fresh herbs like finely chopped chives, parsley, or thyme can add a bright, herbaceous note.
Cheese Swaps: Exploring Different Flavor Profiles
Experiment with other cheeses to customize the flavor. Gruyere offers nutty notes, Fontina provides a buttery richness, and white cheddar intensifies the sharp cheese profile.
Consider adding a touch of cream cheese for extra tang and creaminess, or a small amount of Parmesan for a salty, umami kick to your baked mac and cheese.
Vegetable Boosts: Sneaking in Goodness
Stir in blanched broccoli florets or sautéed spinach during the pasta-sauce combination step. Caramelized onions or roasted butternut squash also make excellent additions, adding sweetness and depth.
Protein Power-Ups: Making it a Main Meal
Transform this side dish into a hearty main course by adding cooked, shredded chicken, crispy bacon bits, or diced ham. Cooked crab meat or shrimp can elevate it into a gourmet seafood baked mac and cheese.
Gluten-Free & Dairy-Free Adaptations
For a gluten-free version, use your favorite gluten-free elbow macaroni and ensure your flour is a GF all-purpose blend. For dairy-free, explore plant-based milks and high-quality vegan cheese shreds designed for melting.
Perfect Pairings & Serving Suggestions
This rich baked mac and cheese is a meal in itself, but it truly shines alongside lighter accompaniments. A crisp green salad with a bright vinaigrette provides a refreshing contrast to its creaminess.
Simple roasted vegetables like asparagus or green beans also make excellent partners, offering a healthy balance to this indulgent dish. Serve it warm straight from the oven for the best experience.
Make Ahead & Storage Tips for Your Leftovers
Prepping Ahead for Less Stress
You can prepare the cheese sauce a day in advance and store it covered in the refrigerator. Reheat gently over low heat, stirring frequently, before combining with freshly cooked pasta.
The entire dish can be assembled up to 24 hours ahead of time. Cover it tightly and refrigerate; allow it to come to room temperature for 30 minutes before baking, potentially adding an extra 5-10 minutes to the bake time.
Storing & Reheating for Best Results
Store any leftover baked mac and cheese in an airtight container in the refrigerator for up to 3-4 days. To reheat, cover with foil and warm in a 300°F (150°C) oven until heated through, or microwave small portions.
To maintain creaminess when reheating, add a splash of milk to individual servings before warming. Freezing is possible for up to 2-3 months; thaw overnight in the refrigerator before reheating.
Common Mac and Cheese Challenges Solved
My Sauce is Lumpy/Grainy!
This often stems from improper roux preparation or cheese melting. Ensure you whisk the roux constantly until smooth, and always add warmed milk gradually while whisking vigorously.
Crucially, remove the saucepan from the heat before incorporating the shredded cheeses. This prevents the cheese from seizing or separating, ensuring a velvety smooth cheese sauce for your baked mac and cheese.
My Mac and Cheese is Dry/Greasy!
A dry baked mac and cheese is often the result of overbaking, which causes the sauce to evaporate. Ensure you bake only until golden and bubbly, not beyond.
Greasy mac and cheese can happen if too much butter is used beyond the recipe, or if a high-fat, non-melting cheese is chosen. Always use the specified quantities and a balanced cheese blend.
Remember that the critical resting period after baking also helps the sauce set, preventing a watery or overly dry consistency.
The Topping Didn’t Crisp Up.
Ensure your panko breadcrumbs are mixed thoroughly with melted butter for even browning. Spread the topping evenly across the entire surface of the mac and cheese.
If your topping isn’t golden brown after the recommended baking time, utilize the broiler for the last 3-5 minutes. Watch it continuously, as broilers can brown very quickly, preventing any burning.
Your Baked Mac and Cheese Questions Answered
What’s the best cheese blend for baked mac and cheese?
Our recipe uses a fantastic blend of sharp cheddar for robust flavor and Monterey Jack for its superior melt. This combination offers a perfect balance of taste and an incredibly creamy, gooey texture.
Ultimately, the “best” blend is subjective, so feel free to experiment with Gruyere, Fontina, or Colby Jack to tailor it to your personal preference.
Can I use milk other than whole milk?
While whole milk provides the richest, creamiest result due to its fat content, you can use 2% milk if necessary. However, expect a slightly less rich and creamy sauce.
Avoid skim milk, as it lacks the fat needed for a truly velvety cheese sauce and can lead to a thinner, less satisfying baked mac and cheese.
Why do you undercook the pasta?
We undercook the pasta by 2 minutes because it will continue to cook and absorb the delicious cheese sauce during baking. This prevents the pasta from becoming mushy or overcooked in the final dish.
Cooking it al dente initially ensures a perfect, tender-chewy texture when your baked mac and cheese emerges from the oven.
Can I freeze baked mac and cheese?
Yes, baked mac and cheese freezes quite well! Allow it to cool completely, then wrap it tightly in plastic wrap and then foil, or place it in an airtight freezer-safe container.
It can be frozen for up to 2-3 months. Thaw overnight in the refrigerator before reheating gently in the oven, potentially adding a splash of milk to restore creaminess.
Share Your Baked Mac and Cheese Success!
Now that you’re equipped with all the secrets, it’s time to create your own perfectly velvety, never-dry Baked Mac and Cheese. This recipe is designed to be foolproof, delivering that classic comfort food you crave.
We encourage you to try this ultimate creamy mac and cheese recipe and experience the difference. Share your delicious results, tips, and comments below; we’d love to hear about your culinary triumph!

Baked Mac and Cheese
Course: Main CourseCuisine: American CuisineDifficulty: easy6
servings15
minutes35
minutes50
minutesAmerican Cuisine
Ingredients
1 pound elbow macaroni or similar short pasta
1/2 cup unsalted butter
1/2 cup all purpose flour
4 cups whole milk, warmed
1 teaspoon salt, plus more for pasta water
1/2 teaspoon black pepper
1/4 teaspoon ground mustard powder (optional, for flavor depth)
1/4 teaspoon ground nutmeg (optional, for flavor depth)
4 cups shredded sharp cheddar cheese
2 cups shredded Monterey Jack cheese (or another good melting cheese)
1 cup panko breadcrumbs
2 tablespoons melted butter, for topping
Directions
- Preheat your oven to 375 degrees F (190 degrees C). Lightly grease a 9×13 inch baking dish.
- Bring a large pot of salted water to a rolling boil. Add the elbow macaroni and cook according to package directions, but reduce the cooking time by 2 minutes. The pasta should be al dente, not fully cooked. Drain well and set aside.
- While the pasta cooks, prepare your cheese sauce. In a large saucepan or Dutch oven, melt the 1/2 cup unsalted butter over medium heat. Once melted, sprinkle in the 1/2 cup flour, whisking constantly for 2-3 minutes to create a smooth roux. This is essential for a lump free, creamy sauce.
- Slowly pour in the warmed whole milk, whisking continuously to prevent any lumps. Continue to whisk as the sauce gently simmers and thickens, about 5-7 minutes. The key here is to use warmed milk, which helps incorporate it smoothly into the roux without shocking the mixture and making it lumpy.
- Remove the saucepan from the heat. Stir in the 1 teaspoon salt, 1/2 teaspoon black pepper, and optional ground mustard powder and nutmeg. Gradually add the shredded cheddar and Monterey Jack cheeses, stirring until completely melted and smooth. Adding the cheese off the heat prevents it from separating or becoming grainy, ensuring a velvety texture.
- Add the drained, slightly undercooked macaroni to the cheese sauce and stir until evenly coated.
- Pour the macaroni and cheese mixture into the prepared baking dish.
- In a small bowl, combine the panko breadcrumbs with 2 tablespoons melted butter. Sprinkle this mixture evenly over the top of the macaroni and cheese.
- Bake for 25-30 minutes, or until the top is golden brown and the cheese sauce is bubbly. For the last 5 minutes, you can switch to broiler mode for extra crispiness, but watch carefully to prevent burning.
- Remove from the oven and let rest for 5-10 minutes before serving. This brief resting period allows the sauce to set slightly, making it even creamier and preventing it from becoming dry. Enjoy your perfectly creamy, never dry mac and cheese!
Notes
- The use of warmed milk and adding cheese off the heat are key for a smooth, lump-free sauce.


