Ever baked pears only to find them frustratingly hard or disappointingly mushy? It’s a common kitchen challenge, but I’ve mastered a simple trick that guarantees your Baked Pears with Blue Cheese, Cranberries, and Walnuts are perfectly tender and juicy, holding their elegant shape while soaking up every delicious flavor.
This recipe transforms a classic fruit into a sophisticated, stress-free dish, proving that gourmet results don’t require complex techniques. Get ready for a truly special sweet and savory treat that will become a go-to for any occasion.
Why This Baked Pears Recipe Will Become Your New Favorite
The Secret to Perfectly Tender, Never Mushy Pears
The hallmark of this recipe is its ingenious use of foil during the initial baking phase. Covering the pears creates a steamy, controlled environment that gently coaxes them to uniform tenderness.
This method prevents the pears from drying out or becoming overcooked and mushy, ensuring a flawless texture that’s soft yet still firm enough to slice beautifully.
A Symphony of Flavors: Sweet, Tangy, and Savory Harmony
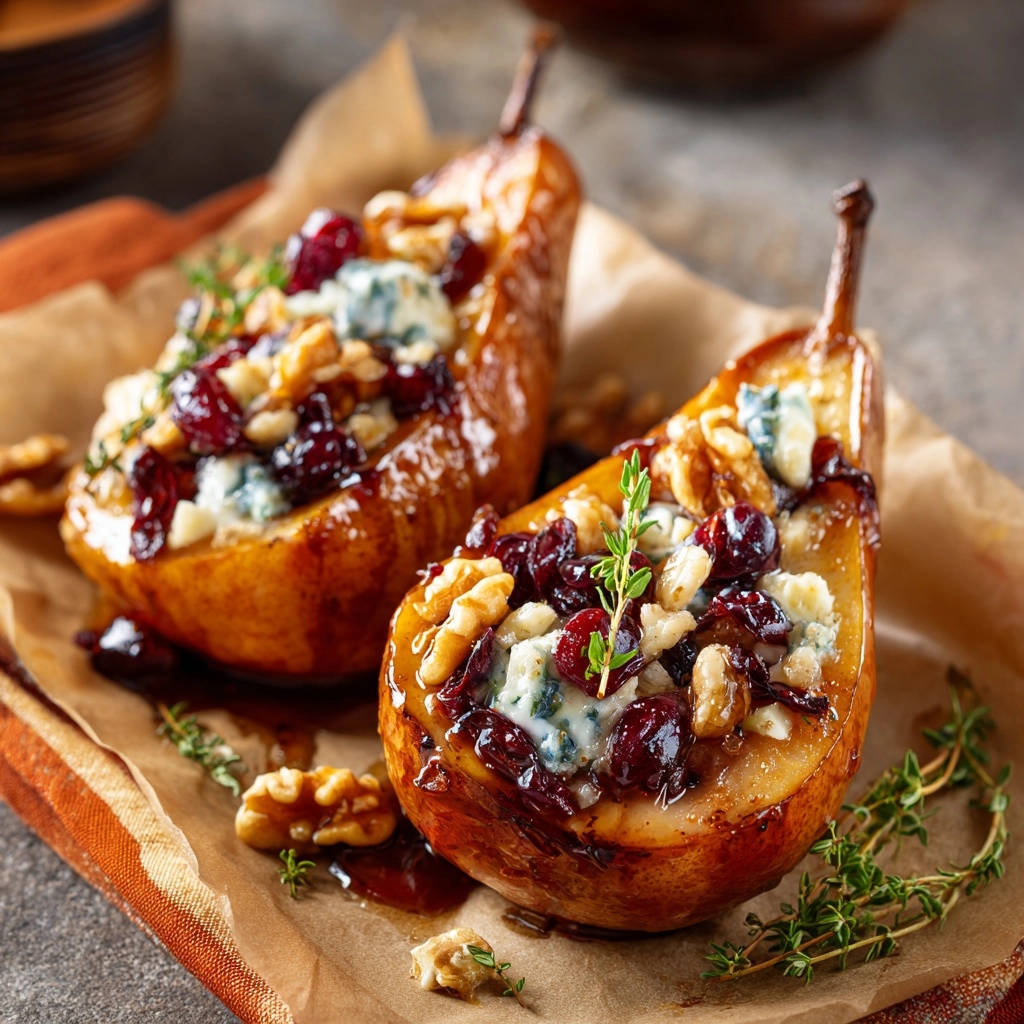
The combination of sweet, juicy baked pears, sharp and creamy blue cheese, tart dried cranberries, and crunchy walnuts is simply irresistible. Each component plays a vital role in building a complex and satisfying taste profile.
It’s a masterful balance that delights the palate, offering a unique blend of textures and tastes in every bite.
Effortless Elegance: A Stress-Free Appetizer or Dessert
Despite its sophisticated appearance, this Baked Pears with Blue Cheese, Cranberries, and Walnuts recipe is remarkably easy to prepare. It requires minimal active time, making it ideal for busy hosts or those seeking a quick, impressive dish.
Whether served as a refined appetizer, a light dessert, or a luxurious brunch item, it consistently delivers a wow factor without the fuss.
Gather Your Pantry Stars: Essential Ingredients for Baked Pears
The Perfect Pear: Choosing Your Base
Selecting the right pear is crucial for this recipe. Opt for ripe but firm varieties like Bosc or Anjou, which hold their shape well under heat.
Avoid overly soft pears, as they tend to become mushy during baking. A pear that gives slightly to gentle pressure is ideal.
Creamy & Crumbly: Selecting Your Blue Cheese
The blue cheese adds a delightful salty, tangy counterpoint to the sweetness of the pears and cranberries. A milder blue, like Gorgonzola Dolce, offers a creamy texture and less assertive flavor, while a stronger variety, such as Roquefort, provides a bolder punch.
Choose a good quality blue cheese that crumbles easily for best results.
Sweet & Crunchy Duo: Cranberries and Walnuts
Dried cranberries contribute a concentrated tartness and chewiness that beautifully cuts through the richness of the cheese and the sweetness of the pear. Walnuts provide a much-needed textural contrast with their satisfying crunch and earthy flavor.
Feel free to experiment with other additions like dried cherries or chopped pecans for slight variations on this delightful Baked Pears with Blue Cheese, Cranberries, and Walnuts.
Liquid Gold: Honey or Maple Syrup’s Role
Honey or maple syrup are more than just sweeteners here; they create a luscious glaze that permeates the pears as they bake. This caramelization enhances the natural sweetness of the fruit and contributes to its tender texture.
The Fresh Touch: Thyme for Garnish
A small sprig of fresh thyme adds a subtle, herbaceous aroma and a sophisticated visual element to the finished dish. Its slightly piney notes perfectly complement the savory-sweet profile of the pears.
Gear Up for Success: Recommended Kitchen Tools
No-Fuss Baking Dish or Rimmed Sheet: Essential for even baking and easy cleanup, especially with parchment paper.
Precision Scooping: Melon Baller or Small Spoon: Perfect for neatly removing the pear cores without damaging the fruit’s integrity.
Whisk and Small Bowls for Mixing: Ideal for thoroughly combining the honey and water into a smooth drizzle.
Aluminum Foil: Your Secret Weapon for Tenderness: Crucial for creating the steamy environment needed for perfectly tender pears.
Crafting Culinary Magic: Step-by-Step Baked Pears Perfection
- Prepare Your Workspace and Preheat:
Set your oven to 375°F (190°C) to ensure it’s at the correct temperature for even baking. Line a small baking dish or a rimmed baking sheet with parchment paper, which will make cleanup incredibly easy.
- Halve and Core the Pears:
Wash the pears thoroughly before slicing them in half lengthwise, directly through the stem to the bottom. Use a small spoon or a melon baller to gently scoop out the core and any seeds from each half, creating a neat hollow that will hold your delicious filling.
- Arrange and Drizzle with Sweetness:
Carefully arrange the pear halves, cut-side up, in your prepared baking dish. In a small bowl, whisk together the honey (or maple syrup) and water until they are well combined. Drizzle this sweet mixture evenly over the cut surfaces and inside the hollows of each pear half, ensuring good coverage.
- The Key to Tenderness: Foil Cover Baking:
This is the most critical step for achieving perfect tenderness. Tightly cover the baking dish with aluminum foil. This creates a steamy environment that gently cooks the pears from within, guaranteeing they become uniformly tender without drying out or turning mushy. Make sure the foil forms a snug seal around the dish to trap all the steam.
- The Initial Bake & Unveiling:
Bake the covered pears for 20 minutes. The steam trapped by the foil works its magic during this phase. After 20 minutes, carefully remove the baking dish from the oven and, with caution, remove the foil to release the hot steam.
- Fill with Flavorful Goodness:
Now, it’s time to add the signature flavors of this dish. Divide the crumbled blue cheese, dried cranberries, and chopped walnuts evenly among the hollows of the pear halves, filling them generously. The warmth from the initial bake will help the cheese soften beautifully.
- The Final Uncovered Bake:
Return the uncovered pears to the oven for an additional 5-10 minutes. This final bake allows the cheese to slightly soften and warm through, and the pears to become truly fork-tender. Keep a close eye on them during this stage to prevent the cheese or nuts from overbrowning.
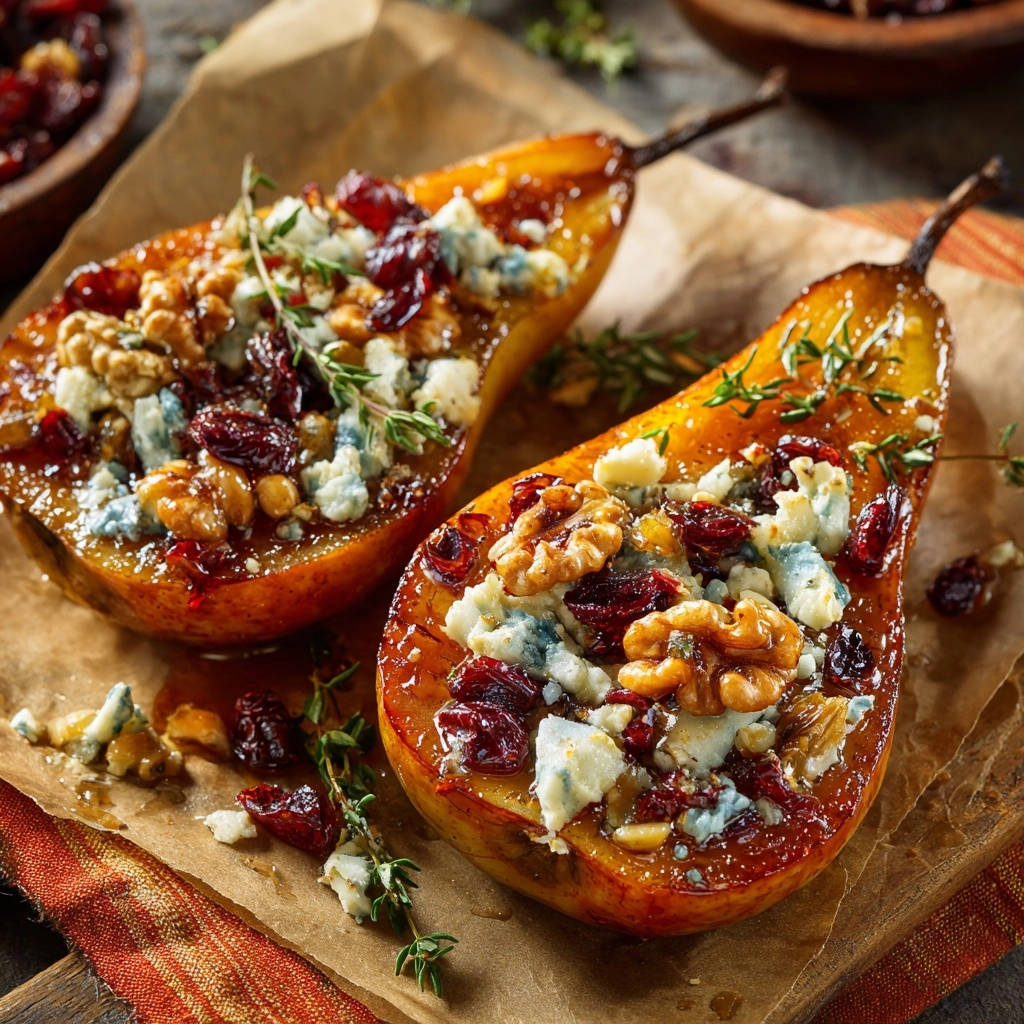
- Garnish and Serve Immediately:
Once the pears are perfectly baked, remove them from the oven. Carefully transfer the warm Baked Pears with Blue Cheese, Cranberries, and Walnuts to serving plates. Garnish each pear half with a small sprig of fresh thyme just before serving for an aromatic accent and beautiful presentation.
Elevate Your Baked Pears: Expert Tips and Customization Ideas
Choosing the Right Pears for Success
For the best results, select pears that are fully ripe but still quite firm to the touch. This balance ensures they have developed their full sweet flavor but will maintain their structural integrity during baking, preventing them from collapsing or becoming overly watery.
Flavor Variations and Add-Ins
While the classic combination is superb, feel free to get creative! Substitute walnuts with toasted pecans or almonds for a different nutty note. Swap dried cranberries for dried cherries or chopped figs to alter the tartness and texture. A pinch of cinnamon or nutmeg added to the honey mixture can also introduce a warm, spiced undertone, creating a truly cozy baked fruit dish.
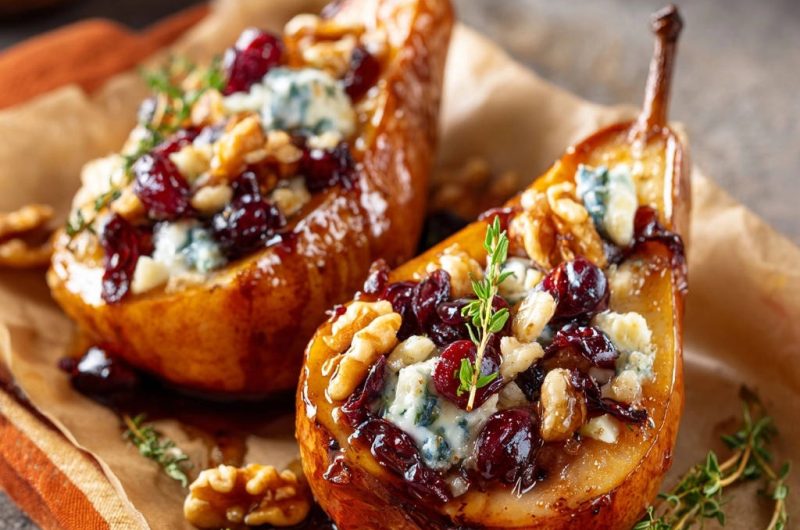
Achieving the Perfect Doneness: Visual Cues and Tests
Your pears are perfectly done when a fork easily pierces the flesh with minimal resistance, yet they still hold their shape. The blue cheese should appear slightly melted and warm, with the cranberries plumped and softened. Avoid overbaking, as this can lead to a mushy texture.
Enhancing Presentation: Beyond Thyme
Beyond fresh thyme, consider other garnishes for an even more stunning presentation. A tiny sprinkle of flaky sea salt on top of the blue cheese can enhance its flavor, while a light drizzle of balsamic glaze or a dusting of powdered sugar adds a touch of gourmet elegance. You might also find inspiration in our elegant baked pears recipe for more presentation tips.
Beyond the Plate: Creative Ways to Serve Your Baked Pears
As a Sophisticated Appetizer
These Baked Pears with Blue Cheese, Cranberries, and Walnuts shine as an appetizer. Serve them warm with slices of crusty baguette or artisanal crackers for scooping. They also make a fantastic addition to a curated cheese board, offering a warm, sweet-savory counterpoint to other cheeses and charcuterie.
A Light Yet Decadent Dessert
For a dessert that feels indulgent yet isn’t overly heavy, pair a warm baked pear half with a small scoop of good quality vanilla bean ice cream. A dollop of plain Greek yogurt or a drizzle of crème fraîche can also add a delightful creamy tang, providing a sophisticated finish to any meal.
Brunch or Breakfast Delight
Transform your breakfast or brunch into a luxurious affair by including these baked pears. They are wonderful alongside a bowl of granola and yogurt, or even as a unique side to a savory dish like crispy bacon or scrambled eggs.
Maximizing Freshness: Storage and Make-Ahead Strategies
Storing Leftovers for Optimal Taste
If you have any leftover baked pears, allow them to cool completely before transferring them to an airtight container. Store them in the refrigerator for up to 2-3 days. While they are best enjoyed fresh, the flavors tend to meld beautifully overnight.
Reheating for Continued Enjoyment
To reheat, place the pears back in a baking dish and warm them in a preheated oven at 300°F (150°C) for 5-10 minutes, or until just warmed through. Avoid microwaving, as it can make the pears too soft and compromise their texture.
Can You Prep Ahead?
Yes, you can certainly prepare parts of this recipe in advance. The pears can be halved and cored up to a day ahead, then stored in an airtight container with a splash of lemon juice to prevent browning. The honey-water mixture and the blue cheese, cranberry, and walnut filling can also be prepared and stored separately in the refrigerator, assembling just before baking.
Common Baking Hurdles & How to Solve Them
Problem: Pears Are Still Hard After Baking
If your pears are still too firm, it likely means they were either not ripe enough to begin with or they didn’t have sufficient steaming time. Ensure you’re using ripe-firm pears and that the aluminum foil is tightly sealed during the initial 20-minute bake to trap all the steam effectively.
Problem: Pears Turned Mushy or Watery
Mushy pears are typically a sign of over-ripeness or overbaking. Select pears that are firm to the touch but yield slightly. Also, strictly adhere to the baking times, especially the final uncovered bake, and watch them closely for fork-tenderness to avoid overdoing it.
Problem: Filling is Overly Browned or Dry
If your blue cheese or nuts look too browned, it might be due to an oven hot spot or simply baking for too long uncovered. If this happens, you can lightly tent the pears with foil during the last few minutes of the uncovered bake to prevent further browning while the pears finish cooking.
Your Baked Pears Questions Answered
What kind of pears are best for baking?
Bosc and Anjou pears are generally considered the best for baking. Their firm flesh holds up well to heat, resulting in a tender texture without becoming watery or mushy.
Can I substitute other cheeses for blue cheese?
Absolutely! While blue cheese offers a unique tang, you can substitute with other cheeses. Crumbled goat cheese provides a creamy, milder tang, or even a soft, creamy Brie can work beautifully for a different flavor profile.
Are there nut-free or dairy-free alternatives for this recipe?
For a nut-free option, simply omit the walnuts or substitute them with toasted pumpkin or sunflower seeds. For dairy-free, you would need to omit the blue cheese. While the cheese is integral to the flavor balance, you could try a sprinkle of savory, toasted breadcrumbs or a hint of nutritional yeast for a umami note instead.
Can I make this recipe in an air fryer?
While an air fryer can bake, the critical steaming step (foil cover) would be difficult to replicate effectively, and the results might vary significantly. For consistent tenderness, conventional oven baking is recommended for this specific Baked Pears with Blue Cheese, Cranberries, and Walnuts recipe.
Is this recipe suitable for meal prepping?
Due to the delicate nature of baked fruit and cheese, this recipe is best enjoyed fresh or reheated gently. While components can be prepped, making it entirely ahead for multiple days of meal prepping might compromise the ideal texture and taste.
Ready to Impress? Share Your Baked Pears Masterpiece!
Now that you’re equipped with the secrets to perfectly tender Baked Pears with Blue Cheese, Cranberries, and Walnuts, it’s time to bring this exquisite dish to your table. Its blend of sweet, savory, and tangy flavors, coupled with its effortless elegance, is sure to impress.
Don’t hesitate to share your culinary creations and any delightful variations you discover! Tag us on social media-we can’t wait to see your masterpiece.
Baked Pears with Blue Cheese, Cranberries, and Walnuts: Perfectly Tender Every Time
Ever baked pears only to find them frustratingly hard or disappointingly mushy? It’s a common kitchen challenge, but I’ve mastered a simple trick that guarantees your Baked Pears with Blue Cheese, Cranberries, and Walnuts are perfectly tender and juicy, holding their elegant shape while soaking up every delicious flavor.
This recipe transforms a classic fruit into a sophisticated, stress-free dish, proving that gourmet results don’t require complex techniques. Get ready for a truly special sweet and savory treat that will become a go-to for any occasion.
Why This Baked Pears Recipe Will Become Your New Favorite
The Secret to Perfectly Tender, Never Mushy Pears
The hallmark of this recipe is its ingenious use of foil during the initial baking phase. Covering the pears creates a steamy, controlled environment that gently coaxes them to uniform tenderness.
This method prevents the pears from drying out or becoming overcooked and mushy, ensuring a flawless texture that’s soft yet still firm enough to slice beautifully.
A Symphony of Flavors: Sweet, Tangy, and Savory Harmony
The combination of sweet, juicy baked pears, sharp and creamy blue cheese, tart dried cranberries, and crunchy walnuts is simply irresistible. Each component plays a vital role in building a complex and satisfying taste profile.
It’s a masterful balance that delights the palate, offering a unique blend of textures and tastes in every bite.
Effortless Elegance: A Stress-Free Appetizer or Dessert
Despite its sophisticated appearance, this Baked Pears with Blue Cheese, Cranberries, and Walnuts recipe is remarkably easy to prepare. It requires minimal active time, making it ideal for busy hosts or those seeking a quick, impressive dish.
Whether served as a refined appetizer, a light dessert, or a luxurious brunch item, it consistently delivers a wow factor without the fuss.
Gather Your Pantry Stars: Essential Ingredients for Baked Pears
The Perfect Pear: Choosing Your Base
Selecting the right pear is crucial for this recipe. Opt for ripe but firm varieties like Bosc or Anjou, which hold their shape well under heat.
Avoid overly soft pears, as they tend to become mushy during baking. A pear that gives slightly to gentle pressure is ideal.
Creamy & Crumbly: Selecting Your Blue Cheese
The blue cheese adds a delightful salty, tangy counterpoint to the sweetness of the pears and cranberries. A milder blue, like Gorgonzola Dolce, offers a creamy texture and less assertive flavor, while a stronger variety, such as Roquefort, provides a bolder punch.
Choose a good quality blue cheese that crumbles easily for best results.
Sweet & Crunchy Duo: Cranberries and Walnuts
Dried cranberries contribute a concentrated tartness and chewiness that beautifully cuts through the richness of the cheese and the sweetness of the pear. Walnuts provide a much-needed textural contrast with their satisfying crunch and earthy flavor.
Feel free to experiment with other additions like dried cherries or chopped pecans for slight variations on this delightful Baked Pears with Blue Cheese, Cranberries, and Walnuts.
Liquid Gold: Honey or Maple Syrup’s Role
Honey or maple syrup are more than just sweeteners here; they create a luscious glaze that permeates the pears as they bake. This caramelization enhances the natural sweetness of the fruit and contributes to its tender texture.
The Fresh Touch: Thyme for Garnish
A small sprig of fresh thyme adds a subtle, herbaceous aroma and a sophisticated visual element to the finished dish. Its slightly piney notes perfectly complement the savory-sweet profile of the pears.
Gear Up for Success: Recommended Kitchen Tools
No-Fuss Baking Dish or Rimmed Sheet: Essential for even baking and easy cleanup, especially with parchment paper.
Precision Scooping: Melon Baller or Small Spoon: Perfect for neatly removing the pear cores without damaging the fruit’s integrity.
Whisk and Small Bowls for Mixing: Ideal for thoroughly combining the honey and water into a smooth drizzle.
Aluminum Foil: Your Secret Weapon for Tenderness: Crucial for creating the steamy environment needed for perfectly tender pears.
Crafting Culinary Magic: Step-by-Step Baked Pears Perfection
- Prepare Your Workspace and Preheat:
Set your oven to 375°F (190°C) to ensure it’s at the correct temperature for even baking. Line a small baking dish or a rimmed baking sheet with parchment paper, which will make cleanup incredibly easy.
- Halve and Core the Pears:
Wash the pears thoroughly before slicing them in half lengthwise, directly through the stem to the bottom. Use a small spoon or a melon baller to gently scoop out the core and any seeds from each half, creating a neat hollow that will hold your delicious filling.
- Arrange and Drizzle with Sweetness:
Carefully arrange the pear halves, cut-side up, in your prepared baking dish. In a small bowl, whisk together the honey (or maple syrup) and water until they are well combined. Drizzle this sweet mixture evenly over the cut surfaces and inside the hollows of each pear half, ensuring good coverage.
- The Key to Tenderness: Foil Cover Baking:
This is the most critical step for achieving perfect tenderness. Tightly cover the baking dish with aluminum foil. This creates a steamy environment that gently cooks the pears from within, guaranteeing they become uniformly tender without drying out or turning mushy. Make sure the foil forms a snug seal around the dish to trap all the steam.
- The Initial Bake & Unveiling:
Bake the covered pears for 20 minutes. The steam trapped by the foil works its magic during this phase. After 20 minutes, carefully remove the baking dish from the oven and, with caution, remove the foil to release the hot steam.
- Fill with Flavorful Goodness:
Now, it’s time to add the signature flavors of this dish. Divide the crumbled blue cheese, dried cranberries, and chopped walnuts evenly among the hollows of the pear halves, filling them generously. The warmth from the initial bake will help the cheese soften beautifully.
- The Final Uncovered Bake:
Return the uncovered pears to the oven for an additional 5-10 minutes. This final bake allows the cheese to slightly soften and warm through, and the pears to become truly fork-tender. Keep a close eye on them during this stage to prevent the cheese or nuts from overbrowning.
- Garnish and Serve Immediately:
Once the pears are perfectly baked, remove them from the oven. Carefully transfer the warm Baked Pears with Blue Cheese, Cranberries, and Walnuts to serving plates. Garnish each half with a small sprig of fresh thyme just before serving for an aromatic accent and beautiful presentation.
Elevate Your Baked Pears: Expert Tips and Customization Ideas
Choosing the Right Pears for Success
For the best results, select pears that are fully ripe but still quite firm to the touch. This balance ensures they have developed their full sweet flavor but will maintain their structural integrity during baking, preventing them from collapsing or becoming overly watery.
Flavor Variations and Add-Ins
While the classic combination is superb, feel free to get creative! Substitute walnuts with toasted pecans or almonds for a different nutty note. Swap dried cranberries for dried cherries or chopped figs to alter the tartness and texture. A pinch of cinnamon or nutmeg added to the honey mixture can also introduce a warm, spiced undertone, creating a truly cozy baked fruit dish.
Achieving the Perfect Doneness: Visual Cues and Tests
Your pears are perfectly done when a fork easily pierces the flesh with minimal resistance, yet they still hold their shape. The blue cheese should appear slightly melted and warm, with the cranberries plumped and softened. Avoid overbaking, as this can lead to a mushy texture.
Enhancing Presentation: Beyond Thyme
Beyond fresh thyme, consider other garnishes for an even more stunning presentation. A tiny sprinkle of flaky sea salt on top of the blue cheese can enhance its flavor, while a light drizzle of balsamic glaze or a dusting of powdered sugar adds a touch of gourmet elegance. You might also find inspiration in our elegant baked pears recipe for more presentation tips.
Beyond the Plate: Creative Ways to Serve Your Baked Pears
As a Sophisticated Appetizer
These Baked Pears with Blue Cheese, Cranberries, and Walnuts shine as an appetizer. Serve them warm with slices of crusty baguette or artisanal crackers for scooping. They also make a fantastic addition to a curated cheese board, offering a warm, sweet-savory counterpoint to other cheeses and charcuterie.
A Light Yet Decadent Dessert
For a dessert that feels indulgent yet isn’t overly heavy, pair a warm baked pear half with a small scoop of good quality vanilla bean ice cream. A dollop of plain Greek yogurt or a drizzle of crème fraîche can also add a delightful creamy tang, providing a sophisticated finish to any meal.
Brunch or Breakfast Delight
Transform your breakfast or brunch into a luxurious affair by including these baked pears. They are wonderful alongside a bowl of granola and yogurt, or even as a unique side to a savory dish like crispy bacon or scrambled eggs.
Maximizing Freshness: Storage and Make-Ahead Strategies
Storing Leftovers for Optimal Taste
If you have any leftover baked pears, allow them to cool completely before transferring them to an airtight container. Store them in the refrigerator for up to 2-3 days. While they are best enjoyed fresh, the flavors tend to meld beautifully overnight.
Reheating for Continued Enjoyment
To reheat, place the pears back in a baking dish and warm them in a preheated oven at 300°F (150°C) for 5-10 minutes, or until just warmed through. Avoid microwaving, as it can make the pears too soft and compromise their texture.
Can You Prep Ahead?
Yes, you can certainly prepare parts of this recipe in advance. The pears can be halved and cored up to a day ahead, then stored in an airtight container with a splash of lemon juice to prevent browning. The honey-water mixture and the blue cheese, cranberry, and walnut filling can also be prepared and stored separately in the refrigerator, assembling just before baking.
Common Baking Hurdles & How to Solve Them
Problem: Pears Are Still Hard After Baking
If your pears are still too firm, it likely means they were either not ripe enough to begin with or they didn’t have sufficient steaming time. Ensure you’re using ripe-firm pears and that the aluminum foil is tightly sealed during the initial 20-minute bake to trap all the steam effectively.
Problem: Pears Turned Mushy or Watery
Mushy pears are typically a sign of over-ripeness or overbaking. Select pears that are firm to the touch but yield slightly. Also, strictly adhere to the baking times, especially the final uncovered bake, and watch them closely for fork-tenderness to avoid overdoing it.
Problem: Filling is Overly Browned or Dry
If your blue cheese or nuts look too browned, it might be due to an oven hot spot or simply baking for too long uncovered. If this happens, you can lightly tent the pears with foil during the last few minutes of the uncovered bake to prevent further browning while the pears finish cooking.
Your Baked Pears Questions Answered
What kind of pears are best for baking?
Bosc and Anjou pears are generally considered the best for baking. Their firm flesh holds up well to heat, resulting in a tender texture without becoming watery or mushy.
Can I substitute other cheeses for blue cheese?
Absolutely! While blue cheese offers a unique tang, you can substitute with other cheeses. Crumbled goat cheese provides a creamy, milder tang, or even a soft, creamy Brie can work beautifully for a different flavor profile.
Are there nut-free or dairy-free alternatives for this recipe?
For a nut-free option, simply omit the walnuts or substitute them with toasted pumpkin or sunflower seeds. For dairy-free, you would need to omit the blue cheese. While the cheese is integral to the flavor balance, you could try a sprinkle of savory, toasted breadcrumbs or a hint of nutritional yeast for a umami note instead.
Can I make this recipe in an air fryer?
While an air fryer can bake, the critical steaming step (foil cover) would be difficult to replicate effectively, and the results might vary significantly. For consistent tenderness, conventional oven baking is recommended for this specific Baked Pears with Blue Cheese, Cranberries, and Walnuts recipe.
Is this recipe suitable for meal prepping?
Due to the delicate nature of baked fruit and cheese, this recipe is best enjoyed fresh or reheated gently. While components can be prepped, making it entirely ahead for multiple days of meal prepping might compromise the ideal texture and taste.
Ready to Impress? Share Your Baked Pears Masterpiece!
Now that you’re equipped with the secrets to perfectly tender Baked Pears with Blue Cheese, Cranberries, and Walnuts, it’s time to bring this exquisite dish to your table. Its blend of sweet, savory, and tangy flavors, coupled with its effortless elegance, is sure to impress.
Don’t hesitate to share your culinary creations and any delightful variations you discover! Tag us on social media-we can’t wait to see your masterpiece.
Baked Pears with Blue Cheese, Cranberries, and Walnuts
Course: DessertCuisine: American CuisineDifficulty: easy2
servings10
minutes25
minutes35
minutesAmerican Cuisine
Ingredients
2 ripe but firm pears (Bosc or Anjou work well)
1/4 cup crumbled blue cheese
1/4 cup dried cranberries
1/4 cup chopped walnuts
2 tablespoons honey or maple syrup
1 tablespoon water
2 small sprigs fresh thyme, for garnish
Directions
- Preheat your oven to 375°F (190°C). Line a small baking dish or rimmed baking sheet with parchment paper for easy cleanup.
- Wash the pears thoroughly. Carefully slice each pear in half lengthwise, from stem to bottom. Using a small spoon or melon baller, gently scoop out the core and seeds from each half, creating a small hollow.
- Arrange the pear halves, cut-side up, in your prepared baking dish.
- In a small bowl, whisk together the honey (or maple syrup) and water until well combined. Drizzle this mixture evenly over the cut surfaces and inside the hollows of each pear half.
- This is the key to perfect tenderness: Tightly cover the baking dish with aluminum foil. This step creates a steamy environment that gently cooks the pears, ensuring they become uniformly tender without drying out or turning mushy.
- Bake for 20 minutes with the foil cover on.
- Carefully remove the baking dish from the oven and remove the foil.
- Divide the crumbled blue cheese, dried cranberries, and chopped walnuts evenly among the hollows of the pear halves, filling them generously.
- Return the uncovered pears to the oven and bake for an additional 5-10 minutes, or until the pears are fork-tender and the cheese is slightly softened and warm. Keep an eye on them to prevent overbrowning.
- Remove from the oven. Carefully transfer the baked pears to serving plates. Garnish each pear half with a small sprig of fresh thyme before serving immediately.
Notes
- The key to perfectly tender pears is covering them with foil during the initial baking, creating a steamy environment that prevents drying out.