Oh, baked pears! They sound so simple, don’t they? And they truly are, when done right. But let’s be honest, achieving that dreamy, tender texture without them turning into watery mush or staying stubbornly hard can feel like a kitchen enigma. If you’ve ever struggled with baked pears, you are absolutely not alone! I’ve been there, staring into the oven, hoping for magic but often finding disappointment.
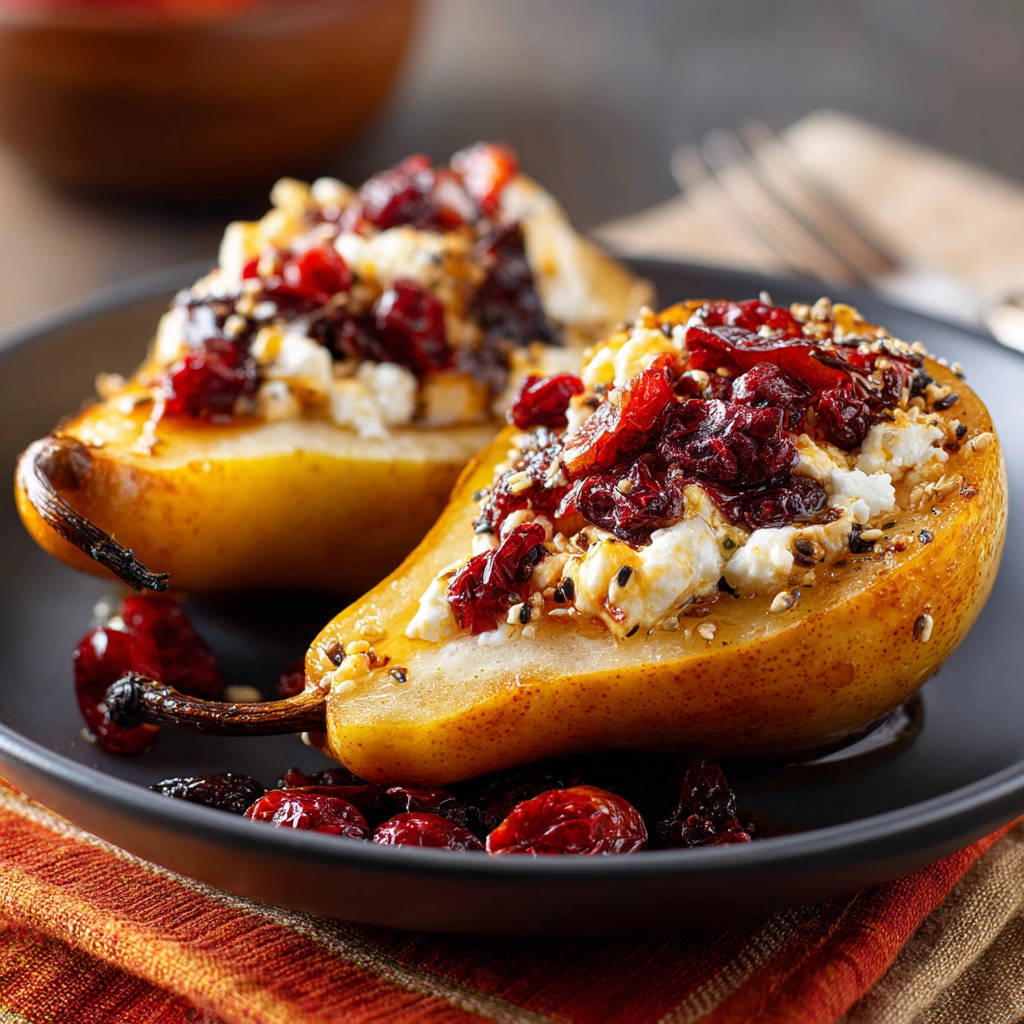
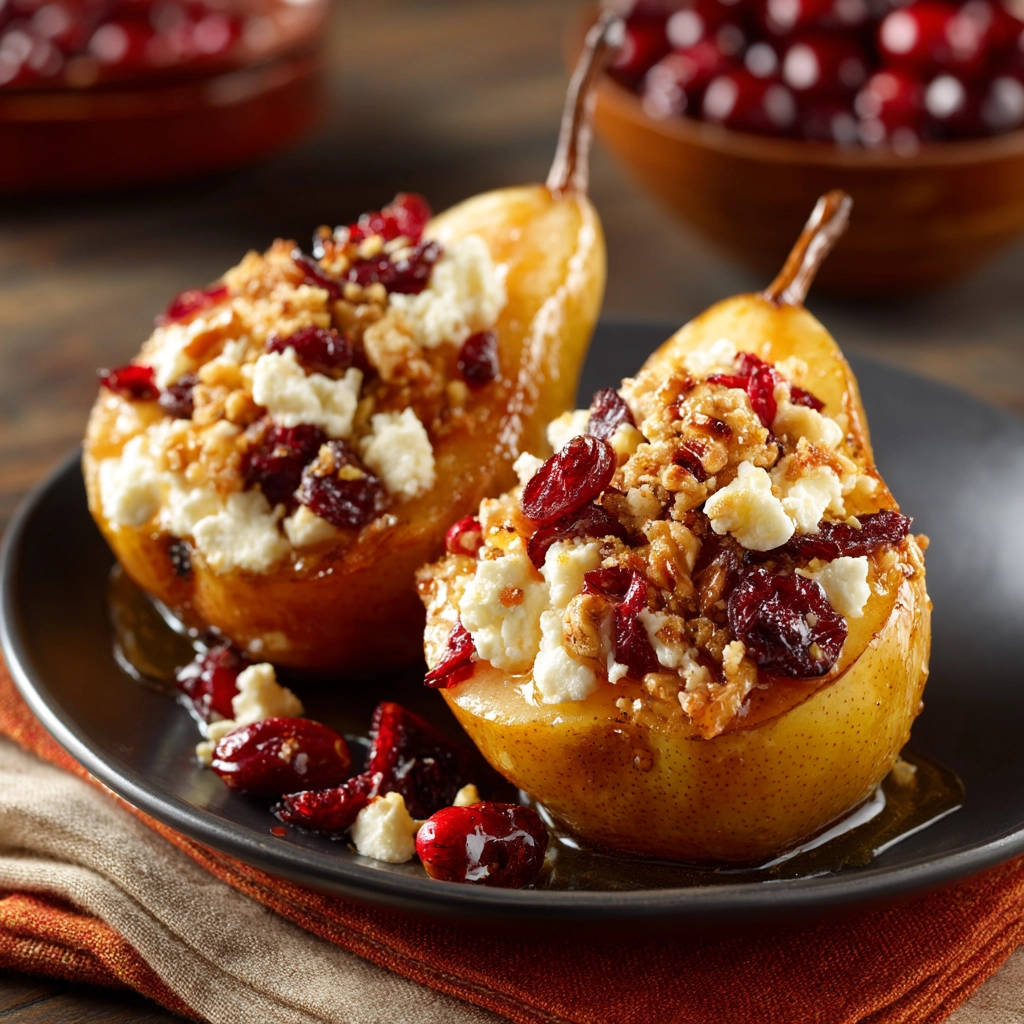
After years of baking pears, experimenting, and learning (sometimes the hard way!), I stumbled upon a simple trick that guarantees success every single time. This method delivers beautifully soft fruit that still holds its elegant shape, making for a stunning presentation. Paired with the delightful sweet-and-savory combination of feta, cranberries, and nuts, these Elegant Baked Pears are an absolute revelation. They’re quick enough for a weeknight but feel special enough for company or a holiday gathering.
Why You’ll Absolutely Adore This Elegant Baked Pears Recipe
Beyond solving the pesky texture problem, there are so many reasons these baked pears deserve a spot in your recipe repertoire:
- Effortlessly Elegant: They look incredibly sophisticated with minimal effort, perfect for impressing guests.
- Perfect Texture Guaranteed: The unique baking method ensures they are tender throughout, never mushy or hard.
- Sweet & Savory Harmony: The combination of sweet pears and honey/maple syrup with salty feta and tart cranberries is simply divine.
- Quick & Easy: With just 10 minutes of prep and under 40 minutes of baking, they’re surprisingly fast.
- Versatile Serving: Delicious served warm as a dessert, a light breakfast, or even a sophisticated side dish.
- Customizable: Easy to adapt with different cheeses, nuts, or sweeteners to suit your taste.
Gathering Your Ingredients for Elegant Baked Pears
One of the beauties of this recipe is its simplicity, relying on just a few key ingredients to create something truly special. Each component plays a vital role, contributing to the overall balance of flavors and textures. Let’s look at what you’ll need and why.
The star, of course, is the pear itself. Choosing the right variety and ripeness is crucial for achieving that perfect baked texture. We’re looking for pears that are ripe but still quite firm to the touch. Varieties like Bosc and Anjou are excellent choices because they hold their shape well when heated and develop a lovely smooth texture as they bake. Avoid overly soft or bruised pears, as they can turn to mush too quickly.
Next up, the delightful flavor builders. Crumbled feta cheese brings a wonderfully salty, tangy counterpoint to the sweetness of the pears and honey. If feta isn’t your favorite, crumbled goat cheese is a fantastic alternative, offering a creamy tanginess that pairs beautifully with fruit. Dried cranberries add bursts of tartness and chewy texture, complementing the soft pears. You could also use other dried fruits like chopped apricots or cherries if cranberries aren’t handy.
A little crunch is essential! Chopped nuts or seeds provide a lovely textural contrast. Walnuts and pecans are classic choices for their warm, earthy flavor, but a mix of sesame and pumpkin seeds (pepitas) offers a nut-free alternative with a delightful crunch and subtle nutty notes. Don’t skip this element – it adds so much to each bite.
Finally, the sweet drizzle that ties it all together. Honey or maple syrup adds natural sweetness and a beautiful glaze. Maple syrup lends a warm, autumnal flavor, while honey offers its distinct floral sweetness. Use whichever you prefer, or even a combination! And the secret ingredient for texture? Just a touch of water in the baking dish creates steam, ensuring those pears cook evenly and gently.
Here is a list of the ingredients you’ll need:
- 2 ripe but firm pears (Bosc or Anjou recommended)
- 1/4 cup crumbled feta cheese (or goat cheese)
- 1/4 cup dried cranberries
- 2 tablespoons chopped nuts or seeds (walnuts, pecans, sesame seeds, pumpkin seeds, or a mix)
- 2 tablespoons honey or maple syrup
- 1/4 cup water
Crafting Your Elegant Baked Pears: Step-by-Step to Perfection
Ready to create these gorgeous and delicious baked pears? The process is wonderfully straightforward, and I’ll walk you through each step, highlighting the little details that make all the difference, especially for that perfect texture.
- Get Your Oven Ready: Start by preheating your oven to 375 degrees F (190 degrees C). Giving the oven time to come to the correct temperature ensures even baking from the moment you place the dish inside. Consistency is key!
- Prepare the Pears: Give your beautiful pears a good wash under cool water. Then, carefully slice each pear in half lengthwise right through the stem. Once halved, use a small spoon (a melon baller works perfectly for this, but a regular spoon is fine) to gently scoop out the core and any seeds. You want to create a neat cavity where all the delicious fillings will go later.
- Arrange for Baking: Find a small baking dish that fits the four pear halves snugly. Placing them cut-side up in a dish that doesn’t have too much extra space helps the water (our secret ingredient!) create a steamy environment around the pears, promoting even cooking.
- Add the Magic Liquid: Pour the 1/4 cup of water directly into the bottom of the baking dish, around the pears. This isn’t just random liquid; this water is the key to our texture success! As the dish heats, the water turns to steam, gently softening the pears from the outside in. This steaming process is what prevents them from drying out or becoming tough.
- Cover for Steam: Tightly cover the baking dish with aluminum foil. Make sure it’s sealed well around the edges. This traps the steam from the water inside the dish, creating a miniature steam bath for the pears.
- The Initial Steam Bake: Place the covered dish into your preheated oven and bake for 20 minutes. This initial covered bake is crucial. The trapped steam works its magic, ensuring the pears soften consistently throughout without the exposed surfaces drying out or getting that unpleasant rubbery skin.
- Uncover and Finish: After the 20 minutes are up, carefully remove the foil (watch out for the hot steam!). Return the uncovered dish to the oven and continue baking for another 5 to 15 minutes. This is the caramelization stage! Baking uncovered allows the surface of the pears to develop a lovely slight caramelization and concentrate their natural sweetness. The exact timing here is flexible and depends heavily on how ripe and large your pears were to begin with. You’ll need to check them frequently during this stage.
- Check for Doneness: To test if the pears are ready, gently pierce one with a fork. It should feel tender with minimal resistance, but still be holding its shape beautifully. If they feel too hard, give them a few more minutes and check again. If they seem too soft, they might be slightly overcooked, but will still be delicious!
- Remove and Fill: Once the pears are perfectly tender, carefully remove the baking dish from the oven. The pears will be hot! Now for the best part – filling those cavities. Carefully divide the crumbled feta or goat cheese, the dried cranberries, and the chopped nuts or seeds among the centers of the four baked pear halves.
- Drizzle with Sweetness: Finish each pear half by drizzling it generously with honey or maple syrup. Don’t be shy! The sweetness melts slightly into the warm fruit and cheese, creating an irresistible combination.
- Serve Warm: These baked pears are best enjoyed warm, right out of the oven, when the cheese is slightly softened and the flavors have melded together beautifully.
Tips for Perfectly Tender Baked Pears Every Time
Mastering the perfect texture is the goal here, and while the covered-then-uncovered baking method is the star, a few extra tips can help you nail it consistently:
- Choose the Right Pears: As mentioned, ripeness matters! You want pears that yield slightly to gentle pressure at the neck but are still firm overall. Overly soft pears will become mushy quickly.
- Uniform Size: Try to select pears that are roughly the same size. This ensures they bake evenly and are likely to be done at the same time.
- Don’t Overcrowd: The snug fit in the baking dish is good, but make sure the pears aren’t piled on top of each other. They need space for the steam to circulate properly.
- Keep an Eye on Them: The baking time after removing the foil is variable (5-15 minutes). Start checking around the 5-minute mark, especially the first time you make these, as oven temperatures can vary. A fork test is your best friend here.
- Sweetener Adjustment: The amount of honey or maple syrup can be adjusted to your preference. You can also drizzle more on when serving if desired.
- Spice it Up (Optional): While the recipe doesn’t call for it, a light sprinkle of cinnamon, nutmeg, or ginger over the pears before baking can add a lovely warmth. Just a pinch will do!
What to Serve With Elegant Baked Pears
These Elegant Baked Pears are incredibly versatile. They shine as a simple yet sophisticated dessert, perhaps with a dollop of vanilla ice cream or a spoonful of Greek yogurt. They also make a fantastic addition to a brunch table or even a light breakfast. For a savory meal pairing, they can complement dishes like roasted chicken or pork tenderloin, adding a touch of sweetness and warmth. If you’re building a menu, they could follow a delicious herb-roasted chicken breast or even a simple pasta dish. Thinking about brunch? Consider serving these alongside a baked berry french toast casserole for a complete spread.
Your Elegant Baked Pears Questions Answered (FAQ)
Let’s tackle some common questions you might have about making these lovely baked pears.
What kind of pears are best for baking?
Firm varieties like Bosc, Anjou, or even Bartlett (if slightly underripe) work best. They hold their shape and texture well during the baking process. Avoid very soft or ripe pears like Comice or Seckel if you want them to keep their form.
Can I use different cheese instead of feta or goat cheese?
Feta and goat cheese offer a lovely tangy and slightly salty contrast that works beautifully with the sweet fruit. If you prefer something milder, a sprinkle of ricotta or even mascarpone could work, though the flavor profile would be different. For a non-dairy option, a plant-based crumbled feta alternative could be tested, but results may vary.
Can I use fresh cranberries?
This recipe specifically calls for dried cranberries because they have a different texture and concentrated sweetness compared to fresh ones. Fresh cranberries are very tart and require cooking down with sugar to be palatable, which is not part of this quick baked pear method.
Do I have to use nuts? What if I have an allergy?
The nuts or seeds add a wonderful crunch, but if you have an allergy or simply don’t like them, you can absolutely omit them. The pears will still be delicious with just the cheese, cranberries, and drizzle.
Can I make these baked pears ahead of time?
These are definitely best served warm, immediately after filling and drizzling. However, you can bake the pears (steps 1-8) a few hours ahead of time and store them covered at room temperature. Reheat gently in the oven at 350°F (175°C) until warm, then add the cheese, cranberries, nuts, and syrup just before serving.
How will I know when the pears are perfectly tender?
The best way is to gently insert the tines of a fork into the thickest part of a pear half after the initial 20 minutes and during the final uncovered stage. The fork should slide in with relatively little resistance, but the pear should not be falling apart or feel mushy. It takes a little practice, but trust the fork test!
Can I double the recipe?
Absolutely! Just use a larger baking dish that fits all the pear halves in a single layer and scale up the ingredients proportionally. The baking time might increase slightly, so rely on the fork test for doneness.
Enjoy Your Homemade Elegant Baked Pears!
There you have it – the secret to perfectly baked pears that are tender, flavorful, and beautiful. This Elegant Baked Pears recipe is a testament to how simple ingredients and a smart technique can create something truly memorable. Whether you serve them for dessert, brunch, or as a unique side, they’re sure to impress with their balance of sweetness, tang, and crunch. Give this recipe a try and discover the joy of perfectly baked pears!
Did you make these Elegant Baked Pears? I’d love to hear how they turned out! Leave a comment below and let me know your favorite part.
Elegant Baked Pears with Cranberries and Feta

Ingredients
- 2 ripe but firm pears, such as Bosc or Anjou
- 1/4 cup crumbled feta cheese (or goat cheese)
- 1/4 cup dried cranberries
- 2 tablespoons chopped nuts or seeds (such as walnuts, pecans, or a mix of sesame and pumpkin seeds)
- 2 tablespoons honey or maple syrup
- 1/4 cup water
Directions
- Preheat oven to 375 degrees F (190 degrees C).
- Wash pears, slice them in half lengthwise, and use a spoon to scoop out the core and seeds.
- Place pear halves, cut-side up, in a small baking dish that holds them snugly.
- Pour the 1/4 cup water into the bottom of the baking dish. This is a key step to ensuring the pears steam gently and cook evenly without drying out or getting tough.
- Cover the baking dish tightly with foil.
- Bake for 20 minutes covered. Baking covered creates steam which helps the pears soften consistently throughout without becoming watery or mushy on the surface.
- Remove the foil and continue baking for another 5-15 minutes, or until the pears are tender when pierced with a fork but still hold their shape. Baking uncovered for this final stage allows the surface to caramelize slightly. The exact time will depend on the ripeness and size of your pears. Check frequently!
- Remove the dish from the oven.
- Carefully divide the crumbled cheese, dried cranberries, and nuts/seeds among the cavities of the baked pear halves.
- Drizzle each pear half generously with honey or maple syrup.
- Serve warm.