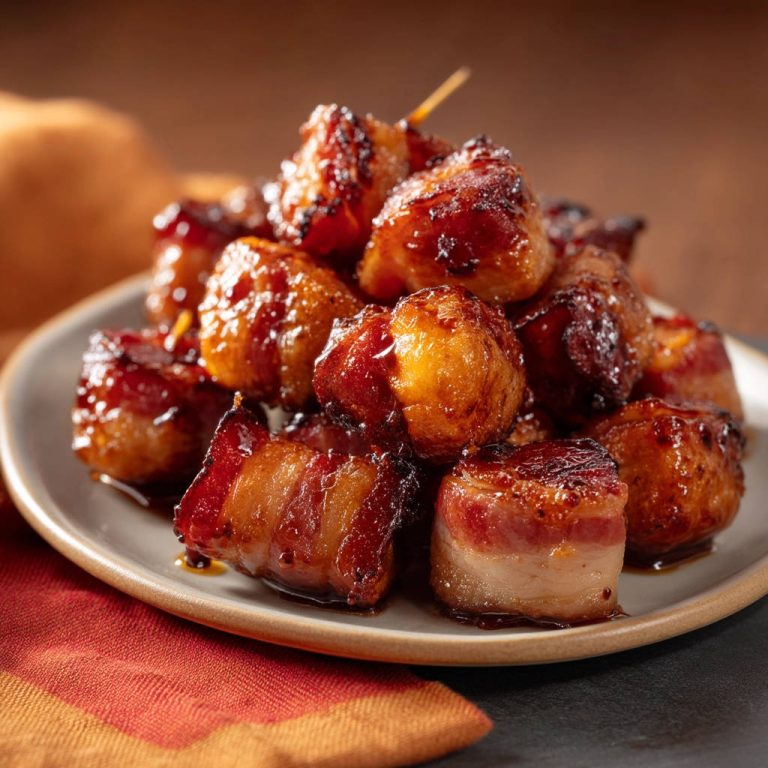
There’s nothing quite like the luxury of biting into a perfectly cooked piece of beef wrapped in golden, flaky pastry. It feels fancy, a little bit celebratory, and utterly delicious. But let’s be honest, the traditional Beef Wellington can be intimidating. And the worst? Cutting into it only to find that beautiful steak center is, well, less than beautiful – perhaps a bit dry and gray.
For years, I struggled to get that elusive, juicy pink center right in classic Beef Wellington. It always seemed like a gamble. The pastry would be perfect, or the steak would be perfect, but rarely both at the same time. That is, until I discovered a simple technique that changed everything. This recipe for Bite-Sized Beef Wellingtons takes all the stress out of the equation, making them surprisingly easy to master. With my method, you get individual portions of tender beef, encased in shatteringly crisp pastry, with a guaranteed medium-rare center every single time.
These mini Wellingtons are fantastic for entertaining because they’re pre-portioned and look incredibly impressive without requiring hours of fuss. They’re also just a delightful treat for a special weeknight meal. Ready to finally conquer the beef-in-pastry challenge?
Reasons These Bite-Sized Beef Wellingtons Are a Keeper
So, why choose the bite-sized route, and what makes this particular recipe stand out? Here are a few key reasons you’ll fall in love with making (and eating!) these miniature masterpieces:
- Guaranteed Perfect Steak: The unique searing and resting method ensures the beef tenderloin stays incredibly juicy and cooks to a lovely medium-rare inside the pastry. No more guesswork or disappointment!
- Impressive Yet Approachable: They look sophisticated enough for any special occasion but are broken down into manageable steps that aren’t overwhelming for a home cook.
- Quick Total Time: From start to finish, you’re looking at just about 35 minutes. That includes prep and cook time, which is incredibly fast for something this impressive.
- Perfect Portion Control: Each bite is a complete, satisfying package. Great for appetizers or small plates.
- Flaky Pastry Perfection: Using readily available frozen puff pastry takes the difficulty out of making dough from scratch while still delivering that essential crisp, buttery shell.
Gathering Your Ingredients for Bite-Sized Beef Wellingtons
Putting together these delightful beef bites requires just a handful of key components, each playing a vital role in creating the perfect harmony of flavors and textures. Success starts with selecting quality ingredients and preparing them properly.
The star of the show is, of course, the beef. We’re using:
- 1 pound beef tenderloin: This is the absolute best cut for Beef Wellington, large or small. Its inherent tenderness means it cooks quickly and stays incredibly moist. Look for a piece that’s uniform in thickness if possible, which helps when cutting it into equally sized cubes or medallions, about 1 inch in size. This ensures even cooking for each bite.
- 1 sheet frozen puff pastry, thawed: The convenience of frozen puff pastry cannot be overstated. It’s designed to create hundreds of flaky layers when baked. Proper thawing is crucial – follow package directions, usually overnight in the fridge or for about 30-40 minutes at room temperature. It should be cold enough to work with but pliable enough to unfold without cracking.
For seasoning and cooking the beef, you’ll need:
- Salt and black pepper to taste: Don’t be shy here! Seasoning the beef generously before searing is essential for building flavor right from the start.
- 2 tablespoons olive oil or butter: A hot fat is needed for that quick, high-heat sear. Olive oil is great for its high smoke point, while butter adds a lovely richness. Either works wonderfully.
To get that gorgeous golden finish on the pastry and a little extra flavor, grab:
- 1 large egg, beaten: Whisking a single egg with a splash of water creates an egg wash. Brushing this over the pastry before baking helps it achieve a beautiful golden-brown color and a lovely sheen as it bakes and puffs up.
- Fresh parsley or chives, chopped, for garnish: A sprinkle of fresh green herbs adds a pop of color and brightness just before serving, elevating the presentation.
Finally, though not explicitly part of the core ingredients needed to make the wellingtons, the recipe mentions:
- Creamy sauce for serving: A rich sauce is a classic accompaniment to Beef Wellington. While the recipe focuses on the beef and pastry, serving these with your favorite creamy sauce, like a mushroom sauce, peppercorn sauce, or even a quick pan gravy, truly completes the experience.
Crafting Your Bite-Sized Beef Wellingtons: Step-by-Step
Alright, let’s get to the exciting part! Making these little bites of heaven is much simpler than you might think, especially when you understand the purpose behind each step. The key, as mentioned, lies in how we handle the beef initially.
-
Prepare Your Oven and Beef: First things first, get your oven preheating to 400°F (200°C). A hot oven is crucial for getting the pastry to puff up quickly and crisp nicely. While the oven heats, turn your attention to the beef tenderloin. Pat each piece completely dry using paper towels. This is a non-negotiable step! Moisture on the surface will steam the beef instead of allowing it to form a beautiful brown crust during the sear. Once dry, season the beef generously on all sides with salt and freshly ground black pepper. Get every surface coated – this builds the foundational flavor.
-
Get the Pan Screaming Hot: Place your heavy skillet (cast iron or stainless steel works best for searing) over high heat. Add the olive oil or butter and let it heat until it is shimmering and looks like it’s just about to smoke. This intense heat is necessary for creating that quick crust without cooking the inside of the beef.
-
The Crucial Quick Sear: Carefully add the seasoned beef pieces to the very hot skillet. The pan should sizzle immediately. Do not overcrowd the pan – this is key! If you add too many pieces at once, the temperature of the pan will drop, and the beef will steam instead of sear, resulting in a sad, gray exterior. Cook the beef in batches if necessary, giving each piece enough space. Sear each piece for just 30-60 seconds per side. We are only aiming for a beautiful brown crust on the exterior. The inside should remain extremely rare, almost raw. This super-quick sear develops fantastic flavor and color on the outside, while preserving the uncooked center, which will gently come up to temperature as the pastry bakes.
-
Rest the Seared Beef: As each batch of beef finishes searing, remove the pieces from the skillet and place them on a clean plate. Let them rest here for about 5-10 minutes. This resting period is important for two reasons: it stops the residual heat from the sear from continuing to cook the steak, and it allows the surface of the beef to cool slightly before wrapping, which helps prevent the pastry from getting soggy too quickly.
-
Prepare the Puff Pastry: While the beef rests, unfold your thawed puff pastry sheet on a lightly floured surface. Puff pastry works best when it’s cold but pliable. Use a knife or pizza cutter to cut the sheet into squares large enough to fully enclose each piece of beef. Depending on the exact size of your beef pieces (about 1 inch cubes/medallions), squares around 3-4 inches per side should be sufficient. You want enough pastry to wrap around and seal without being excessively bulky.
-
Wrap the Beef: Place one seared and rested beef piece directly in the center of each puff pastry square. Gather the corners and edges of the pastry up around the piece of beef, bringing them together at the top. Pinch the pastry edges firmly and completely to seal the beef inside. Think of it like wrapping a little gift! Ensure the seams are well-sealed and any excess pastry is trimmed or folded neatly. A tight seal is vital to prevent any precious juices from escaping during baking, which can lead to soggy bottoms. Place the assembled wellingtons seam-side down on a baking sheet that you’ve lined with parchment paper.
-
Apply the Egg Wash: Whisk your large egg until well beaten. Using a pastry brush, generously brush the tops and sides of each assembled wellington with the egg wash. This coating is what helps the pastry achieve that desirable deep golden-brown color and encourages it to puff up into those beautiful, flaky layers in the oven.
-
Bake to Golden Perfection: Place the baking sheet with the wellingtons into your preheated 400°F (200°C) oven. Bake for 12-15 minutes. Keep an eye on them – the pastry should be dramatically puffed up, golden brown, and look deliciously flaky. As the pastry bakes, the residual heat will finish cooking the very rare steak inside to a perfect medium-rare. If you prefer your steak slightly rarer, bake for closer to 12 minutes. For a touch more doneness towards medium, you can add an extra minute or two, but be cautious not to overcook the beef.
-
Rest Before Serving: Once they emerge from the oven, looking magnificent, resist the urge to slice into them immediately. Let the wellingtons rest on the baking sheet for 5 minutes. This allows the steak juices to redistribute, ensuring a tender, juicy bite, and also helps the pastry structure set slightly.
-
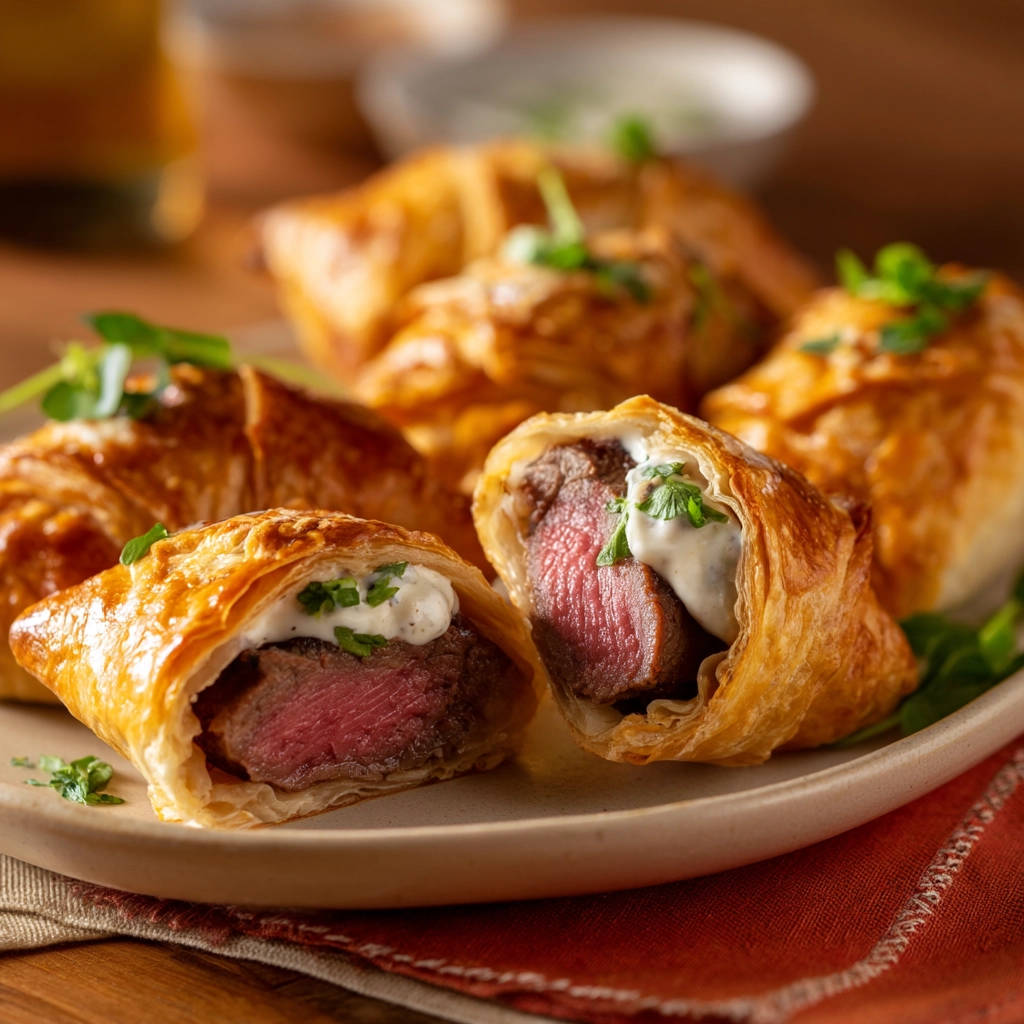
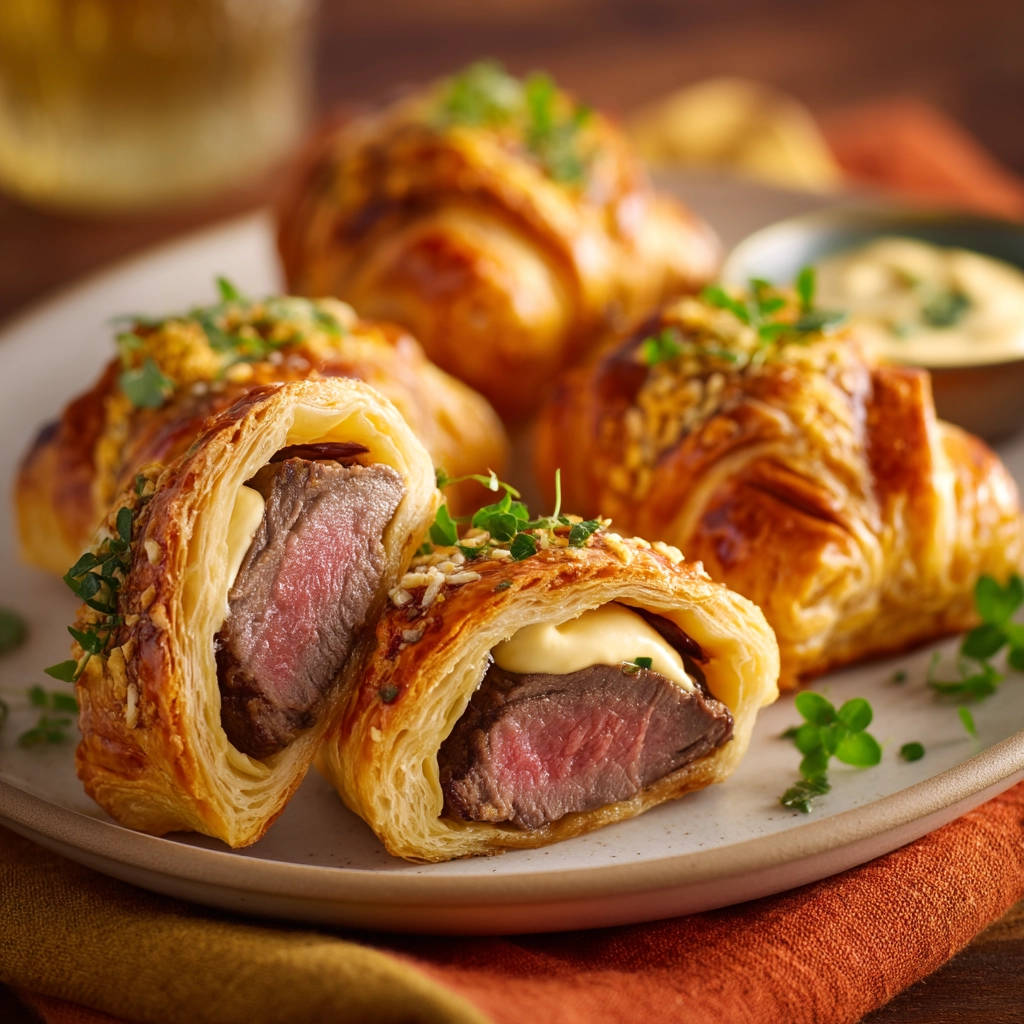
Serve and Enjoy: Serve the Bite-Sized Beef Wellingtons hot! Garnish with a sprinkle of fresh chopped parsley or chives for freshness and color. They are absolutely divine served with your favorite creamy sauce on the side for dipping or drizzling. Get ready for compliments!
Tips for Perfect Bite-Sized Beef Wellingtons Every Time
Achieving Bite-Sized Beef Wellington bliss is within reach! Here are a few extra tips to help you nail this recipe and impress everyone (including yourself):
- Keep Pastry Cold: Work with puff pastry while it’s still cold. If it gets too warm and sticky, pop it back in the fridge for a few minutes. Cold pastry yields the flakiest results.
- Don’t Skip the Sear: That quick, hot sear is truly the secret weapon against gray, overcooked steak. It locks in flavor and sets the stage for perfect internal cooking.
- Seal Tightly: Spend a little extra time ensuring the pastry is firmly sealed around the beef. Any gaps can allow juice to escape, leading to a soggy bottom crust.
- Parchment Paper is Your Friend: Always bake these on parchment paper. It prevents sticking and makes cleanup a breeze.
- Know Your Oven: Ovens can vary. The baking time is a guideline. Watch the pastry for that beautiful golden color and puffiness as the indicator that they are likely ready.
- Internal Temperature (Optional but helpful): While the recipe relies on timing and visual cues, if you want to be absolutely certain of steak doneness, you could carefully insert an instant-read thermometer into the side of one wellington after baking and resting. For medium-rare beef, aim for an internal temperature around 130-135°F (54-57°C).
What to Serve With Your Mini Wellingtons
These delightful bites pair wonderfully with a variety of side dishes. Since the Wellingtons themselves are quite rich, consider lighter or complementary sides to balance the meal.
Classic choices include mashed potatoes or creamy scalloped potatoes, which soak up any extra sauce beautifully. Crispy roasted vegetables like Brussels sprouts, asparagus, or crispy potato wedges offer a nice textural contrast. A simple green salad with a tangy vinaigrette can also provide a refreshing element to cut through the richness.
Your Bite-Sized Beef Wellington Questions Answered (FAQ)
Let’s tackle some common questions that might pop up when you’re making these stellar Bite-Sized Beef Wellingtons:
Can I use a different cut of beef?
Beef tenderloin is highly recommended because of its inherent tenderness and ability to cook quickly to medium-rare within the pastry’s baking time. While you could try other tender cuts like strip steak or ribeye, you would need to adjust the initial searing time and potentially the baking time to ensure the steak isn’t overcooked by the time the pastry is golden brown. Tenderloin truly gives the most consistent and luxurious results here.
Can I make these ahead of time?
Yes, you can assemble the wellingtons (wrap the seared and cooled beef in pastry, brush with egg wash) and place them on the parchment-lined baking sheet. Cover them loosely with plastic wrap and refrigerate for up to 12-24 hours before baking. Bake them directly from the fridge, adding a couple of minutes to the baking time if needed to ensure the pastry is fully cooked and golden. Baking them fresh is always best for ultimate pastry flakiness, but assembly ahead is a good strategy for entertaining.
How do I ensure the steak is medium-rare inside?
The recipe’s method relies on a very quick sear followed by baking time timed to the pastry. The 12-15 minute baking window after searing the beef to very rare and resting it is designed to bring the internal temperature up to the perfect medium-rare range (around 130-135°F or 54-57°C) as the pastry cooks. Trusting the process and sticking to the recommended times based on your desired doneness (12 minutes for rarer, 15 for closer to medium) is usually reliable. If you’re unsure or working with slightly different sized beef pieces, carefully using an instant-read thermometer through the side of one wellington after the rest period is the most accurate way to check.
What kind of creamy sauce works best?
Classic accompaniments include a mushroom sauce, peppercorn sauce, or a rich demi-glace. Since the recipe data didn’t include a specific sauce, you have freedom to choose your favorite! A simple pan sauce made with the beef searing drippings, some broth, and a touch of cream can be quick and delicious. The key is a savory, rich sauce that complements the beef and pastry.
My pastry isn’t puffing up or getting golden. What happened?
Several things can cause this. Ensure your puff pastry was properly thawed but still cold when working with it – warm pastry doesn’t puff well. Make sure your oven is fully preheated to the correct temperature (using an oven thermometer can help verify this). Ensure you used an egg wash and brushed it generously over the pastry. Also, avoid opening the oven door too frequently while they are baking, as this lets heat escape and can prevent proper puffing.
Enjoy Your Homemade Bite-Sized Beef Wellingtons!
Making these Bite-Sized Beef Wellingtons is a rewarding experience. They elevate any meal, taste incredible, and are surprisingly achievable for home cooks. The simple trick of giving the beef just a very quick sear before wrapping and baking truly makes all the difference, ensuring that juicy, tender steak inside every single time.
Give this recipe a try, and you might find yourself making these more often than you ever thought possible! Leave a comment below and let me know how yours turned out, or share your favorite sauce pairing!
Bite-Sized Beef Wellingtons

Ingredients
- 1 pound beef tenderloin, cut into 1 inch cubes or medallions
- 1 sheet frozen puff pastry, thawed
- 1 large egg, beaten
- Salt and black pepper to taste
- 2 tablespoons olive oil or butter
- Creamy sauce for serving (visible in image, recipe not provided as it’s not the focus and ingredients aren’t clear)
- Fresh parsley or chives, chopped, for garnish
Directions
- Preheat your oven to 400°F (200°C).
- Pat the beef tenderloin pieces completely dry with paper towels. Season generously on all sides with salt and black pepper.
- Heat the olive oil or butter in a heavy skillet over high heat until shimmering hot.
- This is the crucial step to prevent overcooking: Carefully add the beef pieces to the hot skillet, making sure not to overcrowd the pan (cook in batches if necessary). Sear each piece for just 30-60 seconds per side, until a nice brown crust forms. The inside should remain very rare. This quick sear develops flavor and color without cooking the center, allowing it to finish perfectly in the oven.
- Remove the seared beef from the skillet and place on a plate to cool slightly for about 5-10 minutes. This stops the residual heat from cooking the steak further before wrapping.
- Unfold the thawed puff pastry sheet on a lightly floured surface. Cut it into squares large enough to enclose each piece of beef (around 3-4 inches per side depending on steak size).
- Place one seared beef piece in the center of each pastry square. Gather the edges of the pastry up around the beef, pinching firmly to seal completely. Ensure the seams are well sealed to prevent juices from escaping and causing soggy bottoms.
- Place the assembled wellingtons seam-side down on a baking sheet lined with parchment paper.
- Brush the tops and sides of each wellington generously with the beaten egg wash. This helps the pastry brown beautifully and become flaky.
- Bake for 12-15 minutes, or until the puff pastry is golden brown and puffed up. The steak inside will finish cooking to a perfect medium rare as the pastry bakes. Adjust time slightly for desired doneness (less for rarer, a minute or two more for medium).
- Let the wellingtons rest on the baking sheet for 5 minutes before serving.
- Serve hot, garnished with fresh chopped parsley or chives and with your favorite creamy sauce on the side.