

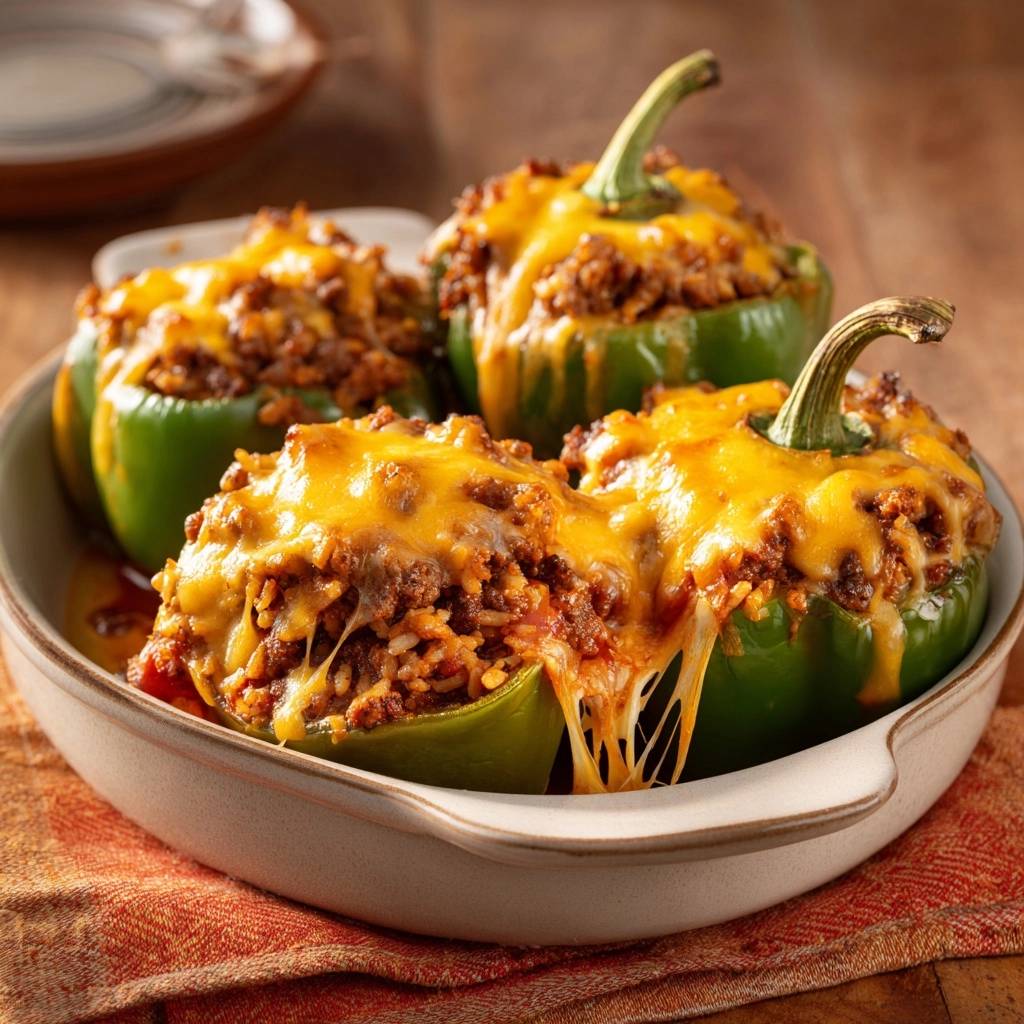
Stuffed peppers always flop because raw peppers leak moisture right into your beef filling during baking. You end up with watery mush instead of that juicy, cheesy bite you’re craving. But this Cheesy Beef Stuffed Peppers recipe changes everything with a quick microwave trick that pulls out the excess water first.
Therefore, you get firm yet tender peppers packed with flavorful beef rice that stays perfectly seasoned. No more diluted sauce or steamed textures ruining dinner. In addition, the oven times lock in the cheese’s gooey melt without drying out the filling.
Here’s the expertise booster: microwave the peppers cut-side down for exactly 4 to 5 minutes, then pat them bone-dry. That simple step traps the flavors inside and delivers Cheesy Beef Stuffed Peppers that outperform every classic version you’ve tried.
Why Cheesy Beef Stuffed Peppers Fail
Raw Pepper Moisture Trap
Peppers hold tons of water in their cell walls. When you bake them raw at 375F, heat breaks down that structure through osmosis. Therefore, liquid floods out and soaks your beef rice filling, turning Cheesy Beef Stuffed Peppers into a soggy mess.
However, this recipe preempts it. You microwave first to steam out the moisture, so the peppers soften just enough without releasing more during baking. In addition, patting dry ensures every bite stays juicy and intact.
Overcooked Beef Filling Issues
Ground beef releases fat as it cooks, but skipping the drain leaves greasy pools that separate from the rice. Overmixing the cheese too early makes it stringy instead of melty. Therefore, you lose that smooth, cohesive filling in your Cheesy Beef Stuffed Peppers.
Proper timing fixes it. Brown the beef, drain well, then stir in cheese at low heat for even melt. In addition, layered seasonings like garlic powder prevent blandness even if you overcook slightly.
Core Ingredients for Cheesy Beef Stuffed Peppers
Selecting Firm Bell Peppers
Grab large green bell peppers because they stand up best to stuffing and hold shape after microwaving. Their thick walls maximize the moisture extraction trick. Therefore, your Cheesy Beef Stuffed Peppers stay upright and firm.
Red or yellow ones work too, but they bring extra sweetness that might overpower the savory beef. Always pick crisp ones without soft spots for top microwave results.
In addition, inspect for smoothness; wrinkled skins mean less water content and quicker prep.
Ground Beef and Rice Foundation
Use 80/20 ground beef for juiciness without drowning the dish in fat after draining. One pound perfectly fills four peppers. Therefore, the meat stays tender in your Cheesy Beef Stuffed Peppers.
Day-old cooked white rice absorbs flavors best and won’t clump when mixed. Two cups give the right bulk without mushiness. Fresh rice releases starch and turns gummy, so plan ahead.
Cheese, Sauce, and Seasonings Breakdown
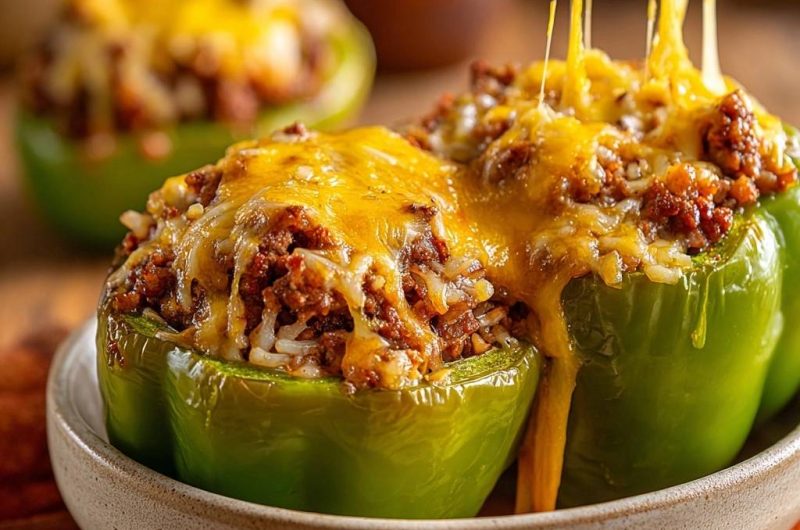
Shredded sharp cheddar melts smoothly and adds tang; mild works if you prefer subtle. Divide it: one cup in the filling for cohesion, half a cup on top for crisp. Therefore, every Cheesy Beef Stuffed Peppers bite oozes perfectly.
Tomato sauce brings acidity to balance richness without overpowering. Garlic and onion powders distribute evenly compared to fresh, which can burn. In addition, one teaspoon each of salt and pepper hits the sweet spot for four servings.
Science of Crisp Cheesy Beef Stuffed Peppers
Microwave Steam Extraction Method
Microwaving cut-side down on paper towels lets vapor escape through the open top while the towel wicks away liquid. Four to five minutes hits the sweet spot: peppers soften slightly without overcooking. Therefore, no sogginess dilutes your Cheesy Beef Stuffed Peppers.
Pat-dry thermodynamics seal it; moisture on the surface evaporates fast, leaving dry interiors ready for filling. Skip this, and cell walls rupture in the oven anyway.
In addition, larger peppers might need an extra 30 seconds, but test for flexibility.
Baking Phases for Juicy Filling
Foil-covered for 20 minutes traps steam to cook the peppers evenly from the inside. Then, uncover for 10 minutes to trigger Maillard browning on the cheese. Therefore, your Cheesy Beef Stuffed Peppers finish golden and bubbly.
Beef reaches safe 160F internally without drying. In addition, this phases tenderize peppers just right, keeping filling moist.
Equipment Essentials for Stuffed Peppers
Microwave Plate and Skillet Setup
A paper towel-lined microwave-safe plate catches every drop of released water. For the skillet, nonstick prevents sticking during beef browning, but cast iron builds better flavor through fond. Therefore, your Cheesy Beef Stuffed Peppers filling develops depth.
Medium size fits four peppers comfortably post-microwave.
Baking Dish and Foil Precision
A 9×13 baking dish keeps peppers upright and stable. Spray with nonstick to avoid fusion to the bottom. In addition, heavy-duty foil tents perfectly to trap steam without collapsing.
Step-by-Step: Prepping Cheesy Beef Stuffed Peppers
Preheating and Pepper Prep
Preheat to 375F; this temp cooks peppers tender without scorching the filling. Slice tops cleanly with a sharp knife, then scoop out seeds and membranes. Therefore, clean cavities hold more in your Cheesy Beef Stuffed Peppers.
Place cut-side down on the towel-lined plate. Microwave 4 to 5 minutes until they yield to gentle pressure and smell faintly sweet. Pat insides and outsides super dry; moisture here spells disaster.
Larger peppers? Add 30 seconds and check.
Cooking Beef Rice Filling
Heat skillet to medium; add beef and crumble as it browns, about 7 minutes. You’ll see fat pooling, so drain it well into a bowl. In addition, this keeps your Cheesy Beef Stuffed Peppers from greasiness.
Stir in rice, sauce, one cup cheese, and seasonings. Cook 2 minutes until cheese melts into a glossy bind; the aroma hits savory peak. Don’t overmix or rice toughens.
Assembling and Baking Stuffed Peppers
Filling Peppers Upright
Stand peppers snugly in the sprayed dish. Spoon filling high, even to the tops; it settles during baking. Therefore, your Cheesy Beef Stuffed Peppers look plump and full.
Pack firmly for stability, but leave a tiny vent for steam.
Cheese Topping and Dual Bake
Sprinkle remaining half-cup cheddar evenly. Cover with foil and bake 20 minutes; filling bubbles hot. Remove foil for 10 more until golden and crisp on top.
Rest 5 minutes post-oven; juices redistribute for perfect slices. In addition, this locks in tenderness.
Avoiding Mistakes in Beef Stuffed Peppers
Skipping the Dry Step
Wet peppers steam the beef rice into bland soup during baking. Sauce dilutes, cheese separates. Therefore, always press with paper towels until no moisture transfers.
Test by squeezing; dry means success for Cheesy Beef Stuffed Peppers.
Overmixing or Undercooking Beef
Fresh rice clumps if overmixed; use cooked and stir gently. Undercooked beef stays pink and risky. Therefore, cook to browned crumble, drain, then check doneness at 160F.
Rest the filling 2 minutes before stuffing.
Flavor Twists on Cheesy Beef Stuffed Peppers
Spicy or Veggie Beef Variations
Dice jalapeños into the beef for heat that cuts richness. Swap rice for quinoa to boost protein, or add chopped mushrooms for earthy umami. Therefore, your Cheesy Beef Stuffed Peppers adapt easily.
Mozzarella instead of cheddar gives stretchy pull. Keep fillings balanced to avoid overflow.
Low-Carb Stuffed Pepper Adaptations
Riced cauliflower replaces rice perfectly; it soaks up sauce without carbs. Skip tomato sauce for keto or use a splash of broth. In addition, nutrition shifts to high-protein, low-net-carb Cheesy Beef Stuffed Peppers.
Make-Ahead Guide for Stuffed Peppers
Freezing Filled Peppers
Assemble stuffed peppers without final bake, then wrap each in plastic and foil. Freeze up to 2 months. Thaw overnight in fridge, bake as directed adding 5 minutes. Therefore, crispness returns fully.
Label with dates for easy meal prep.
Meal Prep Filling Storage
Store cooked beef rice mix in airtight container up to 3 days in fridge. Reheat gently before stuffing. In addition, portion into bags for weekly Cheesy Beef Stuffed Peppers batches.
Pairing Sides with Cheesy Beef Stuffed Peppers
Crisp Salads and Breads
A cucumber-tomato salad with vinaigrette cuts the cheese richness perfectly. Garlic bread scoops up any escaped juices. Therefore, fresh crunch balances your Cheesy Beef Stuffed Peppers.
Simple Veggie Complements
Roast broccoli or green beans at 400F for char that echoes the peppers. Skip starches since rice fills you up. In addition, they add color and fiber.
Troubleshooting Cheesy Beef Stuffed Peppers
Why Is My Filling Watery?
You likely skipped microwaving or pat-drying fully. Peppers released moisture into the mix. Fix mid-bake by spooning out liquid or uncover longer to evaporate.
Cheese Not Melting Evenly
Pre-shredded has anti-caking agents; grate fresh instead. Stir low and slow, or broil 1-2 minutes at end for rescue.
Peppers Too Firm or Soft?
Firm means short microwave; add time next round. Soft from over-microwaving or high-altitude ovens, so reduce bake by 5 minutes above 3000 feet.
Filling Too Dry?
Drain too much fat or scant sauce. Add extra tablespoon sauce or retain some beef juices next time.
Stuffed Peppers Leaking?
Dish too big; peppers tip. Use snug 9×13 and pack filling to stabilize upright.
FAQ
How do I store leftover Cheesy Beef Stuffed Peppers?
Let them cool completely, then store in an airtight container in the fridge for up to 3 days. Reheat in a 350F oven covered for 15-20 minutes until hot, adding a splash of water if needed to revive moisture. They don’t freeze well whole because peppers get mushy post-thaw; freeze just the filling in portions for up to 2 months instead, thawing overnight before restuffing fresh peppers.
Why did my Cheesy Beef Stuffed Peppers turn out watery?
The top culprit is skipping the microwave step or not patting dry thoroughly, so raw pepper moisture steams into the filling during baking. Always microwave 4-5 minutes cut-side down and press insides with towels until no water transfers. If it happens mid-bake, uncover early and bake longer to evaporate excess, or spoon out liquid before serving.
Can I substitute ingredients in Cheesy Beef Stuffed Peppers?
Swap green peppers for red or yellow for sweeter notes, but adjust microwave to 3-4 minutes as they’re thinner. Use ground turkey for leaner, or cauliflower rice for low-carb; it absorbs flavors similarly but needs less sauce. No cheddar? Monterey Jack melts great. Avoid fresh garlic/onion if powders aren’t handy, as they clump; powders ensure even seasoning.
What’s the best way to reheat Cheesy Beef Stuffed Peppers without sogginess?
Oven at 350F covered with foil for 15 minutes steams gently, then uncover 5 minutes to crisp cheese. Microwave singles cut in half for 2-3 minutes on medium power, but expect slight softening. Avoid full-power nuking; it overcooks peppers. Pro tip: add a teaspoon broth to the dish for juiciness restoration.
How do I make Cheesy Beef Stuffed Peppers spicier?
Stir in 1-2 diced jalapeños or a teaspoon cayenne with seasonings for heat that builds without overpowering beef. Top with pepper jack cheese shreds for extra kick. Test a small batch first; it pairs perfectly with the cooling rice and sauce acidity.
Can I make Cheesy Beef Stuffed Peppers ahead for meal prep?
Yes, prep filling up to 3 days ahead and store chilled, or assemble full peppers sans bake and fridge overnight. Bake fresh for best texture. For freezing, do assembled unfilled version wrapped tightly; they reheat to near-fresh quality after 25-30 minutes at 375F post-thaw.
Cheesy Beef Stuffed Peppers
Course: Main CourseCuisine: AmericanDifficulty: easy4
servings15
minutes40
minutes55
Minutes450
kcalAmerican
Ingredients
4 large green bell peppers
1 pound ground beef
2 cups cooked white rice
1 cup tomato sauce
1 1/2 cups shredded cheddar cheese, divided
1 teaspoon salt
1 teaspoon black pepper
1 teaspoon garlic powder
1 teaspoon onion powder
Directions
- Preheat oven to 375 degrees F. Spray a baking dish with nonstick spray.
- Slice tops off peppers and remove seeds and membranes. Place peppers cut-side down on a paper towel-lined microwave-safe plate. Microwave on high for 4 to 5 minutes until slightly softened. This key step releases hidden moisture from the peppers, preventing sogginess, watery filling, or steamed texture. Pat insides and outsides completely dry with paper towels.
- In a skillet over medium heat, cook ground beef until browned and crumbled, about 7 minutes. Drain excess fat. Stir in cooked rice, tomato sauce, 1 cup cheddar cheese, salt, pepper, garlic powder, and onion powder. Mix until cheese melts and flavors blend, 2 minutes.
- Stand peppers upright in baking dish. Spoon beef-rice mixture evenly into each pepper, filling to the top. Sprinkle remaining 1/2 cup cheddar cheese over tops.
- Cover dish with foil and bake 20 minutes. Remove foil and bake 10 more minutes until cheese is bubbly and golden. Peppers stay firm yet tender, filling stays juicy. Serve hot.
Notes
- The microwave step is key to releasing moisture from peppers, ensuring firm yet tender texture and juicy filling. Pat peppers completely dry after microwaving.


