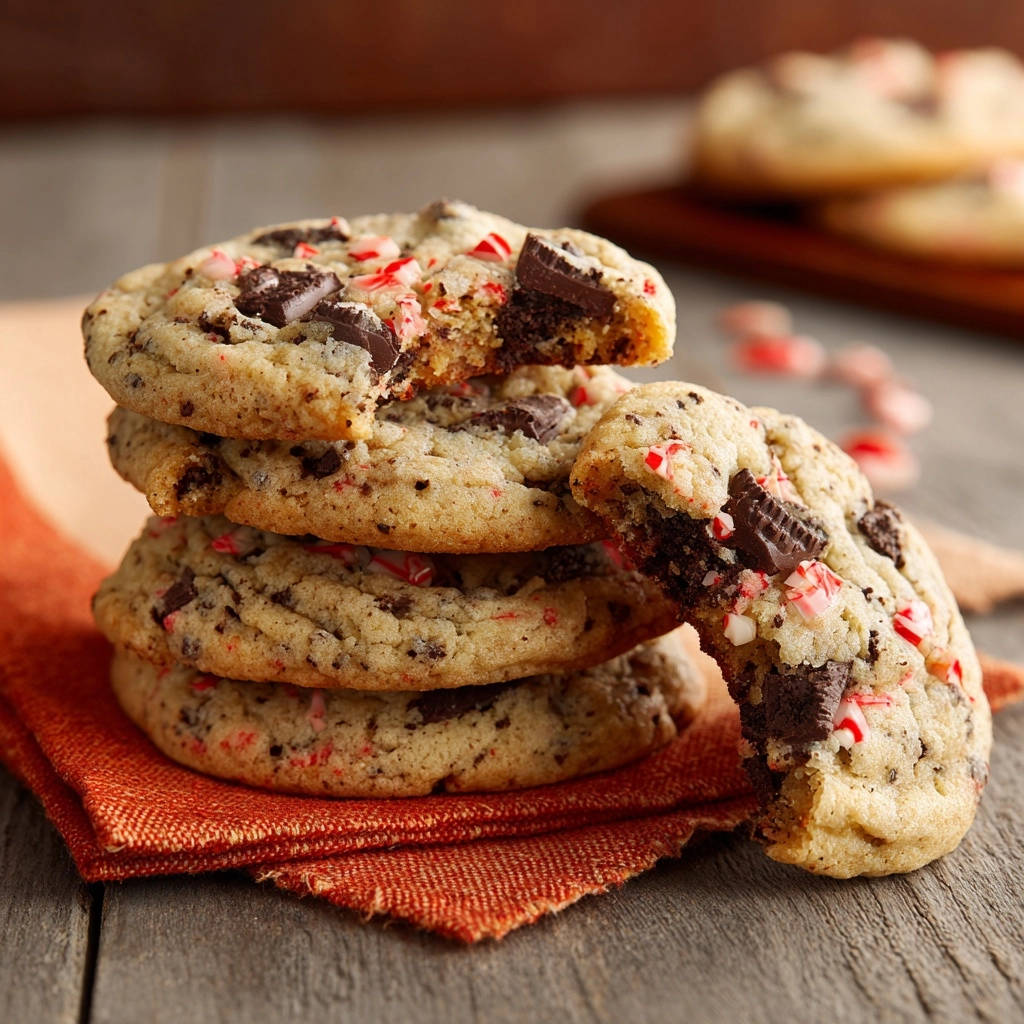
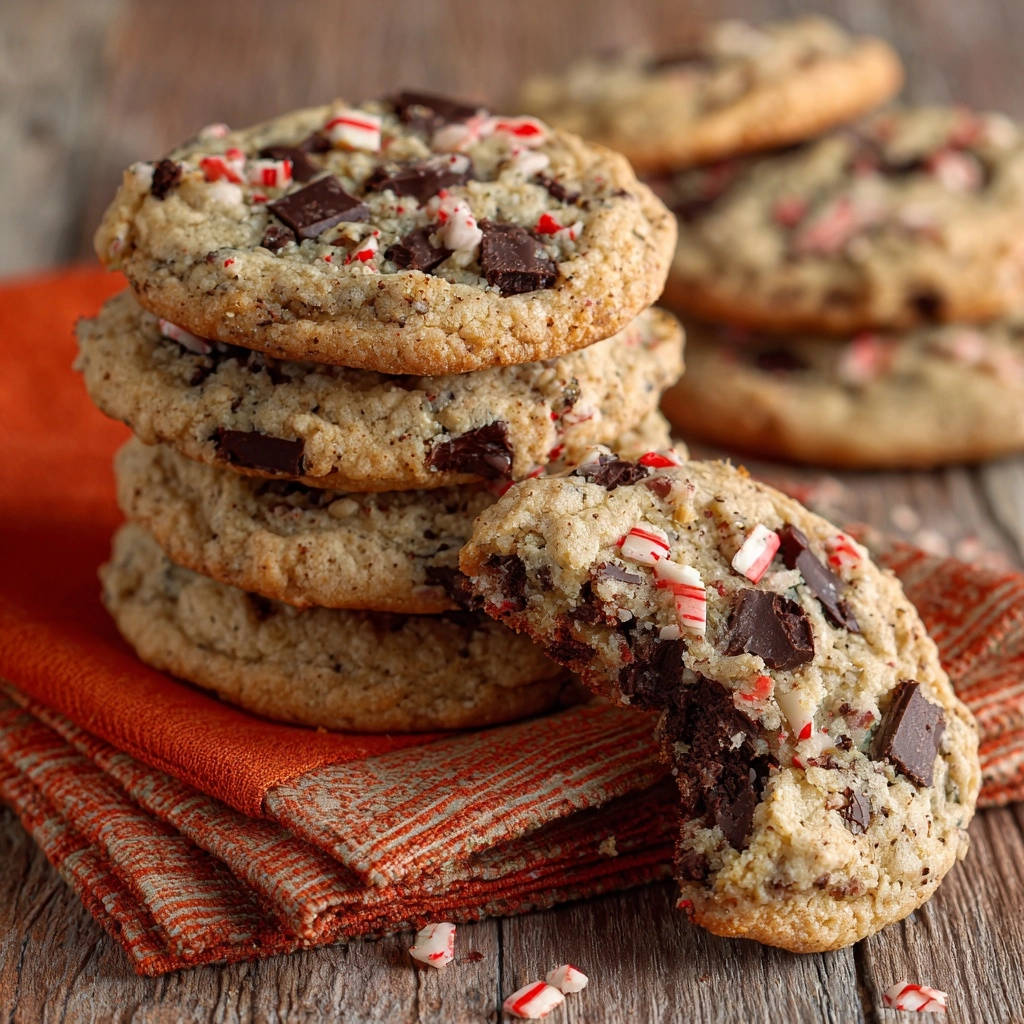
There’s nothing quite like biting into a perfectly thick, wonderfully chewy cookie, especially when it’s a festive treat like these Chewy Chocolate Peppermint Cookies. For years, I struggled with cookies that spread into sad, flat discs, but I’ve finally mastered the technique to guarantee that coveted bakery-style texture every single time.
This isn’t just another cookie recipe; it’s your definitive guide to achieving cookies that are consistently plump, soft in the center, and bursting with delightful chocolate and refreshing peppermint flavor, transforming your holiday baking or any ordinary day into something truly special.
Unlock the Secret: Why These Chewy Chocolate Peppermint Cookies?
This recipe stands out for its unwavering reliability and the simple, yet game-changing, technique that ensures superior results. It tackles common cookie frustrations head-on, delivering a dessert that’s as impressive in texture as it is in taste.
Say Goodbye to Flat Cookies: The Thriving Texture Promise
The core of this recipe’s success lies in preventing those dreaded flat cookies. We focus on specific ingredient temperatures and, crucially, a chilling step that solidifies the butter, ensuring your cookies hold their shape beautifully in the oven.
The result is a batch of Chewy Chocolate Peppermint Cookies that are consistently thick, with a delightful chewiness that melts in your mouth, never thin or brittle.
Seasonal Sensation: Festive Flavors for Every Occasion
Chocolate and peppermint are a match made in culinary heaven, especially during the festive season. These cookies capture that classic holiday spirit, making them perfect for gift-giving, cookie exchanges, or simply enjoying by the fireplace.
Beyond the holidays, the vibrant combination of rich chocolate and cool peppermint makes these treats a refreshing indulgence year-round. They’re a crowd-pleaser for any gathering or a delightful pick-me-up for everyday enjoyment.
Quick & Convenient: Minimal Effort, Maximum Reward
Despite their gourmet appeal, these peppermint chocolate treats are surprisingly simple to prepare. With active prep time under 30 minutes, they’re accessible for bakers of all skill levels, from beginners to seasoned pros.
The straightforward steps and common ingredients mean you can whip up a batch of these amazing cookies without extensive planning, delivering maximum deliciousness with minimal fuss.
Essential Elements: What You’ll Need for Cookie Bliss
The quality and condition of your ingredients are paramount to achieving perfectly thick and chewy cookies. Here’s a closer look at what goes into these delectable treats and why each component is important.
Flour Power & Leavening Agents: The Foundation
All-purpose flour provides the essential structure for your cookies. Measuring it correctly, using the spoon-and-level method, prevents dry, crumbly results.
Baking soda is our leavening agent, creating the tender rise. Salt balances the sweetness and enhances all the flavors, making them pop.
Sweet Harmony: Granulated & Brown Sugars
Granulated sugar contributes to the cookie’s crisp edges and helps with spreading. It also adds a clean sweetness.
Packed light brown sugar is crucial for that signature chewy texture and deep, molasses-rich flavor. Its moisture content helps keep the cookies soft.
Richness & Structure: Butter & Eggs
Unsalted butter, softened but still cool, is key for proper creaming. This state allows it to emulsify beautifully with the sugars, creating a smooth, cohesive dough without incorporating too much air that can lead to spreading.
Large eggs provide binding and richness, contributing to the overall structure and tenderness of the cookies. They should be at room temperature for better incorporation.
Signature Flavors: Vanilla, Chocolate & Peppermint
Vanilla extract enhances the overall sweetness and provides a warm, aromatic base. Always use pure vanilla for the best flavor.
Semi-sweet or dark chocolate chunks (or chopped chocolate) melt into decadent pockets throughout the cookie, offering a superior texture and richer flavor than chips. Crushed peppermint candy canes deliver that iconic cool, festive burst that defines these holiday cookie baking delights.
Your Baking Arsenal: Tools for Chewy Cookie Success
Electric Mixer (Stand or Handheld): Essential for creaming butter and sugars evenly, ensuring a smooth, consistent dough texture.
Large Mixing Bowls: For combining wet and dry ingredients separately, then together, allowing for organized and efficient preparation.
Parchment Paper-Lined Baking Sheets: Ensures even baking, prevents sticking, and simplifies cleanup. This is crucial for maintaining the cookie’s shape.
Cookie Scoop: For consistent size and even baking, leading to uniformly baked Chewy Chocolate Peppermint Cookies.
Wire Cooling Rack: Crucial for proper cooling and preventing soggy bottoms, allowing air to circulate around the cookies.
Step-by-Step Perfection: Crafting Your Chewy Chocolate Peppermint Cookies
-
Prepare Dry Ingredients: In a medium bowl, whisk together the flour, baking soda, and salt. Set aside.
This initial whisking ensures a uniform distribution of leavening agents throughout the dough, which is crucial for consistent cookie rise and texture.
-
Cream Butter and Sugars: In a large bowl, use an electric mixer to cream together the softened butter, granulated sugar, and brown sugar on medium speed until just combined and smooth.
It’s important to avoid over-creaming at this stage; too much air incorporated can cause your cookies to spread excessively in the oven, leading to a flatter result.
-
Incorporate Eggs and Vanilla: Beat in the eggs one at a time, mixing well after each addition. Stir in the vanilla extract.
Adding eggs individually helps them emulsify fully with the butter mixture, creating a stable base for the dough and contributing to a tender crumb.
-
Combine Wet and Dry: Gradually add the dry ingredients to the wet ingredients, mixing on low speed until just combined.
Do not overmix the dough. Overmixing develops gluten, which can result in tough, dense cookies instead of the desired chewy texture. Mix just until no streaks of flour remain.
-
Fold in Flavors: Gently fold in the chocolate chunks and crushed peppermint candy canes until they are evenly distributed throughout the dough.
Using a sturdy spatula for this step helps prevent crushing the peppermint further and ensures your mix-ins are perfectly incorporated without overworking the dough.
-
The Game-Changer: Chilling Your Cookie Dough
Cover the bowl with plastic wrap and refrigerate the cookie dough for at least 30 minutes, or up to 2 hours.
This is the absolutely key step to prevent flat cookies. Chilling solidifies the butter in the dough, which slows down its melting and spreading in the hot oven. This ensures your Chewy Chocolate Peppermint Cookies are wonderfully thick and deliciously chewy.
-
Preheat & Prepare: Preheat your oven to 375 degrees Fahrenheit. Line baking sheets with parchment paper.
Parchment paper is essential for easy removal, prevents sticking, and promotes more even baking across the bottom of the cookies.
-
Scoop & Space: Scoop rounded tablespoons of chilled dough onto the prepared baking sheets, leaving about 2 inches between each cookie.
Proper spacing allows for adequate air circulation around each cookie, promoting even heat distribution and preventing them from baking into each other.
-
Bake to Perfection: Bake for 10-12 minutes, or until the edges are golden brown and the centers are still slightly soft.
The slightly soft centers are a visual cue that your cookies will continue to set as they cool on the baking sheet, yielding that desirable gooey-chewy interior.
-
Cool & Enjoy: Remove from the oven and let the cookies cool on the baking sheets for 5 minutes before transferring them to a wire rack to cool completely.
Cooling on the hot baking sheet for a few minutes helps the cookies firm up and prevents them from breaking when you transfer them, ensuring they maintain their perfect shape.
Master Your Bake: Pro Tips & Troubleshooting for Perfect Cookies
Achieving consistently perfect Chewy Chocolate Peppermint Cookies isn’t just about following steps; it’s about understanding the nuances. These tips will elevate your baking and help you troubleshoot common issues.
Don’t Skip the Chill Time: Refrigerating the dough is non-negotiable for achieving thick, chewy Chewy Chocolate Peppermint Cookies. This fundamental step is your secret weapon against thin, sad disks and ensures the butter is firm.
Measure Flour Correctly: Too much flour is a common culprit for dry, crumbly cookies. Always use the spoon-and-level method: spoon flour into your measuring cup, then level off the top with a straight edge. Never scoop directly from the bag.
Avoid Overmixing: Once you add the dry ingredients, mix only until just combined. Excessive mixing develops gluten, leading to a tough cookie texture rather than a soft, chewy one.
Know Your Oven: Oven temperatures can vary significantly. If your cookies are consistently browning too quickly, spreading excessively, or baking unevenly, consider investing in an inexpensive oven thermometer to verify its accuracy.
The “Slightly Soft” Center Rule: For ultimate chewiness, pull your Chewy Chocolate Peppermint Cookies from the oven when the edges are golden but the centers still look slightly underbaked. They’ll continue to cook and set on the hot baking sheet, achieving that perfect, bendy texture.
Troubleshooting: Cookies Too Flat? If, despite chilling, your cookies are still spreading, ensure your butter isn’t too warm when you start creaming. Also, check that your baking soda is fresh, and you’re not over-creaming the butter and sugar in step 2. You can also try chilling the dough for longer, up to a full 2 hours, or even freezing for 15-20 minutes before baking.
Troubleshooting: Cookies Too Crumbly or Dry? This usually indicates too much flour or overbaking. Double-check your flour measurements (using the spoon-and-level method!) and reduce your oven time slightly until you find the perfect sweet spot for your oven.
Enjoying Your Creations: Serving & Storage Tips
Once your irresistible batch of Chewy Chocolate Peppermint Cookies is baked, knowing how to store and serve them will ensure maximum enjoyment and freshness.
Optimal Freshness: Storing Your Chewy Chocolate Peppermint Cookies
To keep your baked peppermint chocolate treats fresh, store them in an airtight container at room temperature. They will remain wonderfully soft and chewy for up to 3-4 days. For longer storage, consider freezing.
You can also place a slice of bread in the container with the cookies; the cookies will absorb moisture from the bread, keeping them softer for longer. Just remember to replace the bread every couple of days.
Make-Ahead Magic: Dough Prep & Freezing Options
The dough for these cookies is excellent for make-ahead convenience. You can prepare the dough as directed, then wrap it tightly in plastic wrap and refrigerate for up to 3 days before baking. This actually enhances the flavor!
For longer storage, scoop rounded portions of raw dough onto a parchment-lined baking sheet and freeze until solid, about 1-2 hours. Transfer the frozen dough balls to a freezer-safe bag and store for up to 2 months. Bake from frozen, adding 2-4 minutes to the bake time.
Baked cookies also freeze beautifully. Once completely cooled, store them in a single layer in an airtight freezer-safe container or bag for up to 3 months. Thaw at room temperature before enjoying. This is a great way to always have delightful homemade cookies ready.
Perfect Pairings: Serving Suggestions
These Chewy Chocolate Peppermint Cookies are a delight on their own, but they also pair wonderfully with a few simple additions. Serve them with a tall glass of cold milk for a classic treat.
For an extra festive experience, enjoy them with a mug of hot cocoa topped with whipped cream, or alongside a warm cup of coffee or herbal tea. They also make a fantastic addition to any holiday dessert platter, perhaps alongside some easy chocolate lava cake.
Burning Questions? Your Chewy Chocolate Peppermint Cookie FAQs Answered
Can I use chocolate chips instead of chunks?
Yes, you can use chocolate chips, but for the best melt-in-your-mouth experience and gooey pockets of chocolate, I highly recommend using chunks or chopped chocolate. Chips hold their shape more, while chunks melt and spread beautifully within the cookie.
How do I crush candy canes easily?
The easiest way to crush candy canes is to place them in a sturdy freezer bag, seal it, and then gently but firmly tap them with a rolling pin or the flat side of a meat mallet. Avoid smashing too hard, which can tear the bag. Aim for a mix of fine dust and small pieces for texture and visual appeal.
Can I make these cookies gluten-free?
While this recipe is developed for all-purpose flour, you can experiment with a 1:1 gluten-free baking flour blend that contains xanthan gum. Be aware that the texture might be slightly different, often a bit more crumbly or less chewy, but they should still be delicious peppermint chocolate treats.
What if I don’t have time to chill the dough?
Skipping the chilling step is not recommended for this recipe, as it’s the core secret to preventing flat cookies and achieving that thick, chewy texture. If you’re really short on time, try chilling the dough in the freezer for 15-20 minutes. This quick chill is better than nothing, but a full refrigeration period yields superior results.
Ready to Bake? Share Your Chewy Chocolate Peppermint Cookie Journey!
Now that you’re equipped with all the secrets, tips, and troubleshooting advice, you’re ready to create your own batch of truly exceptional Chewy Chocolate Peppermint Cookies. Say goodbye to flat, disappointing cookies forever and hello to perfectly thick, wonderfully chewy, and intensely flavorful holiday cookie baking masterpieces!
I encourage you to give this recipe a try. Enjoy the process, savor the festive aroma filling your kitchen, and delight in the incredible taste. Don’t forget to share your cookie journey with us!

Chewy Chocolate Peppermint Cookies
Course: DessertCuisine: American CuisineDifficulty: easy24
cookies15
minutes10
minutes25
minutesAmerican Cuisine
Ingredients
2 1/4 cups all-purpose flour
1 teaspoon baking soda
1/2 teaspoon salt
1 cup (2 sticks) unsalted butter, softened but still cool
3/4 cup granulated sugar
3/4 cup packed light brown sugar
2 large eggs
1 teaspoon vanilla extract
1 1/2 cups semi-sweet or dark chocolate chunks or chopped chocolate
1/2 cup crushed peppermint candy canes
Directions
- In a medium bowl, whisk together the flour, baking soda, and salt. Set aside.
- In a large bowl, using an electric mixer, cream together the softened butter, granulated sugar, and brown sugar on medium speed until just combined and smooth. Be careful not to over-cream, as too much air can lead to spreading.
- Beat in the eggs one at a time, mixing well after each addition. Stir in the vanilla extract.
- Gradually add the dry ingredients to the wet ingredients, mixing on low speed until just combined. Do not overmix the dough.
- Fold in the chocolate chunks and crushed peppermint candy canes until evenly distributed throughout the dough.
- This is the key step to prevent flat cookies: Cover the bowl with plastic wrap and refrigerate the cookie dough for at least 30 minutes, or up to 2 hours. Chilling the dough helps solidify the butter, which prevents the cookies from spreading too quickly in the oven, ensuring a thicker, chewier result.
- Preheat your oven to 375 degrees Fahrenheit. Line baking sheets with parchment paper.
- Scoop rounded tablespoons of chilled dough onto the prepared baking sheets, leaving about 2 inches between each cookie.
- Bake for 10-12 minutes, or until the edges are golden brown and the centers are still slightly soft.
- Remove from the oven and let the cookies cool on the baking sheets for 5 minutes before transferring them to a wire rack to cool completely. Enjoy your perfectly thick and chewy cookies!
Notes
- Chilling the dough for at least 30 minutes is crucial for preventing spread and ensuring thick, chewy cookies.