

Why Chocolate Macarons Challenge Home Bakers
Picture this: you pipe out those chocolate macaron shells, pop them in the oven, and pull out flat disks with no ruffled feet. It happens to almost everyone on their first try. But here’s the fix that delivers perfect feet every time: a simple resting step where you let the piped shells dry until a skin forms.
So why do most home bakers struggle? Humidity sneaks in, meringue deflates from overmixing, or ovens run too hot. This recipe sidesteps all that with precise steps and that game-changing rest. You’ll get cafe-quality chocolate macarons that look pro and taste even better.
The real secret lies in the skin formation during rest. It traps steam, pushing the batter up into those signature ruffled feet. Nail this, and you’re golden.
Shell Ingredients for Flawless Chocolate Macarons
Chocolate macarons demand exact ratios for stable batter. Start with 1 3/4 cups powdered sugar, 1 cup almond flour, and 3 tablespoons unsweetened cocoa powder. These create the smooth, crack-free shells you crave. Fresh, fine almond flour keeps textures light; coarse stuff leads to lumps and cracks.
Next, 3 large egg whites at room temperature whip up maximum volume. They emulsify better than cold ones, giving airy meringue. Add 1/4 cup granulated sugar and 1/4 teaspoon cream of tartar. That acid stabilizes the whites, preventing collapse during folding.
Pro tip: weigh everything in grams for precision. Cups can vary, but 100g almond flour or 210g powdered sugar ensures success every batch.
Powdered Sugar and Almond Flour Precision
Sift the powdered sugar, almond flour, and cocoa together three times. This removes lumps that cause cracks or uneven feet. Powdered sugar’s fine texture absorbs moisture perfectly, keeping batter just right.
Fine almond flour is key too. It blends seamlessly, unlike coarser grinds that make shells gritty. Discard any big bits after sifting; they ruin the smooth flow.
Egg Whites and Cream of Tartar Role
Room-temp egg whites beat faster to stiff peaks. Cold ones take forever and trap less air. Age them in the fridge for a few days if you can; it reduces water content for stabler meringue.
Cream of tartar boosts acidity, strengthening protein bonds. Without it, peaks weep or deflate. You’ll see glossy, holdable meringue in about 8 minutes.
Science of Macaron Shell Formation
Macaron magic starts with meringue’s protein structure. Whipped egg whites form a net that traps air. During macaronage, dry ingredients deflate it just enough for spread without collapse.
Hygroscopic sugars draw moisture, creating thick lava-like batter. Resting forms a skin that traps steam in the oven. That pressure lifts batter into ruffled feet. No skin, no lift; it’s pure physics from French patisserie.
Chocolate macarons science shines here. Cocoa adds density, so precise folding prevents heaviness. Get this right, and feet ruffle up reliably.
Macaronage Technique Explained
Fold dry mix into meringue in three parts. Use figure-eights: press batter against bowl sides, then scoop and fold. Aim for 65-75 folds until it ribbons off the spatula like thick lava, flowing slowly without breaking.
Undermix, and peaks form; overmix, and it deflates flat. Test by lifting: smooth ribbon means go time. Practice makes it intuitive.
Essential Equipment for Chocolate Macarons
A stand mixer with whisk attachment whips meringue effortlessly. Hand mixers work but tire you out. Fine-mesh sieve sifts powders lump-free. Piping bag with #12 round tip gives even 1.5-inch shells.
Heavy baking sheets prevent bottoms from overbaking. Parchment or silicone mats ensure clean lifts. Digital scale trumps cups; oven thermometer checks true temps. These tools make chocolate macarons foolproof.
Pro tip: double-walled sheets insulate heat for even feet. Skip thin pans; they scorch edges.
Piping and Baking Sheet Choices
Use a #12 tip for uniform circles. Pipe straight down, then lift with a swirl to avoid peaks. Space 2 inches apart for spread.
Tap trays firmly 5 times right after piping. This pops air bubbles that crack shells. Silicone mats grip batter better than parchment for perfect feet.
Phase 1: Preparing Dry Mix for Chocolate Macarons
Sift powders into a bowl, discarding lumps. Sift twice more for silkiness. Meanwhile, beat room-temp whites with cream of tartar on medium until foamy, about 2 minutes.
Gradually add granulated sugar. Crank to high and whip 6 more minutes to stiff, glossy peaks. It holds shape but flows slowly; don’t stop early or batter won’t set.
Phase 2: Macaronage and Piping Shells
Add dry mix to meringue in thirds. Fold gently with spatula in figure-eights, pressing against sides. Stop at lava flow; it should settle flat in 30 seconds.
Bag it up and pipe 1.5-inch rounds. Rap trays 5 times hard, then again after 1 minute. Bubbles rise; pop stragglers with a toothpick for smooth tops.
Critical Resting Step for Perfect Feet
Rest piped shells uncovered 45-60 minutes until dry to touch. No stickiness means skin formed. In humid spots over 60%, use a fan or dehumidifier; it speeds drying.
This skin traps oven steam, forcing ruffled feet upward. Skip it, and shells stay flat. Test often; chocolate macarons resting trick guarantees lift.
Humidity delays skin, so patience pays. You’ll smell faint chocolate as it dries.
Baking Chocolate Macarons to Perfection
Preheat to 300°F. Bake one sheet middle rack, 12-15 minutes. Rotate halfway for even color. Feet ruffle early; shells lift clean when done.
Cool fully on trays. They firm up and release easily. Convection? Drop to 285°F to avoid cracks. Test your oven; tweaks ensure perfection.
Vanilla Cream Filling for Chocolate Macarons
Beat softened butter creamy, 2 minutes. Add powdered sugar gradually to avoid clouds. Mix in heavy cream and vanilla; whip fluffy for pipeable texture.
Pure vanilla shines against chocolate. Heavy cream adds stability over milk. This filling balances chocolate macarons with creamy contrast.
Filling Pipe vs. Spread Methods
Pipe a dime-sized swirl for even layers. Or spread with offset spatula for control. Use about 1 teaspoon per pair; too much squishes out.
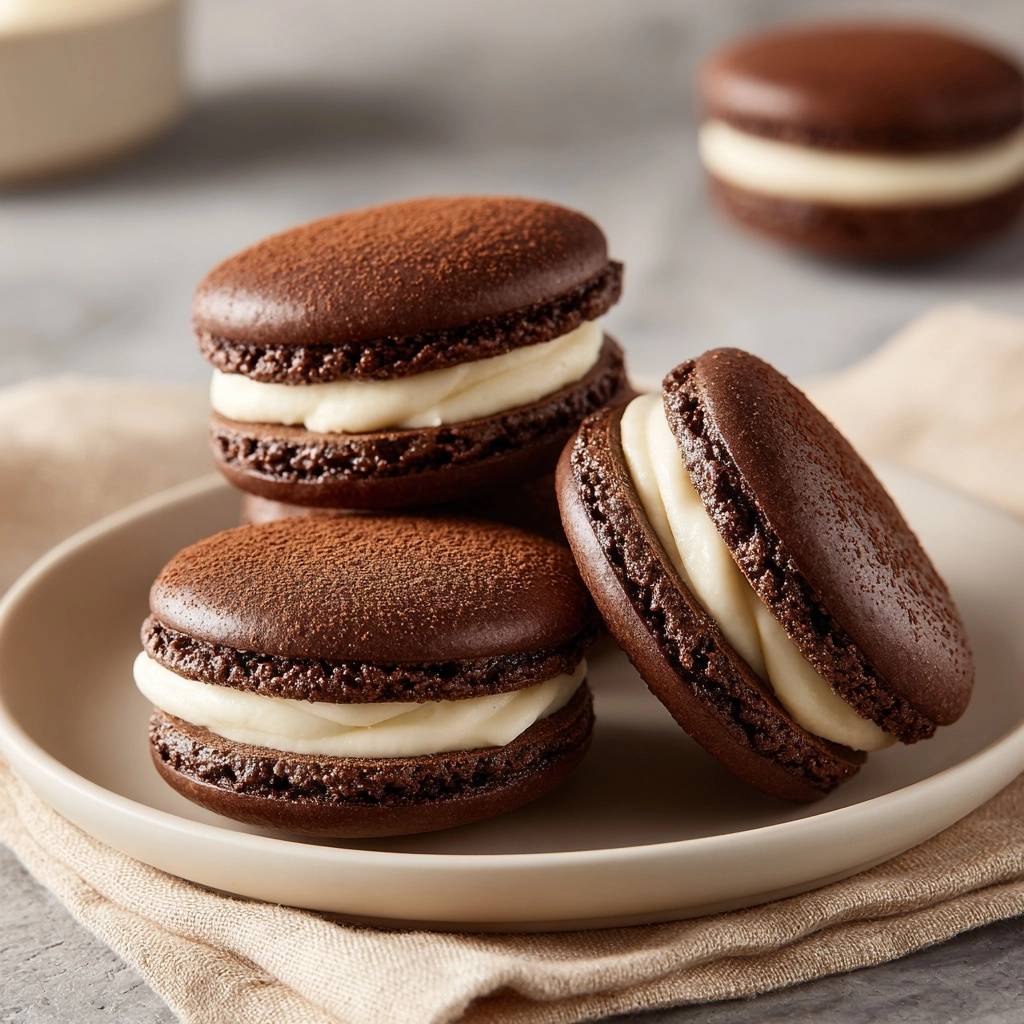
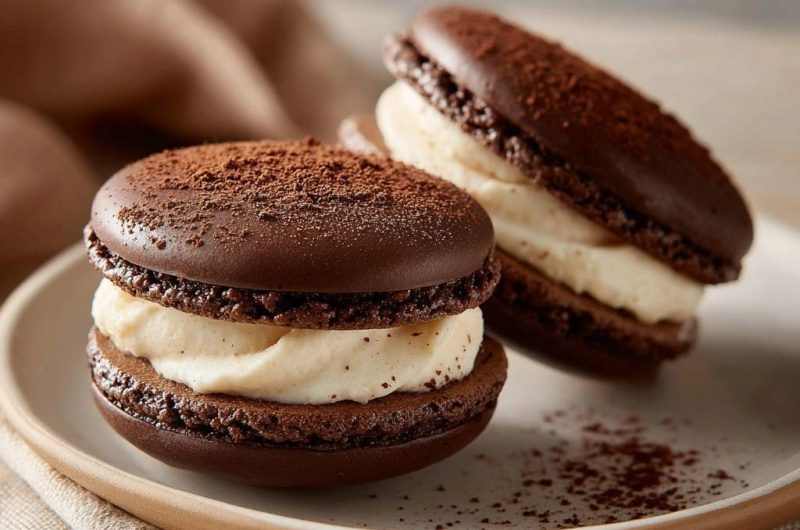
Assembling and Storing Chocolate Macarons
Pair shells by size, flat sides up. Pipe filling on one, top gently. Dust with cocoa for elegance. Press lightly; overdo it and feet crack.
Fridge in airtight container up to 5 days. Flavors meld by day two. Freeze up to 1 month; thaw in fridge overnight. Store chocolate macarons right for peak taste.
Avoiding Common Chocolate Macaron Mistakes
Overmixing kills air, so no feet. Cold eggs make weak meringue; always room-temp. Humid kitchens prevent skin; run AC. Weigh ingredients; scoops flop.
Cracks mean too-hot oven or lumps. Hollow shells? Undermixed batter. Fixes keep you winning. Practice one tweak per batch.
Troubleshooting No Feet Issue
No feet usually means no skin from humidity or short rest. Dry longer, use fan. Low oven temp steams weakly; hit 300°F exactly.
Fixing Cracked or Hollow Shells
Cracks from hot ovens or lumps; sift well, bake lower. Hollow? Poor macaronage; fold to true lava. Adjust next time.
Flavor Variations on Chocolate Macarons
Swap cocoa for matcha or espresso powder. Raspberry powder adds tart pop. Keep ratios same for feet.
Fillings twist it up: dark ganache for double chocolate, peanut butter for nutty crunch. Natural colorants like beet powder tint shells. Variations enhance chocolate macarons without risking structure.
Pro tip: taste dry mix first. Adjust powder for bold flavor minus heaviness.
Pairing Chocolate Macarons with Drinks
Espresso cuts through richness perfectly. Earl Grey tea’s bergamot complements chocolate notes. Whole milk or oat milk balances sweetness.
At parties, serve with these for contrast. Strong brews stand up; mild ones let macarons shine. Simple pairings elevate every bite.
Chocolate Macarons FAQ
Why No Feet on My Chocolate Macarons?
No feet comes from skipping the rest or high humidity preventing skin. Rest 45-60 minutes until dry to touch, use a fan if sticky. Low oven temp fails too; verify 300°F with thermometer for steam lift.
Can I Make Chocolate Macarons Egg-Free?
Aquafaba from chickpeas subs for whites 1:1, whipped same way. Feet form less reliably, and flavor shifts slightly. Add extra cream of tartar for stability, but expect 70% success versus eggs.
How Long Do Chocolate Macarons Last?
Store airtight in fridge up to 5 days; best days 2-3 as flavors meld. Freeze sandwiched up to 1 month in single layer, thaw in fridge. Don’t refreeze; texture suffers.
Why Measure Chocolate Macaron Ingredients in Grams?
Cups pack differently, causing wet or dry batter flops. Grams ensure precision: 100g almond flour, 210g powdered sugar. Use 1 cup powdered sugar = 120g as guide; scales save batches.
High Humidity Affect Chocolate Macarons?
Yes, it delays skin, leading to sticky shells and no feet. Run AC, fan, or dehumidifier; aim under 60% RH. Rest longer, up to 90 minutes, and sift extra for dryness.
Chocolate Macarons
Course: DessertCuisine: FrenchDifficulty: easy4
30 macarons1
hour15
minutes120
Minutes90
kcalFrench
Ingredients
For the shells:
1 3/4 cups powdered sugar
1 cup almond flour
3 tablespoons unsweetened cocoa powder
3 large egg whites, room temperature
1/4 cup granulated sugar
1/4 teaspoon cream of tartar
For the vanilla cream filling:
1/2 cup unsalted butter, softened
2 cups powdered sugar
2 tablespoons heavy cream
1 teaspoon vanilla extract
For dusting:
Unsweetened cocoa powder
Directions
- Sift powdered sugar, almond flour, and cocoa powder together into a large bowl. Discard any large lumps. Set aside.
- In a stand mixer with whisk attachment, beat egg whites and cream of tartar on medium speed until foamy. Gradually add granulated sugar, increase to high speed, and whip to stiff, glossy peaks, about 8 minutes.
- Add dry ingredients to meringue in three parts. Fold gently with a spatula using the macaronage technique: press batter against bowl sides and fold in figure-eights until it flows like thick lava and ribbons off the spatula without breaking, about 65-75 folds. Do not overmix.
- Transfer to a piping bag with a round tip. Pipe 1.5-inch circles onto parchment-lined baking sheets, spacing 2 inches apart. Tap trays firmly on counter 5 times to release air bubbles, then rap again.
- Here is the perfect feet secret: Let piped shells rest uncovered at room temperature for 45-60 minutes until a thin skin forms. Test by touching lightly; it should be dry and not sticky. This skin traps steam during baking, forcing batter up into ruffled feet. No skin means no feet.
- Preheat oven to 300 degrees F. Bake one sheet at a time in the middle rack for 12-15 minutes, rotating halfway. Feet will ruffle up, and shells will lift easily from parchment when done. Cool completely on trays.
- For filling, beat butter until creamy. Gradually add powdered sugar, then cream and vanilla. Beat until fluffy.
- Pair shells by size, pipe or spread filling on one flat side, and sandwich gently. Dust tops with cocoa powder. Store in airtight container in fridge for up to 5 days. Enjoy the flawless feet!
Notes
- Resting time is crucial for perfect feet: 45-60 minutes until a dry skin forms. Bake one sheet at a time for even results. Store in airtight container in fridge up to 5 days.


