I used to dread pie night, especially when faced with a truly rich filling, because a disappointingly soggy bottom crust always undermined the experience. After years of perfecting, I’ve unlocked the secret to a perfectly crisp crust that beautifully supports a decadent filling, even in a luscious Chocolate Walnut Crumble Pie. This isn’t just a recipe; it’s a reliable method guaranteeing a showstopping dessert every time.
Why Our Chocolate Walnut Crumble Pie Stands Apart (No More Soggy Bottoms!)
The Game-Changing Crisp Crust Method
The core of this recipe’s success lies in its specific blind baking technique. We pre-bake the crust not once, but twice, using a heated baking sheet and pie weights. This crucial process ensures the crust dries out and sets completely before the moist filling is added, eliminating any chance of a soggy bottom.
Decadent Flavor, Effortless Appeal
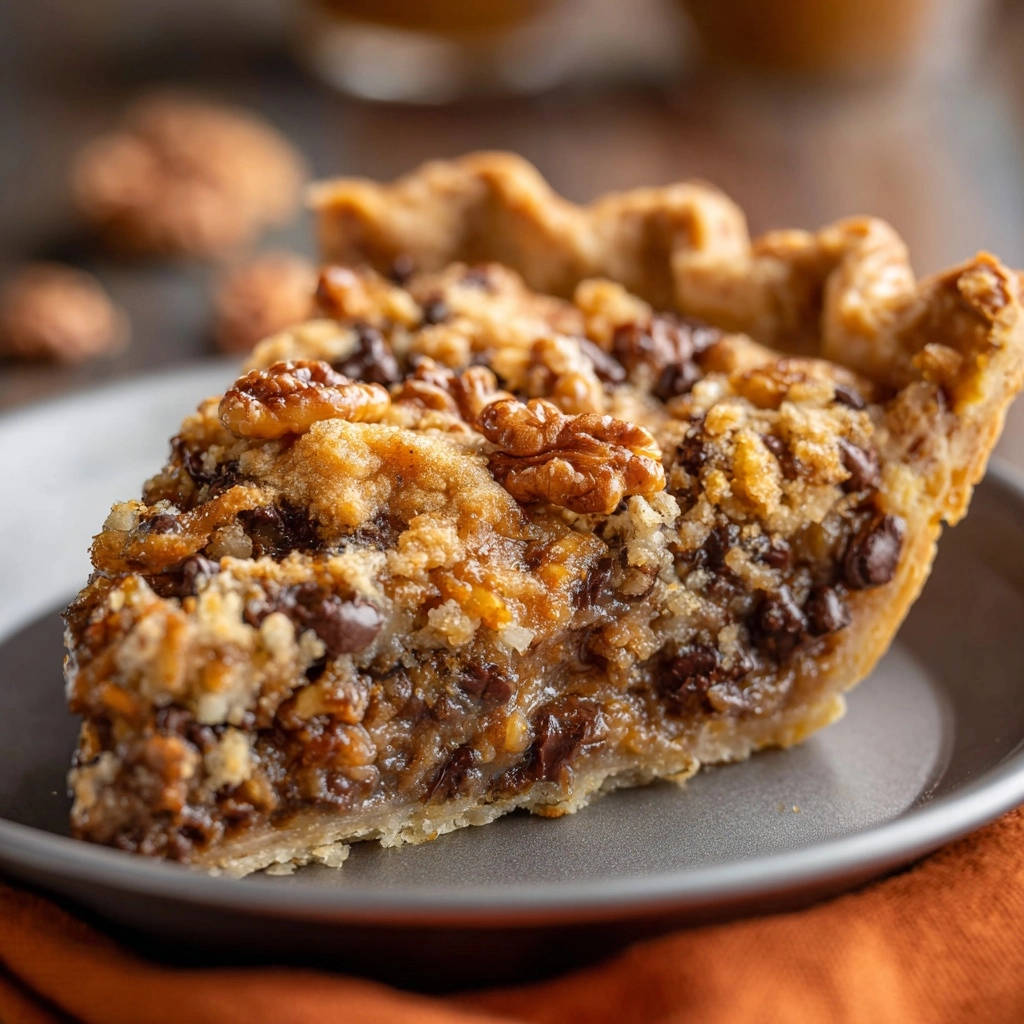
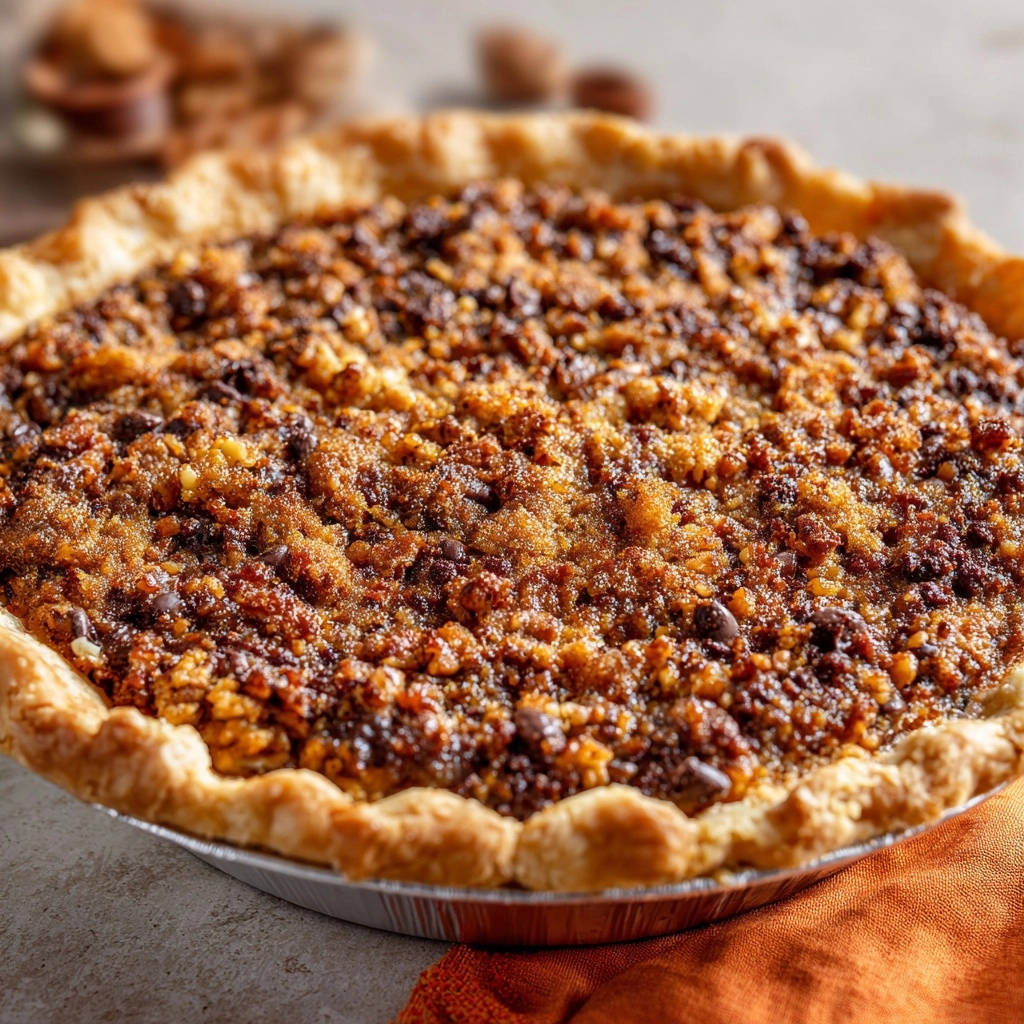
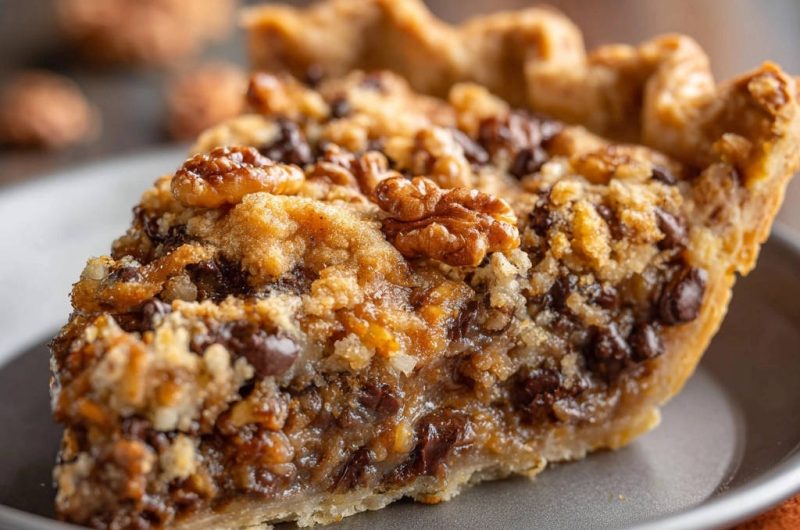
This Chocolate Walnut Crumble Pie masterfully balances rich, melt-in-your-mouth chocolate with the satisfying crunch of toasted walnuts. Crowned with a sweet, buttery crumble topping, each bite offers an irresistible symphony of textures and flavors. It delivers gourmet appeal without complicated steps.
A Crowd-Pleaser for Any Occasion
Whether you’re hosting a festive holiday gathering, celebrating a special family moment, or simply craving a cozy dessert, this pie fits every bill. Its comforting familiarity paired with its elevated flavors makes it a universal favorite that consistently earns rave reviews.
The Building Blocks of Decadence: Ingredients for Your Pie
For the Foundation: Your Pie Crust
A good quality 9-inch unbaked pie crust is your starting point. You can opt for a high-quality store-bought version for convenience, or embrace a homemade crust if you prefer. Its structural integrity is vital for achieving the signature no-soggy-bottom result.
Crafting the Rich Chocolate Walnut Filling
Large eggs provide the essential structure and binding for the filling as it bakes. A blend of granulated and light brown sugar creates a balanced sweetness, contributing to the pie’s gooey texture and rich color. Melted unsalted butter adds luxurious richness and depth of flavor, while pure vanilla extract introduces a warm, aromatic note. A pinch of salt enhances all the flavors, preventing the pie from tasting overly sweet. Semi-sweet chocolate chips melt into luscious pockets of chocolate, and chopped walnuts deliver a delightful nutty crunch and earthy flavor that complements the chocolate perfectly.
The Irresistible Crumble Topping
All-purpose flour forms the base of our crumbly topping, providing structure, while granulated sugar adds a touch of sweetness. Cold unsalted butter, cut into small pieces, is critical; it creates pockets of steam during baking, yielding that coveted crisp, tender crumble texture. Finally, additional chopped walnuts are folded in, reinforcing the nutty profile and adding extra textural intrigue to the topping.
Your Baking Arsenal: Essential Tools for Pie Perfection
Standard Baking Essentials
You’ll need a standard 9-inch pie plate to shape and bake your pie. A medium mixing bowl and a smaller bowl are essential for preparing the filling and crumble separately. A whisk is perfect for smoothly combining the liquid ingredients for the filling.
The Secret Weapon: Baking Sheet & Pie Weights
A preheated baking sheet placed on the lower oven rack is a non-negotiable step for ensuring a beautifully cooked bottom crust. It acts as a heat conductor, rapidly crisping the base. Pie weights, or a reliable substitute like dried beans or rice, are crucial for blind baking; they prevent the crust from bubbling up and shrinking during its initial bake.
Helpful Extras for Effortless Preparation
Parchment paper is invaluable for lining the pie crust before adding weights, making for easy removal. A pastry blender simplifies cutting the cold butter into the flour for the crumble topping, though your fingers work just as well. Lastly, a wire rack is necessary for allowing the pie to cool completely, which is vital for its final set and crispness.
Baking Brilliance: Your Step-by-Step Guide to Chocolate Walnut Crumble Pie
Prepping for Success: Oven & Crust Setup
- Preheat Oven and Baking Sheet:
Set your oven to 400°F (200°C) and place a baking sheet on the lower rack to preheat. This ensures the bottom crust cooks through evenly and starts crisping immediately.
- Fit the Crust:
Gently fit your unbaked pie crust into a 9-inch pie plate. Take care not to stretch it, then crimp the edges decoratively to your liking.
The Anti-Soggy Bottom Breakthrough: Blind Baking Explained
- Prepare for Blind Baking:
Pierce the bottom and sides of the crust thoroughly with a fork. This prevents air bubbles and steam from accumulating, which can cause the crust to puff up or become soggy. Line the crust with parchment paper, allowing it to hang over the edges, then fill with pie weights or dried beans, distributing them evenly up the sides.
- First Bake:
Bake on the preheated sheet for 15 minutes. This crucial step dries out and sets the crust before adding the wet filling, preventing it from absorbing moisture later.
- Second Bake & Cool-Down:
Carefully remove the pie crust from the oven. Gently lift the parchment paper and pie weights out of the crust. Return the crust to the oven for another 5 minutes to lightly brown and further dry out the bottom. Remove from oven and set aside to cool slightly, then reduce the oven temperature to 350°F (175°C).
Whipping Up the Rich Chocolate Walnut Filling
- Combine Wet Ingredients:
While the crust cools, prepare the filling. In a medium bowl, whisk together the eggs, granulated sugar, light brown sugar, melted butter, vanilla extract, and salt until the mixture is smooth and all ingredients are well combined. This ensures a consistent texture throughout the filling.
- Fold in Solids:
Gently stir in the semi-sweet chocolate chips and 1 cup of chopped walnuts. Avoid overmixing; just combine until the chocolate and nuts are evenly distributed. Pour this rich mixture evenly into the prepared, partially baked pie crust.
Creating the Golden Crumble Topping
- Prepare Dry Ingredients:
In a separate small bowl, combine the all-purpose flour and ¼ cup granulated sugar. Whisk them together briefly to ensure no lumps.
- Cut in Butter & Walnuts:
Using a pastry blender or your fingertips, cut in the cold butter pieces until the mixture resembles coarse, pea-sized crumbs. The cold butter is key for a tender, flaky crumble. Stir in the remaining ½ cup chopped walnuts, distributing them evenly throughout the crumble.
Assembling & Baking to Golden Perfection
- Sprinkle the Crumble:
Evenly sprinkle the prepared crumble topping over the chocolate walnut filling in the pie crust. Make sure to cover the entire surface for a consistent crunch in every slice.
- Final Bake:
Place the pie back on the preheated baking sheet (still in the oven) and bake for 35 to 40 minutes. The pie is done when the filling is set around the edges but still slightly jiggly in the very center, and the crumble topping is beautifully golden brown.
The Crucial Cool-Down for Optimal Set
- Cool Completely:
Remove the pie from the oven and let it cool completely on a wire rack before slicing and serving. This allows the filling to fully set, preventing it from being runny, and ensures your meticulously prepared crust stays perfectly crisp. Patience here is rewarded!
Beyond the Recipe: Expert Tips for Your Chocolate Walnut Crumble Pie
Achieving the Crispiest Crust
Don’t Skip the Preheated Baking Sheet: This simple step transfers heat quickly to the bottom of the pie plate, creating a sudden burst of heat that prevents a soggy crust. It’s a game-changer for any pie, not just this Chocolate Walnut Crumble Pie.
Proper Blind Baking is Key: Ensure your crust is thoroughly pricked with a fork, and the weights are evenly distributed across the bottom and up the sides. This prevents bubbling and shrinkage, ensuring a perfectly shaped and dry base.
Perfecting Your Filling Consistency
Avoid Overmixing: Whisk the filling ingredients until they are just combined and smooth. Overmixing can incorporate too much air, which can lead to a less dense filling and a pie that might crack upon cooling.
Trust the Jiggle Test: When you gently shake the pie, the center should have a slight, soft wobble, while the edges appear set. The filling will continue to firm up and fully set as the pie cools.
Crumble Topping Secrets
Keep Butter Cold: This is essential for a truly crumbly, tender topping that doesn’t melt into a paste. Work quickly with the butter, or even chill your mixing bowl and pastry blender. For another fantastic crumble, try our classic apple crumble bars recipe.
Even Distribution: Sprinkle the crumble evenly over the entire surface of the filling. This ensures every single slice of your Chocolate Walnut Crumble Pie gets that delightful crunchy, buttery topping.
Flavor Variations to Explore
Chocolate Types: Experiment with dark chocolate chips for a richer, more intense flavor, or a mix of milk and semi-sweet for a sweeter profile. You could also try chocolate chunks for larger pockets of melted chocolate.
Nut Swaps: Pecans are an excellent substitute for walnuts, offering a buttery richness that pairs beautifully with chocolate. If you love pecans, consider exploring a decadent chocolate pecan tart. Almonds or even hazelnuts could also work for a unique twist.
Add Spices: A pinch of ground cinnamon, a tiny grating of fresh nutmeg, or a hint of espresso powder can add warmth and depth to the filling, enhancing the chocolate and walnut flavors without overpowering them.
Troubleshooting Your Chocolate Walnut Crumble Pie: Solutions to Common Issues
My Crust Is Still Soggy!
First, ensure your oven was fully preheated, especially the baking sheet. It needs that initial blast of heat. You might also need to blind bake for a few more minutes next time, especially if your pie plate is very thick or your filling is particularly moist. Don’t underestimate the power of thorough piercing and evenly distributed pie weights during the first bake.
The Filling Didn’t Set
This usually means the Chocolate Walnut Crumble Pie was underbaked. Return it to the oven for 5-10 minute increments, checking for a firm but slightly jiggly center each time. Investing in an oven thermometer can help verify your oven’s accuracy, as temperatures can vary significantly.
Crumble Topping Burned Too Quickly
If your crumble is browning too fast while the filling needs more time, loosely tent the pie with aluminum foil during the last 15-20 minutes of baking. This acts as a shield, protecting the topping from over-browning while the pie finishes cooking through.
My Pie Is Too Gooey/Dry
Achieving the perfect consistency often comes down to precise baking time for your specific oven. Rely on the visual cues of golden edges and a slight jiggle in the center rather than strictly adhering to the clock. Every oven behaves differently, so adjust baking times as needed based on how your pie looks.
Enjoying Your Masterpiece: Serving & Storage Tips
Perfect Pairings & Serving Suggestions
This rich Chocolate Walnut Crumble Pie is heavenly on its own, its flavors shining through beautifully. For an extra touch of indulgence, it pairs exquisitely with a scoop of premium vanilla bean ice cream, a dollop of freshly whipped cream, or a warm cup of robust coffee or comforting tea. Its deep flavors make it a versatile dessert.
Storing Leftovers for Lasting Freshness
Store leftover pie covered loosely with plastic wrap or in an airtight container at room temperature for up to 2 days to maintain its optimal texture. For extended freshness, it can be kept in the refrigerator for up to 4-5 days. If desired, individual slices can be gently warmed in the microwave or a low oven before serving for a comforting experience.
Make-Ahead & Freezing Options
You can prepare the filling and crumble ahead of time, storing them separately in airtight containers in the refrigerator for up to 2 days. For freezing, a fully baked and completely cooled Chocolate Walnut Crumble Pie can be wrapped tightly in plastic wrap, then foil, and frozen for up to 2 months. Thaw the pie in the refrigerator overnight before serving, or warm gently in a low oven from frozen for a warm treat.
Your Questions Answered: Chocolate Walnut Crumble Pie FAQs
Can I use a homemade pie crust?
Absolutely! A homemade pie crust works wonderfully with this recipe and can elevate the overall flavor. Just ensure you still follow the blind baking steps precisely to achieve that crisp, no-soggy-bottom result, as this technique is key for both store-bought and homemade crusts.
Can I substitute other nuts for walnuts?
Yes, you can! Pecans are an excellent substitute for walnuts, offering a similar texture and a rich, buttery flavor that complements chocolate beautifully. Almonds or even hazelnuts could also work, though they would subtly change the taste profile of the pie. Feel free to experiment based on your preferences.
What if I don’t have pie weights for blind baking?
No pie weights? No problem! You can easily substitute them with common pantry items such as dried beans, uncooked rice, or even granulated sugar. Just make sure to cover the crust with parchment paper first before adding your chosen weights, so they don’t stick to the dough.
How do I know when the Chocolate Walnut Crumble Pie is truly done?
The pie is ready when the filling around the edges appears set and firm, and the center has only a slight, gentle jiggle when the pie is carefully shaken. The crumble topping should also be a beautiful golden brown. If you have a kitchen thermometer, an internal temperature of 200-205°F (93-96°C) for the filling is a reliable indicator.
Can I make this Chocolate Walnut Crumble Pie gluten-free?
Yes, you can! To make this delicious pie gluten-free, simply use a store-bought gluten-free pie crust that is designed for baking, or prepare your own using a gluten-free all-purpose flour blend. For the crumble topping, directly substitute the all-purpose flour with your preferred gluten-free all-purpose baking blend. Always check product labels for certified gluten-free options.
Ready to Bake? Share Your Chocolate Walnut Crumble Pie Success!
Now that you’re armed with the secret to a perfectly crisp crust and a deliciously rich filling, it’s time to create your own Chocolate Walnut Crumble Pie masterpiece. This recipe isn’t just about baking; it’s about confidently creating a dessert that will delight everyone who tries it, leaving them wondering how you achieved such a perfect crust.
We’d love to see your creations! Share your pictures and stories with us on social media, or leave a comment below with your feedback or any delightful variations you tried. Happy baking, and enjoy every decadent, no-soggy-bottom bite!
Chocolate Walnut Crumble Pie
Course: DessertCuisine: American CuisineDifficulty: easy8
servings25
minutes55
minutes60
minutesAmerican Cuisine
Ingredients
1 (9-inch) unbaked pie crust
2 large eggs
1/2 cup granulated sugar
1/2 cup packed light brown sugar
1/2 cup (1 stick) unsalted butter, melted
1 teaspoon vanilla extract
Pinch of salt
1 cup semi-sweet chocolate chips
1 cup chopped walnuts
For the Crumble Topping:
1/2 cup all-purpose flour
1/4 cup granulated sugar
1/4 cup (1/2 stick) cold unsalted butter, cut into small pieces
1/2 cup chopped walnuts
Directions
- Preheat your oven to 400 degrees Fahrenheit (200 degrees Celsius). Place a baking sheet on the lower rack of the oven while it preheats. This helps ensure an evenly cooked bottom crust.
- Carefully fit the unbaked pie crust into a 9-inch pie plate. Crimp the edges as desired.
- For the anti-soggy bottom trick: Pierce the bottom and sides of the pie crust all over with a fork. Line the pie crust with parchment paper, allowing it to extend over the edges. Fill the parchment-lined crust with pie weights or dried beans.
- Bake the pie crust in the preheated oven on the hot baking sheet for 15 minutes. This crucial step is called blind baking and helps to dry out and set the crust before adding the wet filling.
- Carefully remove the pie crust from the oven. Lift the parchment paper and pie weights out of the crust. Return the crust to the oven for another 5 minutes to lightly brown the bottom. Remove from oven and set aside. Reduce oven temperature to 350 degrees Fahrenheit (175 degrees Celsius).
- While the crust is cooling slightly, prepare the filling. In a medium bowl, whisk together the eggs, granulated sugar, light brown sugar, melted butter, vanilla extract, and salt until well combined and smooth.
- Stir in the chocolate chips and 1 cup of chopped walnuts into the filling mixture. Pour the filling evenly into the prepared, partially baked pie crust.
- To make the crumble topping, in a separate small bowl, combine the flour and 1/4 cup granulated sugar. Cut in the cold butter pieces with a pastry blender or your fingers until the mixture resembles coarse crumbs. Stir in the remaining 1/2 cup chopped walnuts.
- Sprinkle the crumble topping evenly over the chocolate walnut filling in the pie crust.
- Place the pie on the preheated baking sheet (still in the oven) and bake for 35 to 40 minutes, or until the filling is set around the edges but still slightly jiggly in the center, and the crumble topping is golden brown.
- Remove the pie from the oven and let it cool completely on a wire rack before slicing and serving. This allows the filling to fully set and ensures the crust remains crisp.
Notes
- Features a blind-baking technique for a perfectly crisp, non-soggy bottom crust, even with a wet filling.