Ah, classic apple pie. It’s the quintessential comfort dessert, isn’t it? That warm, spiced apple filling encased in a flaky, golden crust… there’s really nothing quite like it. But let’s be honest, sometimes making a beautiful fruit pie can be a little intimidating, especially when you picture that dreaded soggy bottom. You bake it, slice it, and instead of a crisp foundation, you get… well, mush. I used to struggle with this too! For years, my otherwise delicious apple pies had a less-than-ideal base.
That all changed when I discovered one simple, yet powerful, trick. This isn’t some complicated technique or a secret ingredient. It’s a straightforward adjustment to the baking process that guarantees a perfectly cooked bottom crust every single time. And today, I’m thrilled to share my go-to Classic Apple Pie recipe with you, the one that finally solved the soggy bottom dilemma and consistently earns rave reviews.
Reasons This Classic Apple Pie is a Keeper
Beyond finally conquering the soggy bottom, this recipe is a favorite for many reasons:
- Foolproof Method: The core technique ensures a crisp crust, giving you confidence in your pie-baking skills.
- Classic Flavor Profile: It delivers that beloved balance of sweet and tart apples with warm cinnamon and nutmeg.
- Simple Ingredients: You likely have most of the components in your pantry right now.
- Flexible: Works beautifully with store-bought or homemade crusts.
Gathering Your Ingredients for the Perfect Apple Pie
Creating a truly memorable apple pie starts with selecting the right components. This recipe relies on a handful of simple ingredients that work together to create a harmonious and utterly delicious filling, all nestled inside that crucial crisp crust.
For the foundation of our pie, you’ll need:
- Pie Crusts: Two standard 9-inch pie crusts. You can opt for the convenience of high-quality store-bought crusts, which are readily available and reliable, or if you have a cherished family recipe for homemade dough, feel free to use that instead. Either way, you’ll need enough for a bottom crust and a top crust (whether solid or lattice).
Now, for the star of the show – the apples and their flavor builders:

- Apples: About 6-8 medium green apples, peeled, cored, and sliced. Green apples, like Granny Smith, are often preferred for baking because their tartness stands up well to the sweetness of the sugar and they hold their shape beautifully during baking. Using a mix of apple varieties can add more complex flavor – consider adding a few Honeycrisp or Fuji for sweetness and texture contrast. You’ll need roughly 6 cups of sliced apples.
- Granulated Sugar: 1/2 cup of white granulated sugar provides the primary sweetness and helps to create that wonderful syrupy filling as it melts with the apple juices.
- Packed Brown Sugar: 1/4 cup of packed brown sugar. The molasses in brown sugar adds a deeper, caramel-like note to the filling, complementing the apples and spices perfectly. It also contributes moisture.
- Thickener: 1/4 cup of all-purpose flour or cornstarch. This is essential for preventing a watery filling. As the apples cook and release their juices, the flour or cornstarch will absorb and thicken them, ensuring your pie slices aren’t swimming in liquid. Flour tends to result in a slightly cloudier filling, while cornstarch yields a clearer, glossy finish. Either works effectively!
- Spices: 1 teaspoon ground cinnamon and 1/4 teaspoon ground nutmeg. These classic pie spices are non-negotiable! They infuse the apples with warmth and quintessential fall flavor. You can adjust the amounts slightly to your preference, or even add a pinch of ground allspice or cloves for extra depth.
- Butter: 2 tablespoons unsalted butter, cut into small pieces. Dotting the top of the filling with butter adds richness and helps create a lovely, bubbly top layer as it melts into the apples. Using unsalted butter gives you control over the overall saltiness of the pie.
And finally, for that beautiful, golden top crust:
- Egg Wash: 1 large egg, beaten with 1 tablespoon water. Brushing the top crust with this mixture before baking gives it a gorgeous shine and promotes even browning.
- Coarse Sugar: 1 tablespoon coarse sugar (optional, for sprinkling). A sprinkle of coarse sugar on top adds sparkle and a delightful textural crunch to the crust.
Crafting Your Pie: Step-by-Step for a Crisp Crust
Ready to bake the best apple pie of your life? Follow these steps carefully, paying special attention to the crucial preheating trick, and you’ll be rewarded with a pie that’s perfect from top to bottom.
- Prepare for Success (The Secret Step!): Begin by preheating your oven to a hot 425 degrees F (220 degrees C). This high initial temperature is key. As the oven heats, place a sturdy metal baking sheet on the middle rack. Allowing the baking sheet to preheat with the oven is the game-changing trick to prevent that dreaded soggy bottom. When the pie dish is placed on this hot surface, it provides immediate high heat to the bottom crust, setting it and making it crisp before the filling has a chance to make it soggy.
- Mix the Apple Filling: While the oven and baking sheet are heating, prepare your filling. In a large bowl, combine your peeled and sliced apples. Sprinkle the granulated sugar, brown sugar, flour or cornstarch, cinnamon, and nutmeg over the apples. Use a large spoon or spatula to gently toss the apples until every slice is evenly coated with the sugar-spice-thickener mixture. Be careful not to mash the apples; you want them to retain their shape.
- Prepare the Bottom Crust: Carefully take one of your pie crusts and lay it smoothly into a standard 9-inch pie dish. Press it gently into the bottom and up the sides, ensuring there are no air bubbles trapped underneath. Use kitchen shears or a knife to trim away any excess dough around the edge, leaving about a 1-inch overhang. This overhang is needed for sealing the top crust later.
- Add the Filling: Pour the prepared apple filling evenly into the bottom pie crust. Distribute the mixture so the apples are relatively level. Then, take your small pieces of cold butter and dot them over the top of the apple filling. This adds richness and helps create pockets of deliciousness.
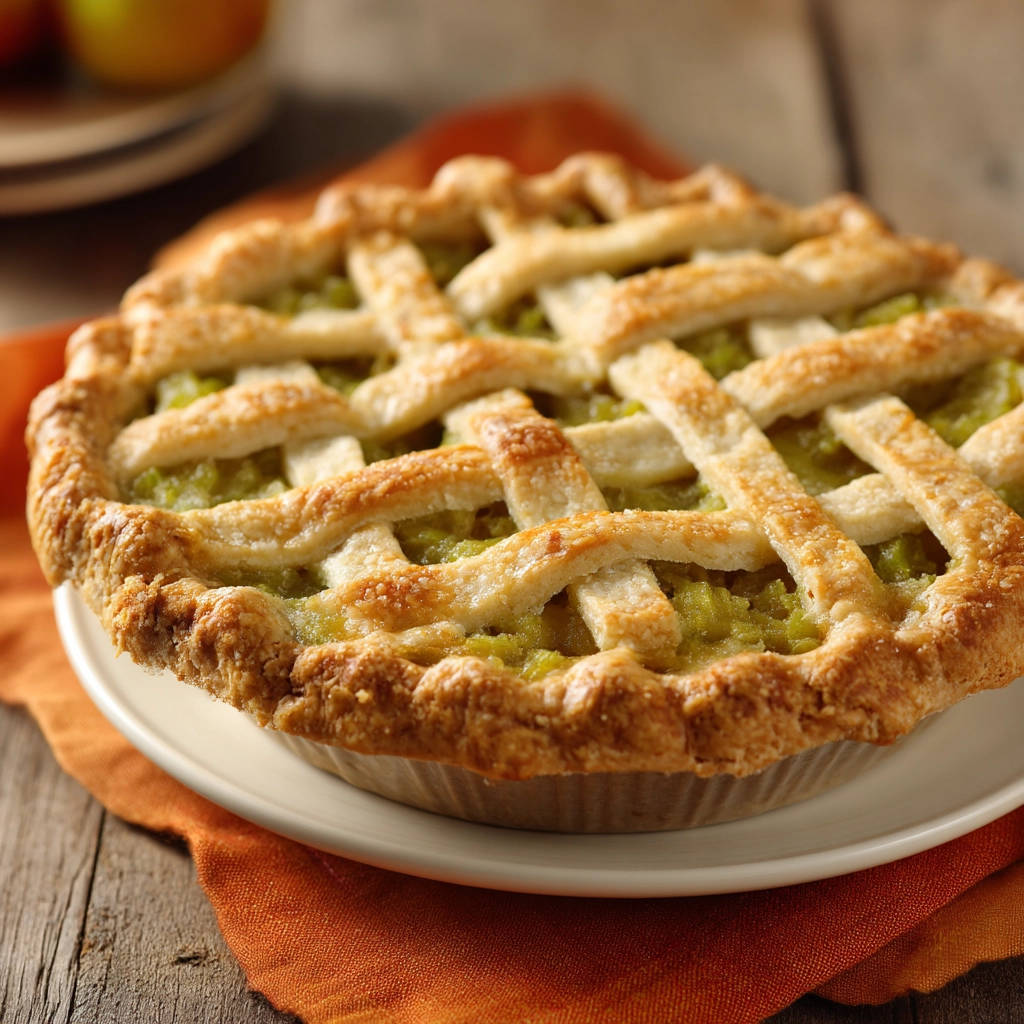
- Add the Top Crust (Lattice or Full): Now it’s time for the top crust. For a classic look, cut the second pie crust into 1-inch wide strips using a knife or a pastry wheel. Arrange these strips over the apple filling in a lattice pattern. Weave the strips over and under each other to create the characteristic criss-cross design. Once the lattice is complete, or if you’re using a full top crust (cut vents in a full crust!), place it over the filling. Trim the edges of the top crust, leaving enough length to meet the bottom crust overhang.
- Seal and Crimp the Edges: Press the edges of the top and bottom crusts together firmly. You can simply press them with your fingers, or use a fork to crimp the edges, creating a decorative and secure seal. This seal is important to keep the bubbly filling contained while baking.
- Apply Egg Wash and Sugar: In a small bowl, make the egg wash by whisking the large egg with 1 tablespoon of water until well combined. Use a pastry brush to lightly brush the top crust (both lattice strips and exposed bottom crust edge) with the egg wash. This helps with browning and shine. If desired, sprinkle the coarse sugar evenly over the egg-washed crust for extra sparkle and crunch.
- The Hot Sheet Transfer: This is the critical soggy-bottom prevention step! Using sturdy oven mitts, carefully remove the hot baking sheet from the preheated oven. Gently lift your filled pie dish and place it directly onto the hot baking sheet.
- Bake to Perfection: Carefully place the baking sheet with the pie back onto the middle rack in the preheated 425 degrees F (220 degrees C) oven. Bake at this high temperature for the initial 15 minutes. This burst of heat sets the bottom crust quickly. After 15 minutes, without opening the oven door too much, reduce the oven temperature to 375 degrees F (190 degrees C). Continue baking for another 45-60 minutes, or until the top crust is beautifully golden brown and you can see the apple filling bubbling up through the lattice or vents. If the edges of your pie crust start browning too quickly before the center is done, you can loosely cover them with thin strips of aluminum foil to protect them.
- Cool COMPLETELY: This step is just as important as the hot baking sheet! Once baked, carefully remove the pie from the oven and place it on a wire rack to cool. It is absolutely crucial to let the pie cool completely, ideally for several hours. As the pie cools, the apple filling continues to thicken and set. Cutting into a hot pie will result in a runny filling and potentially undo some of your non-soggy crust efforts. Patience is key!
Tips for Perfect Apple Pie Every Time
Mastering apple pie is a rewarding journey. Here are a few extra tips to ensure your pie is a triumph:
- Choose Your Apples Wisely: While Granny Smiths are a classic for their tartness and firm texture, don’t be afraid to experiment. Mixing varieties like Honeycrisp, Fuji, Braeburn, or Gala can add layers of flavor and different textures to your filling. Just make sure they are apples suitable for baking (meaning they won’t turn to mush).
- Don’t Skimp on the Thickener: Whether you use flour or cornstarch, make sure your apples are well-coated. This is your best defense against a watery filling, second only to proper cooling.
- Vent Your Top Crust: If you opt for a full top crust instead of a lattice, make sure to cut several vents in it with a knife. These vents allow steam to escape as the pie bakes, preventing the crust from puffing up or cracking excessively and helping the filling thicken properly.
- Protect the Edges: Pie crust edges are notorious for browning faster than the rest of the pie. Keep a roll of aluminum foil handy to create strips you can wrap loosely around the edges if they start to get too dark during baking. This is especially useful during the longer, lower-temperature bake time.
- Make Ahead & Storage: You can prepare the apple filling a few hours ahead of time and keep it covered in the refrigerator. Assemble the pie just before baking for the best results. Baked apple pie can be stored at room temperature for up to two days, covered loosely with foil or plastic wrap. For longer storage, refrigerate for up to 4-5 days.
- Freezing: Unbaked apple pie freezes beautifully! Assemble the pie completely (including egg wash and sugar), then wrap it tightly in plastic wrap and then foil. Freeze for up to 3-4 months. To bake from frozen, do not thaw. Place the frozen pie on your preheated hot baking sheet (following the same temperature guide but adding time) and bake, adding 15-20 minutes to the initial 425°F bake time before reducing the heat. You may need to shield the edges earlier.
What to Serve With Your Apple Pie
Classic apple pie is wonderful on its own, but it truly shines when paired with a few simple accompaniments. A scoop of vanilla ice cream melting into the warm filling is a beloved combination (often called “a la mode”).
Alternatively, a dollop of freshly whipped cream adds a light, airy contrast to the rich filling. For a touch of extra sweetness, a drizzle of caramel sauce elevates the experience. If you’re serving it as part of a larger dessert spread, alongside something creamy like a classic baked cheesecake or a refreshing strawberry caramel cheesecake offers delightful variety.
Your Apple Pie Questions Answered (FAQ)
Got questions about making the perfect Classic Apple Pie? Here are some common ones:
Why do I need to preheat the baking sheet?
This is the secret weapon against soggy bottom crust! Placing the pie dish directly onto a scorching hot baking sheet gives the bottom crust an immediate blast of high heat. This thermal shock helps the dough set and crisp up very quickly, before the moisture from the apple filling has time to soak in and make it soggy. It’s a simple step with dramatic results!
Can I use different types of apples?
Absolutely! While tart green apples like Granny Smith are standard and excellent for baking because they hold their shape, using a mix of apple varieties is highly recommended. Combining tart apples with sweeter ones (like Fuji, Honeycrisp, Gala, or Braeburn) creates a more complex and balanced flavor profile. Just make sure you’re using varieties that are good for baking and won’t turn into applesauce during the long bake time.
Why use both granulated and brown sugar?
Granulated sugar provides straightforward sweetness, while packed brown sugar adds moisture and a lovely, deeper flavor thanks to its molasses content. The combination gives the apple filling a richer, more nuanced sweetness that pairs beautifully with the cinnamon and nutmeg.
Is it better to use flour or cornstarch as a thickener?
Both flour and cornstarch work well to thicken the apple juices released during baking. Flour is a traditional thickener and will create a slightly opaque, gravy-like filling. Cornstarch is a more powerful thickener, requiring less quantity, and results in a clearer, glossy filling. The choice is often based on personal preference for the final look and texture of the filling. Just ensure your apples are well coated with whichever you choose.
How do I know when the pie is done?
Look for visual cues! The top crust should be a beautiful golden brown, not just lightly colored. More importantly, you should see the filling bubbling up through the lattice vents or the cutouts in a solid top crust. The bubbling indicates that the juices are hot and the thickener has had a chance to work properly. You can also gently insert a knife through a vent into the apple filling; the apples should feel tender, not hard. If the crust is browning too fast but the filling isn’t bubbling or the apples aren’t tender, shield the crust edges and continue baking.
Why is cooling the pie completely so important?
Patience is key here! While the pie is still hot, the filling is very liquid. As it cools, the thickener you added (flour or cornstarch) continues to set and absorb moisture. Cutting into a hot pie means the filling will be runny and won’t hold its shape, potentially ruining the slice and making the bottom crust soggy as the hot liquid seeps into it. Allowing it to cool fully ensures you get clean slices with a perfectly set filling.
Enjoy Your Homemade Classic Apple Pie!
There you have it – the secrets to a perfect Classic Apple Pie with a never-soggy bottom! This recipe is more than just ingredients and steps; it’s about creating a timeless treat that brings warmth and joy to any occasion. From the satisfying scent filling your kitchen to that first perfect bite, every moment is a delight.
Give this recipe a try, embrace the simple hot baking sheet trick, and prepare to impress yourself and everyone lucky enough to share a slice. Don’t forget to leave a comment below and let me know how your pie turned out! Happy baking!
Classic Apple Pie

Ingredients
- 2 store-bought pie crusts or homemade pie dough
- 6 cups sliced peeled green apples (about 6-8 medium)
- 1/2 cup granulated sugar
- 1/4 cup packed brown sugar
- 1/4 cup all-purpose flour or cornstarch
- 1 teaspoon ground cinnamon
- 1/4 teaspoon ground nutmeg
- 2 tablespoons unsalted butter, cut into small pieces
- 1 large egg, beaten with 1 tablespoon water (for egg wash)
- 1 tablespoon coarse sugar (optional, for sprinkling)
Directions
- Preheat your oven to 425 degrees F (220 degrees C). Place a baking sheet on the middle rack of the oven while it preheats. This is the key step to prevent a soggy bottom crust.
- In a large bowl, gently toss the sliced apples with the granulated sugar, brown sugar, flour or cornstarch, cinnamon, and nutmeg until the apples are evenly coated.
- Carefully place one pie crust into a standard 9-inch pie dish. Trim any excess dough, leaving about a 1 inch overhang.
- Pour the apple filling into the pie crust. Dot the top of the filling with the small pieces of butter.
- Cut the second pie crust into 1-inch wide strips. Arrange the strips over the filling in a lattice pattern. Crimp and seal the edges of the top and bottom crusts together.
- Brush the top crust with the egg wash and sprinkle with coarse sugar, if desired.
- Carefully remove the hot baking sheet from the oven using oven mitts. Gently place the pie dish directly onto the hot baking sheet.
- Carefully place the baking sheet with the pie back into the preheated oven.
- Bake for 15 minutes at 425 degrees F (220 degrees C). Then, reduce the oven temperature to 375 degrees F (190 degrees C) and continue baking for 45-60 minutes more, or until the crust is golden brown and the filling is bubbly. If the edges of the crust start browning too quickly, you can cover them loosely with aluminum foil strips.
- Remove the pie from the oven and place it on a wire rack to cool completely before slicing and serving. Allowing it to cool fully helps the filling set properly.