Oh, the classic chocolate chip cookie. It’s the ultimate comfort food, the perfect treat with a glass of milk, and a universal symbol of homemade goodness. But let’s be real – trying to bake that perfect batch can sometimes feel like chasing a mythical creature! Have you ever excitedly pulled cookies from the oven, only for them to cool into sad, flat disks or disappointingly hard, dry lumps? It’s a frustrating baking rite of passage we’ve all likely experienced.
What if I told you there’s a way to bypass the guesswork and nail those bakery-style results every single time? Forget flat or dry! This recipe for Classic Chocolate Chip Cookies guarantees gorgeously chewy centers and those irresistible puddles of melted chocolate that make your heart sing.
This isn’t just another recipe; it’s the one that will become your go-to. It’s simple, reliable, and delivers that perfect balance of tender chewiness and rich, molten chocolate in every single bite. Get ready to bake the chocolate chip cookies you’ve always dreamed of!
Why You’ll Fall in Love with These Classic Chocolate Chip Cookies
Beyond just being chocolate chip cookies, these cookies have specific characteristics that make them stand out from the rest. We’re talking about a texture and flavor profile that hits all the right notes for a truly exceptional cookie experience.
- Unbeatable Chewiness: The combination of ingredients and technique here creates a wonderfully soft and chewy interior that contrasts beautifully with slightly crisp edges.
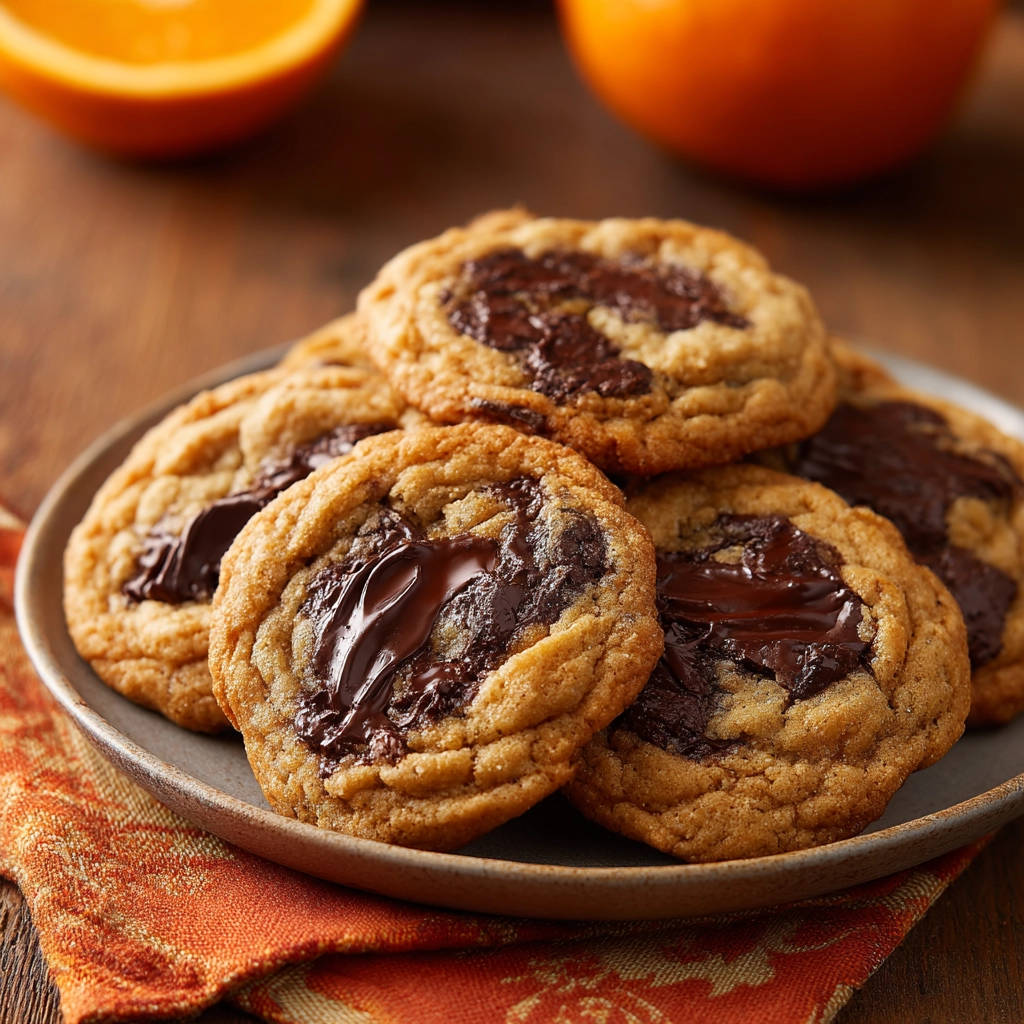
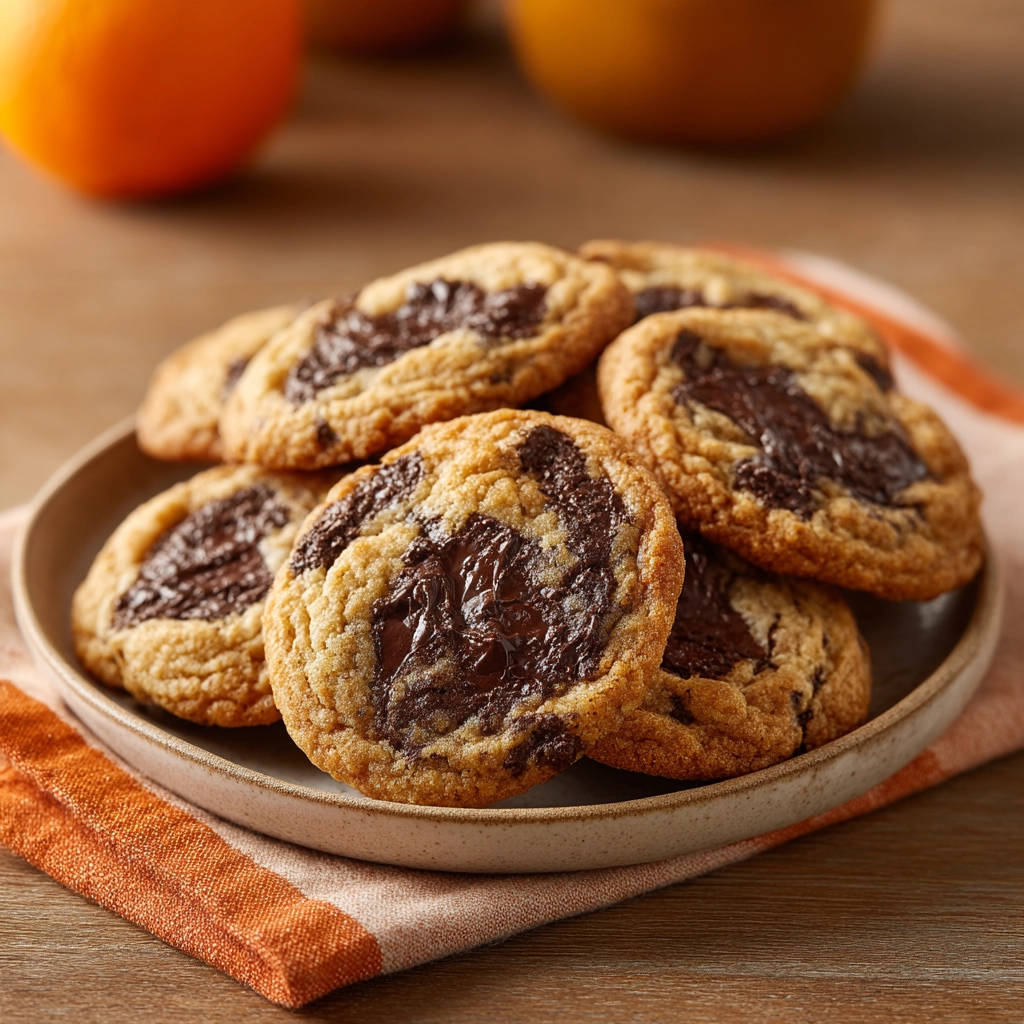
- Gooey Chocolate Puddles: There’s a specific trick in the method (don’t worry, we’ll get to it!) that ensures you get those pools of melted chocolate shining right on top, not just hidden inside. It’s a game-changer for visual appeal and chocolatey impact.
- Deep, Rich Flavor: Using melted butter and a specific ratio of sugars helps develop a deeper, almost caramelized flavor profile that’s far more complex than your average cookie.
- Reliably Perfect: Follow these steps, including the optional chill time, and you’ll get consistent, fantastic results batch after batch. Say goodbye to disappointing cookies!
- Quick Prep: Despite the impressive results, the actual hands-on time for mixing the dough is minimal – only about 15 minutes!
Gathering Your Ingredients for Chewy Chocolate Chip Cookies
The magic of these chewy chocolate chip cookies starts with selecting the right components and understanding how they work together. Each ingredient plays a vital role in achieving that perfect texture and depth of flavor we’re after. Let’s break down what you’ll need and why.
The foundation of these cookies relies on a blend of fats and sugars. Using melted unsalted butter instead of softened creamed butter is intentional; it changes the cookie’s structure, leading to a chewier outcome rather than a cakey one. Unsalted butter allows you to control the overall saltiness of the cookie.
For sweetness and texture, we use a dynamic duo: granulated sugar and packed light brown sugar. The granulated sugar helps with spread and crisping the edges slightly, while the star here is the brown sugar. Its molasses content adds moisture, contributes significantly to the chewiness, and imparts those lovely caramel notes that pair so well with chocolate.
Just one large egg binds everything together and adds richness, while a splash of vanilla extract enhances all the other flavors, adding warmth and complexity to the dough.
Our dry team consists of all-purpose flour, the main structural component. It’s crucial to measure this correctly – either by weight or using the ‘spoon and level’ method – to avoid dense or dry cookies. Baking soda is our leavening agent; it reacts with the brown sugar’s acidity to help the cookies spread and contribute to that desirable chewiness and slight lift. Finally, a touch of salt is essential for balancing the sweetness and bringing out the full flavor of the chocolate.
And of course, the chocolate! We call for chocolate chunks or chopped bar chocolate. While chocolate chips hold their shape, using chunks or chopped chocolate creates those beautiful, melty puddles because they contain stabilizers that prevent them from spreading fully. Chopping a quality chocolate bar is highly recommended for the best flavor and melt.
Here is the full list:
- 1/2 cup unsalted butter, melted
- 1/4 cup granulated sugar
- 1/2 cup packed light brown sugar
- 1 large egg
- 1 teaspoon vanilla extract
- 1 1/4 cups all-purpose flour
- 1/2 teaspoon baking soda
- 1/4 teaspoon salt
- 1 cup chocolate chunks or chopped bar chocolate
Crafting Your Chewy & Gooey Chocolate Chip Cookies: Step-by-Step
Alright, let’s get baking! Follow these detailed steps, and you’ll be well on your way to cookie perfection. Pay attention to the nuances – they make all the difference!
-
Get Ready to Bake: Start by preparing your workspace and oven. Preheat your oven to 350 degrees F (175 degrees C). While it heats, line your baking sheets with parchment paper. Parchment paper is key here – it prevents sticking, ensures even browning on the bottom, and makes cleanup a breeze. Having your sheets lined and oven ready means you can pop the cookies in as soon as the dough is prepared.
-
Combine Wet Ingredients (Part 1): In a medium-sized mixing bowl, pour in your melted butter. Add the granulated sugar and the packed light brown sugar. The ‘packed’ is important for brown sugar – gently press it into the measuring cup. Whisk these together thoroughly until the mixture is smooth and the sugars are starting to dissolve into the warm butter. This step helps build the base flavor and texture.
-
Combine Wet Ingredients (Part 2): Now, crack in your large egg and add the vanilla extract. Beat these into the sugar-butter mixture. Mix until the egg is just incorporated and you have a smooth, cohesive wet mixture. Avoid over-beating here; we’re not trying to whip air into the batter like a cake, just bringing everything together.
-
Prepare Dry Ingredients: Grab a separate, smaller bowl. Whisk together the all-purpose flour, baking soda, and salt. Whisking ensures the leavening agent (baking soda) and salt are evenly distributed throughout the flour. This prevents pockets of leavener and ensures consistent rise and flavor in every cookie.
-
Combine Wet and Dry: This is a crucial step! Gradually add the dry ingredients to the wet ingredients. Mix on the lowest speed setting of your mixer, or use a sturdy wooden spoon or spatula. Mix only until the dry streaks of flour disappear and everything is just combined. The dough will be soft and slightly sticky. As soon as you see no dry flour, stop mixing immediately. Overmixing after adding flour develops too much gluten, which can result in tough, less-chewy cookies.
-
Incorporate Most of the Chocolate: Add about two-thirds of your chocolate chunks or chopped chocolate to the dough. Gently fold them in with a spoon or spatula until they are distributed throughout the dough. We reserve some chocolate for the next step – trust us on this one!
-
The Secret for Gooey Puddles: Now for the trick that guarantees those stunning, visible melted chocolate puddles on top! Scoop rounded tablespoons of dough and place them onto your prepared baking sheets, leaving about 2 inches of space around each one to allow for spreading. Take the remaining chocolate chunks you set aside and gently press several pieces directly onto the top surface of each dough ball. This ensures that as the cookies bake and spread, those chocolate pieces melt beautifully right on top, creating those desirable gooey pools that catch the light.
-
Optional, But Recommended, Chill Time: For cookies that are slightly thicker, boast an even chewier texture, and have a more developed flavor, take the extra step to chill the scooped dough balls on the baking sheet. Place the sheets in the refrigerator for at least 30 minutes. Chilling solidifies the fat in the dough, preventing excessive spread during baking and resulting in a taller, chewier cookie. It also allows the flavors to meld. If you’re in a rush, you can skip this, but for the best results, don’t!
-
Bake to Perfection: Place the baking sheets in your preheated oven. Bake for 10 to 12 minutes. You’re looking for the edges to be lightly golden brown, but the centers should still look noticeably soft, perhaps even a little underbaked or puffy. This is exactly what you want! The residual heat will continue to cook the centers as they cool, setting them into that perfect chewy consistency. Don’t overbake, or you’ll lose the chewiness.
-
Cooling Process: Once the cookies are out of the oven, leave them on the hot baking sheets for a full 5 minutes. This is crucial for allowing them to set properly before moving. They are delicate when hot! After 5 minutes, gently transfer them to a wire rack using a spatula to cool completely. Allowing them to finish cooling on the rack prevents the bottoms from getting soggy from residual heat and steam.
Tips for Perfect Chocolate Chip Cookies Every Single Time
Achieving chocolate chip cookie nirvana is well within your reach! While the recipe itself is straightforward, a few insider tips can elevate your results from great to absolutely phenomenal. Here are some things to keep in mind as you bake:
- Measure Your Flour Correctly: This is arguably the most common cause of dry or cakey cookies. Don’t scoop the flour directly from the bag with your measuring cup, as this compacts it. Instead, gently spoon the flour into your measuring cup and then level off the excess with a straight edge, like a knife. Or, even better, use a kitchen scale for accuracy (1 1/4 cups all-purpose flour is approximately 156 grams).
- Don’t Overmix the Dough: As mentioned in the steps, stop mixing the moment you no longer see dry flour. Overworking the dough develops gluten, which can lead to tougher cookies. A few small streaks of flour are better than an overmixed, tough dough.
- Quality Chocolate Matters: Using good quality chocolate chunks or chopped bar chocolate makes a significant difference in flavor and how the chocolate melts. Look for chocolate you enjoy eating plain. Different types (dark, milk, semi-sweet, or a mix) will give you different results! For another rich, chocolatey treat, why not try making dark chocolate chip cookies or even something decadently different like fudgy brownies?
- Embrace the Chill Time: Seriously, don’t skip the 30-minute chill if you have the time. It hydrates the flour, solidifies the fat for less spread (thicker cookies!), and concentrates the flavor. You’ll get a chewier, more flavorful cookie.
- Don’t Overbake: This is the other critical factor for chewiness. Those slightly underbaked centers are exactly what you want when they come out of the oven. They will continue to cook and set as they cool, resulting in that perfect soft, chewy middle. Edges lightly golden, centers still soft!
- Know Your Oven: Oven temperatures can vary! If you find your cookies are baking much faster or slower than the recipe suggests, or are browning unevenly, consider getting an inexpensive oven thermometer to check its accuracy.
- Cooling is Part of Baking: Let the cookies set on the baking sheet for 5 minutes before moving them. This is essential for them to firm up enough to transfer without falling apart and ensures they continue to cook slightly outside the direct oven heat.
- Storage: Store cooled cookies in an airtight container at room temperature for up to 3-4 days. For longer storage, the baked cookies or even the raw dough balls can be frozen.
Recipe Variations to Try
Once you master the classic version, feel free to experiment! Here are a few ideas to get you started:
- Add Nuts: Stir in 1/2 to 1 cup of chopped walnuts or pecans along with the chocolate chips for added crunch and flavor.
- Different Chocolate: Mix semi-sweet, milk, and dark chocolate chunks for a complex chocolate experience. Or try adding white chocolate chips!
- Additions: Consider adding a sprinkle of flaky sea salt on top of the dough balls before baking for that popular sweet and salty combination. You could also experiment with a pinch of cinnamon or a tiny amount of espresso powder in the dry ingredients to enhance the chocolate flavor.
Serving Suggestions for Peak Enjoyment
These chewy, gooey chocolate chip cookies are absolutely perfect on their own, warm from the oven, perhaps with the chocolate still delightfully molten. But they also pair beautifully with a few simple accompaniments to create an even more memorable treat.
A tall, cold glass of milk is the quintessential pairing, bringing out the sweetness and providing a creamy contrast to the cookie’s texture. For something a bit more indulgent, serve warm cookies alongside a scoop of vanilla ice cream – the melting ice cream mingling with the warm chocolate is pure bliss! Feeling fancy? A drizzle of caramel sauce or a dollop of whipped cream wouldn’t be unwelcome.
If you’re hosting, a plate of these cookies is always a crowd-pleaser. You could even arrange them with other easy desserts like easy chocolate clusters or classic chewy treats for a simple dessert spread. And don’t forget a warm beverage! While coffee and tea are great, a rich mocha frappe makes a delightful pairing.
Your Classic Chocolate Chip Cookie Questions Answered (FAQ)
Making perfect cookies can sometimes bring up questions. Here are answers to some common queries about achieving chewy, gooey chocolate chip cookie perfection:
Why did my chocolate chip cookies come out flat and greasy?
Several factors can cause cookies to spread too much and become flat. The most common culprits are using butter that is too soft or even slightly melted (beyond what the recipe calls for), not chilling the dough (especially if using melted butter), oven temperature being too low, or the baking soda being old or expired. Ensure your butter is melted as specified, consider the optional chill time, check your oven temperature, and make sure your leavening agents are fresh!
Why are my chocolate chip cookies hard or dry?
This usually comes down to ingredient measurement or baking time. Too much flour (often from scooping directly from the bag) is a frequent offender, leading to a dry dough. Overmixing the dough after adding flour can develop too much gluten, resulting in a tough cookie. Most importantly, overbaking will evaporate too much moisture, making them hard once cooled. Remember, the centers should look slightly underbaked when you take them out.
Do I really need to chill the dough? What does it do?
While the recipe notes that chilling is optional, it is highly recommended for the best texture. Chilling the dough serves a few purposes: it solidifies the butter, which slows down spread in the oven, leading to thicker, chewier cookies. It also gives the flour time to hydrate, resulting in a more tender texture, and allows the flavors (especially the sugars and vanilla) to meld, resulting in a richer taste. Even a short 30-minute chill makes a noticeable difference.
Can I use chocolate chips instead of chunks?
Yes, you absolutely can use chocolate chips. However, they contain stabilizers that help them hold their shape during baking. This means you won’t get those gorgeous, melted chocolate puddles on top as easily as you will with chopped chocolate bar or chunks, which melt and spread more readily. The flavor will still be great, but the visual and textural experience of those gooey pools will be less pronounced. If you love melty chocolate, try chopping a good quality chocolate bar!
How long will these cookies last, and how should I store them?
Once completely cooled, store your chocolate chip cookies in an airtight container at room temperature. They are best enjoyed within 3-4 days for optimal freshness and chewiness. For longer storage, you can freeze baked cookies in an airtight container or freezer bag for up to 3 months. Thaw at room temperature, or gently warm in a low oven (around 300°F / 150°C) for a few minutes to regain some of that fresh-baked warmth.
Can I freeze the cookie dough?
Yes, this dough freezes beautifully! Scoop the dough balls as directed in the recipe and place them on a parchment-lined baking sheet or plate that fits in your freezer. Freeze until solid (about 1-2 hours), then transfer the frozen dough balls to an airtight freezer bag or container. Label with the date. They can be frozen for up to 3 months. When ready to bake, you can bake them directly from frozen, adding a couple of extra minutes to the baking time (usually 12-15 minutes total). Freezing dough is a great way to have fresh-baked cookies on demand, much like preparing classic blueberry scones or other baked goods ahead of time.
Enjoy Your Homemade Classic Chocolate Chip Cookies!
There you have it – the key to truly unforgettable, chewy, and gooey Classic Chocolate Chip Cookies. No more settling for flat, hard, or dry! With this recipe and a couple of simple techniques, you can confidently bake cookies that will disappear from the cooling rack almost instantly.
Whip up a batch today and experience the difference. The aroma filling your kitchen, the joy of biting into that perfect texture, the rich chocolate melting in your mouth – it’s pure happiness in cookie form. They’re perfect for sharing (or not!), for a treat after dinner, or just because you deserve something delicious.
Give this recipe a try, and let me know how they turn out in the comments below! I can’t wait to hear about your cookie success. Happy baking!
Classic Chocolate Chip Cookies

Ingredients
- 1/2 cup unsalted butter, melted
- 1/4 cup granulated sugar
- 1/2 cup packed light brown sugar
- 1 large egg
- 1 teaspoon vanilla extract
- 1 1/4 cups all-purpose flour
- 1/2 teaspoon baking soda
- 1/4 teaspoon salt
- 1 cup chocolate chunks or chopped bar chocolate
Directions
- Preheat your oven to 350 degrees F (175 degrees C). Line baking sheets with parchment paper.
- In a medium bowl, whisk together the melted butter, granulated sugar, and brown sugar until well combined and smooth.
- Beat in the egg and vanilla extract until just incorporated.
- In a separate small bowl, whisk together the flour, baking soda, and salt.
- Gradually add the dry ingredients to the wet ingredients, mixing on low speed or with a wooden spoon until just combined. Do not overmix once the flour is added. The dough should be soft.
- Stir in about two thirds of the chocolate chunks.
- Here is the key for those guaranteed gooey puddles: Scoop rounded tablespoons of dough onto the prepared baking sheets, leaving about 2 inches between them. Take the remaining chocolate chunks and press several pieces onto the top surface of each dough ball before baking. This ensures visible, melted chocolate goodness right on top!
- For slightly thicker, chewier cookies, you can chill the dough balls on the baking sheet for 30 minutes before baking. This step is optional but highly recommended for best results.
- Bake for 10 to 12 minutes, or until the edges are lightly golden and the centers still look slightly soft. The cookies may look underbaked in the center, but they will set as they cool.
- Let the cookies cool on the baking sheets for 5 minutes before transferring them to a wire rack to cool completely.