
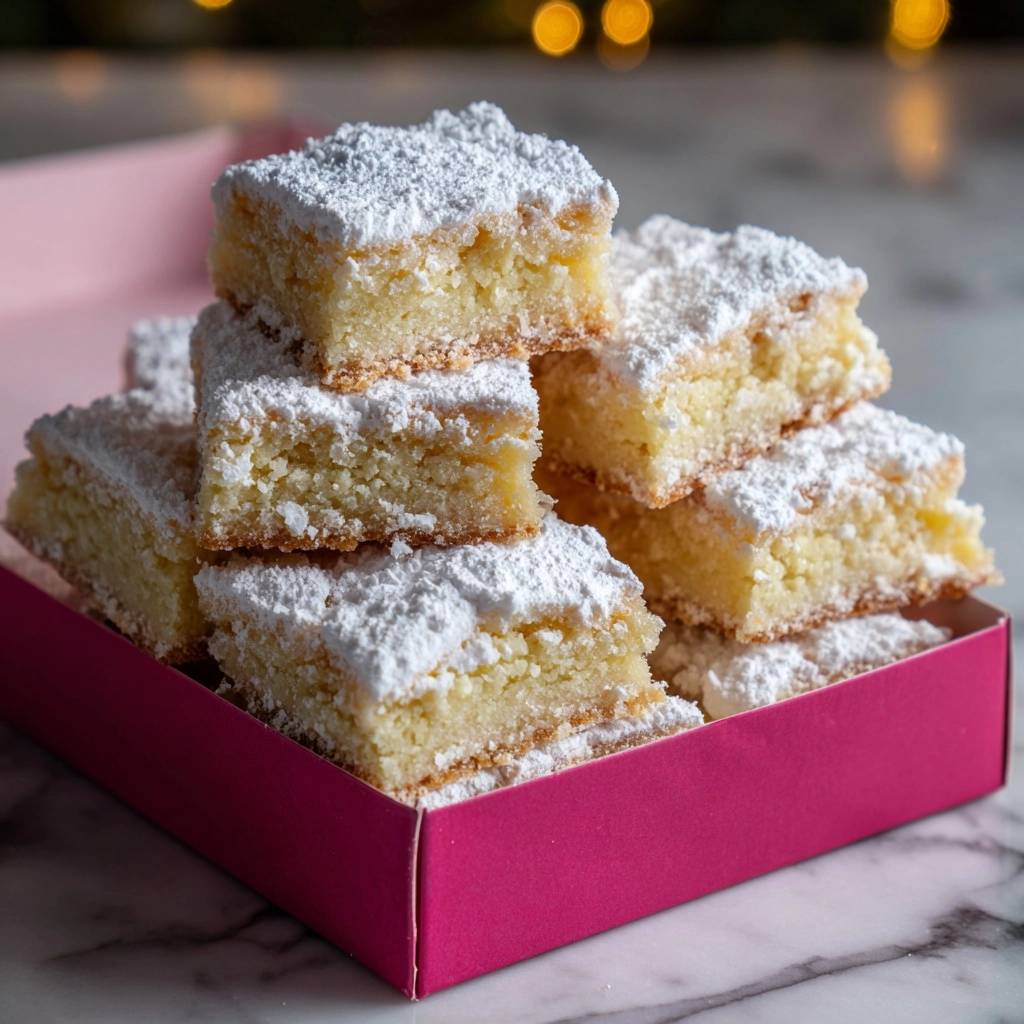
Ever sliced into lemon bars only to watch the filling ooze everywhere? Those runny disasters ruin the whole batch. This classic lemon bars recipe fixes that with a precise bake-and-chill method. You get firm, sliceable texture every time, perfect for holiday gifting.
Therefore, you avoid the common flop of gooey centers that fall apart. Fresh lemons and exact timing create that tangy, sunny bite without the mess. In addition, the hot crust pour starts the set right, locking in structure as it bakes.
The secret lies in the chill phase. After 30 minutes on the rack, refrigerate for 4 hours or overnight. That firms everything up through starch retrogradation, so your classic lemon bars cut cleanly without gumminess. Oh man, the first bite’s crisp crust and jiggly-yet-firm lemon layer? Pure joy.
Crust Foundation for Classic Lemon Bars
Selecting Butter and Sugar Ratios
Start with 1 cup softened unsalted butter for tenderness in your classic lemon bars crust. Cold butter leads to tough, uneven texture, so let it sit out 30 minutes. Therefore, it creams smoothly with 1/2 cup powdered sugar, creating a crumbly dough that presses perfectly.
Powdered sugar melts without graininess, unlike granulated. Use these ratios for a 9×13 pan; they yield a buttery base that holds the filling. In addition, unsalted keeps salt levels precise for balanced flavor.
Flour and Salt Precision
All-purpose flour’s protein gives the crust structure; 2 cups exact prevents crumbling or sogginess. Sift it first for even mixing and pressing. However, don’t overwork, or it toughens up.

Salt at 1/4 teaspoon enhances buttery notes without overpowering. Press dough evenly into the pan for uniform baking. This setup supports the lemon filling perfectly.
Building the Lemon Filling Structure
Eggs and Sugar Whipping Technique
Whisk 4 large eggs with 2 cups granulated sugar vigorously for 2 minutes until pale and thick. This aerates the mix, providing lift so it sets firm. Room-temp eggs blend better, avoiding lumps.
You’re aiming for ribbon stage; the mixture holds shape briefly off the whisk. Therefore, it won’t separate during baking. Fresh eggs ensure proper coagulation for non-runny classic lemon bars.
Incorporating Lemon Juice and Zest
Juice 2 fresh lemons for 1/3 cup; it delivers bright acidity. Zest 1 tablespoon to extract oils for intense flavor without bitterness. Add them after eggs-sugar for smooth incorporation.
Whisk gently to avoid lumps from the acid hitting flour early. This balance keeps the filling tangy yet structured. In addition, fresh beats bottled for vibrant taste and better set.
Baking Powder and Final Blending
Stir in 1/4 cup flour, 1/2 teaspoon baking powder, and 1/4 teaspoon salt last. Baking powder gives gentle lift, preventing dense or cracked filling. Whisk until smooth, no streaks.
Pour immediately over hot crust; the heat jump-starts integration. Therefore, edges set first while center firms evenly. This step guarantees sliceable classic lemon bars.
Science of Perfect Lemon Bars Set
Bake Timing for Edge-to-Center Firmness
Preheat to 350°F; bake crust 18-20 minutes until lightly golden. Edges firm up, releasing steam for crispness. Then pour filling and bake 25-28 minutes.
Look for set edges and slight center jiggle, no wet shine. Proteins coagulate, starches gelatinize, creating structure. However, overbaking cracks it; underbaking leaves runniness. This timing nails firm texture.
Pro tip: Use an oven thermometer. Ovens vary, so calibrate for precision. Your classic lemon bars will thank you with perfect slices.
Chill Phase for Non-Runny Cuts
Cool on rack 30 minutes; this prevents thermal shock. Then cover and refrigerate 4 hours or overnight. Starch retrogradation firms the filling completely.
No-chill versions stay gummy and ooze. Overnight works best; thermodynamics solidify without cracking. Therefore, you get clean cuts every time.
Equipment Choices for Lemon Bars Success
9×13 Pan and Parchment Setup
Metal 9×13 conducts heat evenly for quick, uniform baking. Glass takes longer and risks uneven set. Line with parchment overhang on two sides for easy lift-out.
However, if no 9×13, use 8×8 but adjust time up 5 minutes. This setup prevents sticking and simplifies cutting classic lemon bars.
Mixing Tools and Wire Rack Cooling
Hand whisk the filling; electric over-aerates and deflates structure. Beat butter by hand or mixer on low. Wire rack cools evenly, avoiding soggy bottoms.
In addition, calibrate your oven thermometer. It ensures accurate temps for flawless results.
Step-by-Step Assembly of Classic Lemon Bars
Prepping and Baking the Crust Base
Preheat oven to 350°F. Line 9×13 pan with parchment overhang. Beat softened butter and powdered sugar until creamy, 1-2 minutes.
Add 2 cups flour and 1/4 teaspoon salt; mix to crumbly dough. Press evenly into pan, about 1/4-inch thick. Bake 18-20 minutes until lightly golden and fragrant.
Whisking, Pouring, and Second Bake
Whisk eggs and sugar 2 minutes to pale ribbons. Add lemon juice, zest, flour, baking powder, salt; whisk smooth. Pour over hot crust right away.
Bake 25-28 minutes. Edges set, center jiggles slightly without shine. Cool on rack 30 minutes.
Cooling, Chilling, and Cutting Precision
Cover pan; refrigerate 4 hours or overnight. Lift using parchment. Cut into 16 squares; dust with 1/4 cup powdered sugar.
Store airtight up to 5 days. The chill ensures non-runny slices that hold shape.
Avoiding Lemon Bars Pitfalls
Preventing Runny or Cracked Filling
Runny filling comes from underbaking or weak whisking; always hit jiggle stage. Cracks mean overbake or no baking powder. Use fresh lemons and exact flour for thickeners.
Pour on hot crust for seamless bond. Therefore, chill fully to lock in. These steps deliver perfect classic lemon bars.
Crust Issues and Texture Fixes
Dough too wet? Add 1 tablespoon flour. Uneven press causes thin spots that burn; use flat glass for even layer. Softened butter prevents hardness.
Overbeating toughens; mix just until crumbly. Quick fixes ensure buttery perfection next time.
Flavor Twists on Classic Lemon Bars
Citrus Swaps and Zest Boosts
Swap for lime juice for tropical tang; use 1/3 cup from 3 limes. Double zest amps intensity. Vegan? Mix 4 flax eggs (4 tbsp flax + 12 tbsp water).
These keep the firm set intact. Experiment for your twist on classic lemon bars.
Sugar Adjustments and Add-Ins
Reduce sugar to 1 3/4 cups for tarter bite. Add 1/2 cup coconut flakes to crust for chew. Dust with granulated if powdered clumps.
Top with fresh berries for contrast. Keeps the texture sliceable.
Pairing Classic Lemon Bars Sides
Beverage Matches for Brightness
Iced green tea cuts the richness with herbal notes. Sparkling water refreshes the lemon tang. Herbal teas like mint balance sweetness perfectly.
These contrast the buttery crust without overwhelming.
Occasion Menus and Platters
Pair with shortbread on holiday trays. Picnic with fruit salad for lightness. Gift wrapped in cellophane; scales to double for crowds.
Always a hit at brunches or teas.
Make-Ahead Strategies for Lemon Bars
Freezing Whole Batches
Cool fully, wrap in parchment then plastic. Freeze up to 3 months. Thaw overnight in fridge; dust after.
Texture holds well; no sogginess if airtight. Perfect for holidays.
Component Prep Timeline
Make crust dough; fridge 2 days. Whisk filling day ahead, store covered. Bake-chill schedule fits events seamlessly.
Pro tip: Bake evening before for next-day serving.
Troubleshooting Classic Lemon Bars Issues
Filling Not Setting Firmly
Old eggs or bottled juice weaken set; use fresh. Short chill leaves gumminess; go overnight. Rebake 5 minutes if needed, then chill.
Exact measures prevent this every time.
Crust Too Hard or Soft
Overbeaten butter hardens; underbaked softens base. Soften precisely, bake to golden. Adjust flour by tablespoon next batch.
Powdered Sugar Dusting Problems
Sift sugar to avoid clumps; dust chilled bars. Store airtight to maintain snowy look. Re-dust before serving if needed.
Scaling Recipe for Sizes
For 8×8, halve ingredients; bake crust 20-22 min, filling 28-30 min. Same 350°F. Watch closely for jiggle.
Classic Lemon Bars Queries
Can I Use Bottled Lemon Juice?
Bottled works but tastes flatter, sets slightly softer. Fresh from 2 lemons gives bold flavor and firmer texture. Use 1/3 cup either way.
How Long Do They Last Refrigerated?
Airtight container holds 5 days in fridge. Freezer 3 months wrapped tight. Look for dull sugar or off smell to discard.
Gluten-Free Classic Lemon Bars Adaptation?
Swap 2 cups 1:1 gluten-free flour blend. Add 1/4 tsp xanthan gum to crust for binding. Filling stays same; test bake for timing.
Why Jiggle in Center After Baking?
Normal carryover cooking; chill finishes set. Overbake risks cracks. Jiggle means proteins still firming perfectly.
Best Pan Material for Even Baking?
Aluminum metal excels for quick, even heat. Glass needs 25°F less or 5 extra minutes. Avoid dark pans; they overbrown edges.
Classic Lemon Bars
Course: DessertCuisine: AmericanDifficulty: easy16
squares20
minutes45
minutes300
MinutesAmerican
Ingredients
Crust:
1 cup unsalted butter, softened
1/2 cup powdered sugar
2 cups all-purpose flour
1/4 teaspoon salt
Filling:
4 large eggs
2 cups granulated sugar
1/3 cup fresh lemon juice (about 2 lemons)
1 tablespoon lemon zest
1/4 cup all-purpose flour
1/2 teaspoon baking powder
1/4 teaspoon salt
Topping:
1/4 cup powdered sugar, for dusting
Directions
- Preheat oven to 350 degrees F. Line a 9×13-inch baking pan with parchment paper, leaving overhang on two sides for easy removal.
- For the crust: Beat butter and powdered sugar until creamy. Add flour and salt; mix until crumbly dough forms. Press evenly into prepared pan. Bake 18 to 20 minutes until lightly golden.
- For the filling: Whisk eggs and sugar vigorously until pale and thick, about 2 minutes. Add lemon juice, zest, flour, baking powder, and salt; whisk until smooth.
- Pour filling over hot crust. Bake 25 to 28 minutes until edges are set and center has a slight jiggle but no wet shine. This controlled bake prevents cracks while starting the set.
- Cool pan on wire rack 30 minutes. Cover and refrigerate 4 hours or overnight. The chill is the game-changer: it fully firms the filling for clean, non-runny cuts without any gumminess.
- Lift bars using parchment overhang. Cut into 16 squares. Dust generously with powdered sugar. Store in airtight container up to 5 days.
Notes
- The chill is the game-changer: it fully firms the filling for clean, non-runny cuts without any gumminess. Store in airtight container up to 5 days.


