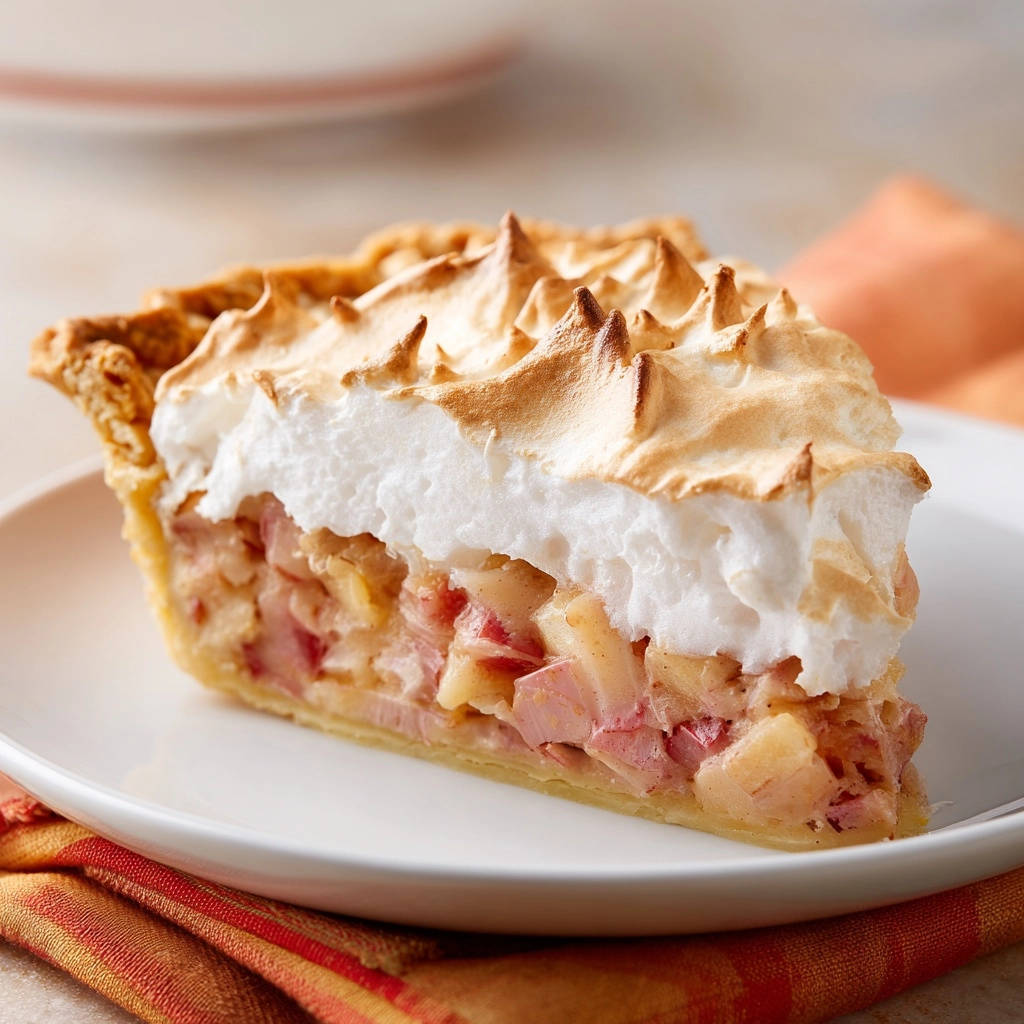
For years, I faced the classic baker’s dilemma with meringue pies: that beautiful, towering topping would inevitably “weep” or shrink, turning a masterpiece into a puddle. But through countless experiments, I finally cracked the code to achieving a perfectly stable, gloriously golden Classic Rhubarb Meringue Pie every single time. This recipe delivers not just incredible flavor, but a meringue that holds its stunning shape with pride, ensuring your pie looks as magnificent as it tastes.
Why Our Classic Rhubarb Meringue Pie Stands Out (No More Weeping!)
Our Classic Rhubarb Meringue Pie recipe addresses the most frustrating challenges bakers face. The primary secret lies in a specific technique for applying the meringue, guaranteeing a stable, glossy topping. You won’t find sad, shrinking, or weeping meringue here.
This approach builds trust, giving you the confidence that your efforts will result in a visually stunning and delicious pie. Say goodbye to guesswork and hello to consistent perfection with every slice.
Gathering Your Pantry Staples: Inside This Pie’s Perfection
Success starts with understanding your ingredients. Each component in this Classic Rhubarb Meringue Pie plays a crucial role, contributing to both flavor and structure.
The Tangy Rhubarb Filling Essentials
Fresh Rhubarb: Chopped into consistent 1-inch pieces, fresh rhubarb provides the signature tangy-sweet balance. Its natural tartness is essential for cutting through the richness of the meringue.
Granulated Sugar & All-Purpose Flour: These work together to sweeten the rhubarb and thicken the filling. The flour ensures a perfectly set, sliceable consistency without being gummy.
Salt: Just a pinch of salt enhances all the other flavors, making the rhubarb taste brighter and more vibrant.
Melted Unsalted Butter & Vanilla Extract: Butter adds richness and a silky texture to the filling. Vanilla extract deepens the overall flavor profile, complementing the rhubarb beautifully.
Large Egg Yolks & Water: Egg yolks act as an emulsifier and thickener, contributing to the filling’s smooth consistency and custard-like quality. Water helps bind the ingredients and ensures even cooking.
Mastering the Meringue Components
Large Egg Whites (Room Temperature): Room temperature egg whites whip up with significantly more volume and stability. They are the foundation of your light and airy meringue.
Cream of Tartar: This acidic ingredient is critical for stabilizing egg whites. It helps them achieve maximum volume and prevents them from collapsing, leading to a consistently fluffy meringue.
Granulated Sugar: Sugar adds sweetness and structure to the meringue. When added gradually, it helps create a strong, stable foam that holds its shape and develops a glossy sheen.
Vanilla Extract: A touch of vanilla adds warmth and depth to the meringue, balancing its sweetness and enhancing the overall aroma of the pie.
Your Baking Arsenal: Tools for Classic Rhubarb Meringue Pie Success
Having the right tools makes all the difference in achieving baking perfection. Here’s what you’ll need for your Classic Rhubarb Meringue Pie:
9-Inch Pie Plate: The standard size for most pies, ensuring even baking and proper fit for your crust.
Large Mixing Bowls: Essential for combining both your rhubarb filling ingredients and for whipping the egg whites separately.
Small Bowl: For whisking the wet ingredients of the filling.
Whisk or Fork: For blending the filling’s liquid components and gently tossing the rhubarb mixture.
Stand Mixer with Whisk Attachment (Recommended): Absolutely crucial for achieving the perfect meringue. A stand mixer provides consistent, powerful beating, leading to high volume and stable peaks. A hand mixer can also work but may require more effort and time.
Rubber Spatula: For scraping bowls and gently folding ingredients, ensuring nothing is left behind.
Baking Sheet: Placed under the pie, it catches any potential drips from the filling, keeping your oven clean.
Wire Rack: Necessary for cooling the pie completely. Air circulation ensures the bottom crust doesn’t get soggy and the filling sets properly.
Baking Brilliance: A Step-by-Step Guide to Your Classic Rhubarb Meringue Pie
- Prepping Your Oven:
Preheat your oven to 425 degrees Fahrenheit (220 degrees Celsius). This initial high heat is crucial for ensuring the pie crust begins to crisp up quickly and the filling starts to cook efficiently, preventing a soggy bottom.
- Crafting the Rhubarb Filling:
In a large bowl, combine the chopped rhubarb, 1 cup of granulated sugar, all-purpose flour, and salt. Gently toss these ingredients together. Coating the rhubarb evenly ensures every piece is infused with sweetness and the flour is properly distributed to thicken the filling.
- Enriching the Filling Mixture:
In a separate small bowl, whisk together the melted unsalted butter, vanilla extract, 3 large egg yolks, and water until they are thoroughly combined and smooth. This creates a rich, binding liquid for the fruit.
Pour this whisked mixture over the rhubarb mixture in the large bowl. Stir everything gently until the rhubarb pieces are evenly coated. This step ensures the custard base is well incorporated throughout the filling.
- Filling the Pie Crust:
Carefully pour the prepared rhubarb filling into your unbaked 9-inch pie crust. Spread the filling evenly across the bottom of the crust. Place the filled pie onto a sturdy baking sheet; this is your insurance against any bubbling-over drips that could mess up your oven.
- Initial Bake for the Filling:
Bake the pie in your preheated 425 degrees Fahrenheit (220 degrees Celsius) oven for 15 minutes. This initial burst of heat helps set the crust and begins the cooking process for the rhubarb.
After 15 minutes, reduce the oven temperature to 350 degrees Fahrenheit (175 degrees Celsius) and continue baking for another 25 to 30 minutes. You’ll know it’s ready when the filling is visibly bubbling in the center and a piece of rhubarb easily yields to the poke of a fork, indicating it’s tender.
- Whipping Up the Meringue Base:
While the pie finishes baking, begin preparing your meringue. Use a very clean, dry bowl-preferably metal or glass-of a stand mixer. Even a tiny bit of grease or water can prevent egg whites from whipping properly.
Add the 3 room-temperature egg whites and cream of tartar to the bowl. Beat on medium speed until soft peaks form. This means when you lift the whisk, the peaks will stand up but curl over at the tips, indicating enough air has been incorporated.
- Achieving Glossy, Stiff Meringue:
Once soft peaks are achieved, gradually add the 1/2 cup of granulated sugar, one tablespoon at a time, while continuing to beat the meringue on high speed. The slow addition allows the sugar to fully dissolve into the egg whites, creating a stable, glossy meringue.
Continue beating until the meringue is glossy and forms stiff peaks. When you lift the whisk, the peaks should stand straight up without curling. Finally, stir in the teaspoon of vanilla extract for flavor, giving your topping a delightful aroma.
- The No-Weep Meringue Application Trick:
This is the crucial step for a no-weep, no-shrink meringue: As soon as the rhubarb pie comes out of the oven, immediately spoon the hot, freshly whipped meringue over the hot filling. Do not wait!
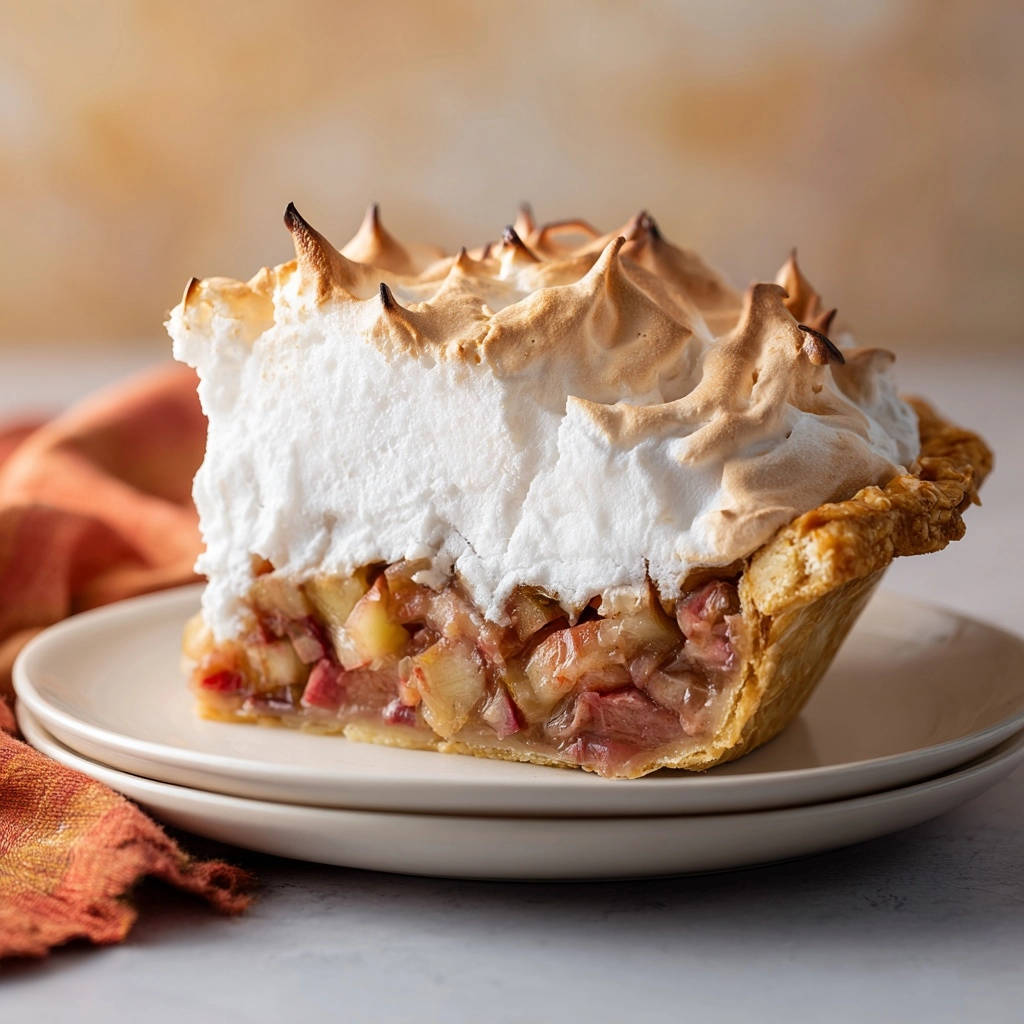
Quickly spread the meringue all the way to the edges of the crust. This creates a seal between the meringue and the hot filling, which is essential for preventing shrinkage and that dreaded weeping. Use the back of a spoon to create attractive decorative peaks on the surface of the meringue.
- Golden Brown Meringue Perfection:
Return the pie to the 350 degrees Fahrenheit (175 degrees Celsius) oven for 10 to 12 minutes. Keep a close eye on it, baking until the meringue peaks are beautifully golden brown. This adds a lovely caramelized flavor and crisp texture to the topping.
- The Essential Cooling Phase:
Once the meringue is golden, remove the pie from the oven and transfer it to a wire rack. Let it cool completely for several hours, ideally 3 to 4 hours, before attempting to slice and serve.
This extended cooling time is absolutely crucial for the rhubarb filling to fully set and for the meringue to stabilize. Rushing this step often leads to a runny filling and an unstable meringue, so patience truly pays off here.
The Meringue Masterclass: Our Secret to No-Weep, No-Shrink Glory
Achieving a picture-perfect meringue isn’t just luck; it’s a combination of precise techniques and understanding the science behind it. Here’s the deeper dive into why our meringue succeeds every time.
The Hot Pie Trick: Sealing the Meringue
Applying the meringue to a piping hot pie filling is our number one secret for preventing weeping. The heat from the filling helps to immediately “cook” the bottom layer of the meringue, creating a protective seal. This barrier prevents moisture from seeping into the meringue from the filling, which is the primary cause of weeping.
Ensuring the meringue touches the pie crust all around the edges is equally important. This seal effectively “glues” the meringue in place, preventing it from shrinking back from the edges as it cools and sets.
Perfect Peaks and Golden Tops
Gradually adding sugar to your egg whites is key for strong, stable peaks. Each small addition of sugar dissolves, strengthening the protein structure of the meringue and allowing it to hold more air. This slow process results in a glossy, firm meringue that can be easily sculpted into beautiful peaks.
For even browning, position your pie in the center of the oven. Keep a close watch during the final browning stage; meringue can go from perfectly golden to burnt very quickly due to its sugar content. A slight golden hue is all you need for that beautiful finish.
The Crucial Cooling Phase Explained
Patience during the cooling phase is non-negotiable for a Classic Rhubarb Meringue Pie. As the pie cools, the filling continues to thicken and set, transforming from a bubbly liquid to a firm, sliceable consistency.
Simultaneously, the meringue is also stabilizing during this time. Rushing the cooling process by cutting into a warm pie can disrupt the set filling and cause the meringue to collapse or weep, even if it was perfectly made. Allow adequate time on a wire rack for air circulation, which helps prevent a soggy bottom crust as well.
Beyond the Recipe: Tips for Classic Rhubarb Meringue Pie Perfection
Elevate your Classic Rhubarb Meringue Pie with these expert tips and variations, ensuring every bake is a resounding success.
Choosing Your Rhubarb: Select firm, brightly colored rhubarb stalks. Thinner stalks are often more tender and less fibrous. Trim both ends, and if the stalks are very wide, consider slicing them lengthwise before chopping into 1-inch pieces for more uniform cooking.
Pre-Baking the Crust (Optional): While this recipe uses an unbaked crust, for an extra-crispy bottom, you can blind bake your pie crust before adding the filling. This is a great technique to prevent sogginess, especially if you’re concerned about a very juicy fruit filling, much like you might for a classic apple pie.
Sweetness Adjustment: Rhubarb’s tartness can vary greatly. Taste a small piece of your raw rhubarb; if it’s exceptionally sour, you might consider adding an extra tablespoon or two of sugar to the filling mixture to balance the flavor to your preference.
Spice It Up: For an added layer of flavor, consider incorporating 1/4 teaspoon of ground cinnamon or ginger into your rhubarb filling alongside the flour and salt. These spices beautifully complement the tartness of the rhubarb.
Troubleshooting Your Classic Rhubarb Meringue Pie: Common Fixes
Help! My Meringue is Weeping!
Weeping (when clear liquid pools under the meringue) usually happens if the meringue wasn’t applied to a hot pie, or if the sugar wasn’t fully dissolved. Ensure you spoon the meringue immediately onto the hot filling to create that crucial seal. Also, always add sugar gradually and beat until it’s completely dissolved and the meringue is glossy and stiff.
Why Did My Meringue Shrink?
Meringue shrinkage often occurs if the meringue wasn’t spread all the way to the edges of the pie crust, creating an incomplete seal. It can also happen if the egg whites weren’t beaten to firm enough peaks, leading to an unstable structure that contracts upon cooling. Make sure your meringue adheres well to the crust all around.
My Rhubarb Filling is Runny!
A runny filling typically means it wasn’t cooked long enough, or not enough flour was used to thicken it. Ensure the pie filling is visibly bubbling in the center during the baking process, indicating it has reached a high enough temperature to activate the thickeners. Also, always allow the pie to cool completely for several hours on a wire rack; the filling continues to set as it cools.
Your Classic Rhubarb Meringue Pie Questions Answered
Can I Use Frozen Rhubarb for This Pie?
Yes, you can use frozen rhubarb. There’s no need to thaw it first, but be aware that frozen rhubarb often releases more liquid. To compensate, you might need to increase the flour in the filling by an extra tablespoon or two to ensure the filling sets properly and isn’t too runny.
How Long Does Classic Rhubarb Meringue Pie Last, and How Should I Store It?
Classic Rhubarb Meringue Pie is best enjoyed within 1-2 days. Due to the perishable nature of the meringue, it’s best stored loosely covered with foil or plastic wrap in the refrigerator. The meringue can start to break down and weep if stored for too long or in humid conditions.
Can I Make This Pie Ahead of Time?
While you can prepare the rhubarb filling mixture a few hours in advance, it’s highly recommended to bake and assemble the pie on the day you plan to serve it. The meringue is at its peak freshness and stability immediately after baking and cooling.
What Can I Substitute for Cream of Tartar?
If you don’t have cream of tartar, you can substitute it with an equal amount of lemon juice or white vinegar. For 1/2 teaspoon of cream of tartar, use 1/2 teaspoon of lemon juice or white vinegar. The acidity helps stabilize the egg whites just as effectively.
Serving and Storing Your Classic Rhubarb Meringue Pie Masterpiece
Once your Classic Rhubarb Meringue Pie has cooled completely, it’s ready to be the star of your dessert table. A well-chilled slice is pure perfection.
Perfect Pairings
This pie is delightful on its own, but a simple dollop of freshly whipped cream or a scoop of vanilla bean ice cream takes it to another level. The cool, creamy accompaniment beautifully contrasts with the tangy rhubarb and the sweet, airy meringue.
For a refreshing beverage pairing, consider a cup of hot tea or a chilled glass of lemonade. These beverages complement the pie without overpowering its delicate flavors.
Storage Best Practices
To keep your Classic Rhubarb Meringue Pie fresh, store any leftovers in the refrigerator. Loosely cover the pie with plastic wrap or aluminum foil, taking care not to press down on the meringue. This helps prevent condensation from forming, which can lead to a weeping meringue.
For the best texture and flavor, aim to consume the pie within 1 to 2 days of baking. While it will still be safe to eat after that, the meringue may begin to lose its crispness and firmness over time.
Your Classic Rhubarb Meringue Pie Journey Starts Here!
There’s immense satisfaction in baking a Classic Rhubarb Meringue Pie that defies expectations, with its vibrant filling and a meringue topping that stands tall and proud. This recipe, perfected over many attempts, ensures your success and confidence in the kitchen. Embrace the spring flavors and delight your loved ones with this impressive yet approachable dessert. Now that you’ve mastered the art of the stable meringue, why not explore other fruit-filled delights like our Blueberry Crumble Bars? Happy baking!
Classic Rhubarb Meringue Pie
Course: DessertCuisine: American CuisineDifficulty: easy8
servings30
minutes45
minutes60
minutesAmerican Cuisine
Ingredients
1 pre-made 9-inch pie crust, unbaked
4 cups chopped rhubarb (about 1 inch pieces)
1 cup granulated sugar
1/4 cup all-purpose flour
1/4 teaspoon salt
1/4 cup unsalted butter, melted
1 teaspoon vanilla extract
3 large egg yolks (reserved egg whites for meringue)
1/4 cup water
For the Meringue:
3 large egg whites (at room temperature)
1/2 teaspoon cream of tartar
1/2 cup granulated sugar
1 teaspoon vanilla extract
Directions
- Preheat your oven to 425 degrees Fahrenheit (220 degrees Celsius).
- In a large bowl, combine the chopped rhubarb, 1 cup granulated sugar, flour, and salt. Toss gently to coat the rhubarb.
- In a separate small bowl, whisk together the melted butter, vanilla extract, egg yolks, and water until well combined. Pour this mixture over the rhubarb mixture and stir until everything is evenly coated.
- Pour the rhubarb filling into the unbaked pie crust. Place the pie on a baking sheet to catch any potential drips.
- Bake for 15 minutes at 425 degrees Fahrenheit (220 degrees Celsius). Then, reduce the oven temperature to 350 degrees Fahrenheit (175 degrees Celsius) and continue baking for another 25 to 30 minutes, or until the filling is bubbly and the rhubarb is tender.
- While the pie is finishing its bake, prepare the meringue. In a very clean, dry bowl (preferably metal or glass) of a stand mixer with a whisk attachment, beat the egg whites and cream of tartar on medium speed until soft peaks form.
- Gradually add the 1/2 cup granulated sugar, one tablespoon at a time, continuing to beat on high speed until the sugar is fully dissolved and the meringue is glossy and forms stiff peaks. Stir in the vanilla extract.
- This is the trick for non-weepy meringue: As soon as the pie comes out of the oven, immediately spoon the hot rhubarb filling. Spread it quickly over the hot filling, making sure to spread the meringue all the way to the edges of the crust. This helps to seal the meringue and prevent shrinkage and weeping. Create decorative peaks with the back of a spoon.
- Return the pie to the 350 degree Fahrenheit (175 degrees Celsius) oven for 10 to 12 minutes, or until the meringue is golden brown on the peaks.
- Remove the pie from the oven and let it cool completely on a wire rack for several hours, ideally 3 to 4 hours, before slicing and serving. This cooling time is crucial for the filling to set properly and further helps the meringue stabilize.
Notes
- For best results, spread meringue on hot filling immediately and allow pie to cool completely for 3-4 hours before serving.