For years, I struggled to make Classic Stuffed Bell Peppers where the peppers themselves were truly tender, not just the filling. It was frustrating to bite into a delicious mixture only to encounter a stubbornly firm pepper.
Through countless trials, I perfected a method that guarantees soft, yielding peppers bursting with savory flavor, creating a meal that feels both wholesome and incredibly comforting.
Beyond Basic: Why Our Stuffed Bell Peppers Stand Out
This recipe transforms a classic into an unforgettable dish. It focuses on achieving perfect texture and maximizing flavor with minimal effort.
The Secret to Effortlessly Tender Peppers
Our unique covered baking technique ensures your bell peppers soften beautifully, absorbing all the rich flavors of the filling and sauce.
Packed with Flavor, Never Dry or Dense
The savory beef and rice filling is perfectly balanced with aromatic vegetables, seasoned just right, and kept moist by the delicious tomato broth base.
A Beloved Comfort Dish, Made Easy
This recipe streamlines the process, making it simple for even weeknight meals while delivering that cherished, home-cooked taste everyone loves.
Gather Your Essentials: What You’ll Need for Stuffed Bell Peppers
Understanding your ingredients and their role is key to a truly exceptional dish.
Choosing the Perfect Bell Peppers
Opt for large, firm red bell peppers with no soft spots. Red peppers offer a sweeter flavor that complements the savory filling beautifully.
The Hearty Filling: Meat and Rice Pairings
Lean ground beef or ground turkey works wonderfully for the base. Cooked white rice adds a comforting texture and helps absorb the delicious juices.
Aromatic Anchors: Onion, Garlic, and Herbs
Fresh chopped onion and minced garlic provide essential aromatic depth, while dried oregano lends that classic, comforting herbal note to the entire dish.
The Sauce: Tomatoes and Broth for Moisture
Crushed tomatoes create a rich, tangy sauce. Beef broth is critical for adding moisture and flavor, which helps tenderize the peppers as they bake.
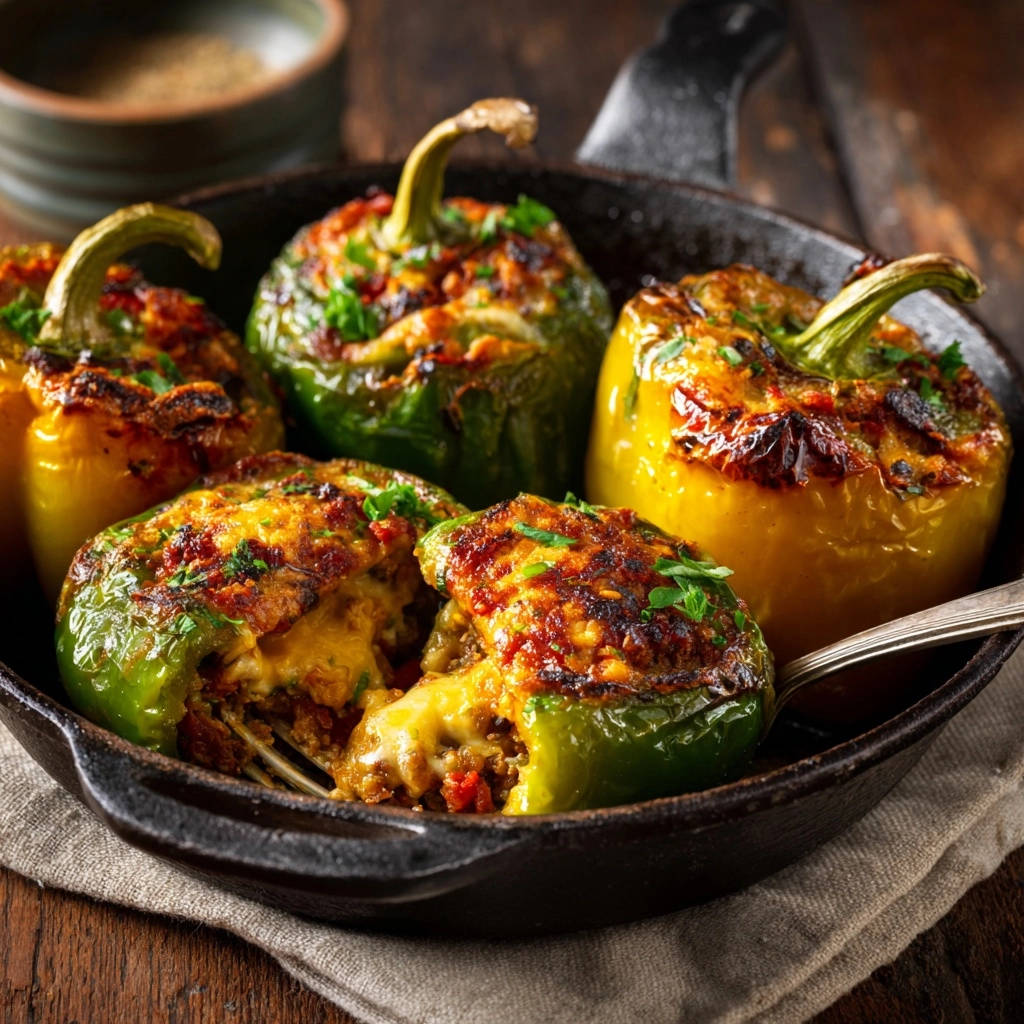
Finishing Touch: Melty Mozzarella
Shredded mozzarella cheese adds a gooey, savory topping that melts into a golden crust, providing the perfect creamy counterpoint to the robust filling.
Your Kitchen Arsenal: Tools for Stuffed Bell Peppers Success
Large Skillet: Essential for browning the meat and sautéing aromatics.
Sharp Knife and Cutting Board: For safely prepping your peppers and vegetables.
Large Mixing Bowl: To combine your flavorful filling ingredients thoroughly.
Cast Iron Skillet or Baking Dish: A vessel large enough to snugly hold the peppers upright during baking.
Aluminum Foil: Key to the tenderizing secret for perfectly soft bell peppers.
Step-by-Step: Crafting Your Classic Stuffed Bell Peppers
-
Prepping Your Peppers and Oven
Preheat your oven to 375 degrees Fahrenheit (190°C). Carefully slice the tops off each large red bell pepper, then scoop out all seeds and membranes. To ensure your stuffed bell peppers stand upright without toppling, you can trim a tiny, flat slice from the very bottom of each pepper, being careful not to cut through to the inside.
-
Building the Flavorful Meat Filling
In a large skillet, heat one tablespoon of olive oil over medium heat. Add the chopped onion and cook until it softens, usually about 5 minutes.
Add your chosen ground beef or turkey to the skillet. Cook it, breaking it up with a spoon, until it’s fully browned. Drain any excess fat to prevent a greasy filling.
Stir in the minced garlic and cook for just one minute more, until it becomes wonderfully fragrant. Remove the skillet from the heat to let it cool slightly before mixing with other ingredients.
-
Assembling and Arranging Your Peppers
In a large bowl, combine the cooked ground meat mixture, 1 ½ cups of cooked white rice, half of the 15-ounce can of crushed tomatoes (about ¾ cup), 1 teaspoon of dried oregano, ½ teaspoon of salt, and ¼ teaspoon of black pepper.
Mix everything thoroughly until all ingredients are evenly distributed and well combined. Evenly stuff each bell pepper with this savory meat and rice mixture. Gently press the filling to ensure it’s packed, but avoid making it overly dense, as this can lead to a heavy, less enjoyable result.
Pour the remaining crushed tomatoes into the bottom of a cast iron skillet or a baking dish. Choose a dish large enough to hold all the stuffed peppers snugly upright, preventing them from falling over during baking.
-
The Tenderizing Bake (Our Secret Step!)
Pour ½ cup of beef broth around the base of the peppers in the skillet. This liquid, combined with the tomatoes, will create a moist environment crucial for tenderizing the peppers.
Now for the secret: cover the skillet or baking dish tightly with aluminum foil. This traps steam inside, ensuring the bell peppers become wonderfully tender without drying out. Bake for 30 minutes in your preheated oven.
-
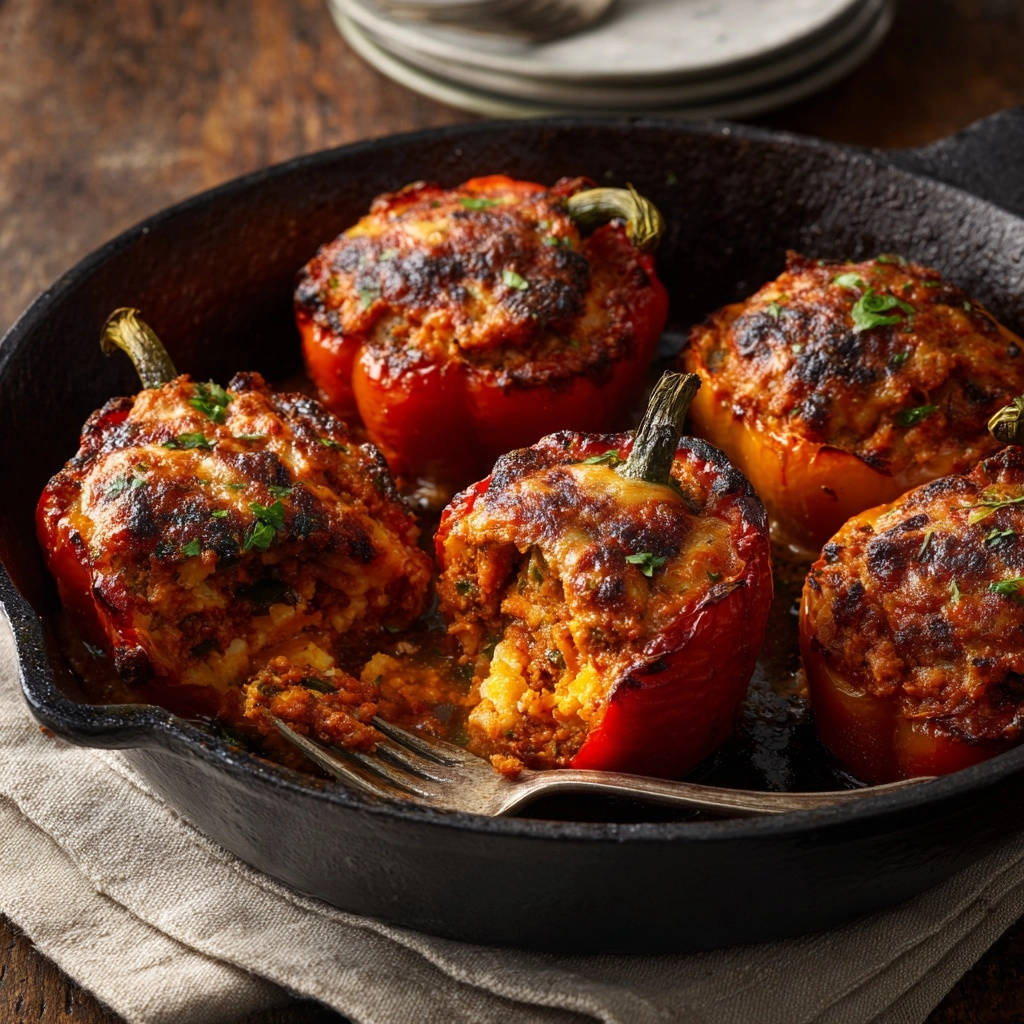
The Grand Finale: Cheesy Perfection
After 30 minutes, carefully remove the foil. The peppers will be partially cooked and tenderizing nicely. Sprinkle the shredded mozzarella cheese generously over the top of each Classic Stuffed Bell Pepper.
Return the uncovered peppers to the oven and bake for an additional 20 minutes. Continue baking until the peppers are completely fork-tender and the cheese is beautifully bubbly and lightly browned, indicating a perfect melty crust.
-
Resting for Optimal Enjoyment
Carefully remove the baked Classic Stuffed Bell Peppers from the oven. Allow them to rest for a few minutes before serving. This brief rest helps the flavors meld and the filling set, making them easier to serve.
Garnish with fresh chopped parsley if desired for a touch of freshness and color.
Elevate Your Dish: Pro Tips for Classic Stuffed Bell Peppers
Unlock even more potential with these expert insights.
-
Achieving That Perfect Tender Bell Pepper Texture
The foil covering during the initial bake is non-negotiable for tender peppers. It steams them, ensuring they become soft without becoming mushy.
Ensuring enough liquid (tomatoes and broth) in the bottom of the pan also contributes significantly to a moist, tender result.
-
Preventing a Dry or Dense Filling
Avoid overpacking your peppers. A gently packed filling allows for better heat circulation and prevents it from becoming too dense or dry.
Make sure your cooked rice isn’t overly dry before mixing, as it needs to absorb some moisture from the other ingredients.
-
Flavor Boosters and Variations
For an extra layer of flavor, consider adding a dash of Worcestershire sauce or a pinch of smoked paprika to the meat filling. You could also mix in different cheeses with the mozzarella, like sharp cheddar or a touch of Parmesan.
If you enjoy experimenting with vegetables, this recipe is quite adaptable. You might even find inspiration in our Cheesy Stuffed Zucchini Boats for another stuffed vegetable idea.
-
Presentation Pointers for a Beautiful Dish
The small slice off the pepper’s bottom helps them stand tall and proud, creating an attractive presentation on the plate. A sprinkle of fresh parsley or even a dollop of sour cream right before serving adds a professional finish.
Your Stuffed Bell Peppers FAQs: Troubleshooting & Substitutions
Common questions answered to ensure your success.
“Why are my peppers still hard after baking?”
This usually means they needed more steaming time or more liquid. Ensure your baking dish is tightly covered with foil for the first 30 minutes, trapping the steam. You can also add an extra splash of broth to the bottom of the dish if it seems to be drying out.
“My filling is dry/bland – what went wrong?”
A dry filling often indicates insufficient moisture from the tomatoes or broth, or the meat was overcooked and not drained properly. For blandness, check your seasoning. Don’t be shy with the salt, pepper, and oregano, and consider adding a pinch of red pepper flakes for a subtle kick.
“Can I use different ground meat?”
Absolutely! Ground chicken, ground turkey, or even a blend of beef and another meat work wonderfully. Adjust cooking times slightly as needed for different types of ground meat.
“What about rice substitutes?”
Cooked quinoa, brown rice, or even riced cauliflower can be excellent substitutes for white rice. Adjust cooking times if the substitute requires more liquid absorption during baking.
“Can I make these ahead of time?”
Yes, you can assemble the stuffed bell peppers up to the point of baking. Cover them tightly and refrigerate for up to 24 hours. When ready to bake, add about 10-15 minutes to the initial covered baking time to account for starting with a cold dish.
“How do I store leftovers?”
Store any leftover Classic Stuffed Bell Peppers in an airtight container in the refrigerator for up to 3-4 days. They reheat beautifully in the microwave or oven.
“Can I freeze stuffed bell peppers?”
Yes, you can! You can freeze them either cooked or uncooked. For cooked peppers, let them cool completely, then wrap each individually and place in a freezer-safe bag for up to 3 months. Thaw in the refrigerator before reheating.
Serving Your Stuffed Bell Peppers: What to Pair & How to Enjoy
These savory peppers are a meal in themselves, but they also pair beautifully with simple sides.
Complementary Side Dishes
A light green salad with a vinaigrette dressing provides a refreshing contrast. For something heartier, serve them alongside a generous scoop of Fluffy Mashed Potatoes or a crusty piece of garlic bread to soak up all the delicious sauce.
Garnishing for a Restaurant-Quality Finish
A sprinkle of fresh chopped parsley adds a vibrant color and fresh aroma. A dollop of sour cream or a sprinkle of extra shredded cheese just before serving can elevate the experience.
Embrace the Comfort: Your New Favorite Stuffed Bell Pepper Recipe!
This recipe for Classic Stuffed Bell Peppers isn’t just about a meal; it’s about bringing comforting, satisfying flavors to your table with confidence. The secret to perfectly tender peppers combined with a rich, savory filling will make this a staple in your home.
Go ahead, give it a try tonight! I’d love to hear how these delicious peppers become a new favorite in your cooking repertoire.

Classic Stuffed Bell Peppers
Course: Main CourseCuisine: American CuisineDifficulty: easy4
servings25
minutes50
minutes60
minutesAmerican Cuisine
Ingredients
4 large red bell peppers
1 tablespoon olive oil
1 pound ground beef or ground turkey
1 small onion, chopped
2 cloves garlic, minced
1 1/2 cups cooked white rice
1 (15 ounce) can crushed tomatoes, divided
1/2 cup beef broth
1 teaspoon dried oregano
1/2 teaspoon salt
1/4 teaspoon black pepper
1 cup shredded mozzarella cheese
Fresh parsley, chopped, for garnish
Directions
- Preheat your oven to 375 degrees Fahrenheit.
- Carefully slice the tops off the bell peppers and remove the seeds and membranes. If the peppers do not sit flat, you can trim a tiny slice from the very bottom of each pepper, being careful not to cut through to the inside.
- In a large skillet, heat the olive oil over medium heat. Add the chopped onion and cook until softened, about 5 minutes. Add the ground beef or turkey and cook, breaking it up with a spoon, until browned. Drain any excess fat.
- Stir in the minced garlic and cook for 1 minute more until fragrant. Remove the skillet from the heat.
- In a large bowl, combine the cooked ground meat mixture, cooked rice, half of the crushed tomatoes (about 3/4 cup), oregano, salt, and black pepper. Mix well until all ingredients are evenly distributed.
- Evenly stuff each bell pepper with the meat and rice mixture, pressing it gently to ensure it’s packed but not overly dense.
- Pour the remaining crushed tomatoes into the bottom of a cast iron skillet or a baking dish large enough to hold the peppers snugly. Place the stuffed peppers upright in the skillet or baking dish.
- Pour the beef broth around the base of the peppers in the skillet.
- To ensure perfectly tender peppers: Cover the skillet or baking dish tightly with aluminum foil. Bake for 30 minutes.
- Remove the foil. Sprinkle the shredded mozzarella cheese generously over the top of each stuffed pepper.
- Return the uncovered peppers to the oven and bake for an additional 20 minutes, or until the peppers are fork-tender and the cheese is bubbly and lightly browned.
- Carefully remove from the oven. Let rest for a few minutes before serving. Garnish with fresh chopped parsley if desired.