
I spent years frustrated by quick breads that promised tenderness but delivered dense, heavy crumbs-a common baking pitfall.
That frustration led me to perfect a simple, critical technique that guarantees a light, airy result every time, making this specific Classic Walnut Snack Cake with Glaze exceptionally reliable.
This recipe is proof that simple, comforting desserts can achieve stellar texture, topped off with a sweet, crackly powdered sugar glaze.
Why This Classic Walnut Snack Cake Belongs in Your Baking Rotation
This recipe is designed for maximum flavor and minimal fuss, making it the perfect everyday treat.
The 8×8 size is ideal for smaller gatherings, avoiding excessive leftovers while still providing enough deliciousness for unexpected guests.
The texture is the star-light, airy, and moist, achieving a tender crumb quality usually reserved for much more complex layer cakes.
Ingredient Deep Dive: The Foundation for Fluffy Cake
The Cake Essentials: Flour, Leaveners, and Salt
All-purpose flour provides the necessary structure, but precision is crucial.
Always spoon and level the flour, rather than scooping, to prevent packing and ensure the correct, airy measurement, which directly impacts the final density.
Baking powder and baking soda work together to create the lift required for this quick bread.
The soda reacts specifically with the acid in the buttermilk, guaranteeing a proper rise and contributing significantly to the final tender result.
The Secret to Moisture: Buttermilk and Fats
Buttermilk is non-negotiable for this recipe’s tender crumb and signature subtle tang.
Its acidity tenderizes the gluten strands, keeping the cake exceptionally moist and soft long after it comes out of the oven.
Ensure your butter and eggs are truly at room temperature before starting the mixing process.
This preparation allows them to emulsify correctly with the granulated sugar, trapping air which is absolutely essential for that light, fluffy crumb texture.
Nuts and Flavor: Vanilla and Walnuts
Vanilla extract adds crucial warmth and depth to the final flavor profile.
Use high-quality pure vanilla extract for the best result, avoiding artificial versions.
We use a generous amount of walnuts, providing a satisfying crunch.
Chopping them finely ensures they are distributed evenly throughout the batter without sinking to the bottom during the baking process.
The Single Trick That Guarantees a Never-Dense Crumb
Understanding Gluten Development in Quick Breads
Gluten is the enemy of a tender quick bread or snack cake.
The more you mix the batter once the wet and dry ingredients combine, the tougher and more elastic the cake becomes.
This overmixing is what creates that heavy, rubbery texture we are actively trying to avoid.
The Importance of Temperature and Creaming
The initial creaming of softened butter and sugar is where most of the cake’s essential air volume is built.
Cream until the mixture is visibly lightened in color and increased in volume (about 3 minutes on medium speed), remembering to scrape the bowl often.
Adding room-temperature eggs slowly ensures the emulsion stays stable and smooth.
If the batter separates or looks curdled here, the final texture will suffer dramatically because the trapped air pockets will collapse.
The Critical Alternating Mixing Method
The recipe calls for adding half the dry ingredients first, followed by the buttermilk, and finally the remaining dry ingredients.
This pattern ensures the dry components hydrate fully without requiring extensive mixing time at the very end of the process.
Once the remaining dry ingredients are added (along with the walnuts), STOP MIXING IMMEDIATELY when the last streaks of flour disappear.
This should only take about 15 seconds on the lowest possible speed. An intentionally slightly lumpy batter is the definitive sign that you executed the critical technique correctly.
Baking Timeline: Detailed Steps for Cake and Glaze Perfection
- Prep Your Tools: Preheat the oven to 350°F (175°C). Prepare an 8×8 inch square baking pan by lightly greasing and flouring it, ensuring full coverage to prevent any sticking.
- Combine Wet Ingredients: Cream the softened butter and sugar until light and fluffy. Add eggs one at a time, beating well after each addition, then stir in the vanilla extract.
- Mix Dry and Integrate: Whisk together the flour, baking powder, baking soda, and salt in a separate medium bowl until thoroughly combined.
- Execute the Fluffy Trick:
Add half of the dry mixture to the wet ingredients, incorporating minimally on low speed. Then add the buttermilk and mix briefly until nearly combined.
Add the remaining dry ingredients and 1/2 cup of the walnuts, mixing ONLY until the very last streak of flour disappears, which prevents gluten development.
Remember the rule: stop mixing immediately, even if the batter looks slightly lumpy-that lumpiness indicates tenderness!
- Bake Until Golden: Transfer the batter to the prepared 8×8 pan, spreading it evenly with a spatula. Bake for 35 to 40 minutes.
Check for doneness when a wooden skewer inserted into the center comes out clean, or with only a few moist crumbs attached.
- Cooling is Mandatory: Transfer the finished Classic Walnut Snack Cake (still in the pan) to a wire rack and allow it to cool completely-at least 45 minutes to one hour is necessary.
Glazing a warm cake will cause the sugar to melt and absorb directly into the surface, resulting in a soggy, sticky top layer instead of a clean, defined powdered sugar glaze.
- Whisk the Glaze: In a small bowl, whisk together the powdered sugar, milk (or heavy cream), and vanilla extract until smooth.
If the glaze is too thick, add milk 1 teaspoon at a time until it reaches a thick but pourable consistency. If it’s too thin, whisk in another tablespoon of powdered sugar.
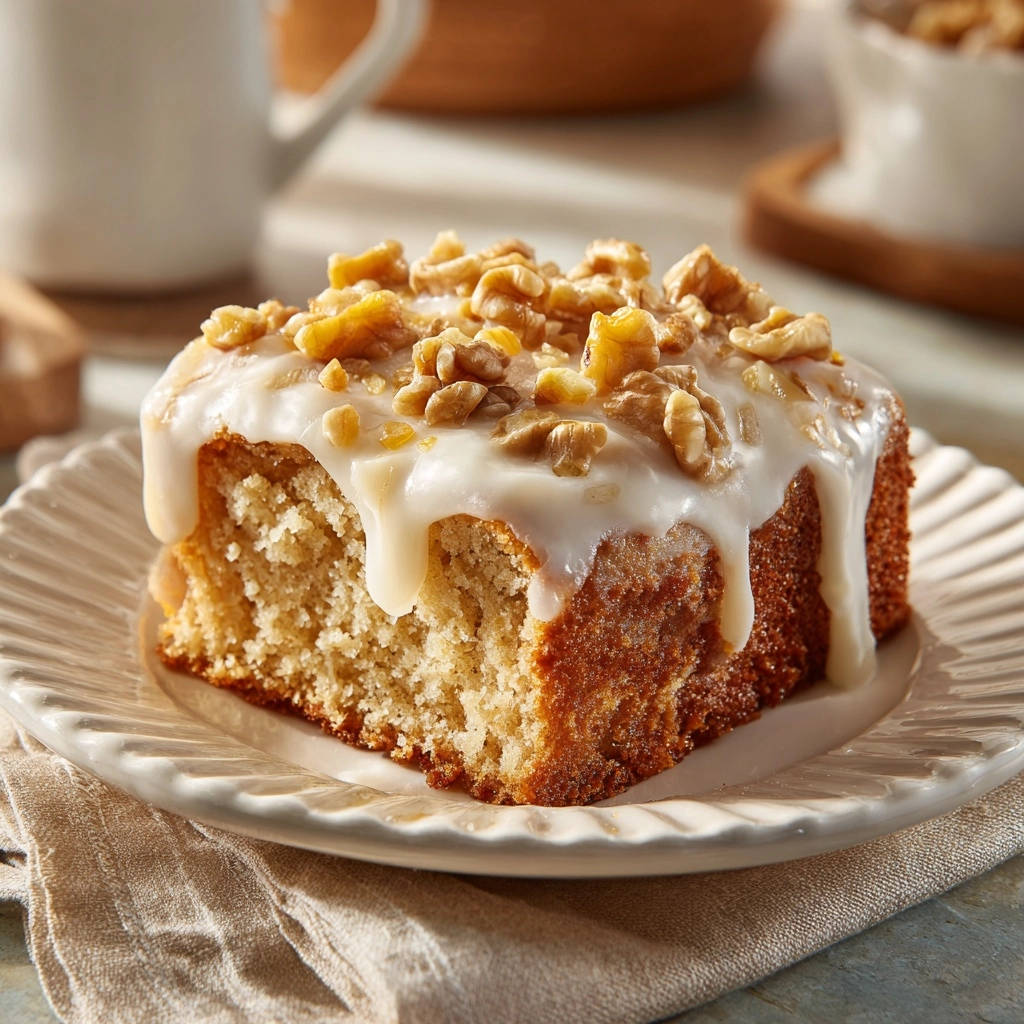
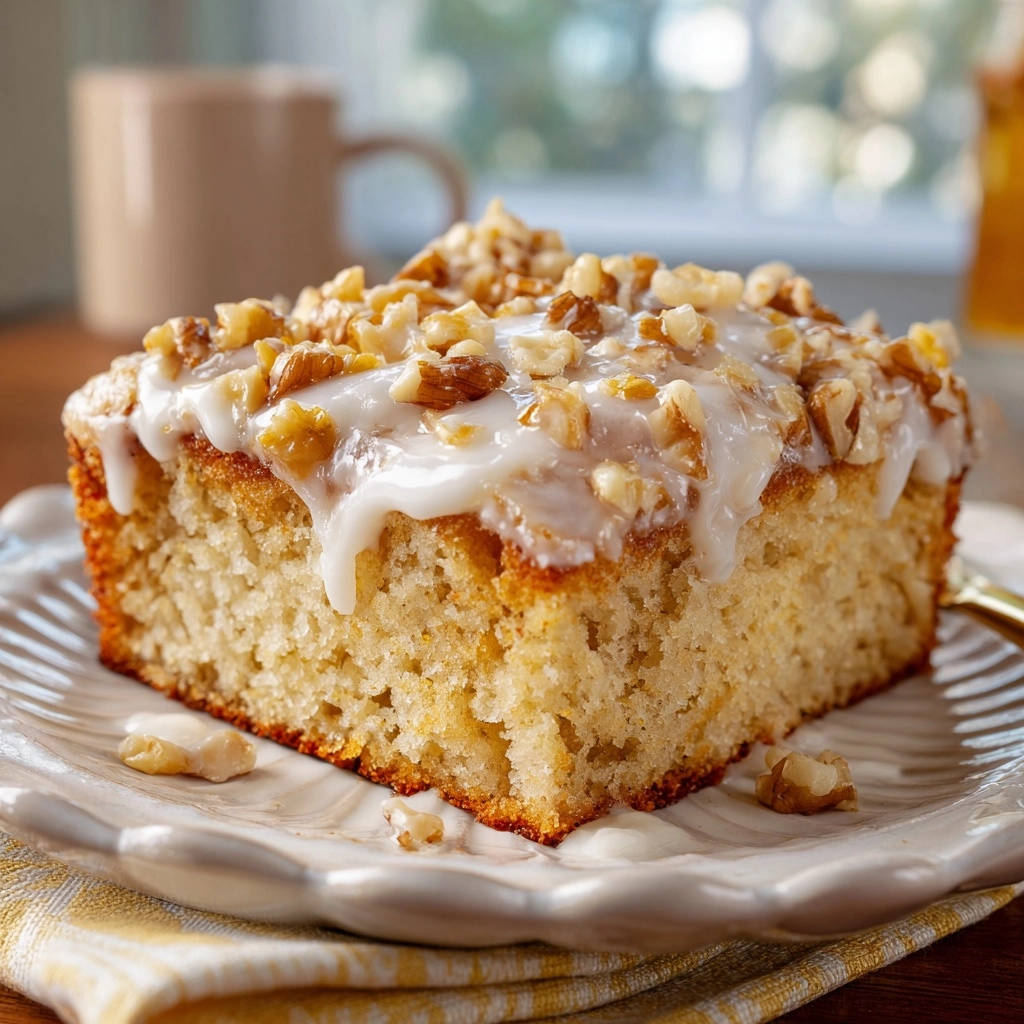
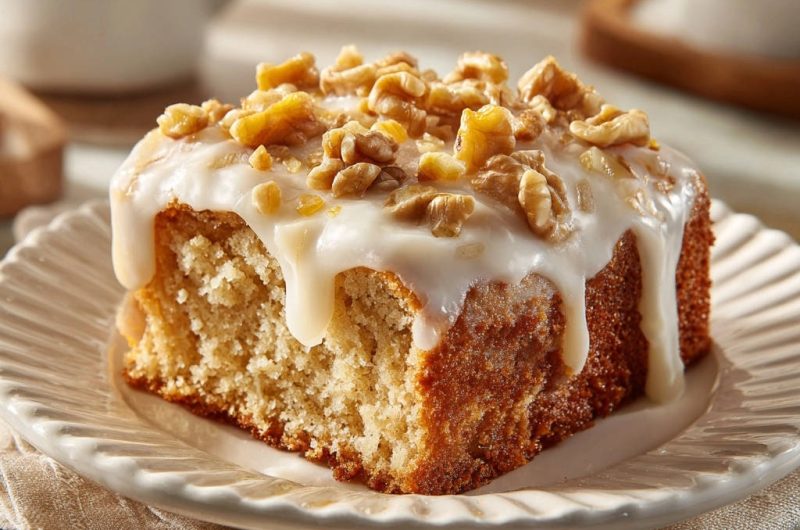
- Finish and Set: Pour the smooth glaze evenly over the completely cooled cake, allowing it to naturally drip down the sides.
Immediately sprinkle the remaining 1/2 cup of chopped walnuts over the wet glaze before it has a chance to set, ensuring they adhere beautifully to the surface.
Preparing the Batter and Pan
Crafting the Perfect Drip Glaze
Common Mishaps Solved: Troubleshooting Your Snack Cake
My Cake Sank in the Middle
A sunken center is usually caused by insufficient baking time or occasionally too much leavening relative to the liquid.
Ensure your oven temperature is accurate-using an external oven thermometer is highly recommended-and always check for a clean skewer test across multiple spots.
If you live at a higher altitude, you may need to slightly reduce your baking powder/soda or increase the oven temperature by 25°F to ensure adequate setting.
My Glaze is Too Runny or Absorbed Quickly
If the glaze runs off the sides quickly and appears translucent, it lacks enough powdered sugar to stabilize.
Whisk in 1/4 cup more powdered sugar until you achieve a thick, opaque, and slowly pourable consistency.
If the cake absorbed the powdered sugar glaze completely, the cake was unquestionably still too warm when you applied it.
Always wait until the cake is fully room temperature, which often takes longer than anticipated in an 8×8 pan.
The Walnuts Sank to the Bottom
Walnuts sink when the batter is too thin or when they are mixed too aggressively into the final batter.
By adding the walnuts only during the final 15 seconds of mixing, as directed, you prevent over-developing the gluten and keep the batter thick enough to naturally suspend them.
Elevating the Experience: Serving and Customization Ideas
Perfect Presentation and Serving Suggestions
Because this is a classic snack cake, it is traditionally served right out of the 8×8 pan, making presentation effortless.
Cutting the cake into 9 generous squares makes it simple for casual entertaining or dessert on the counter.
Pair a slice with a strong cup of coffee or an aromatic herbal tea for a perfect afternoon treat.
For an elevated, warming dessert, serve it heated slightly with a dollop of fresh whipped cream and a sprinkle of cinnamon sugar.
Simple Flavor Variations
For a cozy, autumnal twist, incorporate 1 teaspoon of ground cinnamon and 1/2 teaspoon of ground nutmeg into the dry ingredients.
Substitute half of the walnuts with toasted pecans or mini chocolate chips for a slightly richer, more complex flavor profile.
Storage, Freezing, and Make-Ahead Tips
Store the finished Classic Walnut Snack Cake with Glaze tightly covered at room temperature for up to 3 days to maintain optimal moisture.
Do not refrigerate quick breads, as refrigeration tends to accelerate staling and dry out the tender crumb.
If planning to freeze the cake, it is always best to freeze it before applying the glaze.
Wrap the completely cooled cake tightly first in plastic wrap, followed by a layer of aluminum foil, then thaw completely before preparing and applying the fresh glaze.
Quick Answers: Your Top Classic Walnut Snack Cake Questions
Can I substitute the buttermilk?
While fresh buttermilk provides the optimal results for crumb tenderness and flavor, you can create a viable substitute in a pinch.
Mix 3/4 cup of regular milk (whole milk works best) with 3/4 teaspoon of white vinegar or fresh lemon juice.
Let the mixture sit undisturbed for five minutes until it visibly thickens and curdles before using it in the recipe.
Can I make this cake in a different sized pan?
Yes, you can easily use a standard 9-inch round cake pan instead of the 8×8 square pan specified.
Be aware that the batter will be spread slightly thinner, so the baking time will likely be 5-7 minutes shorter.
Monitor closely using the skewer test starting at the 30-minute mark to prevent over-baking.
What is the shelf life of the glaze?
The powdered sugar glaze is essentially stable once it has set and dried on the cake.
If the Classic Walnut Snack Cake is stored properly at room temperature, the glaze will last the duration of the cake’s shelf life, typically about 3 days.
If the glaze becomes overly sticky or absorbs moisture, the cake may have been exposed to too much air or humidity, indicating improper storage.
Ready to Impress? Share Your Classic Walnut Snack Cake Masterpiece!
Mastering the specific technique for a light, fluffy crumb transforms baking quick breads from a gamble into a guarantee of success.
This Classic Walnut Snack Cake with Glaze is proof that simple, comforting recipes can, and should, have a stellar, professional texture.
Now that you hold the secret to the never-dense cake, there’s nothing stopping you from creating this beautiful and effortless treat today.
We encourage you to try it, perfect your technique, and share your delightful results with friends and family!
Did you try a clever flavor customization or find a new favorite way to serve this 8×8 cake? Let us know in the comments below!
Classic Walnut Snack Cake with Glaze
Course: DessertCuisine: American CuisineDifficulty: easy9
Servings15
minutes35
minutes50
minutesAmerican Cuisine
Ingredients
For the Cake:
2 cups all purpose flour
1 1/2 teaspoons baking powder
1/2 teaspoon baking soda
1/2 teaspoon salt
1 cup granulated sugar
1/2 cup (1 stick) unsalted butter, softened
2 large eggs, room temperature
1 teaspoon vanilla extract
3/4 cup buttermilk, room temperature
1 cup chopped walnuts, divided
For the Glaze:
1 1/2 cups powdered sugar
3 tablespoons milk or heavy cream
1/2 teaspoon vanilla extract
Directions
- Prepare the Pan and Oven. Preheat your oven to 350 degrees F. Lightly grease and flour an 8×8 inch square baking pan. Set aside.
- Cream Wet Ingredients. In a large bowl, cream together the softened butter and granulated sugar until light and fluffy (about 3 minutes). Beat in the eggs one at a time, followed by the vanilla extract. Scrape down the sides of the bowl.
- Mix the Dry Ingredients. In a separate medium bowl, whisk together the flour, baking powder, baking soda, and salt.
- Implement The Non-Dense Cake Trick. This step is critical for a tender crumb. Add half of the dry ingredients to the wet ingredients and mix on low speed just until they are barely incorporated—do not overmix. Add the buttermilk and mix until combined. Then, add the remaining dry ingredients along with 1/2 cup of the chopped walnuts. Mix on the lowest possible speed only until no streaks of flour remain, about 15 seconds. Stop mixing immediately. The batter should still look slightly lumpy; overmixing develops gluten and creates a tough, dense result.
- Bake. Scrape the batter into the prepared 8×8 pan, spreading it evenly. Bake for 35 to 40 minutes, or until a wooden skewer inserted into the center comes out clean.
- Cool. Transfer the cake to a wire rack and allow it to cool completely in the pan before glazing, about 45 minutes to 1 hour.
- Make the Glaze. In a small bowl, whisk together the powdered sugar, milk, and vanilla extract until smooth and thick but pourable. If the glaze is too thick, add milk 1 teaspoon at a time until you reach the desired flowing consistency.
- Finish and Serve. Once the cake is completely cool, pour the glaze evenly over the top, letting it drip down the sides. Sprinkle the remaining 1/2 cup of chopped walnuts over the wet glaze before serving.
Notes
- The secret to a non-dense cake is carefully avoiding overmixing the flour, using the ‘barely incorporated’ technique in step 4.


