I remember the frustration of dense, dry scones – a common baking pitfall many home cooks face, and one I often encountered myself. But through countless test batches, I perfected a technique for truly irresistible Cranberry Orange Star Scones that are beautifully light and fluffy.
This recipe isn’t just about delicious flavor; it’s your dependable guide to achieving that coveted tender crumb every single time, making it perfect for breakfast, brunch, or an elegant afternoon tea.
The Secret to Light & Fluffy Scones: What Makes This Recipe Different
Bidding Farewell to Dense Scones: The Science Behind the Fluff
The dreaded dense scone often results from overworked dough or butter that isn’t cold enough. Our recipe champions minimal handling and intensely cold butter, creating vital steam pockets during baking.
These pockets expand in the oven, lifting the scone from within and ensuring a melt-in-your-mouth tender texture, far from the brick-like consistency some scones can have.
Beyond the Bite: The Charm of Star-Shaped Scones
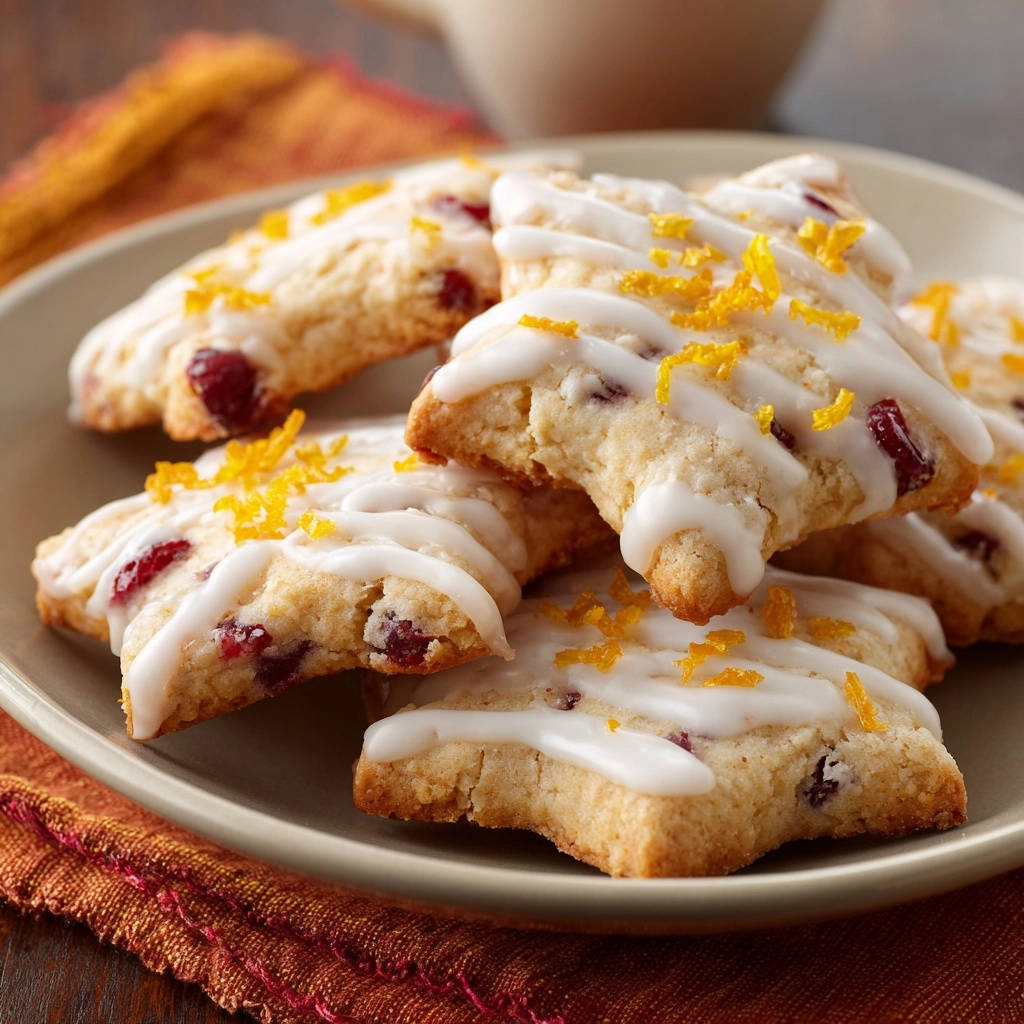
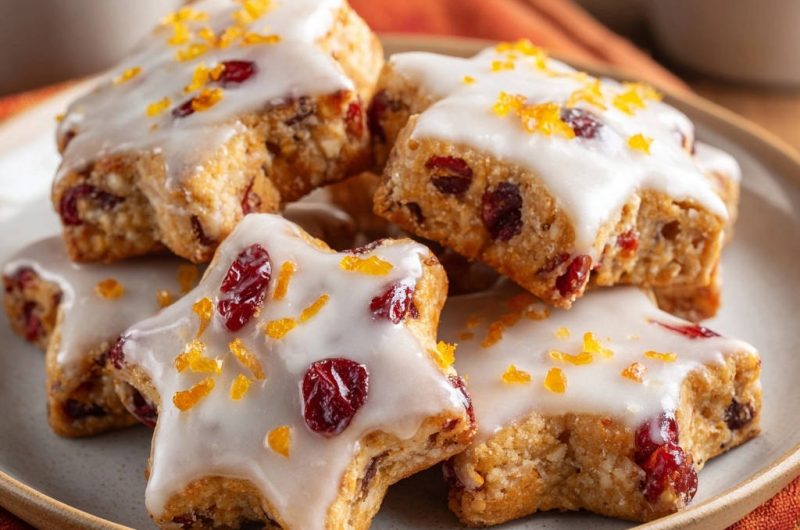
While any cookie cutter will work, the star shape elevates these Cranberry Orange Star Scones from a simple bake to a delightful presentation. They add a festive touch, perfect for holidays or special gatherings.
Their charming appearance also makes them ideal for gifting or surprising loved ones with a thoughtful homemade treat.
Why This Recipe Is Your New Go-To for Baked Goods
This recipe is designed for success, even for novice bakers. It simplifies traditional scone making by focusing on critical techniques that guarantee a superior result.
Beyond the flawless texture, the vibrant cranberry and bright orange flavors are a match made in heaven, ensuring these tender scones are universally loved and quickly disappear from any plate.
Gathering Your Flavorful Ingredients
The Dry Foundation: Flour, Sugar, and Leaveners
All-purpose flour provides the essential structure for our scones, while granulated sugar adds a touch of sweetness and contributes to their tender crumb. Baking powder is our key leavening agent, ensuring a lofty rise and airy interior.
A touch of salt balances the sweetness and enhances all the flavors, making each bite more satisfying.
Butter: The Heart of a Fluffy Scone (and why it matters!)
Very cold, unsalted butter is the cornerstone of truly fluffy scones. When cut into small pieces and kept cold, it creates pockets within the dough.
As the scones bake, these butter pieces melt, releasing steam and forming layers that give scones their signature light and flaky texture. Do not substitute softened butter!
The Wet Elements: Buttermilk & Vanilla for Tenderness
Buttermilk reacts with the baking powder, promoting a higher rise and contributing significantly to a supremely tender crumb. Its slight acidity also adds a subtle tang that beautifully complements the other flavors.
Vanilla extract rounds out the profile with its warm, aromatic notes, enhancing the overall sensory experience of these delicious treats. If you don’t have buttermilk, combine milk with a teaspoon of lemon juice and let it sit for five minutes.
Burst of Brightness: Cranberries and Orange Zest
Dried cranberries offer bursts of tart-sweet flavor and a lovely chewy texture, perfectly contrasting the scone’s tender crumb. They also add a festive visual appeal.
Fresh orange zest infuses the scones with bright, aromatic citrus notes, creating a classic flavor pairing with the cranberries that is both invigorating and comforting. For another delightful citrus-infused bake, consider trying our perfect orange glazed loaf.
Crafting the Irresistible Orange Glaze
Powdered sugar forms the smooth base of our scone glaze, providing essential sweetness. Fresh orange juice adds bright, tangy flavor and helps achieve a pourable consistency.
An extra touch of orange zest in the glaze amplifies the citrus aroma, making each bite even more vibrant.
Essential Tools for Scone Success
Must-Have Kitchen Gadgets
A large mixing bowl is essential for combining your dry ingredients and then gently bringing the dough together. A whisk ensures that your flour, sugar, baking powder, and salt are evenly distributed.
A sturdy baking sheet, lined with parchment paper, is critical for even baking and prevents sticking, ensuring easy removal of your delicate scones. Parchment paper also aids in quick cleanup.
Star-Shaped Cutters: More Than Just Pretty
The star-shaped cookie cutter truly makes these Cranberry Orange Star Scones shine, adding an extra layer of visual delight. It turns a simple scone into a special occasion treat.
However, feel free to use any shape you have on hand-round, square, or even simple wedges work perfectly and still deliver that incredible flavor and texture.
Crafting Your Cranberry Orange Star Scones: A Step-by-Step Guide
- Prepare Your Workspace:
Preheat your oven to 400°F (200°C) and line a baking sheet with parchment paper. This ensures even baking and easy cleanup, crucial for delicate pastries like scones.
- Combine Dry Ingredients:
In a large bowl, whisk together the all-purpose flour, granulated sugar, baking powder, and salt. Whisking ensures an even distribution of leavening agents and flavor throughout the scone dough.
- The Cold Butter Technique:
Add the very cold, cut butter to the dry ingredients. Use your fingertips or a pastry blender to quickly cut the butter into the flour mixture until it resembles coarse crumbs with some pea-sized pieces of butter remaining.
The key here is to work quickly and avoid overworking the butter, keeping it as cold as possible. This creates steam pockets as it bakes, leading to a wonderfully light, airy texture in your Cranberry Orange Star Scones.
- Incorporate Cranberries:
Gently stir in the dried cranberries, ensuring they are evenly distributed throughout the mixture. This prevents clumping and guarantees a burst of flavor in every bite.
- Mix Wet Ingredients:
In a separate small bowl, whisk together the buttermilk and vanilla extract. This ensures they are fully combined before adding them to the dry mixture.
- Combine Wet and Dry Gently:
Pour the wet ingredients into the dry ingredients. Stir gently with a fork or rubber spatula just until the mixture comes together into a shaggy dough. Do not overmix!
Overmixing develops gluten, which leads to tough, bready scones. A few dry spots are perfectly fine and even preferred, indicating you haven’t overworked the dough.
- Shape the Dough:
Turn the scone dough out onto a lightly floured surface. Gently pat the dough into a disc about 3/4 to 1 inch thick, ensuring even thickness for uniform baking.
- Cut Your Star Scones:
Using a star-shaped cookie cutter (or any shape you prefer), cut out the scones. Try to cut straight down without twisting the cutter to ensure an even rise and crisp edges.
Gather any scraps, gently press them together without overworking them, and cut out more scones until all dough is used. Avoid pressing too firmly to keep the scones tender.
- Chill Before Baking (Optional but Recommended):
Place the cut scones onto the prepared baking sheet. For an even fluffier result and to minimize spread, you can chill the cut scones in the refrigerator for 10-15 minutes before baking. For a similar technique with different flavors, check out our classic blueberry scones.
- Bake to Golden Perfection:
Bake for 15-18 minutes, or until the tops are lightly golden brown and a toothpick inserted into the center comes out clean. Baking time may vary slightly by oven, so keep an eye on them.
- Prepare the Orange Glaze:
While the scones are baking, prepare the glaze. In a small bowl, whisk together the powdered sugar, fresh orange juice, and 1/2 teaspoon of the orange zest until smooth.
Adjust juice as needed for a thick, pourable consistency, adding a little at a time until it’s just right for drizzling.
- Cool and Glaze:
Once the scones are out of the oven, let them cool on the baking sheet for a few minutes before transferring them to a wire rack to cool completely. This prevents them from becoming soggy.
Once cool, drizzle the glaze generously over each scone. Garnish with the remaining 1/2 teaspoon of orange zest for an extra pop of flavor and visual appeal. Serve immediately and enjoy that perfect fluffy texture!
Elevate Your Bake: Expert Tips for Perfect Scones
The Chilling Secret: Why Cold Dough is Your Best Friend
Optimize Butter Pockets: Chilling the scone dough before baking helps solidify the butter. This, in turn, creates more pronounced steam pockets for a higher, flakier rise as the cold butter slowly melts and releases steam in the oven.
Easier Handling: Cold dough is significantly less sticky and much easier to work with, especially when cutting shapes with cookie cutters. It helps maintain the scone’s structure before it hits the heat.
Mixing Mindfulness: Avoiding Overworked Dough
Gentle Hands Are Key: Only mix the dough until it just comes together into a shaggy mass. Overmixing develops gluten, which leads to a tough, bready scone instead of a tender, crumbly one that melts in your mouth.
A Little Dryness is Okay: Don’t strive for a perfectly uniform, smooth dough; a few dry spots or unmixed flour patches indicate you haven’t overmixed. These small imperfections often lead to the best texture.
Achieving Golden Perfection: Baking Cues and Times
Visual Indicators: Look for lightly golden brown tops and edges on your Cranberry Orange Star Scones. The bottoms should also be golden, indicating they are fully cooked through.
Toothpick Test: A toothpick inserted into the center of a scone should come out clean. This confirms they are fully baked and ensures no raw dough remains inside, guaranteeing a perfect texture.
Glaze Goals: Mastering the Drizzle
Consistency is Key: Adjust the fresh orange juice in the glaze little by little until you achieve a thick, pourable consistency. It should coat a spoon, not run off too quickly, allowing for a beautiful drizzle that sets well.
Cool Scones, Perfect Glaze: Always wait until scones are completely cool before drizzling with the glaze. If applied to warm scones, the glaze will melt, absorb into the scone, and create a sticky mess rather than a neat, set topping.
Scone Savvy: Troubleshooting Common Baking Hurdles
“My Scones are Dry!” – Solutions for Moisture
Dry scones often result from overmixing the dough, which develops gluten and makes them tough. Always mix just until the ingredients barely come together.
Another common cause is overbaking; ensure you remove them from the oven as soon as the tops are lightly golden and a toothpick comes out clean.
“Why Didn’t My Scones Rise?” – Diagnosing Density
A lack of rise typically stems from old or inactive baking powder, so check its freshness before baking. Butter that isn’t cold enough can also hinder rise, as it won’t create those crucial steam pockets.
Lastly, overworking the dough warms the butter and overdevelops gluten, both contributing to flat, dense scones. Work quickly and keep everything chilled.
“How Do I Prevent Burning?” – Even Baking Techniques
If your scones are browning too quickly, your oven might be running hot or have uneven temperature zones. Consider using an oven thermometer to verify the actual temperature.
Rotating the baking sheet halfway through the baking time can help ensure all scones cook evenly and prevent specific areas from burning.
Your Top Cranberry Orange Star Scones Questions Answered
Can I Substitute Ingredients? (e.g., cranberries, buttermilk)
Yes, you can certainly customize these Cranberry Orange Star Scones. Feel free to swap dried cranberries for other dried fruits like raisins, chopped apricots, or blueberries, adjusting the amount to your taste.
For buttermilk, if you don’t have it, a simple substitute is to add 1 tablespoon of lemon juice or white vinegar to regular milk, let it sit for 5 minutes, and then use it as directed.
Freezing and Make-Ahead Options for Convenience
For convenience, you can freeze unbaked scones. Simply cut them, arrange them on a parchment-lined baking sheet, and freeze until solid before transferring them to a freezer bag.
Bake from frozen, adding a few extra minutes to the baking time. Baked scones can also be frozen and reheated, though the texture might be slightly softer after thawing.
Best Ways to Serve and Pair Your Scones
These Cranberry Orange Star Scones are wonderful on their own, but they truly shine when paired with warm beverages. Serve them alongside a steaming cup of coffee, a robust black tea, or even a fragrant herbal infusion.
For an extra treat, offer them with clotted cream, a dollop of whipped cream, or a variety of fruit jams and marmalades, complementing their bright flavors.
Enjoying and Storing Your Freshly Baked Masterpiece
Serving Suggestions: Perfect Companions
Beyond the delightful orange glaze, these tender scones pair beautifully with a variety of accompaniments. Consider serving them with a generous dollop of homemade lemon curd for an extra citrusy kick, or a spoonful of sweet strawberry jam.
For a truly indulgent experience, offer them warm alongside a scoop of vanilla bean ice cream or a swirl of whipped cream, especially perfect for a dessert treat.
Optimal Storage for Lasting Freshness
To maintain their delicate texture, store your Cranberry Orange Star Scones at room temperature in an airtight container for up to 2-3 days. Ensure they are completely cooled before storing to prevent condensation, which can make them soggy.
For longer storage, they can be frozen (glazed or unglazed) for up to 1 month. Thaw at room temperature before serving.
Reheating for That “Just Baked” Feel
To bring back that delightful warmth and tenderness, gently reheat leftover scones. Place them in a preheated oven at 300°F (150°C) for about 5-7 minutes until warmed through.
Alternatively, a quick 15-30 seconds in the microwave can also revive them, though the crust might not be as crisp as when freshly baked.
Ready to Impress? Share Your Cranberry Orange Star Scones Creation!
With these expert tips and a reliable recipe, you’re now ready to bake a batch of Cranberry Orange Star Scones that are sure to impress. Experience the joy of a truly fluffy, flavorful scone from your own kitchen.
Don’t forget to share your beautiful creations with us on social media! And if you loved perfecting this recipe, be sure to explore more delightful baking adventures on our site.
Cranberry Orange Star Scones
Course: PastryCuisine: American CuisineDifficulty: easy8
scones20
minutes15
minutes35
minutesAmerican Cuisine
Ingredients
2 cups all-purpose flour
1/4 cup granulated sugar
1 tablespoon baking powder
1/2 teaspoon salt
1/2 cup (1 stick) unsalted butter, very cold and cut into small pieces
3/4 cup dried cranberries
3/4 cup buttermilk (or milk with 1 teaspoon lemon juice, let sit 5 min)
1 teaspoon vanilla extract
For the Glaze:
1 cup powdered sugar
2 tablespoons fresh orange juice
1 teaspoon orange zest
Directions
- Preheat your oven to 400°F (200°C). Line a baking sheet with parchment paper.
- In a large bowl, whisk together the flour, granulated sugar, baking powder, and salt.
- This is the secret to fluffy scones: Add the very cold, cut butter to the dry ingredients. Use your fingertips or a pastry blender to quickly cut the butter into the flour mixture until it resembles coarse crumbs with some pea-sized pieces of butter remaining. The key here is to work quickly and avoid overworking the butter, keeping it as cold as possible. This creates steam pockets as it bakes, leading to a light, airy texture.
- Stir in the dried cranberries.
- In a separate small bowl, whisk together the buttermilk and vanilla extract.
- Pour the wet ingredients into the dry ingredients. Stir gently with a fork or rubber spatula just until the mixture comes together into a shaggy dough. Do not overmix! Overmixing develops gluten, which leads to tough scones. A few dry spots are fine.
- Turn the dough out onto a lightly floured surface. Gently pat the dough into a disc about 3/4 to 1 inch thick.
- Using a star-shaped cookie cutter (or any shape you prefer), cut out the scones. Try to cut straight down without twisting the cutter to ensure an even rise. Gather any scraps, gently press them together, and cut out more scones until all dough is used.
- Place the cut scones onto the prepared baking sheet. For an even fluffier result, you can chill the cut scones in the refrigerator for 10-15 minutes before baking.
- Bake for 15-18 minutes, or until the tops are lightly golden brown and a toothpick inserted into the center comes out clean.
- While the scones are baking, prepare the glaze. In a small bowl, whisk together the powdered sugar, fresh orange juice, and 1/2 teaspoon of the orange zest until smooth. Adjust juice as needed for a thick, pourable consistency.
- Once the scones are out of the oven, let them cool on the baking sheet for a few minutes before transferring them to a wire rack to cool completely.
- Once cool, drizzle the glaze generously over each scone. Garnish with the remaining 1/2 teaspoon of orange zest. Serve immediately and enjoy that perfect fluffy texture!
Notes
- Chilling the cut scones in the refrigerator for 10-15 minutes before baking can lead to an even fluffier result.