Getting that truly flaky pastry can feel like a baking mystery, doesn’t it? So many times, you try to achieve those beautiful, buttery layers, and they turn out tough or flat instead of wonderfully light and airy. It’s frustrating when your homemade treats don’t live up to the bakery dream!
But what if I told you there’s a simple trick that makes all the difference? A little secret that ensures you get those gorgeous layers you’ve always wanted in a delicious, easy-to-make dessert? Well, get ready, because this recipe for Cream Cheese Pastries is about to become your new favorite go-to!
Forget complicated techniques and endless frustration. We’re talking about minimal ingredients, straightforward steps, and a result that looks and tastes like you spent hours slaving away. These cream cheese pastries are perfect for a quick breakfast treat, an afternoon snack, or a delightful light dessert after dinner.
Why You’ll Love These Cream Cheese Pastries
What makes these little bites so special and why will they quickly earn a permanent spot in your recipe collection? Let me count the ways!
- They are incredibly easy to make. Seriously, if you can unfold pastry and mix two ingredients, you can make these!
- The result is pure flaky perfection. That sought-after texture where layers shatter just slightly when you bite in? We nail it here.
- The sweet cream cheese filling is both simple and decadent, the perfect creamy counterpoint to the crisp pastry.
- They require only three main ingredients, plus a little dusting sugar, making them budget-friendly and accessible.
- Prep time is minimal (just 15 minutes!), meaning you can satisfy a sudden pastry craving without a huge time commitment.
- They look absolutely beautiful when finished, especially with a generous dusting of powdered sugar, making them perfect for sharing or even gifting.
- This recipe unlocks the secret to better puff pastry results, building your confidence for future baking adventures!
Gathering Your Ingredients for Cream Cheese Pastries
One of the most appealing aspects of this recipe is how few ingredients you actually need! Yet, each plays a vital role in creating that magical balance of textures and flavors. Let’s walk through what you’ll need and why these components are key to success.
- One sheet frozen puff pastry: This is the foundation of our flaky masterpiece! Puff pastry is essentially layers of dough and butter that, when baked at high heat, create steam, causing those layers to puff up dramatically. Using store-bought frozen pastry is a fantastic shortcut that saves a ton of time and effort without sacrificing quality. It’s crucial to thaw it properly according to the package directions – usually in the refrigerator overnight or at room temperature for about 30-40 minutes until pliable but still cold. If it gets too warm, the butter can melt, and you’ll lose those precious layers!
- 8 ounces cream cheese: This provides the creamy, tangy, and slightly sweet heart of our pastry. For the best results, you’ll want to use full-fat block cream cheese. Make sure it’s truly softened to room temperature. This isn’t just about making it easier to mix; softened cream cheese incorporates smoothly with the sugar, preventing lumps in your filling. Take it out of the fridge at least 30-60 minutes before you plan to mix.
- 1/4 cup powdered sugar: This is our primary sweetener for the cream cheese filling. Powdered sugar (also known as confectioners’ sugar or icing sugar) dissolves instantly into the softened cream cheese, creating a smooth, silken filling. Unlike granulated sugar, it won’t leave a grainy texture.
- Additional powdered sugar, for dusting: This isn’t just for decoration! A final dusting of powdered sugar adds an extra touch of sweetness and gives the pastries that classic bakery look. It also makes them absolutely irresistible!
See? Simple ingredients, big flavor and texture payoff! Having these items on hand means you’re only minutes away from warm, flaky, creamy bliss.

Crafting Your Cream Cheese Pastries: Step-by-Step
Now for the fun part – bringing it all together! This process is incredibly forgiving, but paying attention to a couple of key details will elevate your pastries from good to absolutely stunning. Let’s break down each step, focusing on the ‘why’ behind the actions.
- Begin by preparing your workspace and oven. You’ll want to preheat your oven to a hot 400 degrees F (200 degrees C). A hot oven is crucial for puff pastry; the rapid heat creates steam from the butter, which is what forces the layers apart and gives you that incredible puff and flakiness. As the oven heats, line a standard baking sheet with parchment paper. Parchment paper prevents the pastries from sticking to the pan and makes cleanup a breeze, but it also helps regulate the heat distribution slightly for more even baking.
- While the oven preheats, prepare your simple, yet delicious, filling. Grab a small bowl and add your softened cream cheese and the 1/4 cup of powdered sugar. Using a spoon or a spatula, mix these two ingredients together. The key here is to mix until the mixture is completely smooth and lump-free. This ensures a creamy texture in the finished pastry. Don’t overmix, just combine until unified and smooth.
- Next, turn your attention to the puff pastry sheet. Unfold the thawed pastry sheet onto a surface that you’ve lightly dusted with flour. The light dusting of flour is important; it prevents the sticky dough from adhering to your counter or cutting surface, allowing for clean cuts and easy handling, but you don’t want so much that it toughens the dough. Using a knife or a pizza cutter, carefully cut the single sheet of pastry into six equal squares. Aim for roughly even sizes so they bake at the same rate.
- Now it’s time to fill! Take a spoonful (you don’t need too much – about a tablespoon or so) of your smooth cream cheese mixture and place it right in the center of each of the six pastry squares. Try to keep the filling contained to the middle, leaving a border of pastry around the edges. This border is essential for sealing the pastry later.
- With the filling in place, it’s time to shape your pastries. Gently fold the pastry square in half over the filling. You can fold corner-to-corner to create a triangle shape, or edge-to-edge to create a rectangle. The goal is to completely enclose the cream cheese filling within the pastry. Once folded, press the edges gently together with your fingertips to seal them. If you want a more decorative edge, or just extra assurance that the filling won’t leak out, you can use the tines of a fork to crimp the edges shut all the way around.
-
Here is the absolute game-changer, the simple trick that unlocks those perfect, truly flaky layers: Place the formed pastries onto the prepared baking sheet you lined with parchment paper. Now, and this step is CRUCIAL, place the entire baking sheet into the refrigerator for at least 10 minutes. This chilling step isn’t optional! It serves a vital purpose: it hardens the butter that is layered throughout the puff pastry. When the cold, butter-laden pastry hits the hot oven, the butter melts rapidly, creating steam. This steam forces the thin layers of dough apart, resulting in maximum lift, airiness, and that incredible flaky texture we’re after. Skipping this step means your butter is already soft, and you won’t get the same dramatic puff.
- Once your pastries are nicely chilled (they should feel firm to the touch), transfer the baking sheet directly into your preheated 400°F (200°C) oven. Bake for 20 to 25 minutes. You’ll know they’re done when they have puffed up beautifully and are a gorgeous golden brown all over. Keep an eye on them towards the end, as oven temperatures can vary slightly.
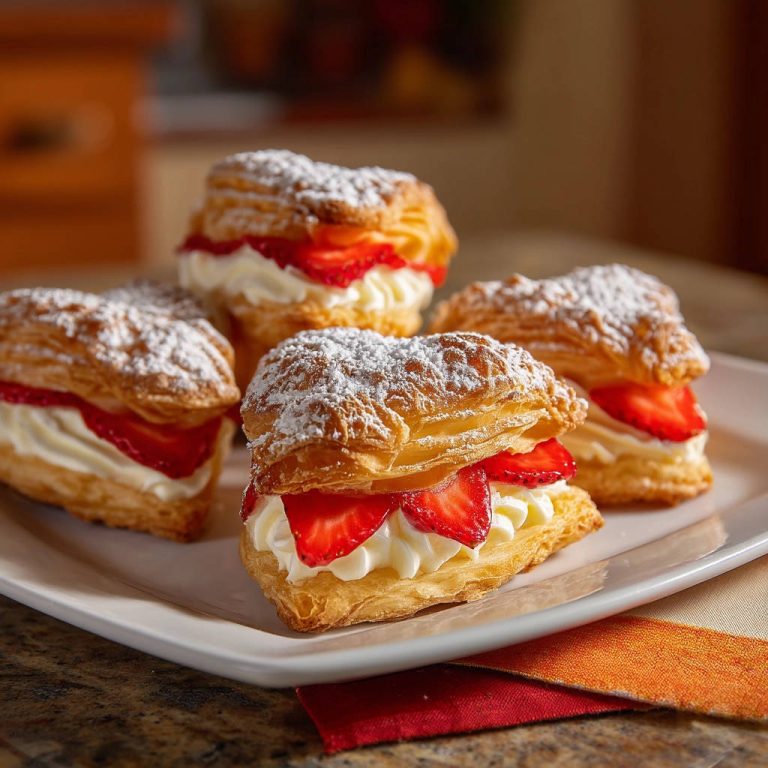
- Carefully remove the baking sheet from the oven. Let the pastries cool slightly on the baking sheet for just a few minutes. They will be very hot and delicate right out of the oven. Allowing them to cool for a moment helps them firm up slightly. Before serving, give them a generous dusting of additional powdered sugar. This adds that finishing touch of sweetness and makes them look like they came straight from a professional bakery case!
And there you have it! Beautiful, flaky, utterly delicious cream cheese pastries, ready to enjoy. See how easy that trick was?
Tips for Perfect Cream Cheese Pastries Every Time
While this recipe is wonderfully simple, a few extra pointers can ensure your success and help you achieve pastry perfection consistently.
- Keep it Cold: This is the golden rule of working with puff pastry. From thawing to handling to that crucial chilling step, maintaining cold temperatures is key to flaky layers. Work relatively quickly once the pastry is out of the fridge, and don’t hesitate to pop the sheet back in the fridge for a few minutes if it becomes too soft or sticky before filling and shaping.
- Don’t Overfill: It’s tempting to pack in lots of that delicious cream cheese filling, but overfilling is a common cause of leaks during baking. Use just enough filling (about a tablespoon) that you can comfortably seal the edges without it squeezing out.
- Ensure a Good Seal: Take a moment to press the edges firmly after folding. Whether you use your fingers or a fork, a good seal keeps the filling safely inside where it belongs.
- Proper Thawing is Key: Follow the package instructions precisely for thawing your puff pastry. If it thaws unevenly or gets too warm, the butter layers can get disrupted. Refrigerating overnight is often the most reliable method.
- Watch the Edges: Sometimes the very thin edges of the pastry can brown faster than the rest. If you notice this happening before the centers are golden, you can loosely tent the baking sheet with foil for the last few minutes of baking.
- Vary the Shape: While triangles and rectangles are easy, you can also make pinwheels (spread filling, roll up like a log, slice) or even turnovers (larger squares folded in half). Just ensure the filling is well-sealed.
What to Serve With Cream Cheese Pastries
These delightful cream cheese pastries are versatile! They shine on their own, but they also pair wonderfully with other items depending on the occasion.
For a delightful brunch spread, serve them alongside fresh fruit, freshly baked scones, or perhaps some yogurt with granola. They’re a lovely sweet counterpoint to savory breakfast dishes too.
As a simple dessert, they are perfect with a cup of coffee or tea. You could add a side of fresh berries or a light fruit compote for extra color and freshness.
If you’re serving them as part of a collection of small bites or appetizers (on the sweeter end!), they sit nicely alongside things like cheese balls, small fruit tarts, or even some light cookies.
Your Cream Cheese Pastries Questions Answered (FAQ)
Got questions about making these flaky treats? Here are some answers to common queries that might pop up.
Why didn’t my pastries get flaky?
The most common culprit is warm pastry! If the puff pastry isn’t kept cold enough throughout the process, especially during that crucial chilling step before baking, the butter melts before it has a chance to create steam and lift the layers. Ensure your pastry is cold when you work with it and never skip the final chill in the refrigerator before baking. Also, check your oven temperature – if it’s not hot enough, the butter will simply melt out rather than puff up.
Can I use reduced-fat cream cheese?
While you technically can use reduced-fat cream cheese, it often contains more water and stabilizers which can affect the texture and richness of the filling. For the best flavor and creamiest texture, we strongly recommend using full-fat block cream cheese.
Can I add other flavors to the cream cheese filling?
Absolutely! This base filling is a great starting point. You could add a tiny bit of vanilla extract, a pinch of lemon zest, or even a tablespoon of fruit preserves (just be careful not to add too much liquid, which can make the filling runny or cause leaks). Ensure any additions are well mixed and don’t make the filling too wet.
How should I store leftover cream cheese pastries?
Let any leftover pastries cool completely. Store them in an airtight container at room temperature for a day or two, or in the refrigerator for up to 3-4 days. The pastry may lose some of its crispness over time, especially in the fridge.
Can I reheat these pastries?
Yes! The best way to revive the crispness is to reheat them in a toaster oven or conventional oven at a moderate temperature (around 300-325°F or 150-160°C) for 5-10 minutes until warmed through. Microwaving will make the pastry soft.
Can I make these ahead of time?
You have a couple of options for making ahead. You can prepare the cream cheese filling up to a day in advance and store it in the refrigerator. Let it soften slightly at room temperature before using. For the pastries themselves, you can assemble them (including the crimping) and place them on the baking sheet, then chill them in the refrigerator for up to a few hours before baking. If chilling for longer than 30 minutes, cover them lightly with plastic wrap. The crucial thing is that they go into the hot oven cold.
Enjoy Your Homemade Cream Cheese Pastries!
There you have it – a simple, effective way to create beautiful, flaky cream cheese pastries right in your own kitchen. No more baking mysteries, just delicious results!
These little treats are proof that you don’t need fancy ingredients or complicated techniques to enjoy stunning homemade baked goods. That simple chilling step is your secret weapon for achieving those perfect layers every single time.
Whether you whip these up for a special breakfast, an easy afternoon snack, or a delightful sweet ending to your day, they are sure to bring smiles. Give this recipe a try and see the flaky magic happen!
Did you try the recipe? What did you think? Leave a comment below and let me know how your pastries turned out! And don’t forget to rate the recipe if you loved it!
Cream Cheese Pastries

Ingredients
- 1 sheet frozen puff pastry, thawed according to package directions
- 8 ounces cream cheese, softened
- 1/4 cup powdered sugar, plus more for dusting
Directions
- Preheat your oven to 400 degrees F (200 degrees C). Line a baking sheet with parchment paper.
- In a small bowl, mix the softened cream cheese with the 1/4 cup powdered sugar until smooth.
- Unfold the thawed puff pastry sheet onto a lightly floured surface. Cut the sheet into six equal squares.
- Place a spoonful of the cream cheese mixture onto the center of each pastry square.
- Fold the pastry over the filling to create a triangle or rectangle shape, pressing the edges gently to seal. You can use a fork to crimp the edges shut if desired.
- Here is the key to truly flaky layers: Place the formed pastries onto the prepared baking sheet. Put the baking sheet into the refrigerator for at least 10 minutes. This chilling step is crucial as it hardens the butter within the puff pastry layers, ensuring maximum lift and flakiness in the hot oven.
- Once chilled, bake in the preheated oven for 20 to 25 minutes, or until the pastries are puffed up and golden brown.
- Let the pastries cool slightly on the baking sheet. Dust generously with additional powdered sugar before serving.