
Why This Pierogi Recipe Stands Out
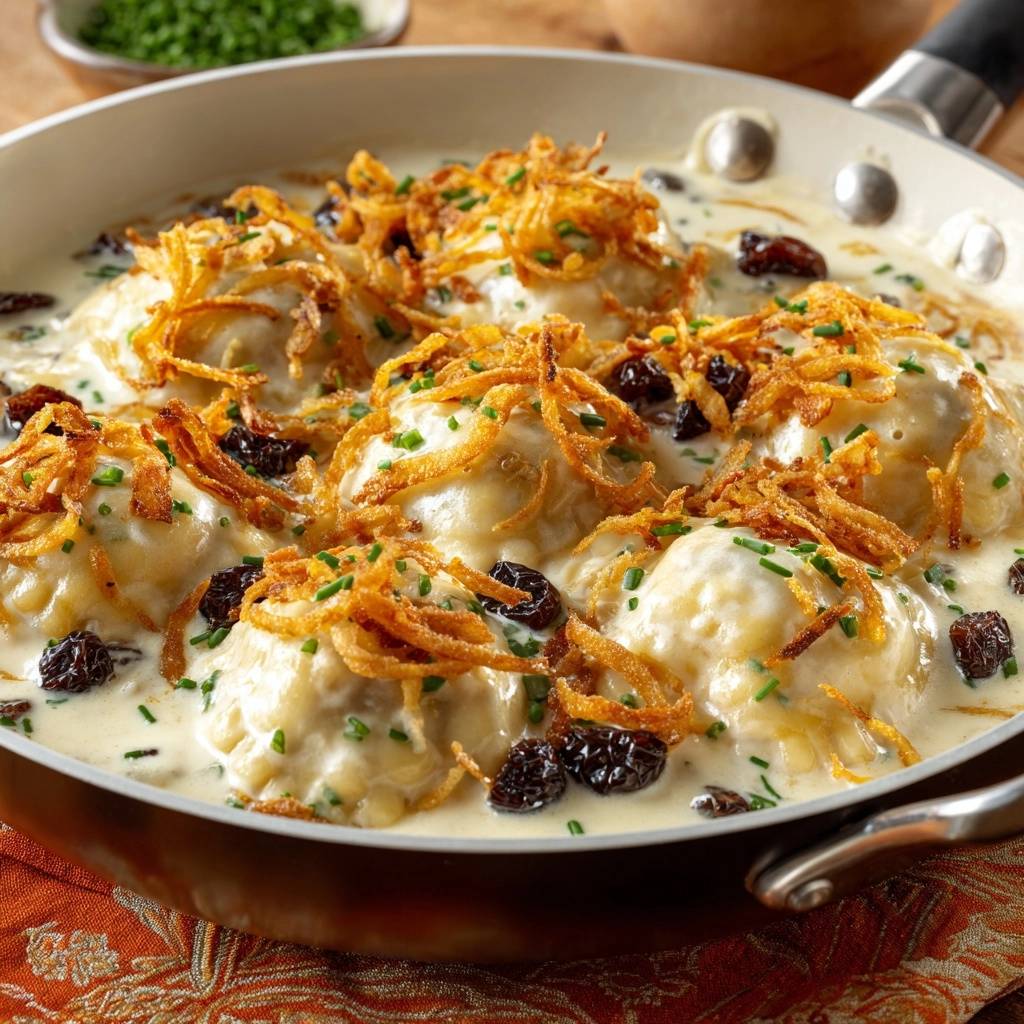
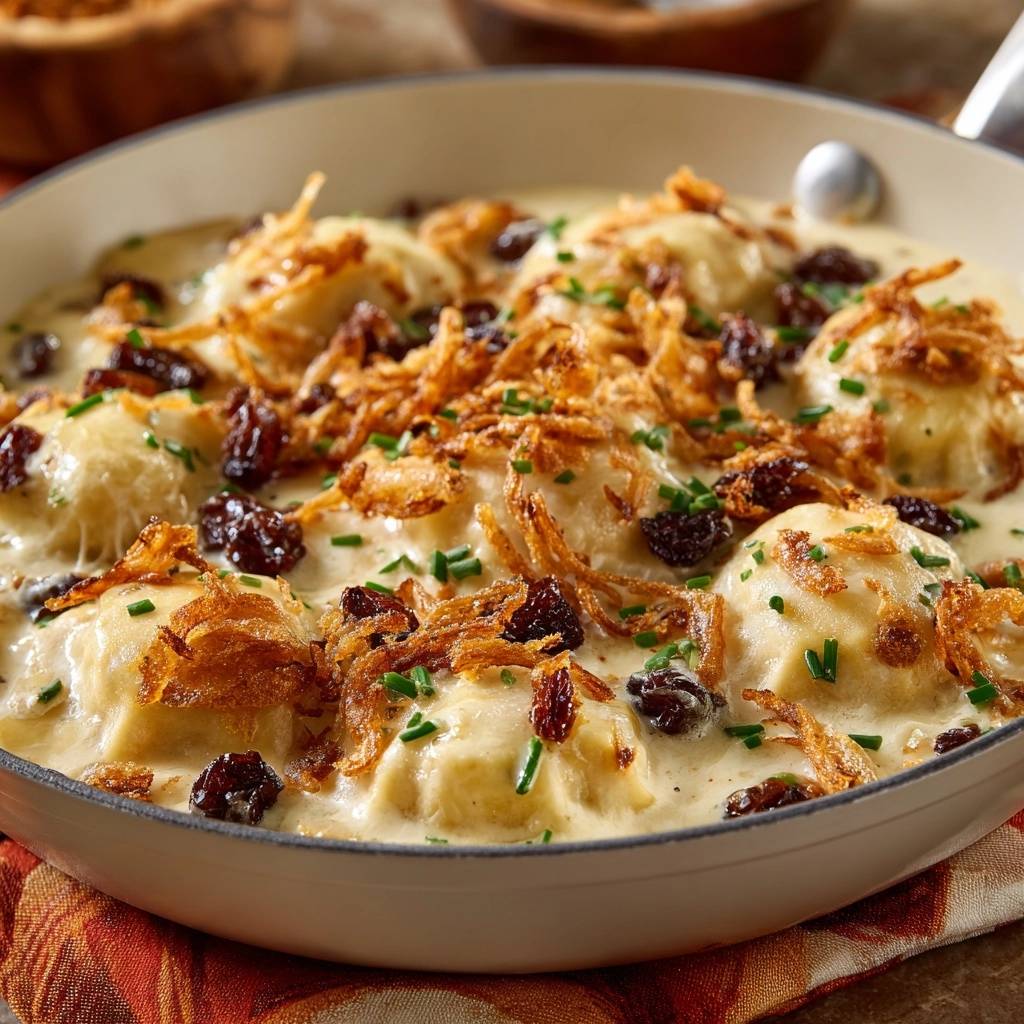
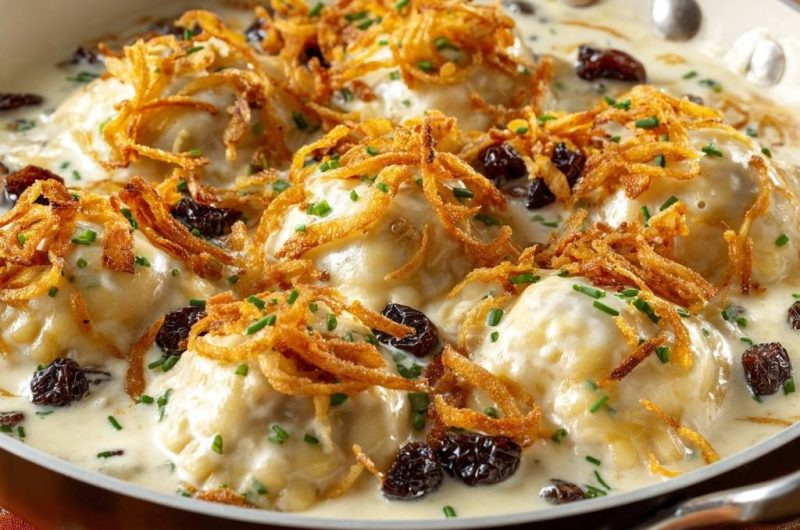
Picture this: tender cheese-filled dumplings swimming in a silky cream sauce dotted with sweet raisins, then crowned with onion strings that snap like potato chips every single bite. Those onions don’t wilt or turn mushy because a cornstarch coat and 350-degree oil create a steam-proof shield. You’ve got sweet-savory bliss that hits all the comfort notes without the usual topping letdown.
So why does this combo work so well? The raisins plump up in the cream, balancing the rich farmer’s cheese inside each pierogi. Meanwhile, the crispy onions add that addictive crunch most creamy cheese pierogi lack. It’s Eastern European soul food upgraded for anyone craving texture contrast.
Here’s the pro move that seals it: fry those onions right before plating. That hot-finish timing locks in shatter-crisp perfection, even over warm sauce. You’ll never settle for soggy toppings again.
Dough Foundation for Tender Pierogi
Start with 2 cups all-purpose flour and 1/2 teaspoon salt in a bowl. The all-purpose flour gives just the right elasticity without chewiness, unlike bread flour that toughens up fast. Beat 1 large egg with 1/2 cup warm water, then mix into the flour.
Knead for about 5 minutes until smooth. Warm water activates gluten gently, so you can roll to 1/8-inch thin later. Wrap and rest 30 minutes; this relaxes the dough for easy handling.
Pro tip: if dough feels sticky, dust lightly with flour. Over-kneading makes tough pierogi, so stop when it springs back softly.
Key Ratios for Flawless Texture
The 2:1 flour-to-water ratio, plus egg’s binding power, creates pliable dough. You’ll see it turn from shaggy to silky during kneading. Don’t skip the rest; it prevents tears when rolling.
Building the Creamy Cheese Filling
Mash 2 cups farmer’s cheese or ricotta with 1 tablespoon softened butter and salt to taste. Farmer’s cheese holds shape better during boiling, while ricotta brings lighter creaminess. The butter adds silkiness that melts into every bite.
Mash until lump-free for even filling. This simple mix stays firm yet gooey post-boil. Salt here balances the sweet raisins in the sauce later.
Therefore, taste as you go; a pinch too much ruins the creamy cheese pierogi harmony.
Cheese Choices for Ultimate Creaminess
Farmer’s cheese offers dense, tangy richness; ricotta’s fluffier but drain it first to avoid watery filling. Both retain moisture after boiling. For substitution, use 2 cups cottage cheese, blended smooth.
Mastering Pierogi Assembly Techniques
Roll rested dough to 1/8-inch thin on a floured surface. Cut 3-inch circles; this size holds 1 teaspoon filling perfectly without bursting. Place filling in center, fold over, and pinch edges tight.
Wet edges with water if dry for better seal. Press out air pockets to prevent leaks. You’ll get 30-40 pierogi from this batch.
Common fix: if edges won’t stick, crimp with a fork. That ensures no creamy cheese escapes during boiling.
Sealing Edges Without Leaks
Dip finger in water, trace half-circle edge, then fold and pleat for authenticity. Apply even pressure to seal fully. Air pockets cause explosions, so flatten filling slightly first.
Boiling Pierogi to Perfection
Bring a pot of salted water to a gentle boil. Drop pierogi in batches; cook 3-4 minutes until they float. Floating means the dough’s tender and filling’s hot.
Drain gently with a slotted spoon to keep them intact. Don’t rinse; starch helps sauce cling later. Pat dry if needed before saucing.
In addition, avoid overcrowding the pot, or temps drop and pierogi turn gummy.
Crafting Silky Raisin Cream Sauce
Melt 2 tablespoons butter in a large skillet over medium heat. Pour in 1 cup heavy cream, add 1/4 cup raisins, salt, and pepper. Simmer 5 minutes; the cream thickens as raisins plump and release sweetness.
Add boiled pierogi, toss gently 2-3 minutes to coat. The sauce clings beautifully without breaking. Remove from heat to keep it silky.
Balance pepper for a subtle kick against the creamy cheese pierogi sweetness.
Raisins’ Role in Sweet Contrast
Golden raisins absorb cream and swell for juicy pops. Soak them in warm water 10 minutes ahead for deeper flavor. Try currants if you want tartness instead.
Science of Crispy Onions That Stay Crisp
Slice 2 large onions into super-thin strings. Toss lightly in 2 tablespoons cornstarch, shake off excess. Heat 1/2 inch vegetable oil to 350F in a deep skillet.
Fry in batches 1-2 minutes until golden. Cornstarch forms a barrier against sauce steam, so they stay crisp. Drain on paper towels right away.
Therefore, fry hot and fast right before serving. Overcrowding drops oil temp, leading to greasy onions.
Cornstarch Coating Mechanics
Light toss coats evenly without clumps. In 350F oil, it triggers Maillard browning for crunch. Shake excess to dodge gumminess.
Pierogi Origins and Raisin Twist
Pierogi hail from Polish and Russian peasant kitchens as stuffed dumplings for using scraps. Cheese fillings evolved sweet with fruits like raisins in Eastern Europe. This version amps tradition with crispy onions.
The raisins nod to holiday twists, cutting richness. Onions add modern crunch over classic buttery toppings. It’s comfort with innovation.
Flavor Variations for Cheese Pierogi
Swap ricotta for twaróg for authenticity. Riff sauce with apples or prunes instead of raisins. Add nutmeg for warmth, but go light.
For vegan, use cashew cream in sauce and filling. These tweaks keep creamy cheese pierogi with raisins versatile. Test small batches first.
Regional Filling Swaps
Classic potato-cheese is hearty; fruit like prune suits sweets. Cut raisins to 2 tablespoons if sweetness overwhelms.
Pairing Sides with Pierogi
Crisp cucumber salad cuts the creaminess. Braised red cabbage adds earthiness. Green beans or sour cream dollop work too.
Herbal teas refresh the palate alongside creamy cheese pierogi with raisins and crispy onions.
Make-Ahead Strategies for Pierogi
Rest dough overnight in fridge. Assemble and freeze on a tray, then bag for up to 3 months. Boil from frozen, adding 1-2 minutes.
Prep sauce separately; reheat gently. Store boiled pierogi in fridge 2 days. This makes creamy cheese pierogi weeknight-ready.
Troubleshooting Pierogi Pitfalls
Dough tears? Add water drop by drop. Leaks mean poor seal; pinch firmer next time. Soggy onions? Check oil to 350F.
Sauce separates? Stir on low heat. These fixes guarantee perfect creamy cheese pierogi every round.
Common Questions on This Pierogi Recipe
How do I store leftovers of Creamy Cheese Pierogi with Raisins and Crispy Onions?
Store cooked pierogi in an airtight container in the fridge for up to 3 days. Reheat in a skillet with a splash of cream to revive sauce. Freeze uncooked pierogi up to 3 months on a tray first, then bag; boil straight from frozen. Don’t freeze cooked ones with sauce; they get soggy. Crispy onions don’t store well, so remake fresh.
Why did my pierogi fall apart or leak during boiling?
Leaks happen from unsealed edges or air pockets. Always wet edges, press firmly, and flatten filling to expel air. Roll dough thin but not too fragile, and don’t overfill beyond 1 teaspoon. Test one first; if it bursts, redo seals with pleats for strength.
Can I make this recipe gluten-free?
Yes, swap all-purpose flour for a 1:1 gluten-free blend like Cup4Cup. Add 1 extra tablespoon warm water for elasticity. Rest dough 45 minutes longer. Filling and sauce stay the same; expect slightly softer texture but great creamy cheese pierogi results.
Can I bake the pierogi instead of boiling?
No, baking dries out the dough and makes filling tough. Boiling creates tender, chewy texture essential for creamy cheese pierogi. If short on time, pan-fry boiled ones post-sauce for extra crisp bottoms.
How do I scale this for a crowd?
Double the dough, filling, and sauce for 60-80 pierogi. Boil in bigger pots in batches. Fry onions fresh in shifts. Prep dough ahead; it freezes well. Feeds 6-8 easily with sides.
How long can I keep crispy onions crisp before serving?
Max 5 minutes on paper towels at room temp. Longer, and steam softens them. Fry right before plating over hot pierogi for peak snap on creamy cheese pierogi with raisins.
Creamy Cheese Pierogi with Raisins and Crispy Onions
Course: Main CourseCuisine: PolishDifficulty: easy4
30 pierogi45
minutes20
minutes65
MinutesPolish
Ingredients
Dough:
2 cups all-purpose flour
1/2 teaspoon salt
1 large egg
1/2 cup warm water
Filling:
2 cups farmer’s cheese or ricotta
1 tablespoon butter, softened
Salt to taste
Sauce:
2 tablespoons butter
1 cup heavy cream
1/4 cup raisins
Salt and pepper to taste
Toppings:
2 large onions, sliced into super-thin strings
2 tablespoons cornstarch
Vegetable oil for frying
1/4 cup chopped chives
Directions
- Make the dough: Mix flour and salt in a bowl. Beat egg with warm water, add to flour, and knead into a smooth dough (about 5 minutes). Wrap and rest 30 minutes.
- Prepare filling: Mash cheese with softened butter and salt. Set aside.
- Roll dough thin (1/8 inch) on floured surface. Cut into 3-inch circles. Place 1 teaspoon filling in center, fold and pinch edges tightly to seal (wet edges with water if needed).
- Boil pierogi in salted water 3-4 minutes until floating. Drain.
- Make sauce: Melt butter in large skillet over medium heat. Add cream, raisins, salt, and pepper. Simmer 5 minutes until thickened. Add boiled pierogi, toss gently to coat, and warm through 2-3 minutes. Remove from heat.
- Fry onions (the no-sog secret): Toss thin onion strings in cornstarch to coat lightly, shaking off excess. Heat 1/2 inch vegetable oil in a deep skillet to 350F (medium-high). Fry onions in batches 1-2 minutes until golden and crisp. Drain on paper towels immediately.
- Serve pierogi in sauce topped with hot crispy onions and chives. The cornstarch locks in crunch by creating a barrier against steam, and frying right before plating keeps them perfect. Enjoy!
Notes
- The cornstarch coat on onions creates a barrier against steam, keeping them ultra-crispy. Fry right before serving for best results.


