
Picture this: you’re ready to dive into a bowl of cool, creamy hummus. You scoop some up, anticipate that velvety texture, and… ugh. It’s gritty. Or maybe it’s thick and pasty, not spreadable at all. Sound familiar? You are not alone! Making hummus at home should be a joyous occasion, resulting in that perfectly smooth, light, and spreadable dip we all crave.
For years, I chased that elusive perfect texture, troubleshooting batch after batch. I tweaked ingredients, adjusted ratios, and even tried peeling chickpeas one by one (let me tell you, that gets old fast!). But then, I unlocked the secret – a simple technique that guarantees incredibly silky, creamy homemade hummus every single time. It’s a game-changer, and once you see how easy it is, you’ll wonder why you ever struggled!
Why This Recipe Delivers Silky Smooth Hummus
So, what makes this recipe stand out from the rest? It boils down to a few key techniques and the smart use of ingredients. Forget just throwing everything in a food processor and hoping for the best. We’re going to build that smooth foundation right from the start.
The first secret lies in how we handle the tahini. Instead of blending it straight with the chickpeas, we emulsify it first with fresh lemon juice. This process, which takes just about a minute in the food processor, transforms the tahini into a pale, thick, almost whipped consistency. This creamy base is the starting point for our silky hummus, ensuring there are no gritty tahini particles interrupting the final texture.
The second, perhaps most magical, technique involves ice water. Yes, ice water! Adding ice water slowly while the food processor is running helps break down the chickpea starches even further, resulting in a lighter, airier texture. It also cools the mixture slightly, preventing the dreaded pasty result that can come from over-processing warm ingredients. This is the step where your hummus goes from “pretty good” to “restaurant-quality incredibly smooth.”
Gathering Your Simple Ingredients for Perfect Hummus
One of the best things about homemade hummus is that it relies on just a handful of humble ingredients. When combined and processed correctly, they create a dip that’s far superior to anything store-bought. Choosing quality ingredients will elevate your hummus, but even with standard pantry staples, these techniques will yield fantastic results.
Here’s what you’ll need to create this smooth delight, with a little insight into each component:
- Chickpeas: We’re using canned chickpeas for ultimate convenience. A standard 15-ounce can is perfect. Make sure to rinse them thoroughly under cold water and drain them well before using. Some people swear by peeling the chickpeas for the absolute silkiest texture, but honestly, with the ice water method, I find it’s usually an unnecessary extra step. If you have the time and patience, go for it, but this recipe gets you ultra-smooth without it.
- Tahini: This sesame paste is essential for authentic hummus flavor and texture. Look for a good quality tahini – one that is pourable and not too thick or separated. Give the jar a good stir if needed before measuring. The type of tahini you use can impact the final flavor and texture, so if you have a favorite brand, stick with it!
- Fresh Lemon Juice: Bright, tangy lemon juice cuts through the richness of the tahini and chickpeas. Freshly squeezed is non-negotiable here; bottled juice just won’t give you the same vibrant flavor. We start with a quarter cup, but you’ll taste and adjust at the end to get the perfect balance of zesty acidity.
- Garlic: Two cloves of fresh garlic add that essential savory depth. Make sure they are minced finely so they blend smoothly into the dip. Raw garlic can be potent, so two cloves provide a good starting point without overpowering the other flavors.
- Olive Oil: Extra virgin olive oil adds richness and helps achieve that luxurious mouthfeel. We use a couple of tablespoons in the mix and plenty more for serving, drizzled generously over the finished dip. The quality of your olive oil will show in the final product, so use the best you have.
- Ice Water: The true secret weapon! Having ice-cold water ready is key to whipping the hummus to perfection. Start with 2-4 tablespoons, but be prepared to add a little more if needed to reach your desired consistency.
- Salt: Enhances all the other flavors. Start with a half teaspoon and adjust to your preference after blending.
- Ground Cumin (Optional): This warm, earthy spice is a classic addition to hummus. A quarter teaspoon adds a lovely layer of flavor without being dominant. If you’re not a cumin fan, you can leave it out, but I highly recommend it!
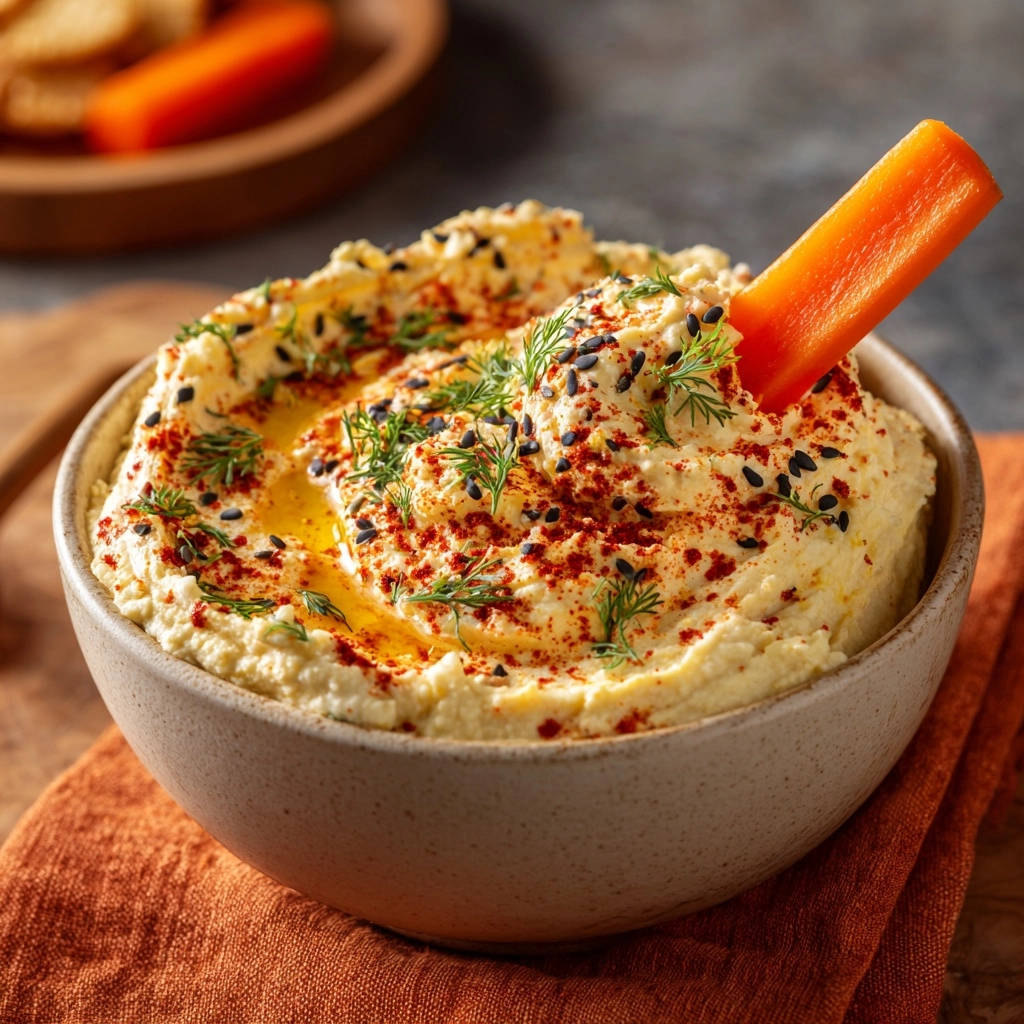
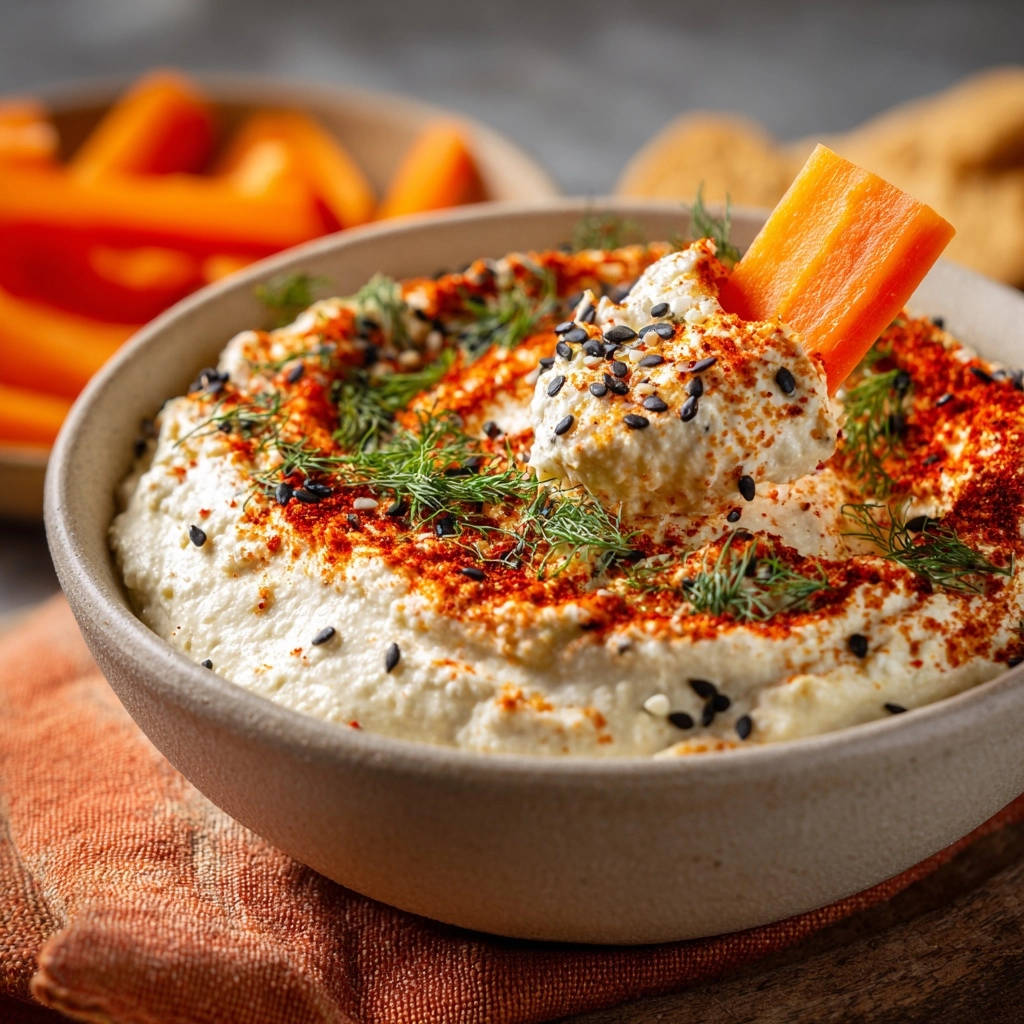
- Garnishes (Optional but Recommended): Paprika, black sesame seeds, and fresh herbs like dill or parsley add both visual appeal and extra pops of flavor when serving. Don’t skip these if you want that authentic, finished look.
Crafting Your Creamy Homemade Hummus: Step-by-Step
Ready to transform these simple ingredients into a smooth, luscious dip? Here’s how to do it, focusing on the techniques that make all the difference. You’ll need a food processor for this – it’s the best tool for achieving that ultra-smooth texture.
Start with the Foundation: Tahini and Lemon Emulsion. The very first step, and a non-negotiable one for creamy results, is to combine the tahini and fresh lemon juice in the bowl of your food processor. Secure the lid and process for about a full minute. As it processes, scrape down the sides of the bowl a couple of times with a spatula. What you’re looking for is a transformation: the mixture should lighten in color and thicken significantly, becoming wonderfully creamy and almost fluffy. This crucial step activates the tahini and creates a stable, smooth base that prevents grittiness later.
Infuse the Base with Aromatics. Now that your tahini and lemon juice are beautifully emulsified, add your minced garlic, salt, and the optional ground cumin to the food processor. Pulse or process for another 30 seconds or so, stopping once again to scrape down the sides. This helps distribute the garlic and spices evenly throughout the creamy base, ensuring every bite is perfectly seasoned.
Introduce the Chickpeas. Add about half of your rinsed and drained chickpeas to the food processor with the tahini mixture. Process for a good 60 seconds, pausing to scrape down the sides as needed. Then, add the remaining chickpeas. Continue processing until all the chickpeas are incorporated and the mixture is relatively uniform. At this stage, don’t worry if it looks incredibly thick, pasty, or even a little lumpy – this is completely normal and where the next step comes in to save the day!
The Magic Happens: Whipping with Ice Water. This is the secret sauce, the moment where everything transforms. With the food processor running continuously, slowly drizzle in the ice water, one tablespoon at a time, through the feed tube. Listen to the sound of the processor and watch the texture change. You’ll likely use between 2 to 4 tablespoons total, but the exact amount depends on your desired consistency and the power of your food processor. Continue processing for a full 2 to 4 minutes after adding the water. This longer processing time, combined with the ice water, is what breaks down the chickpeas into that unbelievably smooth, light, and whipped texture. The hummus should become noticeably paler and significantly smoother. Don’t rush this step!
Taste and Perfect. Stop the food processor and taste your hummus. Now is the time to adjust the seasonings. Does it need a pinch more salt to make the flavors pop? Another squeeze of fresh lemon juice for brightness? Add small amounts, pulse to combine, and taste again until it’s just right for you. This step ensures your hummus isn’t just smooth, but also perfectly balanced in flavor.
Present and Serve. Spoon the finished, silky smooth hummus into a serving bowl. Use the back of a spoon or a spatula to create a shallow well in the center – this is traditional and perfect for holding that final drizzle of olive oil. Generously pour extra virgin olive oil into the well. If using, sprinkle with paprika for color, black sesame seeds for crunch, and fresh dill or parsley for a burst of freshness. Serve immediately with your favorite dippers like pita bread, crackers, or fresh vegetables, or cover and refrigerate.
Insider Tips for the Creamiest Hummus Every Time
While the recipe steps themselves are the key, a few extra pointers can help ensure your creamy homemade hummus reaches its full potential:
- Don’t Skip the Tahini Emulsion: Seriously, I can’t stress this enough. Whipping the tahini and lemon juice first is non-negotiable for that silky base.
- Ice Water is Your Friend: The cold temperature and the gradual addition while processing are crucial for the texture transformation. Don’t just dump in room temperature water.
- Process, Process, Process: Be patient during step 4. Processing for 2-4 minutes after adding the water might seem long, but it’s essential for breaking down the chickpeas completely.
- Scrape Down the Sides: Regularly scraping down the sides throughout the process ensures everything is evenly incorporated and blended.
- Adjust Consistency: The 2-4 tablespoons of ice water is a guideline. If you like your hummus thinner, add a little more ice water, a tablespoon at a time, until it reaches your desired consistency.
- Consider Warm Chickpeas: Some cooks prefer gently warming canned chickpeas before processing, claiming it helps them break down easier. After rinsing and draining, you could microwave them for a minute or two or simmer briefly on the stovetop, then proceed with the recipe.
- Let Flavors Meld: While delicious immediately, the flavors in homemade hummus deepen if you let it rest in the refrigerator for an hour or two before serving.
What to Serve With Your Gorgeous Hummus
Once you have a bowl of beautifully smooth hummus, the serving possibilities are endless! It’s a versatile dip and spread that pairs well with so many things. Here are a few ideas:
- Classic dippers like warm pita bread, pita chips, or your favorite crackers.
- A vibrant platter of fresh vegetables: carrots, celery, cucumber, bell peppers, cherry tomatoes, snap peas.
- As a spread on sandwiches, wraps, or even toast.
- Dolloped onto salads or grain bowls. It would be lovely alongside a Juicy Chicken Quinoa Bowl or a Easy Kale Salad.
- A side dish for grilled meats or vegetables. It pairs wonderfully with Grilled Lemon Herb Chicken or Roasted Veggies.
- Serve it as part of a mezze platter with other dips like Perfect Guacamole or Whipped Feta Dip with Walnuts and Honey, olives, and cheeses.
Your Creamy Homemade Hummus Questions Answered (FAQ)
Got questions about making the perfect batch? Let’s tackle some common ones.
Why is my homemade hummus gritty?
Gritty hummus is often the result of not processing the tahini and lemon juice enough at the beginning, or not processing the chickpeas for long enough, especially when adding the ice water. Make sure you process the tahini/lemon mixture until it’s pale and creamy, and then process the chickpea/water mixture for the recommended 2-4 minutes to really break everything down.
Can I make this without tahini?
Authentic hummus relies on tahini for its distinctive flavor and texture. While you can make dips from chickpeas without tahini, it wouldn’t technically be hummus and the texture would be different. For the best results, tahini is key.
How long does homemade hummus last?
Stored in an airtight container in the refrigerator, creamy homemade hummus will typically last for 3-5 days. Always give it a good stir before serving, and you might need to add a tiny drizzle of olive oil on top if it looks dry.
Can I use dried chickpeas instead of canned?
Yes, you absolutely can! You’ll need to soak dried chickpeas overnight and then boil them until they are very tender. Using dried chickpeas often requires a longer cooking time to get them soft enough for an ultra-smooth texture. Make sure they are cooked until almost mushy before using them in the recipe.
What if I don’t have a food processor?
While a food processor is ideal for the creamiest texture, you can use a high-powered blender. You’ll likely need to stop frequently to scrape down the sides and potentially add a little more liquid to get it moving. A mortar and pestle can work for a rustic, chunkier hummus, but won’t give you that silky smooth result.
Can I add other flavors to this base recipe?
Absolutely! This creamy base is perfect for customization. Once you’ve mastered the plain version, try blending in roasted red peppers, sun-dried tomatoes, a swirl of pesto, or extra garlic for a different twist. Just add them during step 3 or 4.
Enjoy Your Homemade Hummus!
Making creamy, dreamy, silky smooth homemade hummus is truly within your reach. With just a few simple ingredients and the right technique, you can whip up a batch in about 10 minutes that rivals the best you’ve ever had. It’s healthier, fresher, and incredibly satisfying to make yourself.
So, ditch the grainy disappointments and thick pastes of the past. Try this recipe, discover the magic of the tahini emulsion and the ice water whip, and prepare to be amazed. Your snack game is about to change forever!
Did you try this recipe? What are your favorite dippers or ways to enjoy homemade hummus? Let me know in the comments below! Happy dipping!
Hummus
Course: appetizers-snacksCuisine: MediterraneanDifficulty: easy4
servings5
minutes5
minutes240
kcal10
MinutesUnlock the secret to incredibly creamy homemade hummus! This recipe guarantees silky smooth results every time with simple ingredients and easy techniques.
Ingredients
1 can (15 ounce) chickpeas rinsed and drained
1/2 cup tahini
1/4 cup fresh lemon juice
2 cloves garlic minced
2 tablespoons olive oil plus more for serving
2 to 4 tablespoons ice water
1/2 teaspoon salt
1/4 teaspoon ground cumin optional
Paprika for serving optional
Black sesame seeds for serving optional
Fresh dill or parsley for serving optional
Directions
- Combine the tahini and lemon juice in the bowl of a food processor. Process for about 60 seconds scraping down the sides until the mixture is thick and creamy. This step is key.
- Add the minced garlic salt and cumin if using to the tahini mixture. Process for another 30 seconds scraping down the sides.
- Add half of the chickpeas to the food processor. Process for 60 seconds scraping down the sides. Add the remaining chickpeas and process until everything is combined scraping down as needed. The mixture will be very thick and maybe a little lumpy at this stage.
- This is where the magic happens. With the food processor running slowly drizzle in the 2 to 4 tablespoons of ice water one tablespoon at a time. Process until the hummus is incredibly smooth and pale about 2 to 4 minutes total. You may need more or less water depending on your desired consistency. The mixture should look light and whipped.
- Taste and adjust salt or lemon juice as needed.
- Spoon the hummus into a serving bowl. Create a well in the center and drizzle generously with olive oil. Sprinkle with paprika black sesame seeds and fresh herbs if desired. Serve with vegetables crackers or pita bread.
Notes
- For an extra silky smooth hummus, make sure your tahini and lemon juice are well combined before adding other ingredients. Don’t be afraid to add a little more ice water, a tablespoon at a time, until you reach your desired creamy consistency.


