

There's truly nothing quite like a warm, cheesy baked pasta dish to bring comfort to the table. It's the kind of meal that hugs you from the inside out, perfect for a cozy night in or feeding a hungry crowd. Yet, for years, I struggled with achieving that consistently rich, creamy sauce in baked pasta. It would often turn out dry, or worse, the beautiful cheese sauce would break and become oily in the oven. Frustrating, right?
Well, after much trial and error, I finally cracked the code to making a luscious sauce that stays perfectly smooth and creamy through baking. This Creamy Shrimp & Rotini Bake recipe incorporates that crucial technique, ensuring every forkful is pure, velvety perfection combined with tender shrimp and perfectly cooked pasta. You'll be amazed at how simple the "secret" step is once you know it!
Get ready to ditch those dry pasta bake worries and embrace the absolute deliciousness that is this creamy, cheesy, shrimp-filled delight. It's destined to become a family favorite!
Why You'll Fall in Love with This Creamy Shrimp Bake
What makes this Creamy Shrimp & Rotini Bake so special? Beyond the undeniable comfort factor, there are several reasons this recipe stands out and is guaranteed to earn a permanent spot in your rotation:
- Effortlessly Creamy Sauce: This is the star! The method ensures your béchamel-based cheese sauce remains silky and doesn't separate or dry out during baking.
- Perfectly Cooked Shrimp: We add the shrimp at just the right time to keep them tender and juicy, not rubbery.
- Quick Total Time: From start to finish, you're looking at about 45 minutes. It's absolutely achievable for a weeknight meal, making it a fantastic alternative to takeout.
- Simple Ingredients: You won't find any fussy or hard-to-find items here. Just pantry staples and fresh seafood.
- Kid-Friendly Appeal: Pasta, cheese, and shrimp? It's a combination most picky eaters can get behind, making dinner battles a thing of the past.
- Ultimate Comfort Food: Sometimes, you just need a dish that feels like a warm hug. This is it.
Gathering Your Ingredients for Your Creamy Shrimp Rotini Bake
The beauty of this creamy shrimp rotini bake lies in its straightforward ingredients. Each component plays a vital role in building layers of flavor and achieving that dreamy texture. Let's walk through what you'll need and why these choices matter.
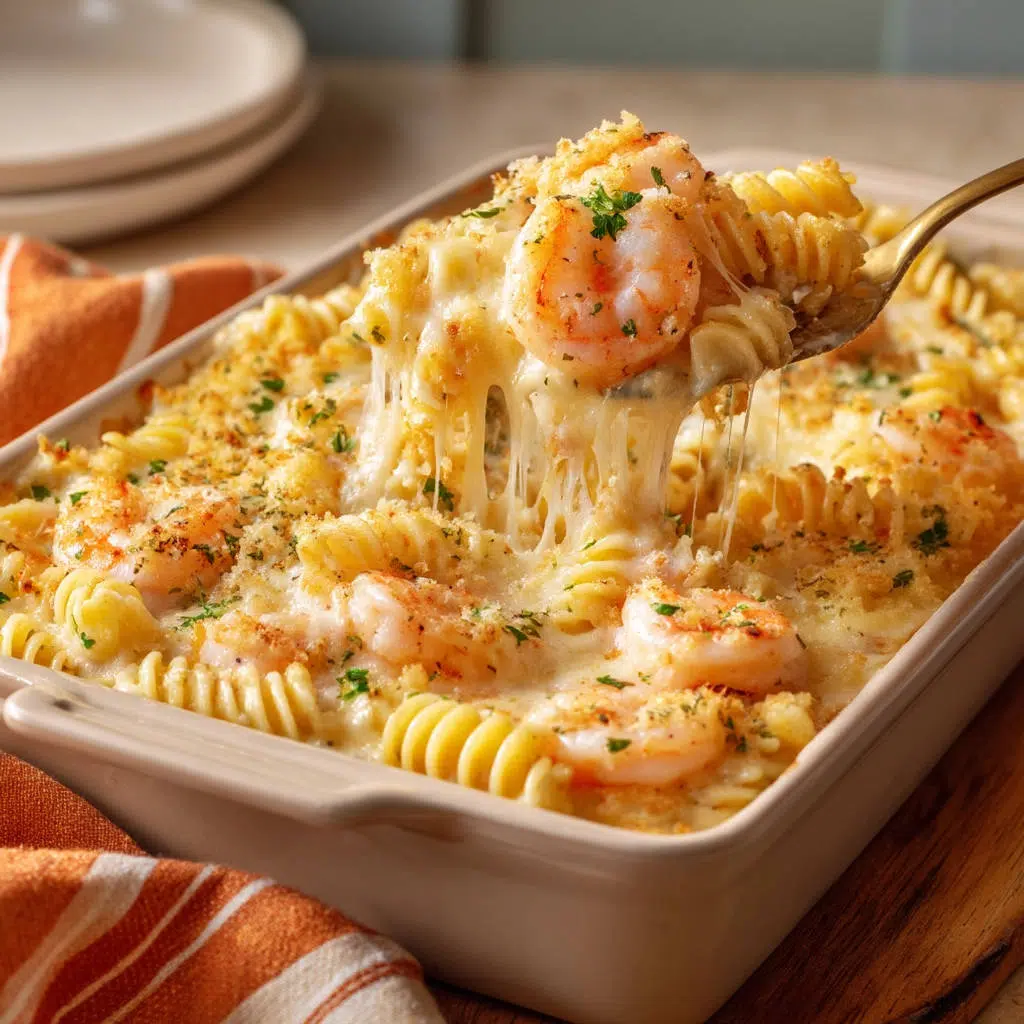
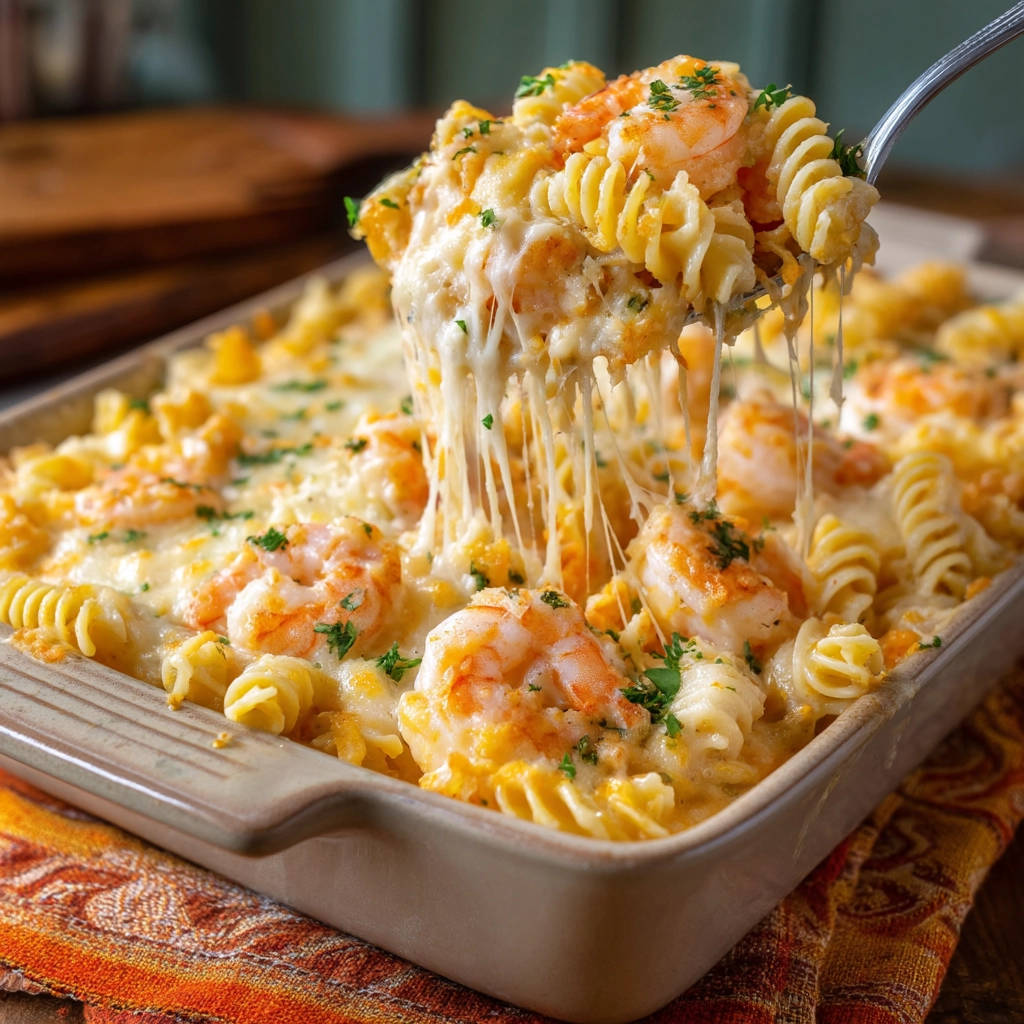
At the heart of any good baked pasta is, well, the pasta! We're using rotini, those delightful little spirals. They're fantastic because their shape holds onto the creamy sauce so well, ensuring every bite is coated in cheesy goodness. A 12-ounce box is just the right amount for a standard 9x13 inch baking dish, providing a great pasta-to-sauce ratio. You'll cook this in a large pot of salted boiling water, aiming for slightly less than al dente.
Next up is the star protein: shrimp! We need about a pound of large shrimp. Using large shrimp means they cook quickly and stay wonderfully tender. Make sure they are peeled and deveined for ease. Fresh or frozen (and thawed properly) both work beautifully here. The sweetness of the shrimp pairs incredibly well with the rich, savory cheese sauce.
The magic of the creamy sauce begins with a classic béchamel base, which requires just two things: fat and flour. We'll use 4 tablespoons of unsalted butter melted down, into which we whisk 4 tablespoons of all-purpose flour. This simple mixture, cooked briefly, forms a roux, which is the thickening agent for our sauce. Using unsalted butter gives you control over the final seasoning.
For the liquid base of the sauce, we turn to milk. Whole milk is highly recommended here for its richness, which contributes significantly to the sauce's creamy texture and flavor. Warming the milk slightly before adding it to the roux is a little trick that helps prevent lumps and speeds up the thickening process. You'll need 3 cups.
Now, for the cheese! A baked pasta wouldn't be complete without plenty of gooey, melted cheese. This recipe calls for a winning combination of sharp cheddar and mozzarella. Sharp cheddar brings a tangy, savory depth of flavor (2 cups shredded), while mozzarella provides that essential stretch and gooey factor (1 cup shredded). Shredding your own cheese from blocks is always best, as pre-shredded cheeses often contain anti-caking agents that can affect how smoothly they melt.
Seasoning is key to elevating all these flavors. Simple additions of 1/2 teaspoon of salt and 1/4 teaspoon of black pepper are perfect for enhancing the richness without overpowering the delicate shrimp. A pinch of paprika is optional but adds a lovely warmth and color to the sauce.
Finally, for an extra layer of texture and a beautiful golden crust, 1/4 cup of breadcrumbs is an optional but highly recommended topping. And a sprinkle of fresh chopped parsley at the end adds a pop of color and fresh brightness that cuts through the richness. If you enjoy using fresh herbs, explore options like our homemade garlic naan bread as a delightful side for scooping up that creamy sauce.
- 12 ounces rotini pasta
- 1 pound large shrimp, peeled and deveined
- 4 tablespoons unsalted butter
- 4 tablespoons all-purpose flour
- 3 cups whole milk, warmed
- 2 cups shredded sharp cheddar cheese
- 1 cup shredded mozzarella cheese
- 1/2 teaspoon salt
- 1/4 teaspoon black pepper
- Pinch of paprika (optional)
- 1/4 cup breadcrumbs (optional)
- Chopped fresh parsley, for garnish
Crafting Your Creamy Shrimp & Rotini Bake: Step-by-Step Guide
Let's get cooking! This dish comes together quite easily, especially once you master the sauce technique. Follow these steps, and you'll be well on your way to baked pasta bliss.
- Prepare Your Baking Dish: Begin by preheating your oven to 375 degrees F (190 degrees C). It's important to preheat thoroughly so the bake cooks evenly and the top gets that lovely golden-brown finish. While the oven heats, take a 9x13 inch baking dish and grease it well. This simple step prevents the pasta and sauce from sticking, making serving and cleanup much easier.
- Cook the Pasta: Grab your largest pot and fill it with generously salted water. Bring it to a rolling boil. Add the 12 ounces of rotini pasta and cook it according to the package directions, but here's a key tip: cook it for 1 to 2 minutes LESS than the recommended al dente time. The pasta will continue to cook and absorb sauce in the oven, and this slight undercooking prevents it from becoming mushy. Once cooked, drain the pasta well and set it aside.
- Build the Roux: While your pasta is doing its thing, start on the sauce in a large saucepan or a Dutch oven over medium heat. Melt the 4 tablespoons of unsalted butter completely. Once melted and bubbly, whisk in the 4 tablespoons of all-purpose flour. Keep whisking constantly for 1 to 2 minutes. You're looking for the mixture to become bubbly and just start to turn a very pale, lightly golden color. This is your roux, and cooking it briefly helps cook out the raw flour taste.
- Whisk in the Warm Milk (The Secret Step!): Now for the crucial part to ensure a lump-free, perfectly creamy sauce. Gradually, add the 3 cups of warmed whole milk to the roux, a little bit at a time (start with maybe 1/4 cup). After each addition, whisk vigorously until the milk is fully incorporated and the mixture is smooth before adding more. Continue this process until all the milk has been added. This slow, whisking method is the secret! Bring the mixture to a gentle simmer, continuing to whisk, and let it cook for 3 to 5 minutes. The sauce will thicken significantly during this time, becoming thick enough to coat the back of a spoon smoothly. Patience here pays off!
- Melt the Cheese Off Heat: As soon as the sauce has thickened to your liking, remove the saucepan completely from the heat. Stir in the 1/2 teaspoon of salt, 1/4 teaspoon of black pepper, and the pinch of paprika, if you're using it. Now, add the 2 cups of shredded sharp cheddar cheese and the 1 cup of shredded mozzarella cheese to the hot sauce. Stir gently using a spoon or spatula until all the cheese is completely melted and incorporated, resulting in a smooth, creamy, and luscious cheese sauce. Removing the pan from the direct heat before adding the cheese is essential for preventing the cheese from becoming oily or the sauce breaking.
- Combine Everything: Add the drained, slightly undercooked rotini pasta and the pound of peeled and deveined shrimp directly into the saucepan with the warm cheese sauce. Gently stir everything together until the pasta and shrimp are evenly coated in the beautiful creamy sauce. Be careful not to overmix, especially with the shrimp.
- Assemble and Top: Pour the entire creamy mixture from the saucepan into the prepared 9x13 inch baking dish, spreading it into an even layer. If you're using the optional breadcrumbs, sprinkle them evenly over the top. This will create a delightful crispy layer during baking.
- Bake to Perfection: Place the dish in your preheated oven. Bake for 20 to 25 minutes. You'll know it's ready when the top is golden brown and the creamy sauce is bubbling enticingly around the edges of the dish. The heat of the oven will finish cooking the shrimp and the pasta, while the sauce melds all the flavors together.
- Rest and Serve: Once baked, carefully remove the dish from the oven. This is another important step for baked pasta! Let it stand for about 5 minutes before serving. This resting period allows the sauce to settle and prevents it from being too runny when you spoon it out. Just before serving, garnish with fresh chopped parsley for a burst of color and freshness.
Pro Tips for the Creamiest Shrimp & Rotini Bake Every Time
Want to ensure your Creamy Shrimp & Rotini Bake is absolutely perfect? Here are a few insider tips to guarantee that luscious, creamy result and keep everything tasting its best:
- Warm Your Milk: As mentioned in the steps, slightly warming your milk (lukewarm is fine, you don't need it hot) before adding it to the roux helps create a smoother sauce and makes the thickening process quicker and more consistent.
- Shred Your Own Cheese: Pre-shredded cheeses often contain cellulose or other anti-caking agents that can give your sauce a slightly grainy texture and prevent it from melting as smoothly. Taking a few extra minutes to shred block cheese makes a noticeable difference in creaminess.
- Don't Overcook the Pasta Initially: Remember to cook the rotini 1-2 minutes less than al dente. It finishes cooking in the oven and absorbs some of the delicious sauce, contributing to the dish's overall texture without becoming mushy.
- Don't Overcook the Shrimp: Large shrimp cook very quickly. Since they go into a hot sauce and then bake, they will finish cooking in the oven. Adding them raw to the hot sauce ensures they don't become tough and rubbery by the time the bake is done.
- Let it Rest: That 5-minute resting period isn't just a suggestion! It allows the sauce to thicken slightly and cling better to the pasta and shrimp, giving you clean, creamy servings.
- Spice it Up: If you like a little heat, add a pinch of red pepper flakes to the sauce when you add the salt and pepper. It provides a nice warmth that complements the richness.
Delicious Variations to Try
This Creamy Shrimp & Rotini Bake is wonderfully versatile! Once you have the basic technique down, feel free to experiment with these variations:
- Add Some Veggies: Stir in some blanched broccoli florets, frozen peas (added straight to the sauce with the pasta), or fresh spinach (it will wilt in the hot sauce) along with the pasta and shrimp. It's a great way to add color, nutrients, and flavor. If you enjoy bakes with added vegetables, you might also like our Creamy Chicken Veggie Bake.
- Switch the Pasta: Any medium-sized pasta shape with nooks and crannies will work well here - penne, shells, cavatappi, or even elbow macaroni for a grown-up mac and cheese vibe. Just be sure to cook it slightly less than al dente. For other delicious pasta ideas, check out our Quick Summer Penne.
- Different Cheeses: While cheddar and mozzarella are a classic combination, feel free to play with other cheeses. Fontina, Gruyere, Monterey Jack, or even a touch of smoked gouda could add interesting twists.
What to Serve with Your Creamy Shrimp & Rotini Bake
This rich, creamy dish pairs beautifully with simple sides that offer a bit of freshness or contrast in texture. Here are a few ideas:
- A Simple Green Salad: A light, crisp salad with a vinaigrette dressing is a perfect counterpoint to the richness of the bake. Think mixed greens, cucumber, and cherry tomatoes. Our Easy Kale Salad would be a fantastic, nutritious option.
- Steamed or Roasted Vegetables: Side dishes like steamed green beans, roasted asparagus, or crispy roasted Brussels sprouts add color and a healthy touch.
- Crusty Bread: A warm, crusty baguette or some garlic bread is excellent for soaking up any extra sauce.
Your Creamy Shrimp & Rotini Bake Questions Answered (FAQ)
Let's address some common questions you might have about making this delicious creamy shrimp rotini bake.
Can I use pre-cooked shrimp?
Yes, you can use pre-cooked shrimp, but be very careful not to overcook them. If using pre-cooked shrimp, stir them into the cheese sauce with the pasta just before transferring the mixture to the baking dish. Since they are already cooked, they only need to be heated through in the oven, which the baking time will accomplish without making them tough.
Can I make this dish ahead of time?
Absolutely! You can assemble the entire bake (steps 1-7, stopping before baking) and cover it tightly with foil. Store it in the refrigerator for up to 24 hours. When ready to bake, let it sit at room temperature for about 20-30 minutes while the oven preheats. You might need to add an extra 5-10 minutes to the baking time since it's starting cold. The sauce should still remain creamy if you followed the milk and cheese steps correctly.
Can I freeze Creamy Shrimp & Rotini Bake?
Yes, this bake freezes reasonably well. Assemble the dish as directed (steps 1-7), but omit the breadcrumb topping if using. Let it cool completely if you cooked the pasta ahead of time. Cover it tightly with plastic wrap, then a layer of foil, and freeze for up to 2-3 months. To reheat, thaw overnight in the refrigerator. Remove the plastic wrap, add the breadcrumbs (if desired), cover with foil, and bake at 375°F (190°C) for about 30-40 minutes, then uncover and bake for another 10-15 minutes, or until heated through and bubbling.
Is there a way to make this gluten-free?
Yes, you can adapt this recipe to be gluten-free. Use your favorite gluten-free rotini pasta and substitute the all-purpose flour in the roux with a gluten-free all-purpose flour blend. Ensure the blend is suitable for making sauces. All other ingredients are naturally gluten-free.
What is the secret to the creamy sauce?
The secret is twofold: gradually adding warmed milk to the roux while continuously whisking, and removing the sauce from the heat before stirring in the cheese. These steps prevent lumps and ensure the cheese melts smoothly without becoming greasy or separating.
How do I prevent the sauce from being too thick?
If your sauce seems too thick after adding the cheese, you can whisk in a splash or two more warmed milk until it reaches your desired consistency before combining it with the pasta and shrimp.
Are there other creamy pasta bakes I should try?
If you love creamy pasta bakes, you're in luck! This site has plenty of delicious options. For a classic, comforting dish, you absolutely must try our Creamy Mac and Cheese. It uses a similar technique for a perfect sauce every time.
Enjoy This Comforting Creamy Shrimp Rotini Bake!
Whipping up a dish like this Creamy Shrimp & Rotini Bake brings such a wonderful sense of accomplishment and, of course, provides truly soul-satisfying food. It's proof that with just a few key techniques, you can transform simple ingredients into something truly spectacular.
Whether you're making it for a family dinner, a potluck, or just because you're craving comfort, this recipe delivers on all fronts. The creamy sauce, the tender shrimp, the perfectly cooked pasta - it's a combination that's hard to beat.
Give this Creamy Shrimp & Rotini Bake a try tonight, and let me know how it turns out in the comments below! Did the secret sauce technique work wonders for you too? Share your experience, and happy cooking!
Creamy Shrimp & Rotini Bake
Ingredients
- 12 ounces rotini pasta
- 1 pound large shrimp, peeled and deveined
- 4 tablespoons unsalted butter
- 4 tablespoons all-purpose flour
- 3 cups whole milk, warmed
- 2 cups shredded sharp cheddar cheese
- 1 cup shredded mozzarella cheese
- 1/2 teaspoon salt
- 1/4 teaspoon black pepper
- Pinch of paprika (optional, for color)
- 1/4 cup breadcrumbs (optional, for topping)
- Chopped fresh parsley, for garnish
Directions
- Preheat oven to 375 degrees F (190 degrees C). Grease a 9×13 inch baking dish.
- Cook pasta in a large pot of salted boiling water according to package directions, cooking for 1-2 minutes less than al dente. Drain and set aside.
- While pasta cooks, melt butter in a large saucepan or Dutch oven over medium heat. Whisk in flour and cook for 1-2 minutes, whisking constantly, until bubbly and lightly golden. This is your roux.
- Gradually whisk in the warmed milk, a little at a time, whisking continuously until smooth and no lumps remain. Bring the mixture to a simmer, whisking, and cook for 3-5 minutes, or until the sauce has thickened enough to coat the back of a spoon. This slow addition and whisking is crucial for a smooth sauce.
- Remove the saucepan from the heat. Stir in salt, pepper, and paprika (if using). Add the shredded cheddar and mozzarella cheeses to the hot sauce. Stir gently until the cheeses are completely melted and the sauce is smooth and creamy. Removing from heat before adding cheese prevents it from separating or becoming oily.
- Add the cooked shrimp and drained pasta to the cheese sauce. Stir gently to combine everything and ensure the pasta and shrimp are fully coated in the creamy sauce.
- Pour the mixture into the prepared baking dish. If using, sprinkle breadcrumbs evenly over the top.
- Bake for 20-25 minutes, or until the top is golden brown and the sauce is bubbling around the edges.
- Let stand for 5 minutes before serving. Garnish with fresh chopped parsley.


