Oh, the classic fritter dilemma! You dream of biting into a light, airy puff with a delightfully crisp exterior, only to end up with a sad, oil-logged sponge. Sound familiar? It’s a common frustration for home cooks. Achieving that perfect golden crunch without your fritters turning into grease bombs feels like kitchen magic sometimes.
Well, get ready to feel like a kitchen wizard, because I’ve finally cracked the code! These crispy herb fritters are the answer to your greasy fritter woes. This recipe will guide you step-by-step, showing you exactly how to create savory, incredibly crispy fritters that stay wonderfully non-greasy every single time. Whether you serve them as an appetizer, a light lunch, or a tasty side dish, they’re guaranteed to disappear fast!
Why You’ll Adore These Crispy Herb Fritters
What makes this recipe stand out from all the other fritter recipes out there? It’s all about achieving that elusive perfect texture and flavor profile without the heavy, oily disappointment. Here are a few reasons why these will become your new go-to fritters:
- Guaranteed Non-Greasy: Seriously! We focus on the techniques that prevent oil absorption, leaving you with crispy goodness, not greasy sadness.
- Perfectly Crispy Texture: These fritters boast an irresistible golden crust that gives way to a tender, flavorful interior. The contrast is simply divine.
- Packed with Fresh Flavor: The generous amount of fresh herbs infuses each bite with brightness and a wonderful savory depth.
- Quick and Easy: With just 15 minutes of prep and 15-20 minutes of cook time, you can have a batch of these ready in about 30-35 minutes.
- Versatile Serving Options: Enjoy them on their own, with a dipping sauce, as part of a meal, or even for breakfast.
Gathering Your Ingredients for Flawlessly Crispy Herb Fritters
The beauty of these savory fritters lies in their simplicity. You likely have most of these pantry staples on hand already. The combination creates a light batter base that crisps up beautifully, while the fresh herbs provide that essential vibrant flavor.
- All-Purpose Flour: This forms the structure of our fritters. Using standard all-purpose flour creates a reliable batter consistency that holds together while frying and crisps up nicely. You’ll need 1 and 1/2 cups.
- Baking Powder: This is our leavening agent, crucial for giving the fritters a little lift and making them light and airy inside, rather than dense. We’re using 1 teaspoon.
- Salt and Black Pepper: The essential seasonings! Salt enhances all the other flavors, and black pepper adds a subtle warmth and bite. You’ll need 1/2 teaspoon of salt and 1/4 teaspoon of black pepper.
- Turmeric Powder (Optional): Adding just 1/4 teaspoon of turmeric isn’t primarily for flavor here (though it adds a very subtle earthy note), but rather for a beautiful golden color that makes the fritters look even more appealing when they come out of the oil. Feel free to skip it if you don’t have it or prefer not to use it.
- Liquid Base (Water or Milk): You have a choice here! 1 cup of water will result in a slightly lighter, crispier fritter, while milk will add a touch of richness and a slightly softer interior. Both work well, so use whichever you prefer or have on hand.
- Large Egg: The egg acts as a binder, helping to hold the batter together and adding a bit of richness and structure. One large egg is all you need.
- Fresh Herbs (Parsley or Cilantro): This is where the ‘herb’ in herb fritters comes in! A full cup of finely chopped fresh parsley or cilantro (or a mix of both!) is folded into the batter, ensuring every bite is bursting with fresh flavor. Make sure your herbs are really finely chopped so they distribute evenly throughout the batter.
- Vegetable Oil, for Frying: You’ll need enough oil to fill your pot or skillet about 1 to 1.5 inches deep. Vegetable oil is a good choice because it has a high smoke point suitable for frying, providing that necessary heat to achieve a crispy exterior without the fritters absorbing too much grease. Other high smoke point oils like canola or sunflower oil would also work.
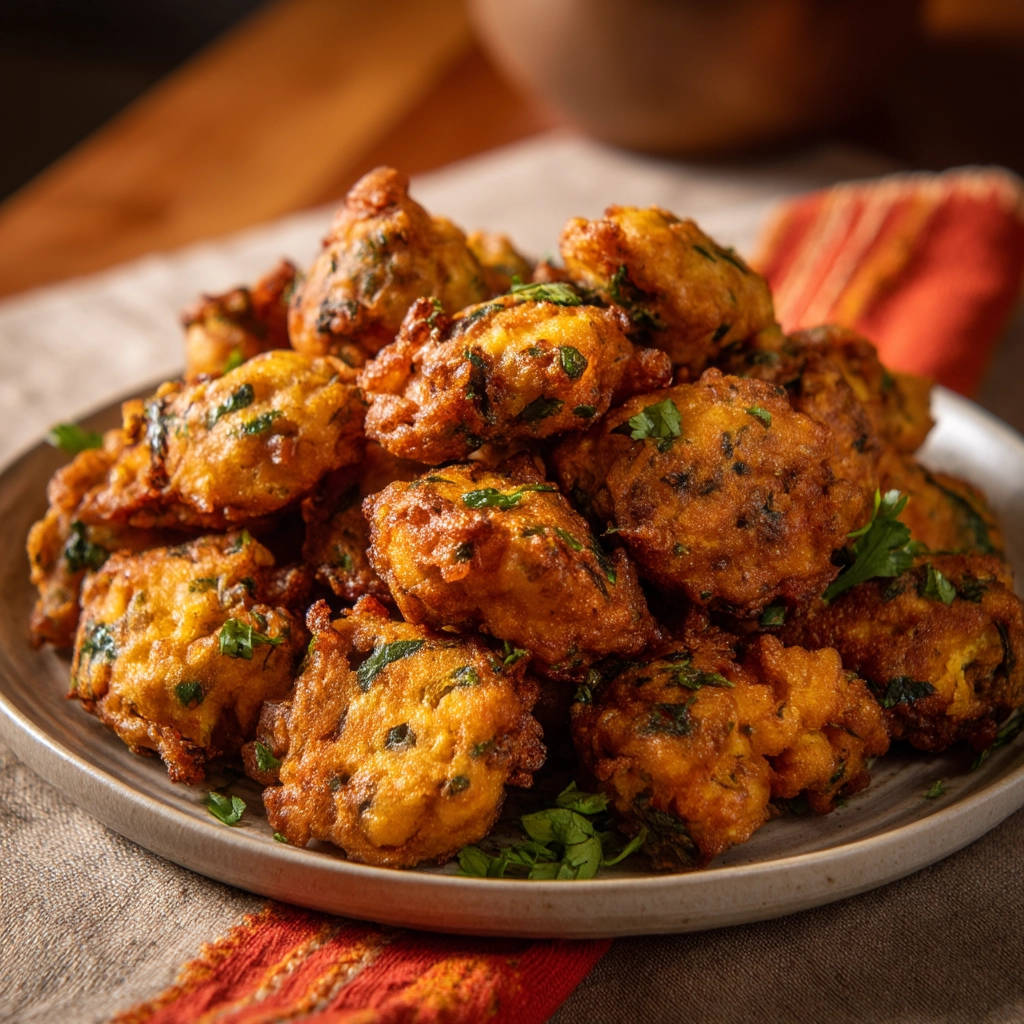
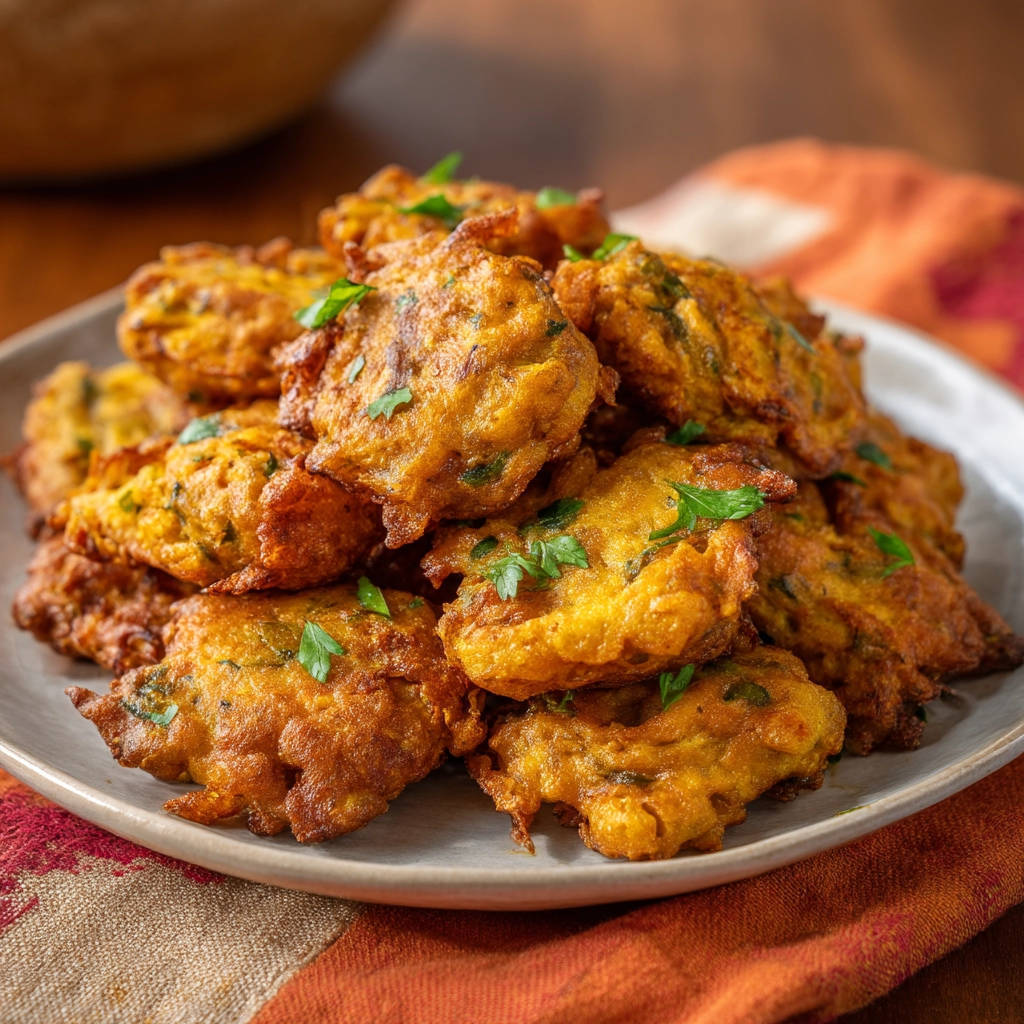
Crafting Your Crispy Herb Fritters: Step-by-Step Guide to Perfection
Making these fritters is straightforward, but the key is paying attention to a couple of crucial details, especially when it comes to frying. Follow these steps carefully for perfectly crispy, non-greasy results!
-
Prepare the Dry Ingredients: In a spacious mixing bowl, measure out your all-purpose flour, baking powder, salt, black pepper, and the optional turmeric powder. Take a whisk and thoroughly combine these dry ingredients. Whisking them together ensures that the leavening agent (baking powder) and seasonings are evenly distributed throughout the flour mixture, which is important for uniform texture and flavor in your fritters.
-
Combine the Wet Ingredients: Grab a separate bowl – even a smaller one will do. Pour in your chosen liquid (water or milk) and crack in the large egg. Give this mixture a good whisk until the egg is fully incorporated into the liquid and it looks uniform. Keeping wet and dry separate initially helps prevent overmixing later.
-
Mix the Batter (Carefully!): Now, pour the whisked wet ingredients directly into the bowl with the dry ingredients. Using your whisk, gently combine the two mixtures. Your goal here is to just bring everything together until most of the flour is incorporated. It’s perfectly okay, even desirable, to have a few small lumps of flour remaining. The absolute key is to not overmix. Overmixing develops the gluten in the flour too much, which can result in tough, chewy fritters instead of light and crispy ones.
-
Add the Fresh Herbs: Once your batter is just combined (lumps are fine!), it’s time to fold in the star flavor builders – the finely chopped fresh parsley or cilantro. Use a spatula or a spoon for this step. Gently fold the herbs into the batter until you see them pretty evenly distributed throughout the mixture. Don’t stir vigorously; just a gentle folding motion is needed.
-
Master the Frying Temperature (The ULTIMATE Key): This step is the secret weapon against greasy fritters. Pour about 1 to 1.5 inches of vegetable oil into a heavy-bottomed pot or a deep skillet. A heavy bottom helps maintain a steady temperature. Place the pot over medium-high heat. You need to heat the oil until it reaches precisely 350 degrees F (about 175 degrees C). Using a thermometer is highly recommended for accuracy. If you don’t have one, you can test the oil: drop a tiny droplet of batter into the hot oil. If it immediately sizzles vigorously and floats to the surface within a few seconds, your oil is likely ready. If it sinks and bubbles lazily, it’s too cool (hello, grease!). If it browns instantly and aggressively, it’s too hot and will burn the outside. Maintaining this 350°F temperature throughout the entire frying process is critical. Oil that is too cool results in soggy, oil-logged fritters, while oil that is too hot will brown the outside before the inside has a chance to cook through properly.
-
Carefully Drop Batter into Hot Oil: Once your oil is at the correct temperature, it’s time to start frying. Using two spoons or a small scoop (around 1.5 to 2 tablespoons of batter per fritter), carefully drop spoonfuls of the batter into the hot oil. Be gentle to avoid splashing. It’s incredibly important not to overcrowd the pot. Fry only a few fritters at a time (usually 3-5 depending on the size of your pot). Overcrowding will cause the oil temperature to drop significantly, which, as we now know, leads to greasy fritters. Give each fritter enough space to fry without touching.
-
Fry Until Golden and Cooked: Let the fritters fry for about 2-4 minutes on the first side. You’ll see the edges start to brown and firm up. Use a slotted spoon or a spider (a wire mesh spoon) to gently flip each fritter. Continue frying for another 2-4 minutes on the second side, or until they are a beautiful golden brown all over and appear puffed and cooked through. The cooking time can vary slightly depending on the size of your fritters and the exact oil temperature.
-
Drain Off Excess Oil: This is another simple but vital step for crispness. As each batch of fritters finishes frying, lift them out of the hot oil using your slotted spoon or spider. Immediately transfer the cooked fritters to a plate or wire rack that you’ve lined generously with paper towels. The paper towels will absorb any surface oil, helping them stay crispy. Don’t skip this!
-
Reheat Oil Between Batches: If you’re frying multiple batches (which you likely will be!), check the oil temperature before adding the next spoonfuls of batter. The temperature will have dropped after frying the previous batch. Allow the oil to reheat back up to that crucial 350 degrees F (175 degrees C) before you add more batter. Patience here ensures consistent, crispy results from the first fritter to the last.
-
Serve Warm: Fritters are always best enjoyed warm, fresh out of the oil! As they cool, they can lose some of their crispness. Serve them promptly and watch them disappear.
Tips for Perfect Crispy Herb Fritters Every Time
While the recipe steps are straightforward, a few extra tips can elevate your fritter game and guarantee that amazing crispy, non-greasy result!
- Precision on Temperature is Key: I cannot stress this enough! Investing in an inexpensive digital thermometer for frying oil is a game-changer. It takes the guesswork out of step 5 and is truly the secret weapon for avoiding greasy fritters. Aim to keep the oil consistently between 340-360°F (170-180°C).
- Don’t Crowd the Pan: Frying too many fritters at once is the quickest way to lower the oil temperature and end up with sad, greasy results. Fry in batches, giving each fritter space.
- Use Fresh, Finely Chopped Herbs: Dried herbs won’t give you the same vibrant flavor. Make sure your fresh parsley or cilantro is very finely chopped so it incorporates smoothly into the batter.
- Let Excess Batter Drip: Before dropping spoonfuls into the oil, let any excess batter drip back into the bowl. This helps create nice shapes and avoids messy oil.
- Drain Properly: Don’t just pile them onto a plate. Use paper towels to absorb excess surface oil immediately after they come out of the fryer. A wire rack placed over paper towels allows for even better drainage and air circulation.
- Spice it Up: Feel free to add a pinch of cayenne pepper or a dash of garlic powder or onion powder to the dry ingredients for extra flavor dimensions.
- Swap the Herbs: While parsley and cilantro are classic, you could experiment with other finely chopped fresh herbs like chives, dill, or even a bit of mint for a different twist.
Delicious Ways to Serve Your Herb Fritters
These savory fritters are incredibly versatile! Their crispy exterior and herby interior make them a fantastic addition to many meals or perfect on their own.
Serve them as an appetizer with a variety of dipping sauces. A simple yogurt-based dip with garlic and lemon, a spicy sriracha mayo, or even just classic ketchup are all great options. For a delightful side dish, they pair wonderfully with roasted meats like our Perfect Juicy Roast Beef or alongside Easy Mexican Rice. They can also be a light main course served with a fresh salad, perhaps something like our Easy Kale Salad.
Your Crispy Herb Fritter Questions Answered (FAQ)
Got questions about making the best crispy herb fritters? Here are some common queries and their answers!
Can I make the batter ahead of time?
While technically possible, I highly recommend making the batter just before frying. Baking powder is activated by liquid, and letting the batter sit for too long can diminish its leavening power, resulting in less fluffy fritters. The fresh herbs can also lose some vibrancy if chopped and left in the batter for an extended period.
How should I reheat leftover fritters to keep them crispy?
The best way to reheat leftover crispy herb fritters is in an oven or air fryer. Avoid the microwave, as it will make them soft and potentially rubbery. Preheat your oven to 350°F (175°C) or air fryer to 325°F (160°C). Place the fritters in a single layer and heat for 5-10 minutes until warmed through and crispy again.
Can I add cheese or other vegetables to the batter?
Absolutely! Finely grated cheese like cheddar or Parmesan works well. You could also add very finely minced vegetables like onion, bell pepper, or zucchini (make sure to squeeze out excess moisture from zucchini first!). Just don’t overload the batter, as too many additions can affect the texture and frying time. It’s a great way to customize your savory fritters!
Is there a way to make these gluten-free?
You might be able to substitute the all-purpose flour with a gluten-free all-purpose flour blend. Look for a blend designed for baking. Results may vary slightly in texture, but many blends work well in recipes like this. Experimentation might be needed!
Why are my fritters still greasy even though the oil temperature was right?
Beyond oil temperature, overcrowding the pot is the most common culprit for greasy fritters. When you add too many to the oil, the temperature drops suddenly, and the fritters soak up the oil instead of frying quickly. Make sure you are frying in small batches and allowing the oil to recover its temperature between additions (as mentioned in step 9).
Enjoy Your Homemade Crispy Herb Fritters!
There you have it! The secret to perfectly crispy, delightfully non-greasy herb fritters. Forget those disappointing, oily versions of the past. With just a little attention to technique, particularly the oil temperature, you can achieve fritter perfection right in your own kitchen.
They’re so quick and easy to whip up, they might just become your new favorite snack or side. Give this recipe a try and let me know what you think! Did you nail the crispiness? What’s your favorite dipping sauce? Share your experience in the comments below – I love hearing from you!
Crispy Herb Fritters

Ingredients
- 1 and 1/2 cups all purpose flour
- 1 teaspoon baking powder
- 1/2 teaspoon salt
- 1/4 teaspoon black pepper
- 1/4 teaspoon turmeric powder (for color, optional)
- 1 cup water or milk
- 1 large egg
- 1 cup finely chopped fresh parsley or cilantro
- Vegetable oil, for frying
Directions
- In a large bowl, whisk together the flour, baking powder, salt, pepper, and turmeric (if using).
- In a separate bowl, whisk together the water or milk and the egg.
- Pour the wet ingredients into the dry ingredients and whisk until just combined. A few small lumps are okay. Do not overmix.
- Fold in the chopped parsley or cilantro until evenly distributed.
- This is the key to non-greasy fritters: Heat about 1 to 1.5 inches of vegetable oil in a heavy-bottomed pot or deep skillet over medium-high heat until it reaches 350 degrees F. If you don’t have a thermometer, test the oil by dropping a tiny bit of batter in; it should sizzle immediately and float to the top within a few seconds. Maintain this temperature throughout frying. Oil that is too cool will result in greasy fritters, and oil that is too hot will burn the outside before the inside cooks.
- Carefully drop spoonfuls (about 1.5 to 2 tablespoons each) of batter into the hot oil. Do not overcrowd the pot. Fry only a few fritters at a time to prevent the oil temperature from dropping too much. Overcrowding also makes fritters greasy.
- Fry for 2-4 minutes per side, or until golden brown and cooked through. Use a slotted spoon or spider to flip the fritters gently as needed.
- Once golden and cooked, lift the fritters out of the oil using the slotted spoon and transfer them immediately to a plate lined with paper towels to drain any excess oil.
- Allow the oil to reheat back to 350 degrees F between batches if necessary before adding more batter.
- Serve the fritters warm.