Oh, friend, have you ever been there? You spend time perfectly frying chicken pieces to golden, glorious crispness, dreaming of that moment you toss them in a sticky, sweet, and tangy sauce. Then, tragedy strikes. Within minutes, that beautiful crunch starts to disappear, leaving you with... well, delicious chicken, but not the crispy orange chicken you were craving.
I know the feeling! For years, I struggled with the dreaded soggy chicken fate. I tried double frying, different coatings, you name it. But it wasn't until I stumbled upon one simple, crucial trick that everything changed. This Crispy Honey Orange Chicken recipe isn't just another recipe; it's a solution. It delivers perfectly crunchy chicken bites coated in a vibrant, sticky honey orange sauce that stays wonderfully crispy until the very last piece is devoured. Get ready to say goodbye to sogginess forever!
Why This Crispy Honey Orange Chicken Recipe is a Keeper
What makes this version stand out from the rest? It all comes down to that magical crispy coating and the timing of the sauce.
- Unbeatable Crispy Texture: We're talking shatteringly crispy chicken that holds its crunch. The combination of flour and cornstarch in the breading creates a superior crust, and our key technique ensures it doesn't melt away in the sauce.
- Perfectly Balanced Sauce: Not too sweet, not too tangy. The bright citrus notes from the orange juice are balanced by the richness of honey and savory soy sauce, with a hint of warmth from ginger and garlic.
- Made at Home: Achieve restaurant-quality results in your own kitchen, often faster and more affordably than ordering takeout.
- Simple, Foolproof Steps: While frying might sound intimidating, I break down each part of the process to make it accessible for home cooks.
- Customizable Heat: Easily adjust the spice level with optional red pepper flakes to suit your preference.
Gathering Your Ingredients for Crispy Honey Orange Chicken
Building incredible flavor and achieving that coveted texture starts with having the right ingredients ready to go. We'll be working with two main sets here: the components for our extra-crispy chicken coating and the elements that build our glossy, irresistible honey orange sauce.
For the star of the show, you'll need:
- Chicken: Two pounds of boneless, skinless chicken breasts or thighs. Thighs tend to stay a bit juicier during frying, but breasts work beautifully too. Cut them into roughly 1-inch pieces - uniform size helps them cook evenly.
- All-Purpose Flour: The foundation of our dry coating mixture.
- Cornstarch: This is a game-changer for crispiness! Using cornstarch alongside flour creates a lighter, crispier crust that holds up better to sauce. You'll notice we use it in the sauce too!
- Seasonings: Salt, black pepper, garlic powder, and onion powder. These aren't just for the chicken; they infuse flavor directly into the breading itself.
- Eggs: Large eggs, beaten. This is the wet component that helps the dry coating adhere to the chicken pieces.
- Milk or Water: Adding just a touch of liquid to the eggs helps thin the mixture slightly, allowing for a thinner, more even coating.
- Vegetable Oil: For frying the chicken. Choose an oil with a high smoke point, like vegetable, canola, or peanut oil. You'll need enough to create about 1 1/2 to 2 inches of depth in your frying pot.
Now, onto the sauce, which brings the vibrant sweet and savory notes:
- Orange Juice: Freshly squeezed or good quality store-bought juice is key for that bright, citrusy flavor.
- Honey: Provides sweetness and that signature sticky glaze.
- Soy Sauce: Adds essential savory depth and umami. If you need a gluten-free version, simply swap it for tamari.
- Rice Vinegar: Introduces a necessary tang that balances the sweetness of the honey and orange juice.
- Cornstarch: Again! Here, it's used as a thickening agent to give the sauce its beautiful, glossy consistency.
- Water: Mixed with the cornstarch to create a smooth slurry before adding it to the hot sauce.
- Fresh Ginger: Grated ginger adds a fresh, slightly peppery zing that complements the orange perfectly.
- Garlic: Minced cloves provide aromatic depth.
- Red Pepper Flakes (Optional): For those who like a little heat to their sweet and savory. Adjust the amount based on your spice preference.
Having all your ingredients measured and prepped before you start cooking, especially before you begin frying, will make the whole process much smoother and more enjoyable.
Crafting Your Crispy Honey Orange Chicken: Step-by-Step
Alright, let's dive into making this incredible dish. While there are a few steps involved, especially with frying, each one is straightforward and leads us closer to that ultimate crispy, saucy bite. Pay special attention to the drying step and the final sauce toss - these are the secrets to success!
- Prepare the Chicken for Ultimate Crispness: This is the foundational step that makes all the difference! Start by cutting your chicken into uniform 1-inch pieces. Then, and this is crucial, pat each piece very dry using paper towels. Any surface moisture on the chicken will steam rather than crisp up in the oil, preventing that golden crunch we're aiming for. Don't rush this part!
- Build the Dry Coating: In a medium-sized bowl, grab your all-purpose flour and cornstarch. Whisk them together thoroughly. This blend of flours is key to the crispy texture. Now, add your flavor builders: salt, black pepper, garlic powder, and onion powder. Whisk everything together until well combined. This ensures every piece gets seasoned as it's coated.
- Prepare the Wet Dip: In a separate medium bowl, whisk together your beaten large eggs with the milk or water. Whisking incorporates a little air and ensures the eggs are smooth. This wet mixture acts as the glue for our dry coating.
- Coat the Chicken: Set up a dredging station: the bowl with the wet mixture, followed by the bowl with the dry mixture, and finally, a wire rack placed over a baking sheet. Dip each piece of chicken first into the wet mixture, allowing any excess egg to drip back into the bowl. Then, immediately transfer the wet chicken piece to the dry flour mixture. Dredge it generously, pressing the flour mixture onto the chicken to ensure it's completely coated. Place the coated pieces on the wire rack. The wire rack allows air to circulate around the chicken, helping the coating set slightly while you prepare for frying. Don't stack the pieces.
- Heat the Frying Oil: Choose a large, heavy-bottomed pot or a Dutch oven for frying. Heavy pots maintain a consistent temperature better, which is important for even cooking and crisping. Pour in enough vegetable oil to reach a depth of about 1 1/2 to 2 inches. Place the pot over medium-high heat. Use a thermometer to heat the oil until it reaches 350 degrees Fahrenheit (about 175 degrees Celsius). Getting the oil to the right temperature is vital - too cool and the chicken will be greasy; too hot and the coating will burn before the inside cooks.
- Fry the Chicken in Batches: Once the oil is at temperature, carefully add the coated chicken pieces to the hot oil. It's essential to fry in batches! Do not overcrowd the pot. Overcrowding lowers the oil temperature, leading to soggy, unevenly cooked chicken. Fry each batch for approximately 4 to 6 minutes, or until the chicken is deep golden brown and cooked through. The exact time will depend on the size of your chicken pieces. Use a slotted spoon or spider to remove the fried chicken and place it back onto the wire rack set over a baking sheet to drain off excess oil. If you're frying multiple batches and want to keep the earlier batches warm, you can place the baking sheet in a low oven (around 200°F or 90°C).
- Prepare the Honey Orange Sauce: While the chicken is frying or immediately after you've finished frying all the batches, prepare the sauce. In a medium saucepan, combine the orange juice, honey, soy sauce (or tamari), rice vinegar, grated fresh ginger, minced garlic, and red pepper flakes (if using). Place the saucepan over medium heat and bring the mixture to a gentle simmer, stirring occasionally.
- Make the Cornstarch Slurry: In a small separate bowl, whisk together the tablespoon of cornstarch with the two tablespoons of cold water until completely smooth. This slurry is what will thicken our sauce.
- Thicken the Sauce: Once the sauce in the saucepan is simmering, slowly pour the cornstarch slurry into the saucepan while continuously whisking the sauce. Keep whisking as the sauce simmers. You'll notice it start to thicken fairly quickly, becoming glossy and coating the back of a spoon. Cook and whisk for another minute or two to ensure the cornstarch is fully cooked and the sauce is smooth. Remove the sauce from the heat once it reaches your desired consistency.
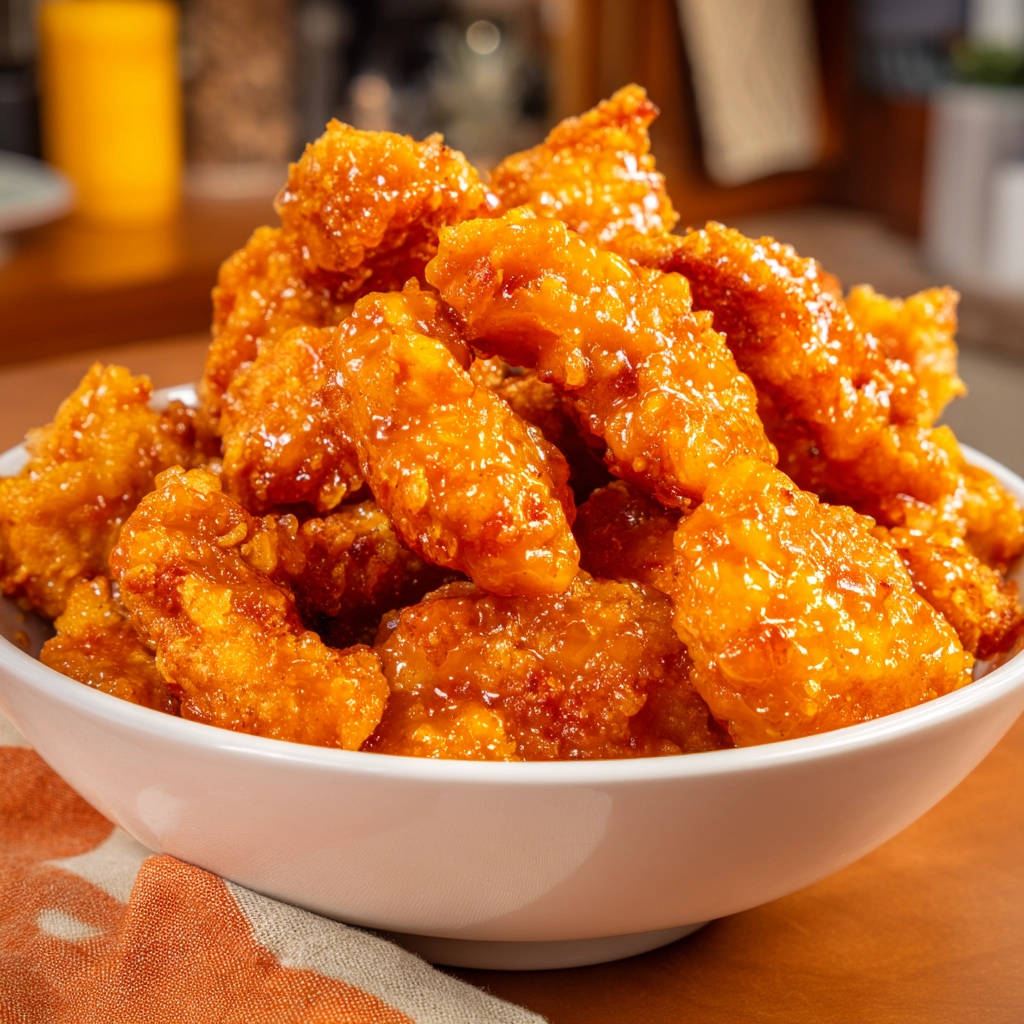
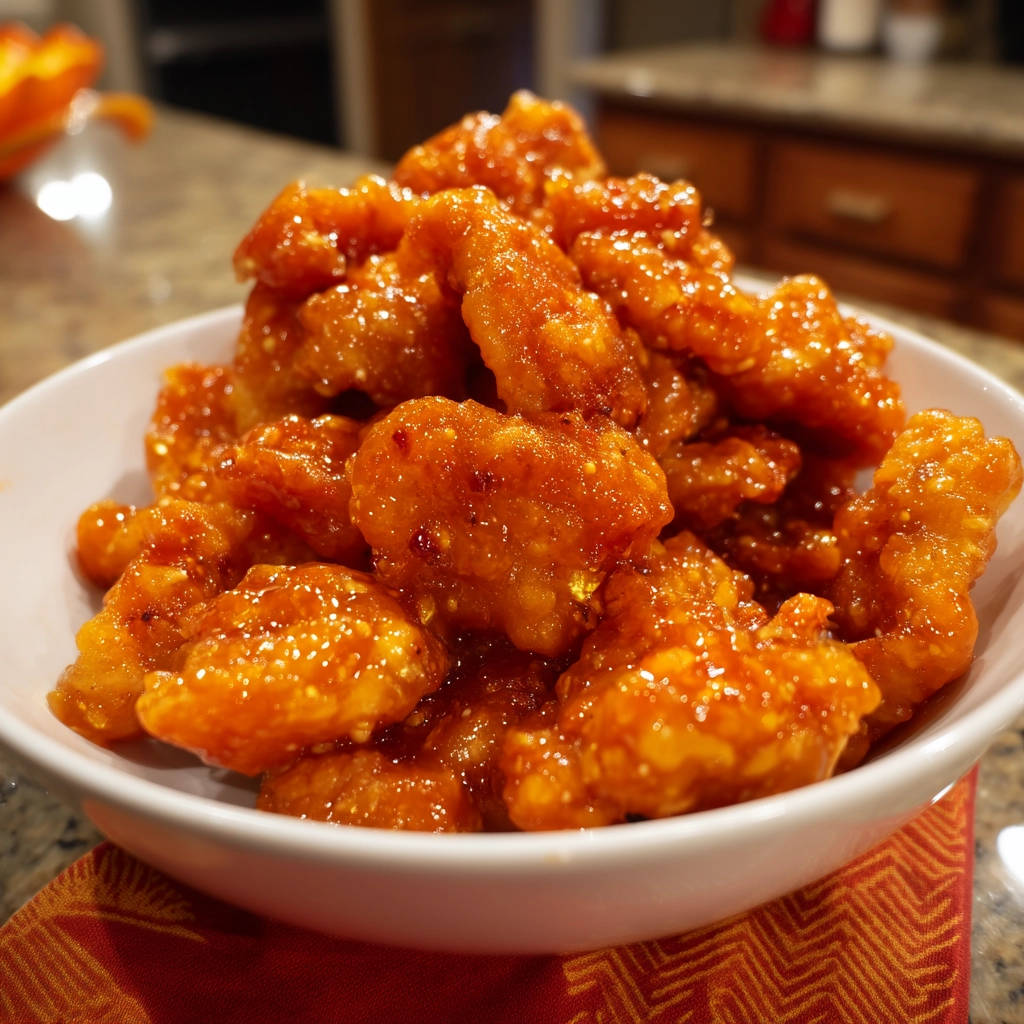
- The Crispy Secret: Toss and Serve IMMEDIATELY: This is it - the crucial step that guarantees crispiness after saucing! Transfer the hot, recently fried chicken pieces to a large bowl. Pour the hot, thickened honey orange sauce directly over the chicken.
- Coat Gently: Using tongs, gently and quickly toss the chicken pieces in the sauce until every piece is evenly coated. The heat from the chicken and the sauce helps the glaze adhere beautifully.
- Serve Without Delay: This is the second part of the crispy secret! The key to maintaining that wonderful crunchy texture is to minimize the time the sauced chicken sits before being eaten. Serve your Crispy Honey Orange Chicken immediately over rice (perhaps our glazed chicken and cilantro rice?), with steamed vegetables, or alongside crispy roasted brussels sprouts. The less time it spends soaking, the longer it stays crispy!
Tips for Perfect Crispy Honey Orange Chicken Every Time
Achieving perfect results is easy when you know a few pro tips. Here are some things to keep in mind:
- Monitor Oil Temperature: Using a thermometer is highly recommended. Maintaining 350°F ensures the chicken cooks through and crisps properly without burning. If the oil gets too hot, turn the heat down slightly between batches. If it drops too low, give it a moment to heat back up before adding more chicken.
- Don't Skip the Double Dredge: Dipping in the wet mixture followed by a generous dredge in the dry mix is essential for building a substantial coating that can withstand the sauce.
- Use a Wire Rack: Resting the chicken on a wire rack after coating and after frying prevents the bottom from getting soggy. For other crispy chicken dishes like crispy chicken tenders, this draining step is equally important!
- Adjust Sauce Consistency: If your sauce is too thick, whisk in a tablespoon of water or orange juice at a time until it reaches your desired consistency. If it's too thin, make another small cornstarch slurry (1 tsp cornstarch + 2 tsp water) and whisk it into the simmering sauce.
- Spice It Up: Add more red pepper flakes to the sauce for a spicier kick. You could also add a pinch of cayenne pepper.
- Ginger and Garlic: For the best flavor, use fresh ginger and garlic. Pre-minced versions work in a pinch but fresh offers a more vibrant taste.
What to Serve With Crispy Honey Orange Chicken
This flavorful dish pairs wonderfully with a variety of sides to create a complete meal.
- Rice: Classic white rice, brown rice, or jasmine rice are perfect for soaking up the extra sauce. Consider a side like our easy Mexican rice for a twist.
- Steamed Vegetables: Broccoli, snap peas, bell peppers, or carrots provide color and nutrients.
- Noodles: Serve it over stir-fried noodles for a different texture experience.
- Salad: A light, refreshing salad like our easy kale salad or a simple cucumber salad can balance the richness.
Your Crispy Honey Orange Chicken Questions Answered (FAQ)
Have questions about making this delicious orange chicken? Here are some common ones I hear:
Can I bake or air fry the chicken instead of frying?
While you can bake or air fry chicken coated this way, it generally won't achieve the same level of crispiness that deep frying provides, especially when sauced. The intense, all-around heat of frying creates a unique crust. If you want to try baking or air frying for a lighter option, spray the coated chicken generously with oil before cooking and anticipate a slightly less crispy result.
Can I make the sauce ahead of time?
Yes, you can prepare the honey orange sauce up to a day in advance. Store it in an airtight container in the refrigerator. When you're ready to use it, gently reheat it in a saucepan over medium heat, whisking occasionally, until it is hot and pourable. Remember, the key to crispy chicken is tossing it with hot sauce right before serving.
What's the secret to the crispy coating staying crispy?
It's primarily a combination of the cornstarch in the breading creating a sturdy crust, and the crucial final step: tossing the hot fried chicken directly with the hot sauce just moments before serving. This minimizes the contact time between the hot, steamy sauce and the crispy coating before you eat it.
Can I use chicken tenders or wings?
Absolutely! You can use boneless chicken tenders or even bone-in chicken wings for this recipe. Adjust the frying time based on the size and thickness of the pieces to ensure they are cooked through. For bone-in wings, you may need to fry them longer.
Is this recipe gluten-free?
As written with all-purpose flour and standard soy sauce, it is not gluten-free. However, you can easily make it gluten-free by substituting the all-purpose flour with a good quality gluten-free all-purpose flour blend and using tamari instead of regular soy sauce.
Can I add vegetables to the sauce?
To keep the chicken its crispiest, it's best not to add vegetables directly into the bowl when you toss the chicken with the sauce. However, you can stir-fry vegetables separately (like bell peppers, onions, or broccoli florets) and either serve them alongside the chicken or toss them with a little bit of the sauce in a separate pan just before serving.
Enjoy Your Homemade Crispy Honey Orange Chicken!
There you have it! No more compromising on that satisfying crunch. This Crispy Honey Orange Chicken recipe brings together tender chicken, a perfectly balanced sticky sauce, and that elusive crispy texture you've been dreaming of, right in your own kitchen. It's guaranteed to become a family favorite.
Give it a try and experience the crispy difference for yourself. We'd love to hear how it turns out! Leave a comment below or share a photo of your delicious creation. Happy cooking!
Crispy Honey Orange Chicken

Ingredients
- 2 pounds boneless skinless chicken breasts or thighs, cut into 1 inch pieces
- 1 cup all purpose flour
- 1/2 cup cornstarch
- 1 teaspoon salt
- 1/2 teaspoon black pepper
- 1/2 teaspoon garlic powder
- 1/2 teaspoon onion powder
- 2 large eggs, beaten
- 1/4 cup milk or water
- Vegetable oil for frying
- For the sauce:
- 1 cup orange juice
- 1/2 cup honey
- 1/4 cup soy sauce (or tamari for gluten free)
- 2 tablespoons rice vinegar
- 1 tablespoon cornstarch
- 2 tablespoons water
- 1 teaspoon grated fresh ginger
- 2 cloves garlic, minced
- Optional: red pepper flakes to taste
Directions
- Pat the chicken pieces very dry with paper towels. This is a key step for crispiness.
- In a medium bowl, whisk together the flour, cornstarch, salt, pepper, garlic powder, and onion powder.
- In another medium bowl, whisk together the beaten eggs and milk or water.
- Dip each piece of chicken first into the wet mixture, letting excess drip off, then dredge generously in the dry flour mixture, ensuring it’s fully coated. Place coated chicken on a wire rack while you heat the oil.
- Heat about 1 1/2 to 2 inches of vegetable oil in a large heavy bottomed pot or Dutch oven over medium high heat until it reaches 350 degrees F.
- Carefully add chicken pieces to the hot oil in batches, making sure not to overcrowd the pot. Fry for 4 to 6 minutes per batch, or until deep golden brown and cooked through. Use a slotted spoon or spider to remove chicken and place it back on the wire rack set over a baking sheet to drain. Keep batches warm in a low oven if needed.
- While the chicken is frying or just finished, prepare the sauce. In a medium saucepan, combine the orange juice, honey, soy sauce, rice vinegar, ginger, garlic, and red pepper flakes (if using). Bring to a simmer over medium heat.
- In a small bowl, whisk together the cornstarch and water to create a slurry.
- Pour the cornstarch slurry into the simmering sauce, whisking constantly. Continue to cook and whisk until the sauce thickens to a glossy consistency. Remove from heat.
- This is the crucial step to avoid sogginess: Place the hot fried chicken pieces into a large bowl. Pour the hot sauce over the chicken.
- Toss the chicken gently with the sauce using tongs until every piece is evenly coated.
- Serve immediately. The key to keeping that crispy texture is coating the chicken with the hot sauce right before serving, minimizing the time the sauce has to penetrate the crispy coating.