
Is there anything more impressive than a beautifully layered cake? A towering, decadent chocolate raspberry layer cake is sure to steal the show at any gathering. But let’s be honest, the thought of making one can be a little daunting! The fear of a sunken middle, uneven layers, or a dry crumb can keep even experienced bakers away. Fear not! This recipe is designed to give you perfect, even layers every single time, so you can confidently create a show-stopping dessert.
Why You’ll Love This Chocolate Raspberry Layer Cake
This isn’t just another cake recipe; it’s a gateway to baking bliss. Here’s why you’ll fall in love with this chocolate raspberry masterpiece:
- Moist and Tender: Say goodbye to dry, crumbly cakes. This recipe uses buttermilk and oil to create an incredibly moist and tender crumb that melts in your mouth.
- Rich Chocolate Flavor: The deep, dark chocolate flavor from the cocoa powder is perfectly balanced by the sweet and tart raspberry filling.
- Perfectly Even Layers: Our secret tip ensures your cakes rise evenly and stay that way, eliminating the dreaded sunken middle.
- Decadent Chocolate Ganache: The smooth, rich chocolate ganache is the perfect finishing touch, adding an extra layer of indulgence.
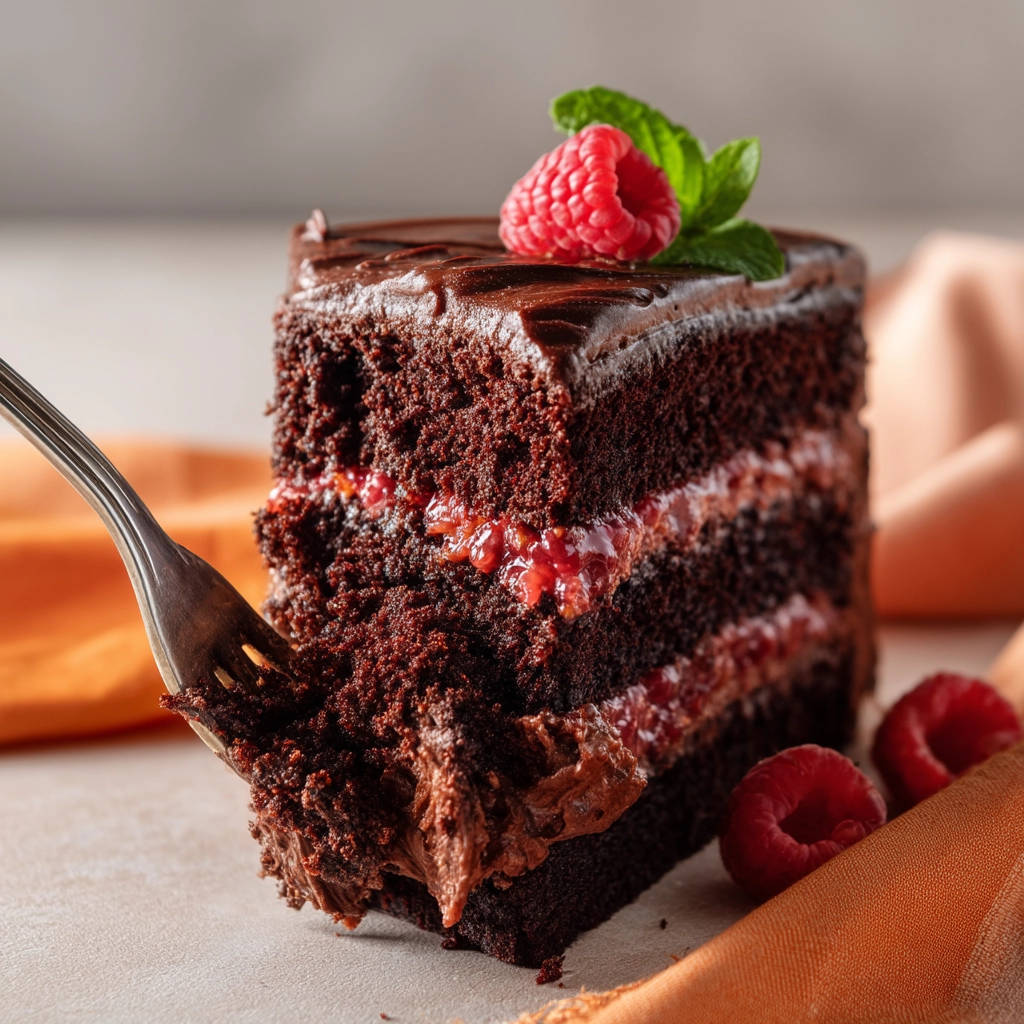
- Impressive Presentation: This cake is a showstopper! The vibrant raspberries and glossy ganache make it a stunning centerpiece for any occasion.
Gathering Your Ingredients for Decadent Chocolate Raspberry Layer Cake
Before we dive into the baking process, let’s talk about the ingredients. The success of this decadent chocolate raspberry layer cake lies in the quality and balance of its components. We’re aiming for a symphony of flavors – the rich depth of chocolate perfectly harmonizing with the bright tang of raspberries. It’s a dessert experience you won’t soon forget!
Here’s what you’ll need to create this masterpiece, grouped by function to help you understand their role in the recipe:
For the Irresistible Chocolate Cake Layers:
- All-Purpose Flour: The foundation of our cake. Be sure to measure it accurately using the spoon and level method to avoid a dense cake.
- Granulated Sugar: Adds sweetness and helps to create a tender crumb.
- Unsweetened Cocoa Powder: This is where that rich chocolate flavor comes from. Opt for a high-quality cocoa powder for the best results.
- Baking Powder & Baking Soda: These leavening agents work together to give the cake its light and airy texture. Make sure they are fresh for optimal results.
- Salt: Enhances the sweetness and balances the flavors.
- Buttermilk: Adds moisture and a subtle tang, contributing to the cake’s tenderness.
- Vegetable Oil: Keeps the cake moist and tender.
- Large Eggs: Provide structure and richness to the cake.
- Vanilla Extract: Enhances the other flavors and adds a touch of warmth.
- Boiling Water: This might seem unusual, but it helps to bloom the cocoa powder, intensifying its flavor and creating a smoother batter.
For the Tangy Raspberry Filling:
- Fresh Raspberries: The star of our filling! Fresh raspberries provide the best flavor and texture, but frozen can be used in a pinch (thaw and drain them well).
- Granulated Sugar: Adds sweetness to balance the tartness of the raspberries.
- Cornstarch: Used to thicken the raspberry filling to the perfect consistency.
For the Luxurious Chocolate Ganache:
- Heavy Cream: The base of our ganache. It needs to be heavy cream (at least 36% milk fat) for the proper richness and texture.
- Bittersweet Chocolate: Use high-quality bittersweet chocolate (around 70% cacao) for a deep, complex flavor. Chopping it finely ensures it melts evenly.
- Unsalted Butter: Adds shine, smoothness, and extra richness to the ganache.
Crafting Your Chocolate Raspberry Layer Cake: Step-by-Step
Alright, let’s get baking! This may seem like a lot of steps, but trust me, it’s worth it. The key to success is to take your time, read each step carefully, and don’t be afraid to ask for help if you get stuck. And remember, even if your cake isn’t perfect, it will still taste delicious! We’re aiming for perfection, but embracing happy accidents is part of the fun. Let’s bake a beautiful cake, one step at a time.
- Preheat and Prep: Preheat your oven to 350 degrees F (175 degrees C). This is crucial for even baking. Grease and flour three 8-inch cake pans. This prevents the cakes from sticking and ensures they release cleanly.
- Combine Dry Ingredients: In a large bowl, whisk together the flour, sugar, cocoa powder, baking powder, baking soda, and salt. Whisking ensures that everything is evenly distributed and prevents lumps.
- Add Wet Ingredients: Add the buttermilk, oil, eggs, and vanilla extract to the dry ingredients. Beat with an electric mixer on medium speed for 2 minutes. This incorporates the wet ingredients and starts to develop the gluten in the flour.
- Add Boiling Water: Gradually add the boiling water to the batter, mixing until just combined. The batter will be thin, don’t worry! The hot water helps to bloom the cocoa powder and creates a moist cake.
- Divide the Batter: Divide the batter evenly among the prepared cake pans. Using a kitchen scale is the best way to ensure even layers.
- Bake the Cakes: Bake for 25-30 minutes, or until a wooden skewer inserted into the center comes out clean. Start checking for doneness around 25 minutes to avoid overbaking.
- Cool the Cakes: Let the cakes cool in the pans for 10 minutes before inverting them onto a wire rack to cool completely. Cooling them upside down is one of the secrets to preventing sinking!
- Prepare Raspberry Filling: While the cakes are baking, prepare the raspberry filling. In a saucepan, combine the raspberries and sugar. Cook over medium heat, stirring occasionally, until the raspberries break down and the mixture thickens slightly, about 10-15 minutes.
- Thicken the Filling: Mix the cornstarch with 1 tablespoon of cold water to form a slurry. Stir the slurry into the raspberry mixture and cook for another minute until thickened. This prevents lumps from forming. Remove from heat and let cool completely.
- Make the Ganache: To make the chocolate ganache, heat the heavy cream in a saucepan until simmering. Pour over the chopped chocolate and let sit for 1 minute to melt the chocolate.
- Whisk the Ganache: Whisk together until smooth. Stir in the butter until melted and incorporated. Let the ganache cool slightly until it thickens to a spreadable consistency. This will make it easier to frost the cake. You can also use our delicious chocolate sheet cake recipe if you prefer to bake a simple, non-layered cake.
- Assemble the Cake: To assemble the cake, level the tops of the cooled cakes if needed. This ensures even layers. Place one cake layer on a serving plate. Spread with half of the raspberry filling. Top with the second cake layer and spread with the remaining raspberry filling. Place the final cake layer on top.
- Frost the Cake: Frost the entire cake with the chocolate ganache. Get creative with your frosting technique!
- Garnish and Chill: Garnish with fresh raspberries and mint leaves, if desired. Refrigerate the cake for at least 30 minutes before serving to allow the ganache to set.
Tips for Perfect Chocolate Raspberry Layer Cake Every Time
Want to take your cake baking game to the next level? Here are some pro tips to ensure your chocolate raspberry layer cake is a resounding success:
- Accurate Measurements: Baking is a science! Use measuring cups and spoons correctly, especially when measuring flour. The spoon and level method (spooning flour into the cup and leveling off with a knife) is crucial for avoiding a dense cake.
- Oven Temperature: Ensure your oven temperature is accurate. An oven thermometer can be a lifesaver.
- Don’t Overmix: Overmixing the batter can develop too much gluten, resulting in a tough cake. Mix until just combined.
- Cooling is Key: Cooling the cakes completely upside down in the pans on a wire rack helps prevent them from sinking.
- Leveling the Layers: Use a serrated knife to level the tops of the cakes before assembling. This ensures a stable and visually appealing cake.
- Chill Time: Refrigerating the cake for at least 30 minutes before serving allows the ganache to set and the flavors to meld together.
- Raspberry Variations: Feel free to experiment with other berries in the filling. Blackberries or mixed berries would also be delicious.
What to Serve With Chocolate Raspberry Layer Cake
This decadent chocolate raspberry layer cake is a showstopper on its own, but if you’re looking to create an even more memorable dessert experience, consider pairing it with:
- A scoop of vanilla bean ice cream. The cold ice cream provides a refreshing contrast to the rich cake.
- A dollop of whipped cream. Lightly sweetened whipped cream adds a touch of elegance.
- Fresh berries. A scattering of fresh raspberries adds a pop of color and flavor.
Your Chocolate Raspberry Layer Cake Questions Answered (FAQ)
Why did my cake sink in the middle?
The most common causes of a sunken cake are inaccurate oven temperature, overmixing the batter, or opening the oven door too early during baking. Make sure your oven is properly calibrated, avoid overmixing, and resist the urge to peek!
Can I use frozen raspberries instead of fresh?
Yes, you can, but fresh raspberries are always preferable. If using frozen, thaw them completely and drain off any excess liquid before using them in the filling. This will prevent the filling from being too watery.
Can I make this cake gluten-free?
Yes! You can substitute the all-purpose flour with a gluten-free all-purpose baking flour blend. Be sure to choose a blend that contains xanthan gum for the best results. Our website has lots of articles containing useful tips and tricks.
Can I make the cake layers ahead of time?
Absolutely! You can bake the cake layers a day or two in advance. Wrap them tightly in plastic wrap and store them at room temperature or in the refrigerator. You can also freeze the cooled cake layers for up to a month. Just thaw them completely before assembling and frosting.
My ganache is too thick/thin. What can I do?
If your ganache is too thick, add a tablespoon of warm heavy cream at a time, whisking until it reaches the desired consistency. If it’s too thin, refrigerate it for a short period of time, whisking occasionally, until it thickens up. The fridge helps it get back to the perfect texture.
Enjoy Your Homemade Chocolate Raspberry Layer Cake!
Congratulations! You’ve successfully created a stunning and delicious chocolate raspberry layer cake. This recipe is a testament to the fact that with a little patience and attention to detail, anyone can bake a show-stopping dessert. Share your creations with friends and family, and don’t forget to leave a comment below and let us know how your cake turned out! Happy baking!
Decadent Chocolate Raspberry Layer Cake (Stops Cakes Sinking!)

Ingredients
- 2 cups all-purpose flour
- 2 cups granulated sugar
- 3/4 cup unsweetened cocoa powder
- 1 1/2 teaspoons baking powder
- 1 1/2 teaspoons baking soda
- 1 teaspoon salt
- 1 cup buttermilk
- 1/2 cup vegetable oil
- 2 large eggs
- 2 teaspoons vanilla extract
- 1 cup boiling water
- 12 ounces fresh raspberries
- 1/2 cup granulated sugar for raspberry filling
- 2 tablespoons cornstarch
- 1 cup heavy cream
- 8 ounces bittersweet chocolate, chopped
- 2 tablespoons unsalted butter
Directions
- Preheat oven to 350 degrees F (175 degrees C). Grease and flour three 8-inch cake pans.
- In a large bowl, whisk together flour, sugar, cocoa, baking powder, baking soda, and salt.
- Add buttermilk, oil, eggs, and vanilla to the dry ingredients. Beat with an electric mixer on medium speed for 2 minutes.
- Gradually add the boiling water to the batter, mixing until just combined. Batter will be thin.
- Divide batter evenly among the prepared cake pans.
- Bake for 25-30 minutes, or until a wooden skewer inserted into the center comes out clean.
- Let cakes cool in pans for 10 minutes before inverting them onto a wire rack to cool completely.
- While cakes are baking, prepare the raspberry filling. In a saucepan, combine raspberries and sugar. Cook over medium heat, stirring occasionally, until the raspberries break down and the mixture thickens slightly, about 10-15 minutes.
- Mix cornstarch with 1 tablespoon of cold water to form a slurry. Stir the slurry into the raspberry mixture and cook for another minute until thickened. Remove from heat and let cool completely.
- To make the chocolate ganache, heat heavy cream in a saucepan until simmering. Pour over the chopped chocolate and let sit for 1 minute to melt the chocolate.
- Whisk together until smooth. Stir in the butter until melted and incorporated. Let ganache cool slightly until it thickens to a spreadable consistency.
- To assemble the cake, level the tops of the cooled cakes if needed. Place one cake layer on a serving plate. Spread with half of the raspberry filling. Top with the second cake layer and spread with the remaining raspberry filling. Place the final cake layer on top.
- Frost the entire cake with the chocolate ganache.
- Garnish with fresh raspberries and mint leaves, if desired.
- Refrigerate cake for at least 30 minutes before serving to allow the ganache to set.
- **The “Stops Cakes Sinking!” Secret:** The KEY to avoiding a sunken cake is properly measuring your ingredients and baking at the correct temperature! Make sure to measure the flour precisely using the spoon and level method and avoid overmixing the batter. Make sure your oven temperature is accurate. Cool the cakes completely upside down in the pans on a wire rack. This helps the cake retain its shape and prevents it from sinking in the center.


