

Craving a truly decadent dessert that’s surprisingly easy to make? Look no further than this dreamy chocolate mousse! Forget dense, disappointing mousses of the past. This recipe guarantees a light, airy, and intensely chocolatey experience every single time. Prepare for a taste of pure chocolate bliss!
Why You’ll Love This Chocolate Mousse
This isn’t your average chocolate mousse recipe. Here’s why you’ll absolutely adore it:
- Unbelievably Fluffy: The secret’s in the technique! We’ll show you how to achieve that perfect airy texture.
- Rich Chocolate Flavor: Uses semi-sweet chocolate for a deep, satisfying taste that isn’t overly sweet.
- Simple Ingredients: No fancy or hard-to-find ingredients required.
- Impressive Yet Easy: Perfect for special occasions, but simple enough for a weeknight treat.
- Make-Ahead Friendly: Prepare it in advance and chill until you’re ready to indulge.
Gathering Your Ingredients for Dreamy Chocolate Mousse
The key to a truly outstanding chocolate mousse lies in the quality of your ingredients. Choosing the right chocolate and ensuring your eggs are fresh will make a noticeable difference in the final result. The rich, complex flavor of the chocolate is the star here, supported by the lightness of the whipped egg whites and cream. Let’s break down what you’ll need:
- 6 ounces Semi-Sweet Chocolate, Chopped: Opt for a high-quality semi-sweet chocolate with a cocoa content of around 60-70%. This provides a balanced sweetness and intense chocolate flavor. Chop it finely for even melting.
- 4 Large Eggs, Separated: Fresh eggs are crucial! The egg whites are beaten to stiff peaks, providing the lift and airy texture of the mousse. Make sure no yolk gets into the whites when separating them.
- 1/4 cup Granulated Sugar: This adds a touch of sweetness and helps to stabilize the egg whites.
- 1/4 teaspoon Salt: A pinch of salt enhances the chocolate flavor and also helps to denature the proteins in the egg whites, allowing them to whip up to a greater volume and more stable foam.
- 1 cup Heavy Cream: Use cold heavy cream with a fat content of at least 36% for optimal whipping. This creates a luscious, creamy texture.
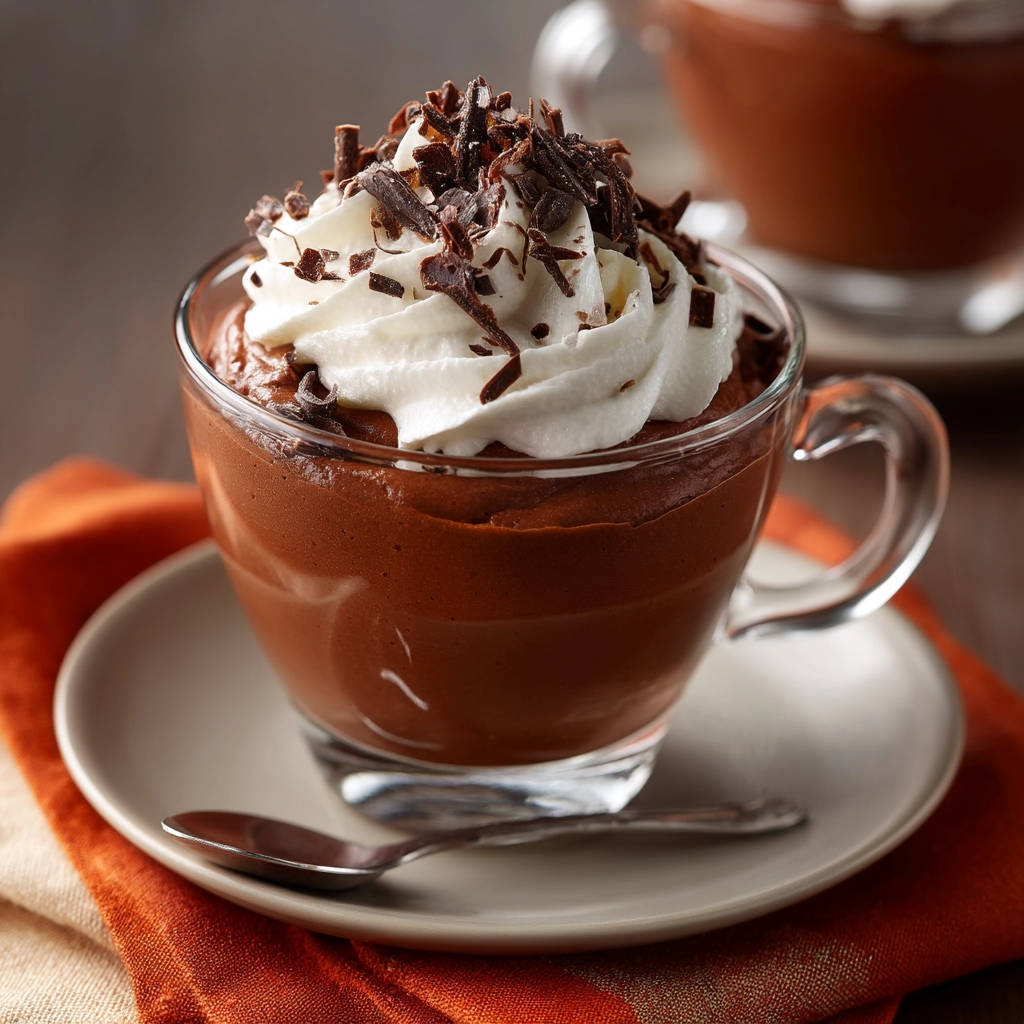
- Chocolate Shavings for Garnish: A simple yet elegant way to elevate the presentation. Use a vegetable peeler or grater to create chocolate shavings from a bar of chocolate.
- Whipped Cream for Garnish: Adds extra creaminess and a beautiful finishing touch. You can use store-bought or make your own.
Crafting Your Chocolate Mousse: Step-by-Step
Don’t be intimidated by the idea of making chocolate mousse! While it requires a bit of technique, each step is straightforward and easy to follow. The most important thing is to be gentle and patient, especially when folding in the egg whites and whipped cream. Let’s get started!
- Melt the Chocolate: Begin by gently melting the chopped chocolate. The best way to do this is using a double boiler. Place a heatproof bowl over a saucepan filled with simmering water, ensuring the bottom of the bowl doesn’t touch the water. This prevents the chocolate from burning. Stir constantly until the chocolate is completely smooth and melted. Remove from the heat and let it cool slightly. Cooling the chocolate prevents it from cooking the egg yolks in the next step.
- Whisk Egg Yolks and Sugar: In a separate bowl, whisk together the egg yolks and sugar. This step is crucial for incorporating air into the mousse and creating a light texture. Whisk vigorously until the mixture becomes pale and thick, almost like a ribbon. This usually takes a few minutes.
- Combine Chocolate and Egg Yolks: Gradually whisk the melted chocolate into the egg yolk mixture. It’s important to add the chocolate slowly to prevent the yolks from scrambling. Whisk until the mixture is smooth and well combined.
- Beat Egg Whites to Stiff Peaks: This is where the magic happens! In another clean, dry bowl (make sure there’s no trace of grease!), beat the egg whites with salt until stiff peaks form. The bowl and beaters must be clean as any grease will prevent the whites from whipping. Stiff peaks mean that when you lift the beaters, the peaks stand up straight and don’t collapse. The addition of salt helps stabilize the egg whites. If you are struggling to reach stiff peaks, chilling the metal bowl for a few minutes beforehand can help.
- Gently Fold in Egg Whites: This is the most delicate step. Gently fold one-third of the beaten egg whites into the chocolate mixture to lighten it. This makes it easier to incorporate the remaining egg whites without deflating them. Then, gently fold in the remaining egg whites until just combined. Be careful not to overmix, as this will deflate the mousse and result in a dense texture.
- Whip the Cream: In another bowl, whip the heavy cream until soft peaks form. Soft peaks mean that the peaks hold their shape but the tips curl over slightly. Don’t overwhip, or the cream will become grainy.
- Gently Fold in Whipped Cream: Gently fold the whipped cream into the chocolate mixture until just combined. Again, be careful not to overmix. We want to keep all that lovely air in there!
- Divide and Chill: Divide the mousse among serving glasses or cups. Cover them with plastic wrap, pressing it gently against the surface of the mousse to prevent a skin from forming. Refrigerate for at least 3 hours, or preferably overnight, to allow the mousse to set completely.
- Garnish and Serve: Before serving, garnish with chocolate shavings and whipped cream. And get ready to enjoy the most heavenly chocolate mousse you’ve ever tasted!
Tips for Perfect Chocolate Mousse Every Time
Want to ensure your chocolate mousse is a resounding success? Here are a few extra tips to keep in mind:
- Use High-Quality Chocolate: The better the chocolate, the better the mousse.
- Room Temperature Egg Yolks: While the egg whites whip better when cold, room temperature egg yolks incorporate more smoothly.
- Don’t Overmix: Be gentle when folding in the egg whites and whipped cream. Overmixing will deflate the mousse.
- Chill Thoroughly: Allow the mousse to chill for at least 3 hours, or preferably overnight, to allow it to set completely.
- Make it Ahead: This mousse is perfect for making ahead of time. It will keep in the refrigerator for up to 2 days.
What to Serve With Chocolate Mousse
While this chocolate mousse is delicious on its own, it also pairs well with a variety of other treats! Consider serving it alongside fresh berries, such as raspberries or strawberries, for a touch of brightness and acidity. For a contrast in textures, you could also serve it with a side of crispy cookies or biscotti. If you are a fan of chilled desserts, you could check out these easy caramel nut dessert jars.
Your Chocolate Mousse Questions Answered (FAQ)
Can I use milk chocolate instead of semi-sweet chocolate?
While you can use milk chocolate, the mousse will be significantly sweeter. Semi-sweet chocolate provides a better balance of sweetness and chocolate intensity.
Can I make this mousse dairy-free?
Unfortunately, this recipe relies on the fat content of heavy cream for its structure. Substituting with a dairy-free alternative will likely result in a less stable and less fluffy mousse.
Why is my mousse grainy?
A grainy mousse is often caused by overwhipping the cream or overcooking the chocolate. Be careful not to overwhip the cream, and ensure the chocolate is melted gently and doesn’t burn. Also, be sure to gently fold, not stir, the ingredients together.
Can I add flavoring to the mousse?
Yes! A touch of vanilla extract can enhance the chocolate flavor. You could also add a small amount of coffee extract for a mocha twist. Be careful not to add too much liquid, as this can affect the texture of the mousse.
Enjoy Your Homemade Chocolate Mousse!
Congratulations! You’ve just created a truly decadent and unforgettable dessert. This Dreamy Chocolate Mousse is sure to impress your friends and family, and it’s so easy to make that you’ll want to whip it up again and again. Now it’s your turn: try the recipe, and let me know how it turns out in the comments below! Don’t forget to rate the recipe and share it with your friends!
Dreamy Chocolate Mousse (Guaranteed Fluffy Every Time)
Ingredients
- 6 ounces semi-sweet chocolate, chopped
- 4 large eggs, separated
- 1/4 cup granulated sugar
- 1/4 teaspoon salt
- 1 cup heavy cream
- Chocolate shavings for garnish
- Whipped cream for garnish
Directions
- Melt the chocolate in a heatproof bowl set over a saucepan of simmering water, ensuring the bottom of the bowl doesn’t touch the water. Stir until smooth. Remove from heat and let cool slightly.
- In a separate bowl, whisk together the egg yolks and sugar until pale and thick. This is key to incorporating air.
- Gradually whisk the melted chocolate into the egg yolk mixture until well combined.
- In another clean, dry bowl, beat the egg whites with salt until stiff peaks form. The key to fluffy mousse is STIFF PEAKS. Make sure you don’t under-beat. If necessary, chill the metal bowl for a few minutes. The addition of salt to the egg whites will help to denature the proteins, which in turn helps to trap more air when beating.
- Gently fold one-third of the beaten egg whites into the chocolate mixture to lighten it. Then, gently fold in the remaining egg whites until just combined. Be careful not to overmix, as this will deflate the mousse.
- In another bowl, whip the heavy cream until soft peaks form. Gently fold the whipped cream into the chocolate mixture until just combined.
- Divide the mousse among serving glasses or cups.
- Cover and refrigerate for at least 3 hours, or preferably overnight, to allow the mousse to set completely.
- Before serving, garnish with chocolate shavings and whipped cream.


