Oh, have I got a game-changer for you today! If you’ve ever tried making homemade no-bake treats or energy balls only to have them crumble like dry sand before you even get them rolled, or worse, disintegrate in your hand the moment you pick one up, then you know the frustration. It’s a total bummer when your healthy, convenient snack dreams turn into a pile of sticky, loose oats. I spent ages dealing with this exact problem!
After countless batches that just wouldn’t cooperate, I finally stumbled upon the one simple, crucial step that makes all the difference. It’s so easy, you’ll wonder why you didn’t think of it sooner! This no-crumbling trick is the secret weapon to perfectly formed, delightfully chewy energy balls every single time. Forget the mess and embrace snack perfection!
These aren’t just any snack balls; this is the reliable, hold-together, boosts-your-day Energy Ball Recipe that will become a staple in your kitchen. They’re packed with wholesome ingredients and just enough sweetness to feel like a treat. Let’s dive in!
Why You’ll Fall in Love with This Energy Ball Recipe
Beyond solving the dreaded crumbling crisis, this recipe boasts a list of benefits that make it an absolute winner:
- Effortlessly Easy: Seriously, if you can stir, you can make these. There’s no baking required, just simple mixing and chilling.
- Nutrient-Packed Powerhouse: Oats, chia seeds, nut butter – these little spheres are loaded with fiber, healthy fats, and plant-based protein to keep you fueled.
- Quick & Convenient: Perfect for grabbing on the go, pre-workout, post-workout, or whenever the afternoon slump hits. Make a batch on the weekend and have snacks ready for the week.
- Totally Customizable: While this version is fantastic, the base is forgiving enough for you to experiment with different additions and flavors.
- Kid-Approved (Sneakily Healthy): Even picky eaters will likely devour these, especially with the addition of mini chocolate chips!
- Economical: Making your own snacks is often much cheaper than buying pre-made versions at the store.
Gathering Your Ingredients for Non-Crumbling Energy Balls
The magic of these energy balls lies in the simple yet effective combination of dry and wet ingredients, working together perfectly once they’ve had a chance to mingle properly. You likely have most of these staples in your pantry already, making them a go-to whenever you need a quick batch.
Let’s look at what makes these binder-rich energy bites tick:
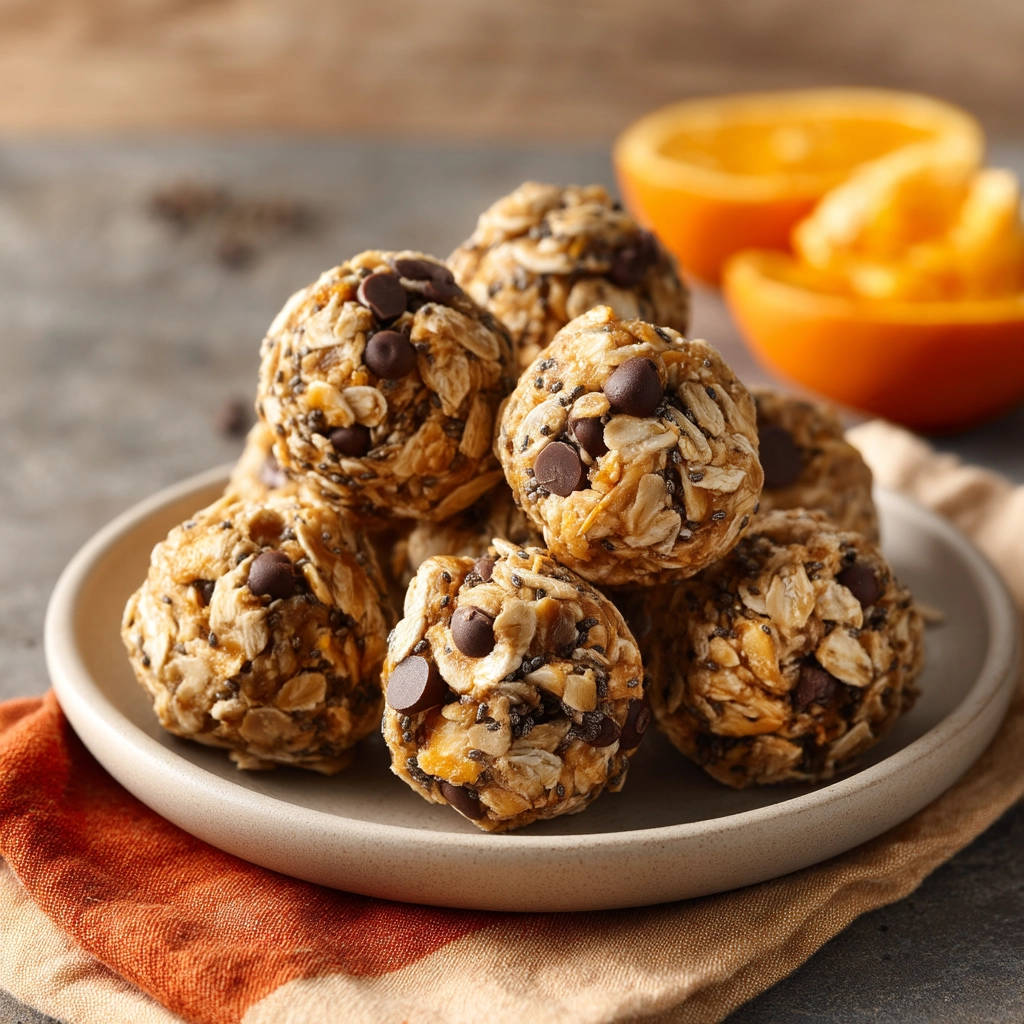
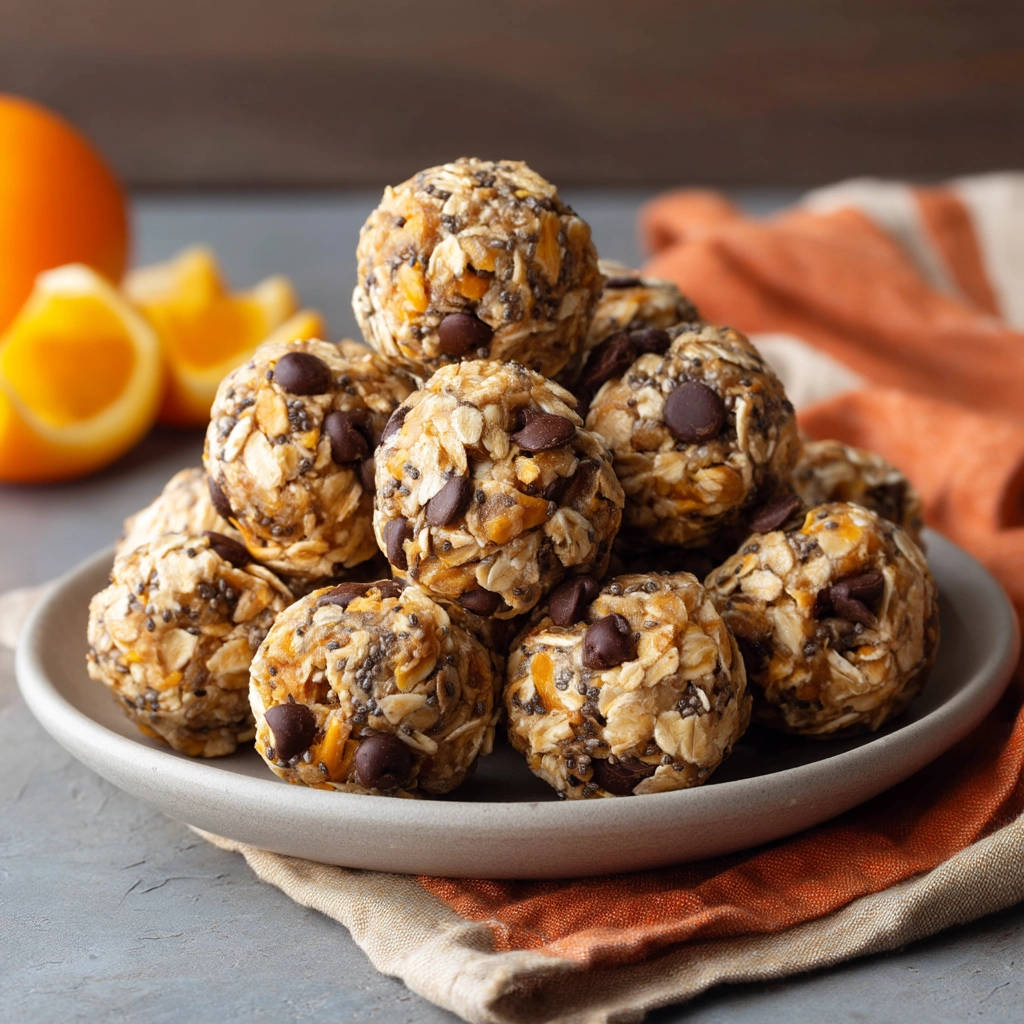
- Rolled Oats: You’ll need 1 1/2 cups of good old-fashioned rolled oats (sometimes called old-fashioned oats). Avoid instant oats here, as they break down too quickly and won’t give you the desired texture or binding power. Rolled oats provide the bulk and essential fiber.
- Mini Chocolate Chips: A half cup of mini chocolate chips adds little bursts of sweetness and makes these feel like a real treat. You can adjust the amount or use regular-sized chips, but mini ones distribute nicely.
- Chia Seeds: Our binding superheroes! A quarter cup of chia seeds is crucial. When they come into contact with moisture, chia seeds develop a gel-like coating that is absolutely essential for holding these balls together. They also add healthy omega-3s and fiber. If you’re curious about other ways to use this nutritional powerhouse, check out our recipe for Perfect Chia Seed Pudding.
- Finely Chopped Dried Apricots or Orange Zest: This quarter cup adds a lovely chewiness and touch of fruity brightness. Finely chopped dried apricots offer sweetness and texture, while fresh orange zest provides a vibrant, aromatic lift. Choose your adventure or try other finely chopped dried fruits like cranberries, raisins, or dates.
- Creamy Peanut Butter: The primary binder and source of creamy richness! Use 1/2 cup of creamy peanut butter. Natural peanut butter can work, but sometimes requires a bit more stirring if it’s very oily. The key is a smooth, creamy texture to help coat the dry ingredients. Feel free to substitute with other creamy nut butters like almond butter, cashew butter, or sunflower seed butter if you have allergies or different preferences.
- Honey or Maple Syrup: We need a sweetener and another liquid binder. A quarter cup of either honey or maple syrup does the job beautifully, adding sweetness and helping to create that sticky texture needed for rolling. Use whichever you prefer or have on hand.
- Vanilla Extract: Just 1 teaspoon of vanilla extract enhances all the other flavors, adding warmth and depth to the energy balls.
Crafting Your Energy Balls: The Step-by-Step Guide to No-Crumble Success
Alright, let’s make some magic happen! This process is incredibly straightforward, but paying attention to the details – especially that one critical step – is key to getting perfectly formed, non-crumbling energy bites.
Here’s how we turn simple ingredients into snack-time heroes:
-
Bring Together the Dry Crew: Start by grabbing a medium-sized mixing bowl. Into this bowl, you’ll measure and add the rolled oats, mini chocolate chips, chia seeds, and your choice of finely chopped dried apricots or orange zest. Give these dry components a quick stir just to combine them roughly. This ensures everything is evenly distributed before the wet ingredients are added.
-
Whip Up the Wet Binders: In a separate, smaller bowl, it’s time to mix the ingredients that will hold everything together and provide sweetness and flavor. Add your creamy peanut butter (or other nut butter), honey or maple syrup, and the vanilla extract. Take a whisk or a fork and really work these together until they are completely smooth and look uniform. You want a well-emulsified blend of these sticky, flavorful ingredients.
-
Combine and Conquer (Almost!): Now, pour the smooth wet mixture from the smaller bowl into the medium bowl with your dry ingredients. Get a sturdy spoon or spatula and stir everything together thoroughly. This step requires a little elbow grease to make sure every oat, every chia seed, and every piece of dried fruit/zest gets coated in the sticky, sweet wet mixture. At this point, the mixture might look a bit loose and maybe even too wet or crumbly – don’t panic! This is completely normal and expected before the crucial next step.
-
The Game-Changing Chill Time (DO NOT SKIP THIS!): This is IT. The secret sauce. To guarantee your energy balls hold their shape and don’t fall apart, you absolutely must refrigerate the mixture. Cover the bowl tightly – plastic wrap or a lid works perfectly – and place it in the refrigerator for a minimum of 30 minutes. What’s happening during this chill? The rolled oats and, especially, the chia seeds are slowly absorbing the moisture from the peanut butter and sweetener. As they absorb, they swell and create a natural binding network that locks everything together. This transforms the loose mixture into a much firmer, pliable dough that’s ready to be rolled. Trust the chill!
-
Scoop, Roll, and Form: After the chilling time, pull the bowl out of the fridge. The mixture should feel significantly firmer and easier to work with. Use a small cookie scoop (my favorite method for uniform size!) or a standard tablespoon measure to portion out the mixture. This ensures your balls are relatively equal in size. Once portioned, take the mixture between your palms and roll it tightly, applying a bit of pressure, to form a firm, compact ball. If you find the mixture still feels a touch dry after chilling, add just a tiny splash (start with about 1 teaspoon) of water or milk, mix it into the main bowl, and try rolling again. Repeat this tiny splash process only if necessary, mixing well each time, until the consistency is just right for rolling.
-
Store Your Power Snacks: As you roll each ball, place it on a plate or directly into your airtight storage container. Once they’re all rolled, pop them back into the refrigerator. They will continue to firm up nicely as they stay chilled. Keep them stored in the fridge for easy access whenever you need a delicious, energizing bite.
Tips for Perfect Energy Balls Every Batch
Getting perfectly formed energy balls is easy once you know the chilling trick, but here are a few extra pointers to make every batch a success and maybe even switch things up a little:
- Ingredient Quality Matters: Using fresh peanut butter that isn’t too oily or dry will help with consistency. Similarly, make sure your oats aren’t stale.
- Chilling Time is Non-Negotiable: I know I’ve said it, but it bears repeating! Don’t rush the 30-minute chill. If you have more time, chilling for an hour or even longer is absolutely fine and can sometimes make them even easier to roll.
- Rolling Technique: Don’t be afraid to apply firm, consistent pressure when rolling the balls between your palms. This helps compress the mixture and encourages it to hold its shape.
- Sticky Hands? If the mixture is sticking to your hands while rolling, try lightly wetting your palms with a tiny bit of water. This provides a non-stick surface.
- Portioning Tool: A small cookie scoop (about 1 or 1.5 tablespoons) is your best friend here! It makes portioning quick and ensures all your energy balls are the same size for even snacking.
- Consistency Check Before Rolling: After chilling, if the mixture seems too stiff and hard to roll, let it sit at room temperature for a few minutes to soften slightly. If it’s too loose, mix in another tiny pinch of chia seeds or a little extra oat flour (made by blending oats) and chill again briefly.
Recipe Variations to Keep Things Exciting
The basic structure of this Energy Ball Recipe is incredibly versatile! Once you’ve mastered the base, feel free to play around with additions and swaps (just remember the no-alcohol/pork rule!).
- Go Cocoa: Add a tablespoon or two of unsweetened cocoa powder to the dry ingredients for a chocolatey twist. You could even use dark chocolate chips instead of mini ones! For another simple chocolate fix, try our Easy Chocolate Clusters.
- Coconut Love: Stir in a couple of tablespoons of shredded coconut (sweetened or unsweetened) with the dry ingredients.
- Nutty Additions: Finely chopped nuts like almonds, walnuts, or pecans can add extra crunch and healthy fats. Add them with the dry ingredients.
- Spice It Up: A pinch of cinnamon, nutmeg, or pumpkin pie spice can add warmth, especially if you’re using dried cranberries or dates.
- Protein Boost: For an extra protein kick, you can carefully mix in a scoop of your favorite protein powder. You might need to add a tiny bit more liquid (like a splash of milk or water) if the protein powder absorbs a lot of moisture.
- Different Dried Fruits: Swap dried apricots for finely chopped dates, cranberries, raisins, or even dried cherries.
- Seed Cycling: Instead of or in addition to chia seeds, consider adding flax seeds (whole or ground) or hemp seeds for different nutritional profiles and textures.
What to Serve With Your Homemade Energy Balls
These little powerhouses are fantastic on their own, but they also pair well with certain things to make a more complete snack or even a light breakfast.
- A Simple Drink: Enjoy them with a glass of milk, a cup of tea, or your morning coffee. If you’re feeling fancy, they’d be lovely alongside a homemade beverage like a Homemade Pumpkin Spice Latte or a refreshing smoothie.
- Yogurt or Cottage Cheese: Pair a couple of energy balls with a serving of yogurt or cottage cheese for a snack with extra protein and creaminess.
- Fresh Fruit: A side of berries, an apple, or a banana makes for a well-rounded snack combo.
- As Part of a Snack Box: Pack them along with some veggie sticks, hummus, and maybe some cheese for a satisfying snack box to take to work or school.
Your Energy Ball Questions Answered (FAQ)
It’s natural to have questions when trying a new recipe, especially one with a key technique like chilling! Here are some common queries about making these energy balls:
Can I use quick oats instead of rolled oats?
While technically you can, I strongly recommend sticking with rolled oats for this recipe. Quick oats are cut finer and steam-rolled thinner, meaning they absorb liquid much faster and can become mushy. Rolled oats hold their structure better and provide a chewier texture, which is ideal for these energy balls and contributes significantly to the binding process during chilling.
My mixture still feels too dry after chilling. What did I do wrong?
Don’t worry, this can happen! It might be due to slight variations in ingredient moisture (like the consistency of your peanut butter or the dryness of your oats). The recipe addresses this: add a tiny splash (start with 1 teaspoon) of water or milk to the bowl, mix it in really well, and see if that makes the mixture easier to roll. If needed, add another teaspoon and mix again. Avoid adding too much liquid at once, as it can make them too wet. Just gradually add tiny amounts until the mixture is pliable and holds together when squeezed.
Can I make these energy balls gluten-free?
Absolutely! The base ingredients are naturally gluten-free, provided you use certified gluten-free rolled oats and ensure your peanut butter and other additions are also certified gluten-free if necessary. Most other ingredients like chia seeds, honey/maple syrup, vanilla, and chocolate chips are typically gluten-free, but it’s always wise to check labels for cross-contamination if you have a strict gluten intolerance or allergy.
Can I make these energy balls vegan?
Yes, you can easily make this recipe vegan. The only non-vegan ingredients are potentially the chocolate chips (check for dairy) and the honey. Simply substitute the honey with maple syrup (as suggested in the ingredients list) or another liquid vegan sweetener like agave nectar or brown rice syrup. Use dairy-free chocolate chips or omit them, and ensure your nut butter is vegan. Chia seeds are a fantastic vegan binder!
How long do these energy balls last? How should I store them?
When stored in an airtight container in the refrigerator, these energy balls will typically last for 1 to 2 weeks. The chilling helps maintain their texture and freshness. For longer storage, you can also freeze them! Place the rolled balls on a plate or baking sheet in the freezer until firm (about 1-2 hours), then transfer them to a freezer-safe bag or container. They should last for 2-3 months in the freezer. Thaw them in the refrigerator or at room temperature for a few minutes before eating.
Can I add protein powder or other supplements?
Yes, you can add protein powder, collagen peptides, or other powdered supplements. Start by stirring 1-2 tablespoons into the dry ingredients. Keep in mind that some powders can absorb a lot of moisture, so you might need to increase the amount of peanut butter or liquid sweetener slightly, or add a tiny splash of water/milk as described in step 5 if the mixture is too dry after chilling.
Enjoy Your Homemade Energy Balls!
There you have it – the secret to making delicious, perfectly-shaped energy balls that actually stay together! No more crumbly messes, just convenient, healthy, and satisfying snacks ready whenever you need them. This recipe is proof that sometimes the simplest techniques make the biggest difference.
Whip up a batch (and don’t forget that crucial chilling step!), and keep them in the fridge for an easy grab-and-go snack or a little boost to power you through your day. They’re perfect for lunchboxes, pre-gym fuel, or curbing those afternoon sweet cravings.
Did you try the recipe? How did your energy balls turn out? Let me know in the comments below! I’d love to hear about any variations you tried too. Happy rolling (and non-crumbling)!
Energy Ball Recipe

Ingredients
- 1 1/2 cups rolled oats
- 1/2 cup mini chocolate chips
- 1/4 cup chia seeds
- 1/4 cup finely chopped dried apricots or orange zest
- 1/2 cup creamy peanut butter (or other nut butter)
- 1/4 cup honey or maple syrup
- 1 teaspoon vanilla extract
Directions
- In a medium bowl, combine the rolled oats, mini chocolate chips, chia seeds, and chopped dried apricots or orange zest.
- In a separate smaller bowl, whisk together the peanut butter, honey or maple syrup, and vanilla extract until well combined and smooth.
- Pour the wet ingredients into the bowl with the dry ingredients. Stir everything together until thoroughly combined. The mixture might seem a bit loose at this stage, but don’t worry.
- This is the critical step to prevent crumbling: Cover the bowl tightly and refrigerate the mixture for at least 30 minutes. Chilling allows the oats and chia seeds to absorb moisture from the wet ingredients, helping the mixture bind together firmly. This step is essential for the balls to hold their shape when rolled.
- After chilling, the mixture should be much easier to handle. Use a small cookie scoop or a tablespoon measure to portion the mixture, then roll it tightly between your palms to form firm balls. If the mixture still feels too dry after chilling, you can add a tiny splash (about 1 teaspoon at a time) of water or milk and mix again before rolling.
- Place the finished energy balls on a plate or in an airtight container. Store them in the refrigerator for a quick snack whenever you need a boost. They will continue to firm up as they stay chilled.