

I remember my first attempts at homemade bagels – they were more like dense, chewy bread rolls than the glorious, satisfyingly textured bagels I craved. It took some experimentation, but I’ve finally cracked the code to making authentic, chewy Everything Bagels right in your own kitchen, without any of that frustrating density.
This recipe isn’t just about mixing ingredients; it’s about understanding the simple secrets that elevate your bagels from good to absolutely extraordinary, ensuring that coveted chewiness and deep flavor every single time. Get ready to impress yourself and everyone you share them with.
Why This Everything Bagels Recipe Is a Game-Changer
Forget disappointing, dense bagels. This recipe is meticulously crafted to deliver that true bagel shop experience, right in your home. We focus on key techniques that make all the difference, ensuring every bite is a triumph of texture and flavor.
The “Never Dense” Promise: Achieving Fluffy Interiors
The secret to avoiding dense, bread-like bagels lies in two crucial stages: thorough kneading and a slow, cold proof. Our method emphasizes developing robust gluten structure, which prevents a heavy interior while promoting that desirable fluffy, airy crumb.
The extended cold fermentation also plays a vital role, allowing the dough to develop strength and flavor, resulting in a bagel that’s never overly thick or heavy.
Unlocking That Signature Chewy Bite: Our Secret Method
That iconic chewy texture isn’t accidental; it’s achieved through specific steps that this recipe highlights. From the precise hydration of the dough to the essential boiling step with baking soda, every instruction builds towards that satisfying resistance you expect from a great bagel.
The alkaline boil creates a gelatinized crust, locking in moisture and ensuring a distinctive, chewy exterior that truly sets these Everything Bagels apart.
Effortless Mastery: Simple Steps, Spectacular Results
While the techniques sound advanced, this recipe breaks down each step into clear, manageable instructions, making the process accessible for home bakers of all skill levels. You’ll gain confidence with techniques that deliver professional-quality results.
Even with the specialized boiling and cold proofing, the overall flow is designed for ease, ensuring you can consistently produce spectacular Everything Bagels without unnecessary stress.
The Essential Ingredients for Your Bagel Journey
Understanding the role of each ingredient is key to successful bagel making. We focus on quality and purpose to ensure your Everything Bagels achieve their full potential.
Building Blocks: Flour, Yeast, Sugar & Salt
Bread Flour: This is our preferred choice due to its higher protein content, which translates directly to more gluten development and that characteristic chewy texture. All-purpose flour can be used, but the chew will be slightly less pronounced.
Instant Yeast: Convenient and reliable, instant yeast doesn’t require prior proofing, making the dough-making process smoother. It ensures your bagels rise beautifully.
Granulated Sugar: A small amount of sugar feeds the yeast, helping with fermentation and contributing to a lovely golden-brown crust during baking.
Salt: Essential for flavor, salt also plays a critical role in controlling yeast activity, ensuring a balanced and steady rise.
The Alkaline Advantage: Baking Soda for the Boil
Baking Soda: This unassuming ingredient is absolutely crucial. Added to the boiling water, it creates an alkaline environment that gelatinizes the starches on the bagel’s surface. This process gives bagels their signature glossy, dark crust and dramatically enhances their chewy texture.
Finishing Flourish: Egg Wash & Everything Bagel Seasoning
Large Egg (whisked): An egg wash brushed over the bagels before baking provides a beautiful shine, a deeper golden color, and acts as the perfect adhesive for our generous seasoning.
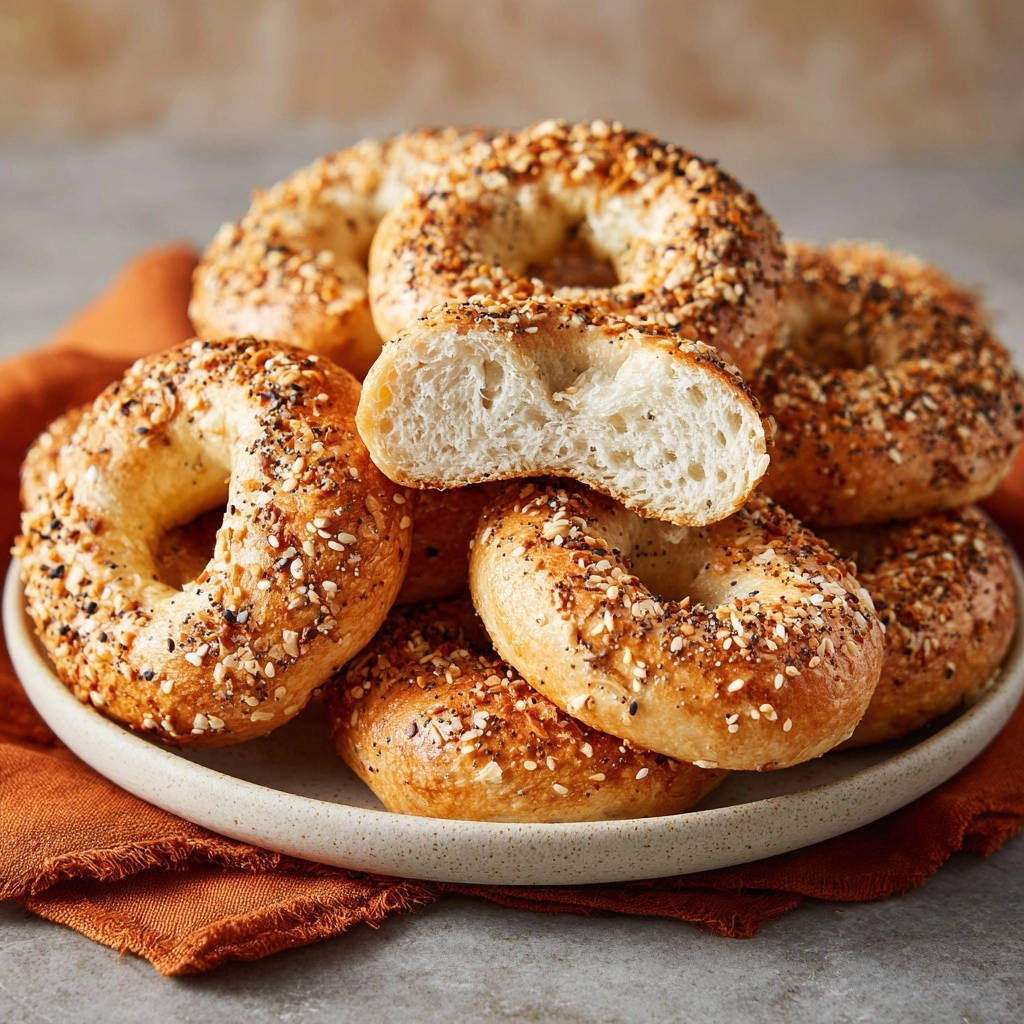
Everything Bagel Seasoning: The iconic blend of sesame seeds, poppy seeds, dried garlic, dried onion, and flaky sea salt. Don’t be shy with this! It adds the unmistakable flavor that gives these Everything Bagels their name.
Tools for Your Homemade Bagel Adventure
Having the right tools makes the bagel-making process much smoother and more enjoyable. Here are the essentials for achieving bagel perfection.
Key Equipment for Bagel Perfection
Large Mixing Bowl: Essential for combining your ingredients and allowing the dough to rise comfortably.
Stand Mixer (optional but recommended): A stand mixer with a dough hook makes the lengthy kneading process significantly easier, ensuring proper gluten development without tiring your arms.
Baking Sheets: You’ll need these for resting your shaped bagels in the refrigerator and for baking them in the oven.
Parchment Paper: Prevents sticking and makes transferring the bagels much simpler, especially after the cold proof.
Large Pot: Crucial for the boiling step, ensuring enough space for the bagels to float freely without overcrowding.
Slotted Spoon or Spider: Perfect for carefully transferring boiled bagels without tearing them.
Crafting Your Chewy Everything Bagels: A Step-by-Step Guide
Follow these detailed steps carefully, paying attention to the ‘why’ behind each action, and you’ll be rewarded with incredible Everything Bagels.
- Mixing the Dough:
In a large mixing bowl, combine the flour, yeast, sugar, and salt. Gradually add the warm water, mixing until a shaggy dough forms. Focus on even distribution here to ensure a consistent rise and texture throughout your Everything Bagels, avoiding dry pockets.
- The Crucial Knead: Developing Gluten for Chew:
Turn the dough out onto a lightly floured surface and knead for 8-10 minutes until it’s smooth and elastic. This thorough kneading is absolutely vital for developing the gluten structure that gives bagels their signature chewiness and prevents a dense, heavy interior. You should feel the dough become noticeably smoother and more pliable.
- First Rise: A Gentle Rest:
Shape the dough into a smooth ball, place it in a lightly oiled bowl, turn to coat, and cover with plastic wrap. Let it rest at room temperature for 1 hour. This initial rise begins the fermentation process, allowing yeast to activate and build both flavor and a foundational light texture.
- Dividing & Shaping Your Bagels:
After the initial rise, gently punch down the dough to release excess air. Divide it into 8 equal pieces, roughly 3.5-4 ounces each, and roll each piece into a smooth, tight ball. Consistency in size helps ensure even baking.
To form the classic bagel shape, poke a hole in the center of each ball with your thumb. Gently stretch the dough outwards to create a 1 1/2 to 2-inch hole. This helps ensure even cooking and prevents the center from closing up during the boiling and baking stages.
- The Game-Changing Cold Proof: Flavor & Texture Development:
Place the formed bagels on a baking sheet lined with parchment paper, lightly dusted with cornmeal or semolina to prevent sticking. Cover loosely with plastic wrap and refrigerate for 12-18 hours. This slow cold proof is the game-changer for developing complex flavor, fostering a stronger gluten network, and achieving that truly distinct chewy, non-dense texture, making them far superior to regular bread.
- The Next Day: Preheat & Prepare for the Boil:
The next day, preheat your oven to 425°F (218°C). Bring a large pot of water to a rolling boil and add the baking soda. The baking soda creates an alkaline environment that helps achieve a beautiful, glossy brown crust and significantly contributes to that coveted chewy exterior, a hallmark of excellent Everything Bagels.
- The Iconic Boil: Setting the Crust & Chew:
Carefully drop 2-3 bagels into the boiling water, ensuring not to overcrowd the pot; this maintains water temperature. Boil for 60 seconds on one side, then flip and boil for another 60 seconds on the other side. This quick boiling step is the secret sauce for that perfect chewy texture and distinctive bagel crust.
- Prepping for the Bake: Egg Wash & Seasoning:
Remove the boiled bagels with a slotted spoon and place them back on the parchment-lined baking sheet. They may look a bit wrinkled, but that’s perfectly normal as the water evaporates. Immediately brush the tops of the bagels with the whisked egg wash and generously sprinkle with Everything Bagel seasoning. Don’t delay, as the egg wash helps the seasoning adhere best when the surface is slightly tacky.
- Baking to Golden Perfection:
Bake for 20-25 minutes, or until golden brown and cooked through. The bagels should sound hollow when tapped on the bottom.
Let them cool completely on a wire rack before enjoying. Cooling allows the internal structure to set fully, enhancing that perfect chewy texture and ensuring the crust holds its integrity.
Elevate Your Bake: Expert Tips for Phenomenal Everything Bagels
Mastering Everything Bagels is about attention to detail. These expert tips will help you achieve outstanding results every time.
Don’t Skimp on the Kneading: Thorough kneading is absolutely non-negotiable for developing the gluten structure that prevents dense bagels and ensures a perfect chew. The dough should pass the “windowpane test” – stretch a small piece thin enough to see light through it without tearing.
Respect the Cold Proof Time: While 12-18 hours seems long, this extended fermentation in the refrigerator is where the magic happens for profound flavor depth and ideal texture. Don’t rush it for truly authentic Everything Bagels; it’s a critical step!
Mind the Boil: Boiling for too long can make bagels too tough and leathery, while too short won’t create the proper crust and chew. Stick precisely to the 60 seconds per side for optimal results; set a timer.
Customize Your Seasoning: While “Everything” is classic and delicious, feel free to experiment! Try plain sesame seeds, poppy seeds, or even a savory herb blend with garlic and dried oregano before baking for unique variations.
Achieving the Golden Crust: The egg wash not only helps the seasoning stick but also contributes significantly to that beautiful, deep golden-brown crust. Don’t skip this step for visually appealing and flavorful Everything Bagels!
Troubleshooting Your Homemade Bagels: Common Challenges Solved
Even seasoned bakers encounter issues. Here’s how to tackle common bagel-making problems and ensure your next batch is perfect.
Why Are My Bagels Dense and Not Chewy?
This often points to insufficient kneading. You need to develop the gluten properly. Also, a rushed cold proof can result in a less developed flavor and a denser texture. Ensure you’re kneading for the full time and allowing the dough its full cold fermentation.
My Bagels Didn’t Rise Properly. What Happened?
Check your yeast! It might be old or inactive. Ensure your warm water is between 105-115°F (40-46°C); water that’s too hot can kill the yeast, and too cold won’t activate it. A consistent, warm proofing environment helps, especially during the first rise. For general dough handling tips, you might find our guide to Homemade Loaf Bread helpful.
The Everything Seasoning Isn’t Sticking!
The key here is timing and the egg wash. Apply the egg wash immediately after boiling, while the bagels are still warm and tacky. Then, generously sprinkle the seasoning right away before the surface dries.
My Bagels Are Cracking or Too Hard.
This can happen if you’ve over-boiled the bagels, making the exterior too thick, or if they’ve been over-baked. Keep a close eye on your boiling time and oven temperature to prevent this. A shorter bake time might be needed if your oven runs hot.
Serving, Storage & Make-Ahead Magic for Your Everything Bagels
Once you’ve baked a fresh batch of Everything Bagels, you’ll want to enjoy them at their best and know how to preserve their deliciousness.
The Best Ways to Enjoy Your Freshly Baked Everything Bagels
The classic pairing is, of course, with a generous schmear of cream cheese. Elevate your breakfast by adding smoked salmon, capers, and red onion. These bagels also make fantastic sandwich bases; try them toasted with avocado, a fried egg, or even some hearty breakfast bake leftovers.
They’re also perfect simply toasted with butter or jam, showcasing their incredible texture and savory seasoning.
Keeping Your Bagels Fresh: Storage Tips
For optimal freshness, store cooled Everything Bagels in an airtight container or a large zip-top bag at room temperature for up to 2 days. To refresh, simply slice and toast them. Refrigeration can dry them out, so it’s generally not recommended for more than a few days.
Planning Ahead: Make-Ahead & Freezing Instructions
Freezing Unbaked Bagels: After shaping and the cold proof (Step 6), place the unboiled bagels on a parchment-lined baking sheet and freeze until solid. Transfer them to a freezer-safe bag. When ready to bake, thaw overnight in the refrigerator, then proceed with boiling and baking as usual, adding 30-60 seconds to the boil time.
Freezing Baked Bagels: Once your Everything Bagels are fully cooled, slice them in half, then place them in a freezer-safe bag. When you crave a fresh bagel, simply pop the frozen halves directly into a toaster until golden and warm. This method ensures you always have a delicious bagel ready to go!
Your Everything Bagels Questions Answered (FAQ)
Here are answers to some of the most common questions about making these incredible bagels at home.
Can I Use All-Purpose Flour Instead of Bread Flour?
Yes, you can substitute all-purpose flour, but be aware that the final texture will be slightly less chewy and might have a softer crumb. Bread flour’s higher protein content is specifically designed for stronger gluten development, which is ideal for bagels.
How Long Can I Cold Proof the Dough?
The minimum recommended cold proof is 12 hours for significant flavor and texture development. You can extend this to up to 24 hours. Beyond that, the dough might over-ferment, leading to a weaker structure and off-flavors.
Is Boiling the Bagels Really Necessary?
Absolutely! Boiling is arguably the most crucial step for achieving that signature chewy exterior and glossy crust. It quickly sets the outside of the dough, preventing over-rising in the oven and locking in moisture for a distinct texture you won’t get from just baking.
Can I Make These Gluten-Free Everything Bagels?
This specific recipe is designed for wheat flour and its gluten development. Adapting it for gluten-free flours would require significant modifications to hydration, flour blends, and techniques, as GF flours behave very differently.
How Do I Store Leftover Bagels?
Store fully cooled, baked bagels in an airtight container or bag at room temperature for up to two days. For longer storage, slice and freeze them. Always toast day-old or frozen bagels for the best texture and flavor.
Ready to Bake? Share Your Everything Bagels Masterpiece!
You now possess the secrets to crafting exceptional, chewy Everything Bagels that will rival your favorite bagel shop. The satisfaction of pulling a fresh, golden-brown bagel from your own oven, fragrant with savory seasoning, is truly unmatched.
So, gather your ingredients, follow these proven steps, and prepare for a rewarding baking experience. Don’t hesitate to leave a comment below with your thoughts or share photos of your delicious creations!

Everything Bagels
Course: BreadCuisine: American CuisineDifficulty: easy4
8 bagels25
hours20
minutes780
minutesAmerican Cuisine
Ingredients
3 1/2 cups bread flour (or all-purpose flour)
1 teaspoon instant yeast
1 teaspoon granulated sugar
1 1/2 teaspoons salt
1 1/4 cups warm water (105-115°F)
1 large egg, whisked (for egg wash)
1 tablespoon baking soda
Everything Bagel seasoning (about 1/4 cup)
Directions
- In a large mixing bowl, combine the flour, yeast, sugar, and salt. Gradually add the warm water, mixing until a shaggy dough forms.
- Turn the dough out onto a lightly floured surface and knead for 8-10 minutes until it’s smooth and elastic. This thorough kneading is crucial for developing the gluten structure that gives bagels their signature chewiness and prevents a dense, heavy interior.
- Shape the dough into a ball, place it in a lightly oiled bowl, turn to coat, cover with plastic wrap, and let it rest at room temperature for 1 hour.
- After the initial rise, gently punch down the dough and divide it into 8 equal pieces. Roll each piece into a smooth ball.
- To form the bagels, poke a hole in the center of each ball with your thumb. Gently stretch the dough outwards to create a 1 1/2 to 2-inch hole. This helps ensure even cooking and the classic bagel shape.
- Place the formed bagels on a baking sheet lined with parchment paper, lightly dusted with cornmeal or semolina. Cover loosely with plastic wrap and refrigerate for 12-18 hours. This slow cold proof is the game-changer for developing complex flavor and that truly distinct chewy texture, preventing them from becoming dense like regular bread.
- The next day, preheat your oven to 425°F (218°C). Bring a large pot of water to a rolling boil and add the baking soda. The baking soda creates an alkaline environment that helps achieve a beautiful brown crust and significantly contributes to that coveted chewy exterior.
- Carefully drop 2-3 bagels into the boiling water (do not overcrowd the pot). Boil for 60 seconds on one side, then flip and boil for another 60 seconds on the other side. This boiling step is the secret sauce for that perfect chewy texture and distinctive bagel crust.
- Remove the boiled bagels with a slotted spoon and place them back on the parchment-lined baking sheet. They may look a bit wrinkled, but that’s perfectly normal.
- Brush the tops of the bagels with the whisked egg wash and generously sprinkle with Everything Bagel seasoning.
- Bake for 20-25 minutes, or until golden brown and cooked through. Let cool on a wire rack before enjoying.


