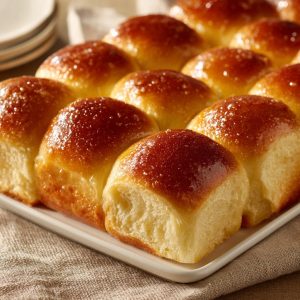
Is there anything quite as comforting as a warm, fluffy biscuit, fresh from the oven? The aroma alone is enough to make anyone’s day a little brighter. But let’s be honest, achieving that perfect, cloud-like texture can sometimes feel like a baking mystery. Tough, dense biscuits are a common kitchen mishap, but fear not! This recipe for fluffy homemade biscuits is your guaranteed ticket to baking success, every single time.
Why You’ll Love This Homemade Biscuits Recipe
These aren’t just any biscuits; they’re little bites of heaven! Here’s why you’ll be making them again and again:
- Unbelievably Fluffy: We’re talking melt-in-your-mouth texture, thanks to a few key techniques.
- Simple Ingredients: No fancy or hard-to-find items required.
- Quick & Easy: From start to finish, you’ll have warm biscuits on the table in under 30 minutes.
- Versatile: Perfect for breakfast, lunch, dinner, or a snack.
- Guaranteed Success: Follow these steps, and you’ll banish tough biscuits forever!
Gathering Your Ingredients for Fluffy Homemade Biscuits
The beauty of these biscuits lies in the simplicity of the ingredients. It’s the how you use them that makes all the difference. Think of these ingredients as building blocks for that perfect fluffy texture and classic biscuit flavor. Let’s take a closer look:
- All-Purpose Flour: The foundation of our biscuits. We use all-purpose flour for its reliable gluten development, which provides structure. Don’t be tempted to use bread flour, as it will make the biscuits too chewy.
- Baking Powder: This is our primary leavening agent, responsible for that incredible rise. Make sure your baking powder is fresh for optimal results!
- Baking Soda: A little baking soda helps to create a lighter, more tender crumb. It also reacts with the buttermilk to give the biscuits a subtle tang.
- Salt: Enhances the overall flavor and balances the sweetness.
- Sugar: Just a touch of sugar adds a hint of sweetness and helps with browning.
- Cold Unsalted Butter: This is the secret ingredient for flaky layers. The cold butter creates pockets of steam as it melts in the oven, resulting in that irresistible texture. Make sure it’s very cold! Cubing the butter makes it easier to incorporate.
- Cold Buttermilk: The acidity in buttermilk helps to tenderize the gluten and activate the baking soda, creating a softer biscuit. The cold temperature also helps to keep the butter from melting too quickly.
Crafting Your Fluffy Homemade Biscuits: Step-by-Step
Ready to embark on your biscuit-baking adventure? Don’t be intimidated! These steps are straightforward, and I’ll guide you through each one. The key to success lies in keeping everything cold and avoiding overmixing. Let’s get started!
- Preheat Power! Begin by preheating your oven to a roaring 425 degrees F (220 degrees C). A hot oven is crucial for creating that initial burst of steam that helps the biscuits rise tall and proud. Place a rack in the center of the oven for even baking.
- Dry Ingredient Harmony: In a large bowl, whisk together the all-purpose flour, baking powder, baking soda, salt, and sugar. Whisking ensures that the leavening agents are evenly distributed throughout the flour, leading to a consistent rise. This step is about creating a uniform base for our biscuits.
- Butter Incorporation: The Cold Key: This is where the magic happens! Add the cold, cubed unsalted butter to the dry ingredients. Using a pastry blender (or your fingertips, if you’re feeling adventurous!), cut the butter into the flour until the mixture resembles coarse crumbs with some larger pea-sized pieces of butter remaining. Don’t overdo it! The goal is to have visible pieces of butter that will melt in the oven and create flaky layers. This is arguably the most crucial step for achieving that signature biscuit fluffiness.
- Buttermilk Embrace: Pour in the cold buttermilk and gently stir with a fork just until the dough is combined. Resist the urge to overmix! The dough will be shaggy and a little rough – that’s perfectly fine. Overmixing develops the gluten, leading to tough biscuits. We want to keep things light and tender.
- Gentle Kneading: Turn the dough out onto a lightly floured surface. Gently knead or fold the dough 2-3 times, just enough to bring it together into a cohesive mass. Again, do not overwork the dough! We’re aiming for a delicate touch here.
- Pat and Fold (For Extra Layers): Pat or gently roll the dough to about 1/2 inch thickness. For those coveted extra layers and even more fluffiness, fold the dough in half and pat it down again. Repeat this folding and patting process once more. This technique creates those beautiful, flaky layers that we all adore.
- Biscuit Cutting: Precision is Key: Use a biscuit cutter to cut out the biscuits. To prevent sticking, dip the cutter in flour between each cut. Here’s a pro tip: press the cutter straight down without twisting. Twisting seals the edges of the dough, preventing the biscuits from rising properly. Gather the scraps and gently pat them together to cut out more biscuits. Try not to overwork the scraps, as they will be a bit tougher than the first batch.
- Baking Sheet Placement: Sides Matter: Place the biscuits on an ungreased baking sheet. For softer sides, arrange the biscuits so that they are touching slightly. For crispier sides, space them further apart. The choice is yours!
- Baking Time: Golden Perfection: Bake for 12-15 minutes, or until the biscuits are golden brown on top and bottom. Keep a close eye on them, as baking times can vary depending on your oven. A perfectly baked biscuit will have a beautiful golden hue and a slightly crisp exterior.
Tips for Perfect Homemade Biscuits Every Time
Want to ensure biscuit-baking success every single time? Here are a few extra tips and tricks to keep in mind:
- Keep Everything Cold: This cannot be stressed enough! Cold ingredients are key to creating flaky layers. If your butter or buttermilk starts to warm up, pop them back in the fridge for a few minutes.
- Don’t Overmix: Overmixing develops the gluten, resulting in tough biscuits. Mix just until the ingredients are combined.
- Handle with Care: Be gentle with the dough. Avoid over-kneading or pressing too hard when cutting out the biscuits.
- Fresh Ingredients: Make sure your baking powder and baking soda are fresh for optimal results.
- Experiment with Flavors: Once you’ve mastered the basic recipe, feel free to add your own personal touch. Consider adding herbs, cheese, or even a sprinkle of everything bagel seasoning.
- Storage: Store leftover biscuits in an airtight container at room temperature for up to 2 days, or in the freezer for longer storage. Reheat in a warm oven or microwave.
What to Serve With Fluffy Homemade Biscuits
These biscuits are incredibly versatile and pair well with a variety of dishes. For a classic breakfast, serve them with some eggs and bacon. Or use them to build a hearty sandwich with your favorite fillings. They’re also delicious with soups, stews, and salads. For a delightful dessert, consider topping them with fresh fruit and whipped cream.
Speaking of side dishes, you could serve these biscuits alongside some slow cooker cheesy potatoes for a comforting and satisfying meal.
Your Homemade Biscuits Questions Answered (FAQ)
Why are my biscuits tough?
Tough biscuits are usually the result of overmixing the dough. Overmixing develops the gluten, leading to a chewier texture. Be sure to mix just until the ingredients are combined, and handle the dough gently.
Can I use milk instead of buttermilk?
While buttermilk is ideal for its acidity and flavor, you can substitute it with regular milk. For a similar effect, add 1 tablespoon of lemon juice or white vinegar to 1 cup of milk and let it sit for 5 minutes before using.
Can I make these biscuits ahead of time?
Yes, you can prepare the dough ahead of time and store it in the refrigerator for up to 24 hours. However, keep in mind that the baking powder will start to lose its potency over time, so the biscuits may not rise as much. Alternatively, you can cut out the biscuits and freeze them on a baking sheet. Once frozen, transfer them to a freezer bag. Bake directly from frozen, adding a few extra minutes to the baking time. Alternatively, consider trying our savory sausage and bread bake, which can be made ahead of time as well.
How do I get my biscuits to rise higher?
Several factors contribute to biscuit height: using fresh baking powder, keeping the ingredients cold, avoiding overmixing, and ensuring a hot oven. Also, cutting the biscuits with a sharp cutter and pressing straight down (without twisting) will help them rise evenly.
Enjoy Your Homemade Fluffy Biscuits!
There you have it – a foolproof recipe for fluffy homemade biscuits that are guaranteed to impress! These golden delights are perfect for any occasion, from a cozy breakfast to a comforting side dish. So go ahead, preheat your oven, gather your ingredients, and get ready to experience the joy of homemade biscuits. Don’t forget to leave a comment below and let me know how they turned out. Happy baking!
Fluffy Homemade Biscuits (Guaranteed Fluffy Every Time)
Ingredients
- 2 cups all purpose flour
- 2 teaspoons baking powder
- 1/4 teaspoon baking soda
- 1/2 teaspoon salt
- 1 tablespoon sugar
- 1/2 cup cold unsalted butter cubed
- 3/4 cup cold buttermilk
Directions
- Preheat oven to 425 degrees F (220 degrees C).
- In a large bowl whisk together the flour, baking powder, baking soda, salt, and sugar.
- Cut the cold cubed butter into the dry ingredients using a pastry blender or your fingers until the mixture resembles coarse crumbs with some larger pea sized pieces of butter remaining. This is a crucial step for fluffiness.
- Pour in the cold buttermilk and stir with a fork just until the dough is combined. Be careful not to overmix. The dough will be shaggy.
- Turn the dough out onto a lightly floured surface. Gently knead or fold the dough 2-3 times just to bring it together. Do not overwork the dough.
- Pat or gently roll the dough to about 1/2 inch thickness. For extra layers and fluffiness, you can fold the dough in half and pat down, repeating once more.
- Use a biscuit cutter to cut out biscuits. Dip the cutter in flour between cuts. Press the cutter straight down without twisting to keep the edges clean and help with rise. Gather scraps and gently pat together to cut more biscuits.
- Place biscuits on an ungreased baking sheet, touching slightly for softer sides or further apart for crispier sides.
- Bake for 12-15 minutes, or until golden brown on top and bottom.


