

There’s nothing quite like the allure of French toast, but often, homemade versions can turn out either bland or disappointingly soggy. I’ve been there, facing the challenge of achieving that perfect texture and flavor. However, I’ve refined a technique to ensure your French Toast Rolls emerge golden, crispy on the outside, and delightfully tender within.
This recipe offers a unique, irresistible savory-sweet combination that will elevate your brunch game. Get ready to transform your morning routine with these incredible treats.
Why These French Toast Rolls Will Become Your New Brunch Favorite
A Surprising Savory-Sweet Filling That Delights
Imagine the richness of seasoned ground beef perfectly complemented by a creamy, slightly sweet vanilla-infused cream cheese. This unexpected pairing within these French Toast Rolls creates a flavor profile that’s both comforting and exciting.
It’s a refreshing twist on traditional sweet French toast, offering a satisfying heartiness that keeps you coming back for more.
Mastering Texture: Crispy Golden Outside, Tender Inside
The secret to avoiding soggy French toast lies in a precise “quick dip” technique and controlled cooking. We’ll guide you to achieve a beautifully golden-brown crust that holds up, encasing a soft, flavorful interior.
Each bite delivers a satisfying textural contrast, ensuring these French Toast Rolls are truly exceptional.
Simple Steps for a Stress-Free Brunch Experience
Despite their gourmet appeal, these French Toast Rolls are surprisingly straightforward to prepare. The steps are designed to be efficient, making them perfect for both seasoned cooks and brunch novices.
You’ll be able to enjoy a luxurious, homemade brunch without the usual kitchen stress.
Essential Tools for Your French Toast Rolls Journey
Having the right equipment on hand makes all the difference for a smooth cooking experience. These essential kitchen gadgets will help you craft perfect French Toast Rolls with ease.
Key Kitchen Gadgets You’ll Need
Rolling Pin: Crucial for flattening the bread evenly, allowing for tight, well-formed rolls that hold their shape during cooking.
Shallow Dish: Ideal for holding the egg wash. A wide, shallow dish ensures easy dipping without excessive soaking.
Large Non-Stick Skillet or Griddle: Essential for even heat distribution and preventing the rolls from sticking, guaranteeing that beautiful golden crust.
Tongs: Perfect for gently turning the French Toast Rolls in the hot pan, preventing damage and ensuring even browning on all sides.
The Heart of the Recipe: Gathering Your Ingredients
Building the Savory-Sweet Core: Beef and Cream Cheese
Our unique filling starts with cooked and seasoned ground beef, providing a hearty, savory foundation. You can use simple salt and pepper or opt for a breakfast sausage seasoning blend for extra flair.
The softened cream cheese, blended with granulated sugar and vanilla extract, adds a creamy texture and sweet balance that truly sets these French Toast Rolls apart.
The Golden Coating: Bread, Eggs, and Dairy Essentials
For the best results, use soft white sandwich bread with crusts removed, as it flattens easily and rolls without tearing. This creates the perfect canvas for our delightful filling.
Large eggs, combined with rich milk and aromatic ground cinnamon, form the foundational egg wash. This mixture provides the classic French toast flavor and binds everything together beautifully.
Finishing Touches: Butter, Dusting, and Syrup
Butter is used for cooking, not only preventing sticking but also contributing a rich, savory depth and aiding in achieving a perfectly golden-brown exterior. It’s key for flavor.
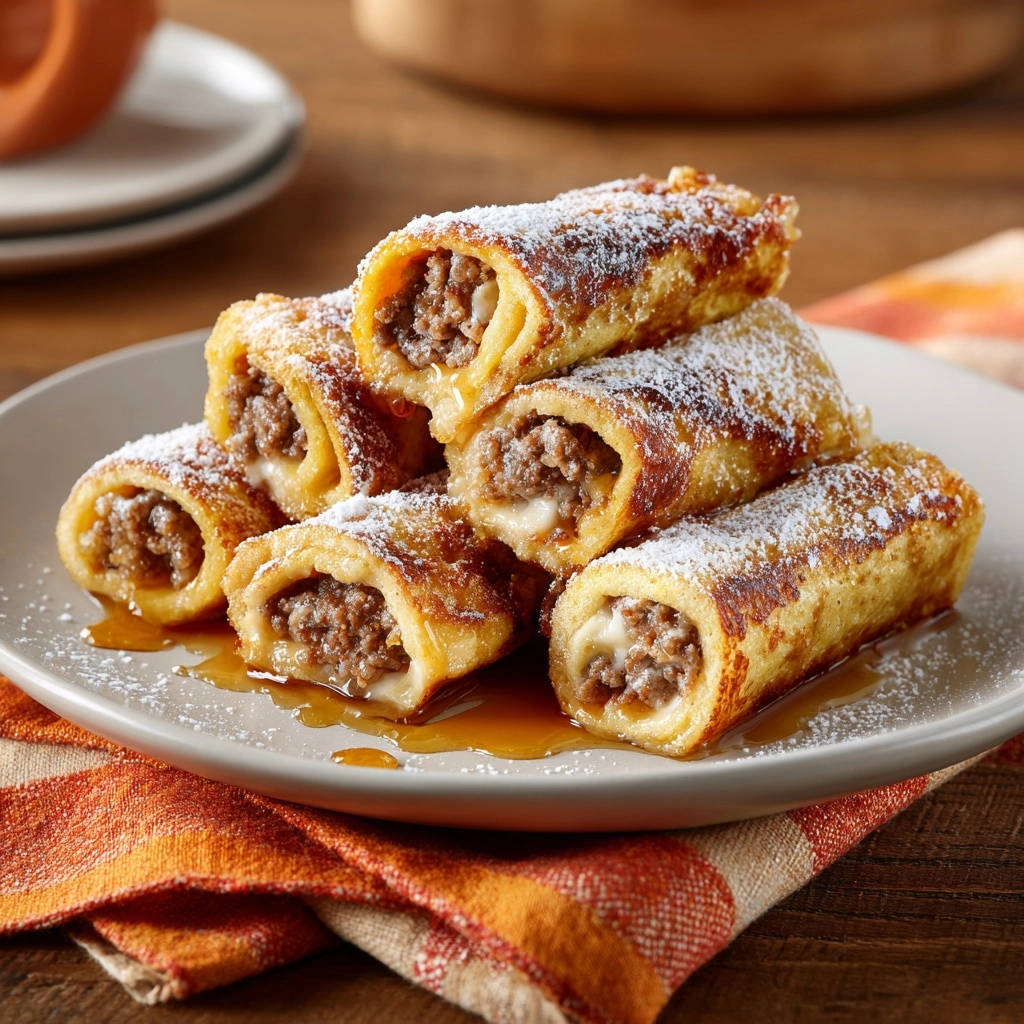
A generous dusting of powdered sugar adds a touch of elegant sweetness and visual appeal. Finally, a drizzle of warm maple syrup provides the quintessential sweet counterpoint to our savory-sweet French Toast Rolls.
Your Step-by-Step Guide to Flawless French Toast Rolls
Crafting the Creamy Filling: A Sweet Start
In a small bowl, combine the softened cream cheese, granulated sugar, and vanilla extract. Beat or mix these ingredients thoroughly until the mixture is completely smooth and creamy. Ensuring your cream cheese is properly softened is crucial for a lump-free, spreadable filling.
Preparing Your Savory Beef Component
Take your cooked and seasoned ground beef and place it in a separate bowl. You have flexibility here; a simple pinch of salt and pepper works wonderfully, or for a bolder flavor, consider a breakfast sausage seasoning blend. If you’re looking for other ways to incorporate savory beef, explore our cheesy beef pasta bake recipe for more ideas.
Flattening the Bread to Perfection
Place one slice of white bread on a clean surface. Using a rolling pin, carefully flatten the bread slice as thin as possible without tearing it. This step is vital for creating pliable bread that rolls tightly and consistently, which prevents the filling from oozing out during cooking and ensures perfectly formed French Toast Rolls.
Assembling Your Flavorful Rolls
Evenly spread about 1 tablespoon of the creamy cream cheese mixture over one flattened bread slice, leaving a small border at one end. Next, top the cream cheese with about 1 tablespoon of the seasoned ground beef. Starting from the end opposite the border, tightly roll up the bread slice into a log, then gently press to seal the seam.
Repeat this process with all remaining bread slices and fillings, ensuring each roll is compact and well-sealed.
Whisking the Essential Egg Wash
In a shallow dish, whisk together the large eggs, milk, and ground cinnamon until they are thoroughly combined. A well-whisked mixture ensures an even, consistent coating on your French Toast Rolls, contributing to that desirable golden-brown finish.
Prepping the Pan: Heat and Butter
Heat 1 tablespoon of butter in a large non-stick skillet or griddle over medium heat. Allow the butter to melt completely and ensure it evenly coats the pan. Using medium heat is key to prevent burning while still allowing the rolls to cook through and achieve a beautiful crust.
The Quick Dip Secret to Non-Soggy Rolls
This is where the magic happens for perfectly textured French Toast Rolls. Quickly dip one roll into the egg mixture, turning it once to lightly coat all sides. Do not let it soak! A brief, swift dip ensures the bread absorbs just enough moisture for flavor without becoming soggy or falling apart.
Cooking to Golden-Brown Perfection
Place the dipped roll seam-side down in the hot skillet. Cook for approximately 2-3 minutes on each side, turning gently with tongs, until each side is a beautiful golden brown and the roll is heated through. Adjust the heat as needed to prevent burning while ensuring even browning. You may need to add the remaining butter for subsequent batches to maintain consistent heat and browning.
Removing and Preparing for Serving
Once cooked to perfection, carefully remove the French Toast Rolls from the skillet. Place them onto a serving plate, ready for their final delicious touches.
Garnish and Enjoy Your Masterpiece!
Dust generously with powdered sugar for a touch of elegance and extra sweetness. Serve your savory-sweet French Toast Rolls immediately with warm maple syrup on the side. This classic combination truly completes the experience.
Chef’s Secrets: Elevating Your French Toast Rolls Game
Choosing the Best Bread for Rolling
The type of bread significantly impacts your French Toast Rolls. While soft white bread is excellent, enriched breads like brioche or challah offer an even richer flavor and tenderness.
Avoid dense or heavily crusted breads, as they are difficult to flatten and prone to tearing when rolled.
Mastering the “Quick Dip” Technique for Ideal Texture
The success of these no-soggy French Toast Rolls hinges on the quick dip. Ensure your egg wash is evenly spread in a shallow dish, then literally dip and flip the roll in one swift motion.
The goal is a light coating, not saturation, preserving the bread’s structure for that golden-crispy exterior.
Customizing Your Savory Filling: Beyond Ground Beef
Feel free to experiment with the savory component of your French Toast Rolls. Cooked and crumbled breakfast sausage, finely shredded cooked chicken, or even seasoned sautéed mushrooms make fantastic alternatives.
For a vegetarian option, try a mix of finely chopped, seasoned spinach and feta cheese.
Sweetening Options and Creative Topping Variations
Beyond maple syrup and powdered sugar, consider a warm fruit compote (like berry or apple) for extra sweetness and moisture. A drizzle of chocolate sauce or a dollop of whipped cream can also enhance the indulgence.
Toasted nuts or a sprinkle of flaky sea salt can add delightful texture and flavor contrast to your French Toast Rolls.
Troubleshooting Common French Toast Rolls Hurdles
My Rolls Are Soggy Inside
This is usually due to over-soaking the bread in the egg wash. Ensure your dip is very quick, just enough to coat the exterior.
Also, make sure your skillet is at a consistent medium heat; too low, and the bread absorbs too much moisture before browning.
The Filling Is Oozing Out While Cooking
An oozing filling often means the rolls weren’t sealed tightly enough or were overfilled. Double-check that you’re pressing the seam firmly to seal each roll.
Try to keep the filling amounts to the suggested tablespoon to avoid overstuffing.
My Rolls Aren’t Getting Golden Brown
Insufficient butter or too low heat are common culprits. Ensure there’s enough butter in the pan for each batch and that your skillet is maintained at a steady medium heat.
Don’t be afraid to add more butter as needed between batches to achieve that desirable golden hue.
The Bread Tears When Flattening or Rolling
This problem usually arises from stale bread or applying too much pressure. Always use fresh, soft sandwich bread for optimal pliability.
When using the rolling pin, apply gentle, even pressure across the slice, working from the center outwards.
Serving Suggestions: Pairing Your Savory-Sweet Rolls
These French Toast Rolls are substantial enough to be the star of your brunch, but they also pair beautifully with a few complementary sides.
Perfect Companions for a Balanced Brunch
Serve them alongside a simple fresh fruit salad for a burst of freshness. A side of crispy bacon or scrambled eggs can further enhance the savory breakfast experience.
For a lighter touch, a small bowl of Greek yogurt can offer a creamy contrast.
Beverage Pairings to Complete the Meal
Classic pairings like freshly brewed coffee or a robust black tea are always excellent choices. For a brighter option, freshly squeezed orange juice complements the savory-sweet profile wonderfully.
A mimosa or sparkling cider can add a celebratory touch for a special occasion.
Make Ahead & Storage Tips for Busy Mornings
Prepping Components in Advance
To save time on brunch day, you can cook and season the ground beef, and prepare the cream cheese filling a day ahead. Store both components separately in airtight containers in the refrigerator.
This allows for quick assembly of your French Toast Rolls when you’re ready to cook.
Storing Leftover French Toast Rolls
Should you have any delicious leftovers, allow them to cool completely before storing. Place the cooked French Toast Rolls in an airtight container and refrigerate for up to 2-3 days.
Reheat gently in a skillet or oven for the best texture.
Freezing for Future Enjoyment
These French Toast Rolls freeze beautifully! After cooking and cooling, arrange them in a single layer on a baking sheet and freeze until solid. Once frozen, transfer them to a freezer-safe bag or container.
They will keep for up to 1 month. Reheat from frozen in a preheated oven at 350°F (175°C) for about 15-20 minutes, or in an air fryer, until warmed through and crisp.
Frequently Asked Questions About French Toast Rolls
Can I Use Different Kinds of Bread?
Absolutely! While soft white bread is recommended, brioche or challah can add a richer flavor and more tender crumb to your French Toast Rolls. Just ensure it’s fresh and soft to facilitate easy flattening and rolling without tearing.
What About a Sweet Only Filling?
Yes, you can easily adapt this recipe for a purely sweet experience. Consider fillings like fruit preserves, a blend of cinnamon sugar with a touch of cream cheese, or even chocolate hazelnut spread. If you enjoy other sweet, creamy delights, you might also like our easy cream cheese pastries for a similar comforting flavor.
Can I Make These Gluten-Free?
Certainly! Simply substitute the white bread with your favorite brand of gluten-free sandwich bread. Look for a brand known for being pliable and not too crumbly, as this will make the flattening and rolling process much smoother for your French Toast Rolls.
Is it Possible to Bake These Instead of Frying?
You can bake these French Toast Rolls as an alternative to pan-frying. Preheat your oven to 375°F (190°C). Arrange the prepared rolls on a lightly greased baking sheet and bake for 15-20 minutes, flipping halfway through, until they are golden brown and heated through. For best browning, brush them with a little extra melted butter before baking.
How Long Do French Toast Rolls Last?
When stored properly in an airtight container, cooked French Toast Rolls will remain fresh in the refrigerator for 2-3 days. If frozen, they can maintain their quality for up to 1 month. Always reheat them for the best flavor and texture.
Ready to Transform Your Brunch? Share Your Creations!
These savory-sweet French Toast Rolls are more than just a meal; they’re an experience designed to delight and impress. I’m confident this recipe will quickly become a cherished favorite in your kitchen, making every brunch feel special.
Don’t wait to try this unique twist on a classic! I encourage you to whip up a batch this weekend. When you do, be sure to share your culinary masterpieces on social media and tag us. We can’t wait to see your delicious French Toast Rolls!

French Toast Rolls
Course: BreakfastCuisine: American CuisineDifficulty: easy4
servings15
minutes20
minutes35
minutesAmerican Cuisine
Ingredients
8 slices white bread, crusts removed
1/2 pound ground beef, cooked and seasoned
4 ounces cream cheese, softened
2 tablespoons granulated sugar
1/2 teaspoon vanilla extract
2 large eggs
1/4 cup milk
1/4 teaspoon ground cinnamon
2 tablespoons butter, for cooking
Powdered sugar, for dusting
Maple syrup, for serving
Directions
- In a small bowl, combine the softened cream cheese, granulated sugar, and vanilla extract. Mix until smooth and creamy.
- In a separate bowl, add the cooked and seasoned ground beef. You can season it with a pinch of salt and pepper or your favorite breakfast sausage seasoning blend.
- On a clean surface, place one slice of bread. Using a rolling pin, flatten the bread slice as thin as possible without tearing it. Repeat with all bread slices.
- Spread about 1 tablespoon of the cream cheese mixture evenly over one flattened bread slice, leaving a small border at one end. Top the cream cheese with about 1 tablespoon of the seasoned ground beef.
- Starting from the end opposite the border, tightly roll up the bread slice into a log. Press gently to seal the seam. Repeat with the remaining bread slices and fillings.
- In a shallow dish, whisk together the eggs, milk, and ground cinnamon until well combined.
- Heat 1 tablespoon of butter in a large non-stick skillet or griddle over medium heat. Make sure the butter is melted and evenly coats the pan.
- For the golden and tender result: Quickly dip one French toast roll into the egg mixture, turning once to lightly coat all sides. Do not let it soak; a quick dip ensures the bread doesn’t become soggy.
- Place the dipped roll seam-side down in the hot skillet. Cook for about 2-3 minutes on each side, turning gently with tongs, until each side is beautifully golden brown and the roll is heated through. Adjust heat as needed to prevent burning while ensuring even browning. You may need to add the remaining butter for subsequent batches.
- Once cooked, remove the French toast rolls from the skillet and place them on a serving plate.
- Dust generously with powdered sugar and serve immediately with maple syrup.
Notes
- For best results, quickly dip rolls in egg mixture to avoid sogginess. Adjust heat during cooking for even browning.


