Let’s talk about breakfast struggles, shall we? Specifically, the crushing disappointment of biting into what should be a perfectly golden, fluffy French toast stick, only to be met with a raw, eggy, soggy center. Ugh, it’s the worst!
For years, I battled this exact problem. I tried different types of bread, varying the soak time, adjusting the heat – nothing seemed to work consistently. The outside would be beautiful, but the middle was a mushy mess. But fear not, fellow breakfast lovers! I finally cracked the code, and it’s surprisingly simple. The secret to French Toast Sticks that are golden brown, tender all the way through, and never, ever mushy lies in one small, but mighty, technique adjustment.
These French Toast Sticks are everything you want: easy to make, delightful to eat (especially for little hands!), and guaranteed to be perfectly cooked inside and out. They’re a total game-changer for weekend mornings or anytime you crave that classic sweet breakfast treat without the dreaded soggy surprise.
Why You’ll Absolutely Adore These French Toast Sticks
Beyond banishing the soggy middle blues forever, there are so many reasons why these French Toast Sticks will become a staple in your breakfast rotation:
- Perfect Texture, Guaranteed: Say goodbye to mush! The method ensures a crispy-golden exterior and a wonderfully tender, fully cooked interior.
- Kid-Friendly Fun: Sticks are inherently more fun to eat than slices, making them a hit with kids (and adults who are kids at heart!). They’re perfect for dipping.
- Quick & Easy: This recipe comes together fast, making it ideal for busy mornings or a quick weekend treat without a lot of fuss.
- Simple Ingredients: You likely have most of these pantry staples on hand right now.
- Versatile: They’re a fantastic base for all your favorite toppings, from classic maple syrup to fresh fruit and beyond.
Gathering Your Ingredients for Perfect French Toast Sticks
Creating these delightful French Toast Sticks starts with choosing the right components. While the technique is key, the ingredients play a vital supporting role in achieving that ideal texture and flavor. Think of these as the building blocks for your breakfast masterpiece. The simple combination of eggs, milk, a touch of sweetness, and warm spice creates that classic, comforting flavor profile we all love.
Here’s what you’ll need on your counter:
- Thick-Cut Bread: This is crucial! Thin bread will fall apart or become instantly saturated. Look for a sturdy loaf labeled “Texas Toast,” challah, brioche, or even a good quality country loaf. Eight slices will yield a decent batch. Slightly stale bread is actually your friend here; it doesn’t absorb the custard too quickly, helping prevent sogginess right from the start. If your bread is super fresh, you can leave it out on the counter uncovered for a few hours or even overnight to dry out slightly.
- Large Eggs: We use three large eggs. These form the base of our custard, providing richness and helping the bread cook through to a firm, yet tender, consistency. They also help achieve that beautiful golden crust when cooked.
- Milk: One cup of milk adds liquid to create the custard and helps distribute the flavorings. You can use dairy milk (whole milk is great for richness) or your favorite non-dairy alternative like almond, soy, or oat milk. The slight difference in fat content might slightly affect the richness, but the technique prevents sogginess regardless of the milk type.
- Granulated Sugar: Two tablespoons provide just enough sweetness to the custard base without being overly sugary before adding toppings. It helps with browning too.
- Vanilla Extract: A teaspoon of pure vanilla extract is essential for that warm, comforting French toast flavor. Don’t skip this!
- Ground Cinnamon: Half a teaspoon of ground cinnamon adds that classic spice note that pairs perfectly with French toast. You could also add a pinch of nutmeg for extra warmth.
- Butter or Oil for Cooking: You’ll need enough butter or a neutral oil (like vegetable or canola) to coat the surface of your cooking pan. Butter adds a lovely flavor and helps achieve a beautiful golden-brown color, while oil tends to get a little crispier. Feel free to use a combination!
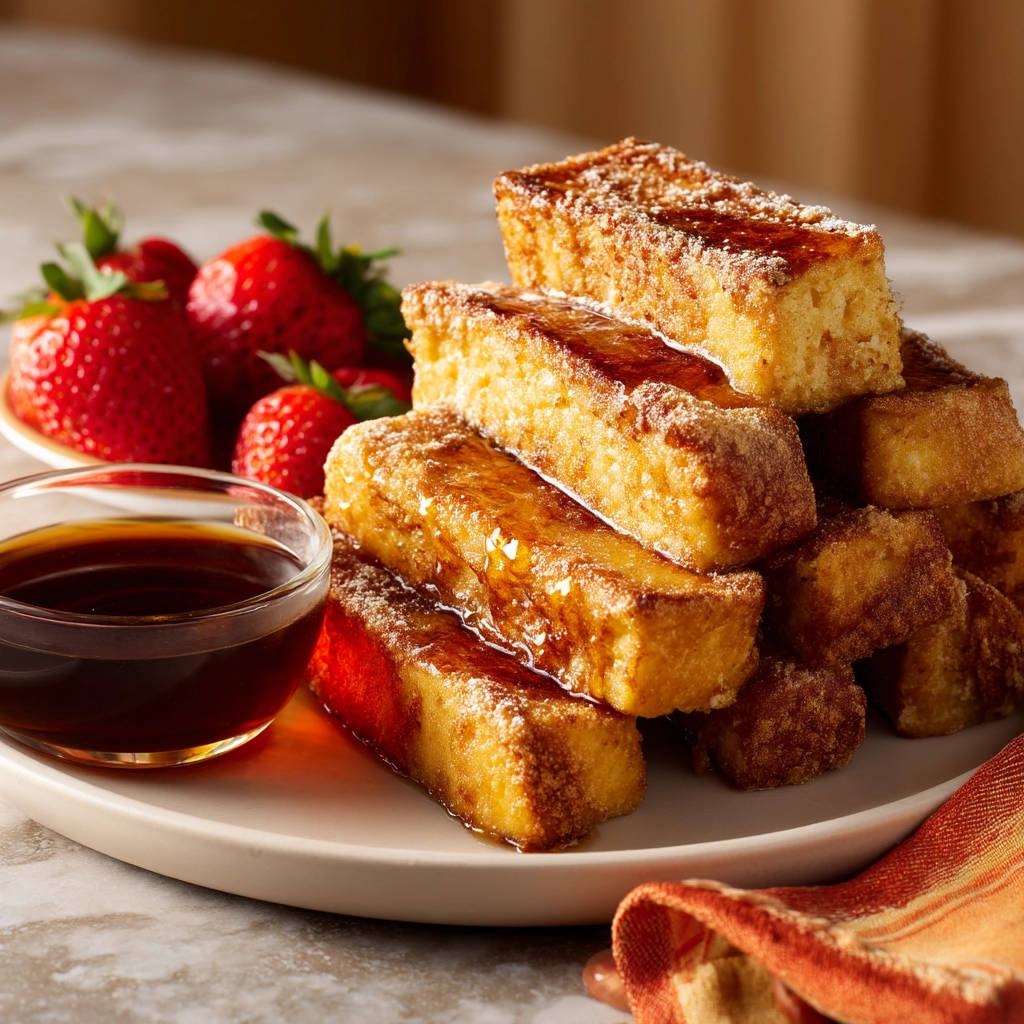
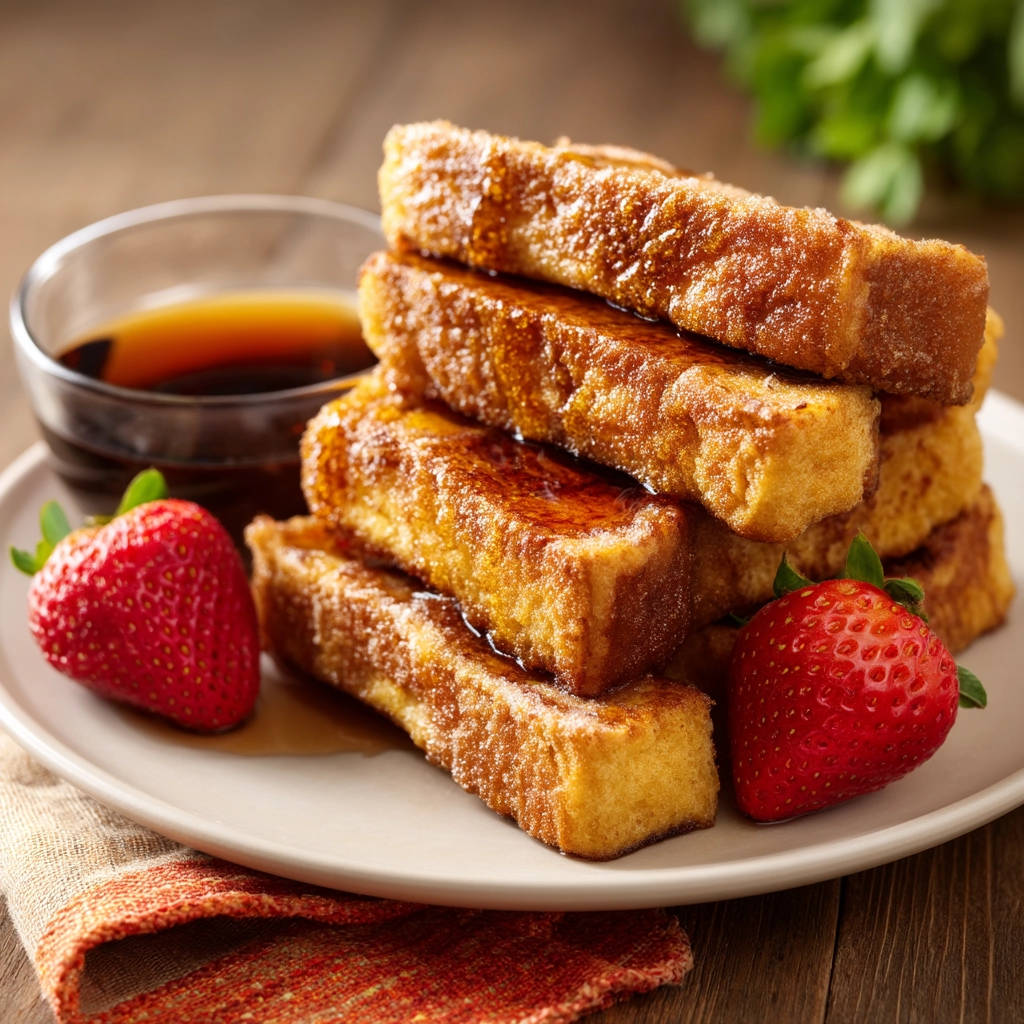
- For Serving: Powdered sugar for dusting, plenty of maple syrup for drizzling, and fresh strawberries for a burst of freshness and color. These are traditional toppings, but feel free to get creative!
Crafting Your French Toast Sticks: A Step-by-Step Guide to No Soggy Middles
Alright, let’s get to the good part – making these perfect French Toast Sticks! The magic truly happens in step 4, but paying attention to each step ensures success. Grab your ingredients and let’s dive in. This process is straightforward, even for beginner cooks.
-
Prepare the Bread: Start with your eight slices of thick-cut bread. The goal here is uniform pieces that are easy to handle and cook evenly. Cut each slice into two or three sticks. The exact number will depend on how large your bread slices are. Aim for sticks that are roughly the same size so they cook at the same rate. Using slightly stale bread, as mentioned earlier, is a secret weapon here; it gives the bread structure and prevents it from instantly turning to mush when it hits the custard.
-
Whisk the Custard: In a shallow dish (a pie plate or a baking dish works perfectly), whisk together the three large eggs until the yolks and whites are fully combined. Then, pour in the cup of milk. Add the granulated sugar, vanilla extract, and ground cinnamon. Whisk everything together thoroughly until the mixture is smooth and the sugar is mostly dissolved. You want a well-mixed custard so every stick gets an even coating of flavor.
-
Heat Your Skillet: Place a large nonstick skillet or a griddle over medium heat. It’s important not to go too high with the heat; medium heat allows the outside to turn golden brown slowly while the inside cooks through. Once the pan is hot, add enough butter or oil to generously coat the surface. You want a little sizzle when you add the bread, but not smoking hot fat.
-
The Anti-Soggy Secret – Dip Just Briefly: This is the moment we’ve been waiting for! The absolute key to avoiding that raw, eggy middle is how long you dip the bread. Take each bread stick and dip it into the egg mixture for just a few seconds per side. We are talking maybe 5-10 seconds total for the entire stick. You want the bread to absorb some of the liquid, allowing the flavors to penetrate and providing moisture for the interior to cook, but you explicitly do not want it to become completely saturated or soak through to the core instantly. As you lift the stick out, hold it over the dish for a moment, letting any excess liquid drip back into the bowl. This controlled, brief dip prevents the middle from getting waterlogged before it even hits the heat.
-
Cook in Batches: Carefully place the dipped French toast sticks directly onto the hot, buttered skillet. Now, resist the urge to cram them all in at once! Overcrowding the pan will lower the temperature, steam the bread instead of searing it, and can lead to uneven cooking and yes, soggy spots. Cook the sticks in batches, leaving a little space between each one so the heat can circulate effectively and give you that beautiful golden crust.
-
Cook Until Golden and Cooked Through: Let the French toast sticks cook for about 2 to 3 minutes on the first side. You’ll know they’re ready to flip when the underside is a lovely golden brown color. Gently flip each stick using tongs or a spatula and cook for another 2 to 3 minutes on the second side. As they cook, they should feel firmer to the touch, which is a good sign they are cooking through. If the outsides are browning too fast but they still feel soft in the middle, slightly reduce the heat. The medium heat and brief dip should allow the inside to finish cooking by the time the outside is golden.
-
Remove and Repeat: Once a batch is cooked to golden perfection and feels firm, remove the French toast sticks from the skillet and place them on a plate. Continue dipping and cooking the remaining bread sticks in batches, adding more butter or oil to the pan as needed before each new batch. Keep the finished sticks warm if desired, though they are best served immediately.
-
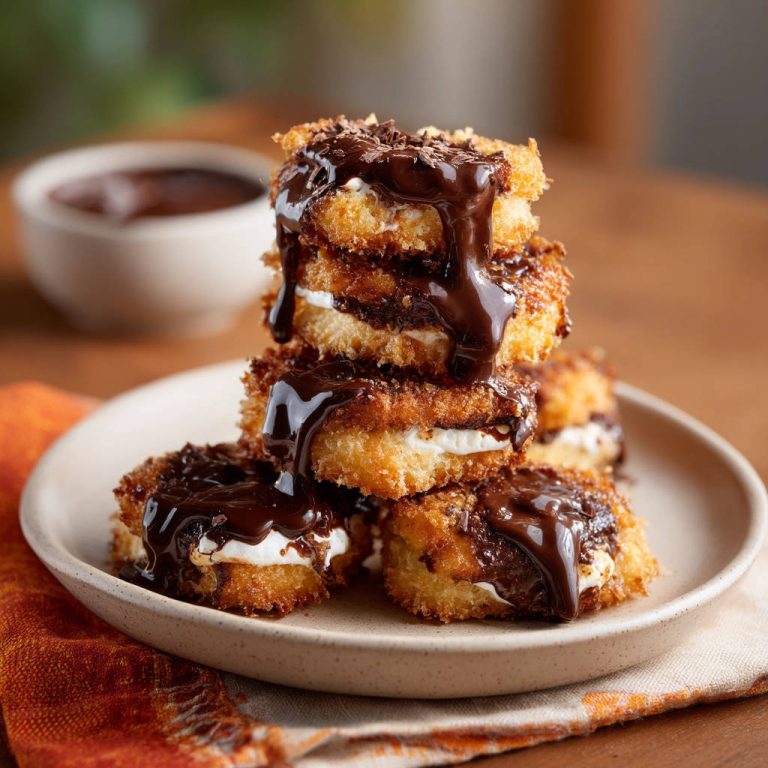
Serve Immediately: The moment they come off the pan is the prime time! Arrange the golden French toast sticks on a serving plate. Dust them generously with powdered sugar – it adds a touch of elegance and extra sweetness. Serve them immediately with warm maple syrup for dipping (because is it even French toast without maple syrup?!) and a side of fresh strawberries for a bright, fruity contrast. Other berries or sliced fruit also work beautifully.
Tips for Perfect French Toast Sticks Every Single Time
Mastering French Toast Sticks is easy once you know the secrets, but here are a few extra tips to ensure your success and maybe even add a little flair:
- Bread Choice is King (Almost): We stressed thick-cut bread, but the type matters too. Brioche, challah, and sourdough are fantastic choices because they hold their shape well and offer lovely flavor. Sourdough adds a subtle tang that contrasts nicely with the sweetness.
- Don’t Over-Dip: This is the absolute most important tip! Just a quick dunk, letting excess drip off, is all you need. Think of it as giving the bread a quick bath, not drowning it.
- Medium Heat is Your Friend: High heat will burn the outside before the inside has a chance to cook. Be patient and keep the heat at a steady medium. If your pan runs hot, err on the side of slightly lower heat.
- Prep Ahead (Partially): You can whisk the egg mixture a few hours ahead of time and keep it covered in the fridge. This saves a step when you’re ready to cook. Don’t cut the bread too far in advance unless you want it extra stale, but cutting it right before dipping is perfectly fine.
- Keep Warm: If you’re cooking multiple batches, you can keep the finished French toast sticks warm in a single layer on a baking sheet in a low oven (around 200°F / 90°C) while you finish the rest.
- Experiment with Flavors: Want to change it up? Add a pinch of nutmeg, a dash of almond extract, or even some orange zest to the custard for different flavor profiles.
- Serving Variations: While maple syrup and strawberries are classic, don’t stop there! Consider serving with sliced bananas, blueberries, whipped cream, a sprinkle of chopped nuts, or even a dollop of yogurt. For another delicious breakfast option that uses a different base, check out our Gourmet Breakfast Toast Crispy recipe.
- Storage and Reheating: Let cooled French Toast Sticks cool completely on a wire rack before storing them in an airtight container in the refrigerator for 3-4 days. For best results when reheating, use a toaster oven or air fryer to help them regain some crispness, or warm them gently in a skillet. Microwaving can sometimes make them a little soft.
What to Serve With Your Delicious French Toast Sticks
These French Toast Sticks are fantastic on their own with toppings, but they also pair wonderfully with other breakfast or brunch favorites to create a complete meal. A side of crispy bacon or sausage is a classic combination, offering a savory contrast to the sweet French toast. For a heartier option, you could serve them alongside a Sausage and Potato Hash or a simple Cheesy Potato Egg Scramble.
If you prefer a fruit-focused spread, a fresh fruit salad or a simple berry compote would be lovely. And for those who enjoy something sweet for brunch, consider serving these alongside other treats like muffins or even a slice of Baked Berry French Toast Casserole for a varied spread.
Your French Toast Sticks Questions Answered (FAQ)
Got questions about making the perfect French Toast Sticks? Here are some common ones and their answers:
Q: Why is my French toast still soggy in the middle?
A: This is the most common issue, and it almost always comes down to over-soaking the bread in the egg mixture. Thick bread needs some absorption, but if it sits in the custard for too long, the liquid saturates the center before it has a chance to cook through on the pan. Make sure you are doing just a quick, brief dip – only a few seconds per side – and letting the excess drip off before placing the stick in the hot pan.
Q: What kind of bread is best for French toast sticks?
A: Thick-cut bread is non-negotiable! Brioche and challah are excellent choices due to their rich flavor and sturdy texture. A good quality country loaf also works well. Using bread that is slightly stale helps significantly, as it won’t absorb the custard too quickly and helps maintain its structure.
Q: Can I make the French toast batter ahead of time?
A: Yes, absolutely! You can whisk together the eggs, milk, sugar, vanilla, and cinnamon a few hours in advance and store it in an airtight container in the refrigerator. Give it a quick whisk again before dipping the bread.
Q: Can I freeze cooked French toast sticks?
A: Yes, they freeze well! Allow them to cool completely on a wire rack. Then, lay them in a single layer on a baking sheet and freeze until solid. Once frozen, transfer them to a freezer-safe bag or container. They should last for 1-2 months. Reheat from frozen in a toaster oven or air fryer until heated through and crispy again.
Q: How do I make these dairy-free?
A: It’s easy! Simply substitute the dairy milk with your favorite unsweetened non-dairy milk, such as almond milk, soy milk, or oat milk. The recipe works beautifully with non-dairy alternatives.
Q: Can I bake French toast sticks instead of frying them?
A: Yes, you can, but the texture will be different – less of a crispy exterior, more uniformly soft. To bake, preheat your oven to around 400°F (200°C). Arrange the dipped sticks on a baking sheet lined with parchment paper or lightly greased. Bake for 10-15 minutes, flipping halfway through, or until golden brown and cooked through. The brief dip method is still key to prevent sogginess.
Enjoy Your Homemade French Toast Sticks!
There you have it! No more soggy centers, just perfectly cooked, golden French Toast Sticks ready to be devoured. This simple technique truly makes all the difference, transforming a potentially frustrating breakfast into a consistently delicious treat. They’re ideal for a relaxed weekend brunch, a fun after-school snack, or even a delightful breakfast-for-dinner option.
Give this recipe a try and experience the joy of a French toast stick cooked just right! Don’t forget to load up on your favorite toppings. We’d love to hear how yours turn out – leave a comment below and let us know! Happy cooking (and eating!).
French Toast Sticks

Ingredients
- 8 slices thick-cut bread, slightly stale is best
- 3 large eggs
- 1 cup milk (dairy or non-dairy)
- 2 tablespoons granulated sugar
- 1 teaspoon vanilla extract
- 1/2 teaspoon ground cinnamon
- Butter or oil for cooking
- Powdered sugar for dusting
- Maple syrup for serving
- Fresh strawberries for serving
Directions
- Cut each slice of bread into 2 or 3 sticks, depending on the size of the slice. Using slightly stale bread helps prevent the sticks from becoming too soggy.
- In a shallow dish, whisk together the eggs, milk, sugar, vanilla extract, and cinnamon until well combined.
- Heat a large nonstick skillet or griddle over medium heat. Add butter or oil to coat the surface.
- This is the key to avoiding sogginess: Dip each bread stick into the egg mixture for just a few seconds per side. You want the bread to absorb some of the liquid, but not become completely saturated. Lift the stick, letting any excess drip off.
- Place the dipped sticks directly onto the hot skillet. Do not overcrowd the pan; cook in batches if necessary.
- Cook for 2 to 3 minutes per side, or until each side is golden brown and the sticks feel firm to the touch, indicating they are cooked through. Adjust heat as needed to prevent burning while ensuring they cook internally.
- Remove cooked French toast sticks to a plate.
- Dust with powdered sugar and serve immediately with maple syrup and fresh strawberries.