
I spent years battling dense, heavy bread until I inherited my grandmother’s secret technique for truly light rolls. This recipe for Grandma’s Golden Butter Rolls guarantees a pillowy, airy crumb that melts in your mouth, solving the common dilemma of dry dinner bread.
It’s all about mastering the dough development and a specific, structure-locking shaping method that ensures a perfect, golden rise every time.
The “Never Dense” Promise: Why This Butter Roll Recipe Wins
The biggest frustration with homemade rolls is a heavy, brick-like interior resulting from poor gluten development or inaccurate measurements. Our method bypasses this by focusing intensely on precise hydration and proper proofing environment, resulting in unparalleled softness.
This specific technique transforms simple ingredients into rolls with a rich, complex buttery flavor and that irresistible cloud-like texture many traditional recipes often miss.
The Secret to Achieving a Truly Pillowy, Airy Crumb
The key to a high, airy rise is generating maximum surface tension during the shaping process. By aggressively stretching and pinching the rolls into tight balls, we create a taut ‘skin’ on the exterior of the dough.
This powerful external structure forces the roll to expand strictly upwards during the second rise and baking, preventing it from spreading outward and becoming flat or dense.
Comparing This Recipe to Traditional Dinner Rolls
Unlike complex sourdough or many enriched, overnight yeasted breads, this recipe minimizes active labor while maximizing flavor development. The exceptional results are achieved efficiently without compromising a delicate, rich interior.
We focus on ensuring the two rises-known as bulk fermentation and pan proofing-are optimally warm and short, making these golden butter rolls an achievable addition to even a busy weeknight meal.
Inside the Gold Standard: Key Ingredients and Their Functions
The Foundation: Flour, Gluten, and Ideal Measurement
All-purpose flour provides the perfect protein level (typically 10-12%) to develop a strong, elastic gluten network without making the final product tough or chewy.
Always use the spoon and level method to measure flour; scooping directly compacts it, easily adding half a cup too much, which is the fastest way to guarantee dry, dense rolls.
Butter and Milk: Ensuring Optimal Richness and Moisture
We use unsalted butter because it gives us absolute control over the total salt content, which is vital for yeast performance. Half of the butter is used within the dough for tenderness, and the other half is reserved for the crucial golden finish.
Whole milk provides essential fat for richness and superior flavor, and its liquid content is required for hydrating the flour and activating the yeast simultaneously.
The Catalyst: Why Yeast Type and Temperature Control Are Non-Negotiable
We rely on active dry yeast, which requires blooming in warm liquid before mixing with the dough, acting as a foolproof confirmation of its viability.
The temperature range of 105°F to 115°F is critical for success. Below 105°F, the yeast is sluggish, causing an agonizingly slow rise; above 120°F, the yeast dies, leading to total failure and dense bread.
Setting Up for Success: Essential Tools for Dough Work
Having the right equipment ensures consistency and simplifies the process of making these delicate rolls, ensuring every step is executed precisely.
- Digital Thermometer: Absolutely essential for ensuring the milk temperature is safe and ideal for the yeast’s activation.
- Stand Mixer with Dough Hook: Highly recommended for consistent, effortless kneading and ideal gluten development required for a pillowy texture.
- Kitchen Scale: Useful for precise ingredient measuring (especially flour) and dividing the dough into 12 perfectly equal portions for uniform baking.
The Kneading Process: Stand Mixer vs. Hand Mixing
A stand mixer makes achieving the proper gluten structure simple, requiring about 6 to 8 minutes at medium-low speed with the dough hook attachment.
If kneading by hand, the process will take slightly longer-closer to 10 to 12 minutes of vigorous, consistent work-to pass the windowpane test and achieve the necessary elasticity.
Choosing the Right Baking Pan for Even Browning
A standard 9×13 inch light-colored metal baking pan is ideal for maximum heat conduction and even cooking. Light colors prevent the bottoms from darkening too quickly.
If you must use glass, reduce the oven temperature by 25°F, as glass retains and transfers heat more aggressively than metal, potentially causing the edges of the rolls to dry out.
Baking the Best: A Detailed Guide to Grandma’s Golden Butter Rolls
Phase 1: Perfecting the Yeast Slurry and Wet Ingredients
-
Activate Yeast Precisely:
Gently warm the milk and 1/4 cup of the butter together until the mixture is within the crucial 105°F-115°F window. This warmth activates the yeast, while the sugar feeds it, creating a foamy ‘fluffiness foundation’ within 5-10 minutes.
-
Building the Initial Dough:
In your large mixing bowl, whisk the egg and salt thoroughly until combined. Pour in the activated yeast mixture, ensuring the salt is evenly distributed before the bulk of the flour is added.
Phase 2: Mastering the Windowpane Test for Ideal Kneading
-
Knead Until Elastic:
Gradually add the flour, starting with 3 cups, mixing until a shaggy mass forms. Knead for the full 6-8 minutes recommended, only adding extra flour sparingly if the dough aggressively sticks to the bowl.
The finished dough should be smooth, velvety, and pull away cleanly from the sides, being slightly tacky but manageable.
-
Testing for Readiness (The Windowpane Check):
Tear off a golf-ball sized piece of dough and stretch it gently between your fingers. If you can stretch it thin enough to see light through it without tearing-like a thin membrane-the gluten is perfectly developed and ready for the first rise.
Phase 3: The First Proof and Release
-
The First Rise (Bulk Fermentation):
Place the dough in a lightly oiled bowl, turning to coat, cover it securely, and find a warm, draft-free spot. Visual doubling in size is the goal, typically taking 60 to 90 minutes, depending entirely on the ambient temperature.
-
Gently Punch Down:
Once doubled, gently deflate the dough to release the fermentation gases. This critical step redistributes the yeast cells, evens out the internal temperature, and prevents overly large, inconsistent air pockets in the final product.
The Ultimate Fluffiness Secret: Shaping Grandma’s Golden Butter Rolls
Dividing and Pre-Shaping for Consistent Results
After deflating the dough, turn it out onto a lightly floured surface and divide it into 12 equal pieces. For maximum consistency and uniform baking, use a kitchen scale to ensure each portion weighs exactly the same amount.
Even slight weight variations can lead to some rolls being baked to the perfect golden color while others remain doughy or become over-baked.
The Taut Seam Technique: How to Guarantee a High Dome
Take one portion and flatten it slightly. Pull the edges of the dough down and inward toward the center point, rotating the ball as you go to build powerful surface tension on the top.
Pinch the bottom seam tightly to seal the structure. This tension locks the roll in place, guaranteeing that it holds its perfect dome shape and rises vertically instead of spreading outward like an inconsistent patty.
The Second Rise and Oven Preparation
-
Arrangement and Second Proof:
Arrange the shaped Grandma’s Golden Butter Rolls tightly in the greased 9×13 pan, ensuring they gently touch. This arrangement provides mutual support during the second proofing (the pan-proof) and helps create the soft, pull-apart sides.
Cover and let them rise until they look visibly puffy, typically taking 30-45 minutes. They do not need to fully double again at this stage.
-
Preheat and Bake:
Ensure the oven is fully preheated to 375°F before placing the rolls inside. Baking time is 18 to 22 minutes, or until the tops achieve a deep, rich golden brown color.
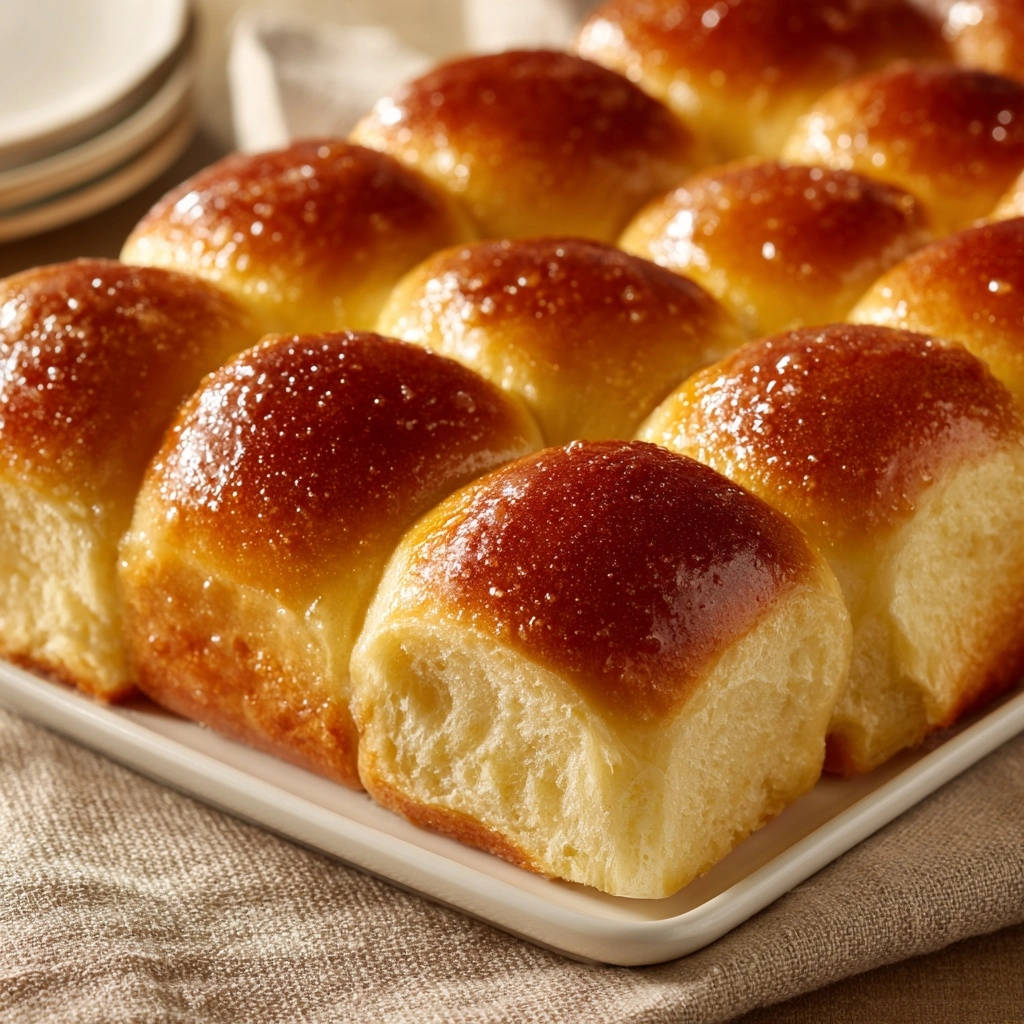
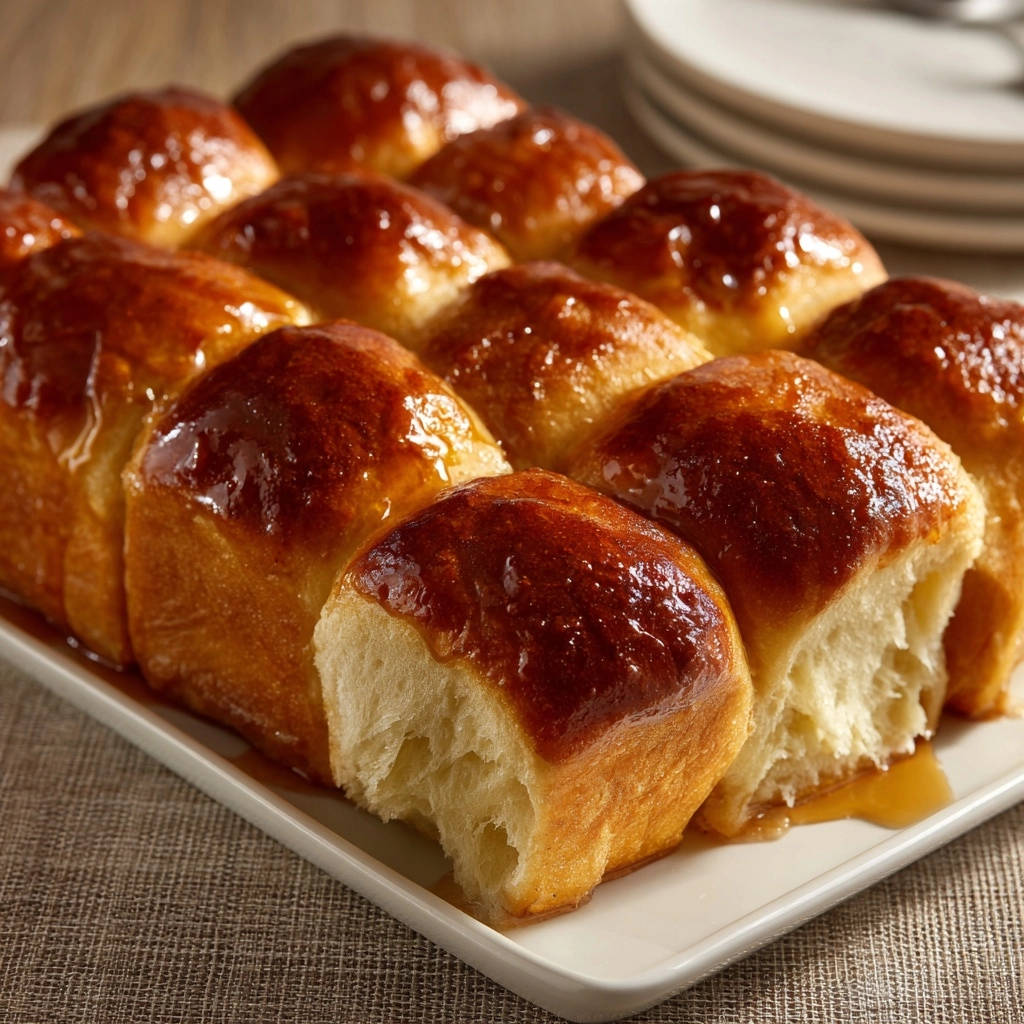
The Irresistible Finish: Glazing and Serving Warm
The final touch is absolutely non-negotiable for achieving that signature flavor and shine. Immediately upon removing the hot rolls from the oven, brush them liberally with the remaining 4 tablespoons of melted unsalted butter.
This critical step locks in the internal moisture and creates the glossy, tender crust that defines these remarkable Grandma’s Golden Butter Rolls. Serve immediately while they are still warm.
Baking Confidence: Troubleshooting and Pro Tips
Problem: My Rolls Didn’t Rise or Are Too Dense
The issue is almost certainly dead or sluggish yeast. Check your water/milk temperature next time-it was likely too hot (killed the yeast) or too cold (failed to activate it fully).
Insufficient kneading is another culprit; if the dough failed the windowpane test, the essential gluten structure wasn’t strong enough to trap the gas and hold the shape.
Problem: The Rolls Spread Out and Lost Their Shape
This is usually due to weak surface tension. Ensure you are pinching the bottom seam aggressively tight after shaping to completely seal and secure the roll’s structure.
Alternatively, you may have used too little flour relative to your liquid, resulting in an overly wet, slack dough that couldn’t hold its form during the proofing stages.
Pro Tip: Adjusting the Recipe for High Altitude Baking
At high altitudes, gas expands faster, often leading to over-proofed dough before the baking starts. Slightly reduce the yeast by 1/4 teaspoon and slightly decrease the sugar content to slow fermentation.
You may also need to increase the liquid (milk) by a tablespoon or two, as drier mountain air causes flour to absorb more moisture rapidly.
Pro Tip: When to Use Sifted Flour vs. Regular Flour
Sifting the flour before measuring and adding it results in a noticeably lighter, more tender product, as it introduces more air and prevents compacting.
While not strictly necessary for this recipe’s success, sifting is highly recommended if you are seeking the absolute maximum pillowy texture in your finished dinner rolls.
Planning Ahead: Storage, Freezing, and Serving Suggestions
The Best Way to Store Leftover Rolls
Store fully cooled rolls in an airtight container or zip-top bag at room temperature. They will retain their exceptional freshness and soft texture for 2 to 3 days.
Freezing Rolls: Baked vs. Unbaked Options
To freeze fully baked rolls, wrap them tightly once cooled and place in the freezer for up to 3 months. Reheat directly from frozen, loosely covered in foil, in a 300°F oven until warmed through.
To freeze unbaked dough, complete the first rise, shape the rolls, place them on a baking sheet, and freeze until solid. Transfer the frozen, shaped rolls to a heavy-duty freezer bag, then thaw overnight in the fridge before the second proof and baking.
Make-Ahead Strategy: Preparing Dough Overnight (Cold Proof)
After kneading and a brief first rise (about 30 minutes at room temp), place the dough in an oiled, covered bowl in the refrigerator for 8 to 12 hours.
The cold proof slows the fermentation significantly, developing richer, more complex flavor. Let the dough warm on the counter for 30 minutes before shaping and beginning the final second rise.
Serving Pairings: What Complements Grandma’s Golden Butter Rolls
These fluffy golden butter rolls are the ultimate accompaniment to hearty savory dishes like holiday roasts, beef stew, creamy chicken pot pie, or slow-cooked ribs.
For sweet applications, they are incredible simply split and spread with homemade strawberry jam, lemon curd, or cinnamon-sugar honey butter.
Quick Answers: Common Questions About Butter Rolls
Can I substitute vegan butter or alternative milk?
Yes, you can successfully substitute quality vegan stick butter 1:1 for the unsalted butter. For the liquid, use full-fat oat milk or soy milk in place of whole milk for a similar richness and hydration level.
What if I don’t have a kitchen thermometer for the yeast?
If you lack a thermometer, rely on the “comfort test” to gauge the milk temperature. The mixture should feel notably warm but never hot-it should feel like a comfortable baby’s bath water when you briefly dip your finger in it.
How long are these rolls good for, and how do I reheat them?
The rolls are best enjoyed within two days of baking. To properly reheat, wrap them loosely in aluminum foil and place them in a 300°F oven for about 10 minutes, or microwave individual rolls for 10-15 seconds.
Bring Grandma’s Golden Butter Rolls Tradition Home
This recipe for Grandma’s Golden Butter Rolls is more than just a standard baked good; it’s a commitment to superior texture and truly memorable flavor.
By implementing the crucial temperature checks and the structural surface tension shaping method, you will finally achieve the pillowy soft rolls you’ve always dreamed of making.
Go ahead and try this golden standard; I promise your dinner guests will ask for the recipe immediately, guaranteeing your baking confidence soars.

Grandma’s Golden Butter Rolls
Course: BreadCuisine: American CuisineDifficulty: easy12
rolls25
minutes20
minutes120
minutesAmerican Cuisine
Ingredients
1 cup whole milk
1/4 cup granulated sugar
2 1/4 teaspoons active dry yeast (one packet)
1/2 cup (1 stick) unsalted butter, divided
1 large egg
1 teaspoon kosher salt
3 to 3 1/2 cups all-purpose flour
Directions
- Activate the Yeast (The Fluffiness Foundation): In a small saucepan, gently warm the milk and 1/4 cup of the butter together until the butter is mostly melted and the liquid is warm to the touch (about 105 degrees F to 115 degrees F). This precise temperature is crucial to activate the yeast fully without killing it, which is the secret to a high, fluffy rise. Stir in the sugar and sprinkle the yeast over the mixture. Let it sit for 5 to 10 minutes until foamy.
- Build the Dough: In a large mixing bowl or stand mixer, whisk the egg and salt. Pour in the yeast mixture. Gradually add the flour, starting with 3 cups, mixing until a shaggy dough forms.
- Knead for Texture: Turn the dough out onto a lightly floured surface or attach the dough hook. Knead for 6 to 8 minutes until the dough is smooth, elastic, and passes the windowpane test (a small piece can be stretched thin enough to see light through it without tearing). If the dough is sticky, add the remaining flour 1 tablespoon at a time. The dough should be slightly tacky but not stick to your hands.
- First Rise: Lightly grease a clean bowl. Place the dough ball in the bowl, turning to coat. Cover with plastic wrap and let rise in a warm, draft-free spot until doubled in size, about 60 to 90 minutes.
- Shape and Secure the Rise: Gently punch down the dough to release the air. Turn it out and divide it into 12 equal pieces. Here is the key step for guaranteed fluffiness: Take each piece and stretch the edges down and under, pinching the bottom seam tightly to create a smooth, taut, round ball. This technique creates surface tension, ensuring the rolls hold their perfect dome shape and rise high in the oven without spreading or becoming dense.
- Second Rise and Bake: Arrange the rolls tightly in a lightly greased 9×13 inch baking pan. Cover and let rise for a second time until puffy (about 30 to 45 minutes). Preheat oven to 375 degrees F. Bake for 18 to 22 minutes, or until the tops are deeply golden brown.
- The Golden Finish: While the rolls are still hot, brush them immediately with the remaining 4 tablespoons of melted butter. This creates that irresistible glossy finish, locks in moisture, and adds that perfect buttery flavor depth. Serve warm.
Notes
- Ensure the dough passes the windowpane test. The key to the guaranteed high rise is creating tight surface tension by pinching the seam underneath during shaping (Step 5).


