
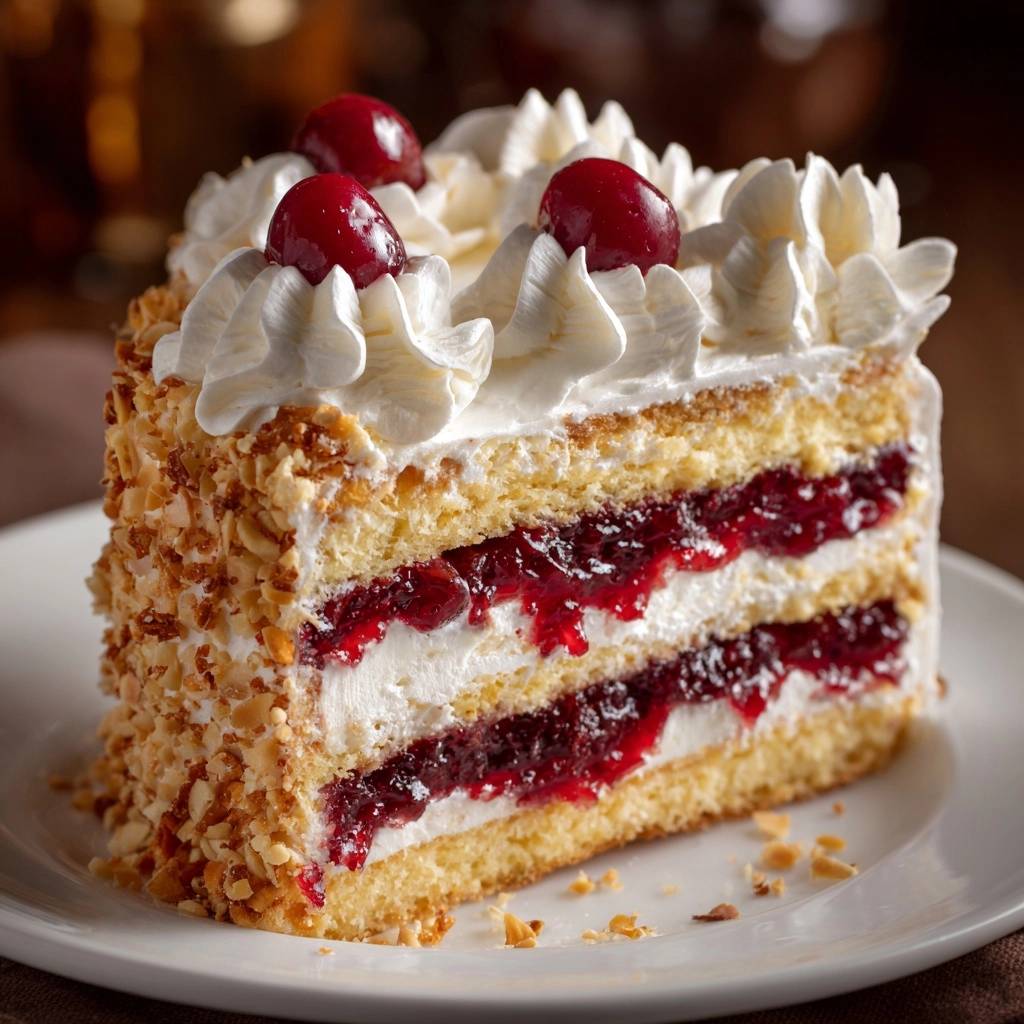
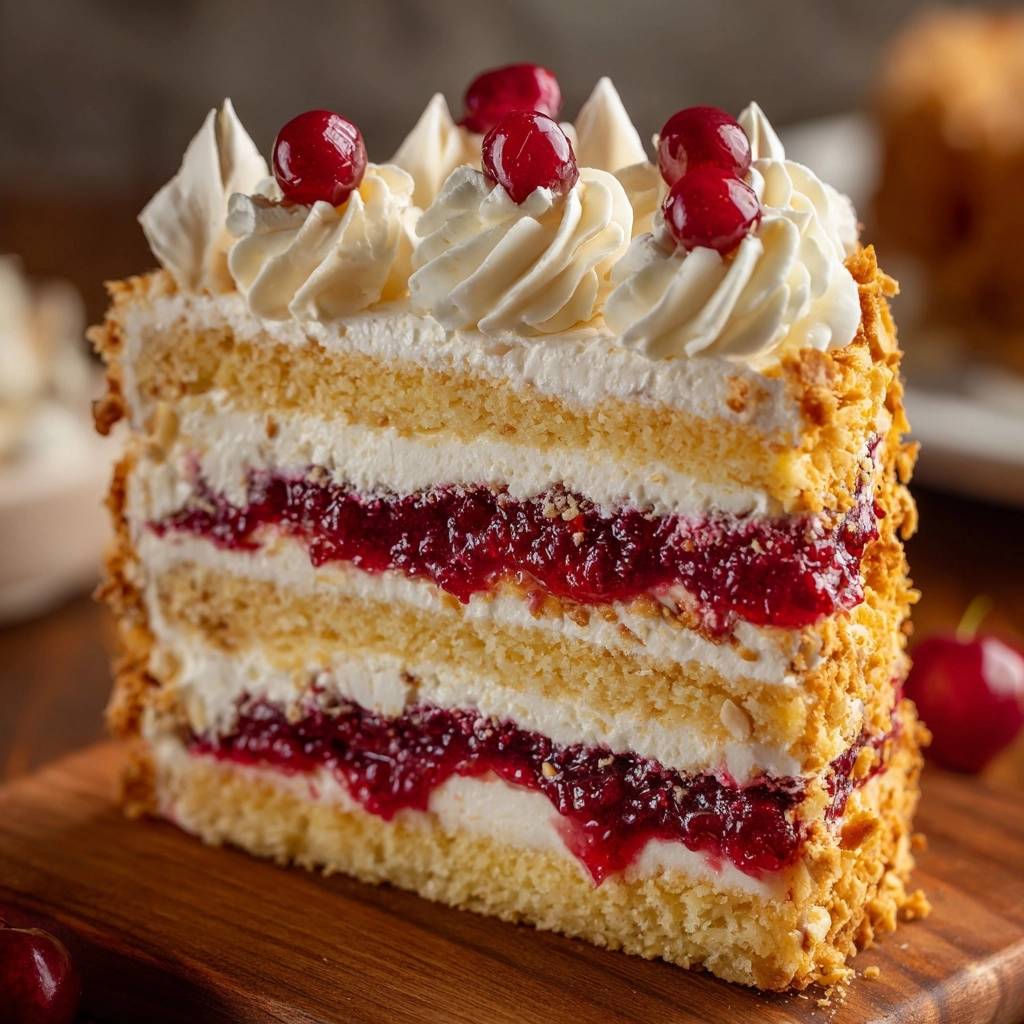
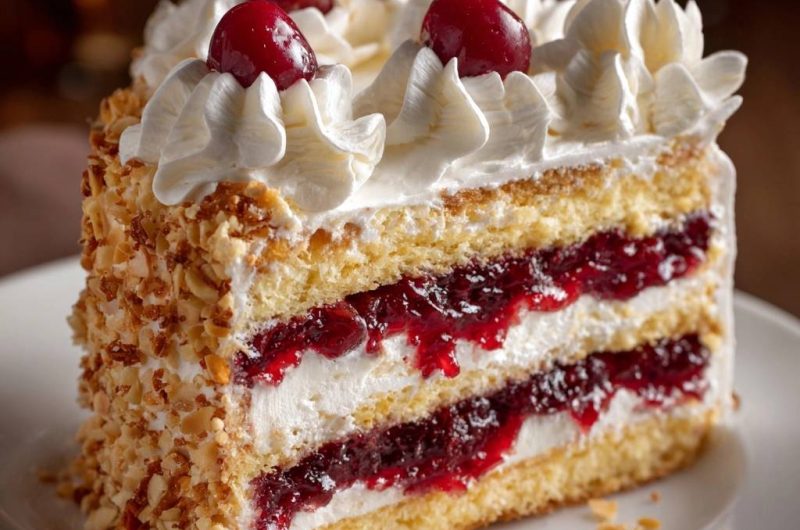
Ever bite into a stunning torte only to watch those hazelnuts tumble off the sides like they’re fleeing a sinking ship? This hazelnut cherry torte recipe ends that nightmare forever. You’ll get crunchy nuts that stick tight, fluffy vanilla cake layers, and bursts of tart cherry jam all wrapped in billowy whipped cream. It’s a showstopper that slices clean every time.
So why does this version nail it? The chill-and-press technique locks everything in place, creating that perfect crunch-against-cream contrast. Imagine the toasted hazelnut snap giving way to soft cake and juicy cherries. Plus, the flavors balance just right, tart fruit cutting through sweet cream.
Here’s the pro tip that seals the deal: after your crumb coat, chill for a full 30 minutes. That firms up the cream so the nuts embed without a fight. No more messy slides, just flawless hazelnut cherry torte slices that wow everyone.
Core Components for Hazelnut Cherry Torte
Cake Layers: Flour to Milk Ratios
You start with 1 1/2 cups all-purpose flour, 1 1/2 tsp baking powder, and 1/4 tsp salt. That combo gives your hazelnut cherry torte layers the lift they need without toughness. The baking powder reacts with the milk’s subtle acidity for even fluffiness.
Softened butter and sugar cream together to trap air bubbles. Then 2 large eggs add structure, while 1/2 cup whole milk keeps things tender. Skip low-fat milk here; it won’t emulsify as well, leading to dry cake. Room-temp ingredients blend smooth, so batter rises evenly.
Cherry Preserves: Tart Filling Selection
Grab 2 cups cherry preserves for the filling. They spread easy and pack pectin for hold, unlike fresh cherries that weep juice and soggy your layers. Look for thick, tart ones with real fruit chunks to contrast the sweet cream in your hazelnut cherry torte.
However, if yours is too smooth, it’ll still work fine. The tartness cuts richness perfectly. Don’t boil them down; they’re ready to layer as is.
Whipped Cream: Peak Stability Secrets
Chill your 3 cups heavy whipping cream first, then whip with 1/2 cup powdered sugar and 1 tsp vanilla to stiff peaks. Cold cream holds air better, preventing separation. Reserve 1 cup for those top rosettes.
In addition, the sugar stabilizes fat molecules. Whip just until peaks stand firm; overdo it and you’ll get butter. This cream layers thick without sliding in your hazelnut cherry torte.
Hazelnut Coating: Toasting and Chopping
Toast 2 cups hazelnuts, then chop fine. Roasting deepens their earthy flavor and releases oils for better adhesion. Fine bits press into cream without gaps.
Top with 6 drained maraschino cherries for pop. This fixes the classic slide-off problem in hazelnut cherry tortes. Therefore, every slice shows off that nutty armor.
Science of Fluffy Hazelnut Cherry Torte Layers
Emulsification in Butter-Sugar Creaming
Beat 1/2 cup softened butter and 1 cup sugar for 3 full minutes. This creams in air pockets that expand in the oven for fluff. Eggs emulsify it all, binding fat and water.
Baking powder releases gas when it hits the batter’s mild acidity from milk. Therefore, you get tall, even layers that stack steady. Skip this beat time, and your hazelnut cherry torte cakes turn dense.
Pro tip: alternate dry and wet adds gently. Overmix, and gluten toughens the crumb.
Cherry Jam’s Pectin and Whipped Cream Interaction
Cherry preserves’ pectin gels slightly, blocking excess moisture into the cake. Whipped cream’s fats buffer the fruit acids, so no weeping occurs. Assemble at cool room temp for best hold.
Chill steps firm everything up. This keeps your hazelnut cherry torte textured right, fluffy not mushy.
Chill-Press Physics for Nut Adhesion
The 30-minute crumb coat chill sets a firm cream base. Press nuts then, and surface tension grips them tight. A 1-2 hour final chill hardens the bond permanently.
Light pressure embeds without crushing cream. Therefore, no slides even on warm days. Science makes this hazelnut cherry torte foolproof.
Essential Tools for Hazelnut Cherry Torte Success
9-Inch Pans and Parchment Precision
Grease, flour, and line three 9-inch round pans with parchment. This ensures even bake and clean release. No parchment? Cakes stick and tear.
Springforms work too, but rounds stack flatter. Even layers mean stable hazelnut cherry torte height.
Whisk, Beater, and Piping Bags
Whisk dries for no lumps. A stand mixer beats butter fluffy fast. Chill the bowl for whipped cream stability.
Disposable piping bags make neat rosettes easy. Reusables need washing, but both pipe clean designs on your hazelnut cherry torte.
Layering Hazelnut Cherry Torte Step-by-Step
Batter Prep and Even Pan Division
Preheat to 350F. Whisk flour mix. Beat butter and sugar fluffy, add eggs one by one with vanilla. Alternate flour and milk, starting and ending with dries.
Weigh batter for equal pans; eyeballing leads to uneven layers. Smooth tops gently. This sets up perfect hazelnut cherry torte stacks.
Baking and Full Cooling Process
Bake 20-25 minutes till toothpick clean. Cool in pans 10 minutes, then rack invert. Level domes with serrated knife for flat stacking.
Full cool prevents crumbling. Therefore, your hazelnut cherry torte holds firm.
Assembly: Preserves, Cream, Crumb Coat
Place first layer on plate. Spread 2/3 cup preserves, then 1 cup whipped cream. Repeat for second. Top with third.
Thin crumb coat top and sides traps bits. Chill 30 minutes to set. This base grips nuts in hazelnut cherry torte.
No-Fail Side Nut Press Technique
Spread thin cream on sides only. Grab handfuls of chopped hazelnuts. Press gently while rotating cake, filling gaps top to bottom.
Light pats embed them without squishing cream. Chill 1-2 hours; cold firms the grip. Slice test proves nuts stay put on your hazelnut cherry torte.
Pro tip: work in cool kitchen. Warm cream slips.
Topping with Rosettes and Cherries
Pipe reserved cream into rosettes around top edge. Center a stem-on maraschino cherry on each. Serve chilled for clean cuts.
Fridge stores it 3 days. Simple finish elevates the whole hazelnut cherry torte.
Avoiding Pitfalls in Hazelnut Cherry Torte
Preventing Cake Sogginess from Cherries
Stick to preserves; fresh fruit releases too much water. Chill after each layer if needed. Over-whipped cream curdles, so stop at stiff peaks.
Fix lumps by folding gently. Keeps hazelnut cherry torte crisp.
Fixing Loose or Uneven Hazelnut Coating
Warm cream or coarse chops cause slips. Reapply thin cream, chill extra, re-press. Fine-toasted nuts stick best.
Patch gaps post-chill. Your hazelnut cherry torte looks pro.
Slicing Clean Without Nut Avalanche
Chill fully. Use sharp knife dipped hot, wipe between cuts. Serrated works for cake base.
Slow saw prevents pulls. Perfect slices every time.
Flavor Twists on Hazelnut Cherry Torte
Nut Swaps: Almonds or Pistachios
Toasted almonds bring mild crunch; pistachios add green pop. Chop fine for stick. They pair well with cherry tartness.
Taste as you press. Keeps hazelnut cherry torte vibe alive.
Fruit Variations: Berry or Apricot Filling
Raspberry preserves amp tartness; apricot softens sweet. Bump cream sugar if needed. Layers stay stable.
Stick close to original for best hazelnut cherry torte balance.
Perfect Pairings for Hazelnut Cherry Torte
Beverage Matches: Coffee to Tea
Bold espresso slices through cream richness. Herbal tea lifts cherry notes. Both refresh the palate.
Light Sides: Fruits and Creams
Fresh berries add zing. Yogurt parfaits keep it light. No heavy stuff needed.
Hazelnut Cherry Torte FAQ
Can I Make Hazelnut Cherry Torte Gluten-Free?
Yes, swap all-purpose flour for a 1:1 gluten-free blend. Add 1/2 tsp xanthan gum if your mix lacks it for structure. Bake 22-28 minutes; test doneness early since GF bakes faster. Layers hold up fine for stacking and nut coating.
How Long Does Hazelnut Cherry Torte Last?
Store in fridge up to 3 days in an airtight container; cover loosely after day one to avoid soggy nuts. It freezes well assembled up to 1 month, but remove cherries first or they stain. Thaw overnight in fridge, then re-chill 2 hours before slicing.
Why Do Nuts Fall Off My Torte?
Usually from skipping chills or using warm cream, which won’t grip. Fix with the crumb coat chill, thin side cream, gentle press of fine-chopped toasted nuts, and 1-2 hour set. Cold firms surface tension so they lock in permanently. Always work chilled for no-slide hazelnut cherry torte.
Scaling for Smaller Hazelnut Cherry Torte?
Halve recipe for two 6-inch pans; bake 22-27 minutes. Yields 6-8 servings versus original 12. Keep chill times same for adhesion. Perfect for small gatherings.
Dairy-Free Options for This Torte?
Use coconut cream for whipping (chill cans overnight, skim solids). Swap butter for vegan stick and milk for oat. Add 1 tsp cornstarch to cream for peaks. Flavor shifts nuttier, but cherries balance it. Cakes tenderize well.
Hazelnut Cherry Torte
Course: DessertCuisine: AmericanDifficulty: easy12
servings45
minutes25
minutes180
Minutes550
kcalAmerican
Ingredients
Cake:
1 1/2 cups all-purpose flour
1 1/2 tsp baking powder
1/4 tsp salt
1/2 cup unsalted butter, softened
1 cup granulated sugar
2 large eggs
1 tsp vanilla extract
1/2 cup whole milk
Filling and Frosting:
2 cups cherry preserves
3 cups heavy whipping cream, cold
1/2 cup powdered sugar
1 tsp vanilla extract
Coating and Topping:
2 cups hazelnuts, toasted and finely chopped
6 maraschino cherries with stems, drained
Directions
- Preheat oven to 350 degrees F. Grease and flour three 9-inch round cake pans. Line bottoms with parchment.
- Whisk flour, baking powder, and salt. In another bowl, beat butter and sugar until fluffy, about 3 minutes. Add eggs one at a time, then vanilla. Alternate adding flour mixture and milk, starting and ending with flour. Divide batter evenly into pans.
- Bake 20-25 minutes until toothpick comes out clean. Cool in pans 10 minutes, then invert onto racks to cool fully.
- Whip cream, powdered sugar, and vanilla to stiff peaks. Set aside 1 cup for top decoration.
- Level cake layers if needed. Place one layer on serving plate. Spread with 2/3 cup cherry preserves, then 1 cup whipped cream. Repeat with second layer. Top with third layer. Spread thin layer of whipped cream over top and sides (crumb coat). Chill 30 minutes.
- Here’s the no-fail nut trick: Spread a generous thin layer of whipped cream over sides only (keep top mostly clean). Gently press handfuls of chopped hazelnuts into sides, rotating cake and filling gaps. Press lightly to embed without crushing. Chill 1-2 hours or until firm, locking nuts in place. No more falling off!
- Pipe reserved whipped cream rosettes on top. Place cherries on rosettes. Slice and serve chilled. Store in fridge up to 3 days.
Notes
- Chill the cake after applying the crumb coat and nut coating to ensure the hazelnuts stay in place. Store in fridge up to 3 days.


