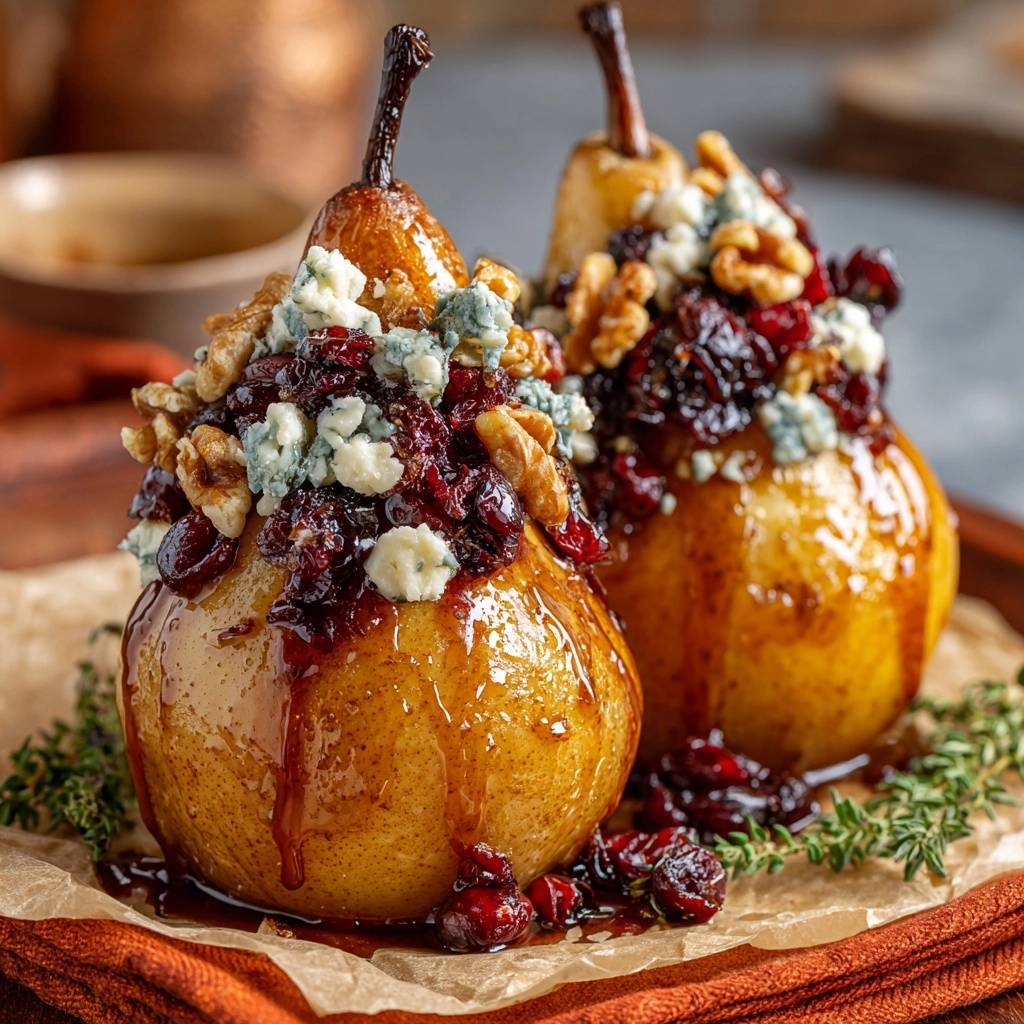
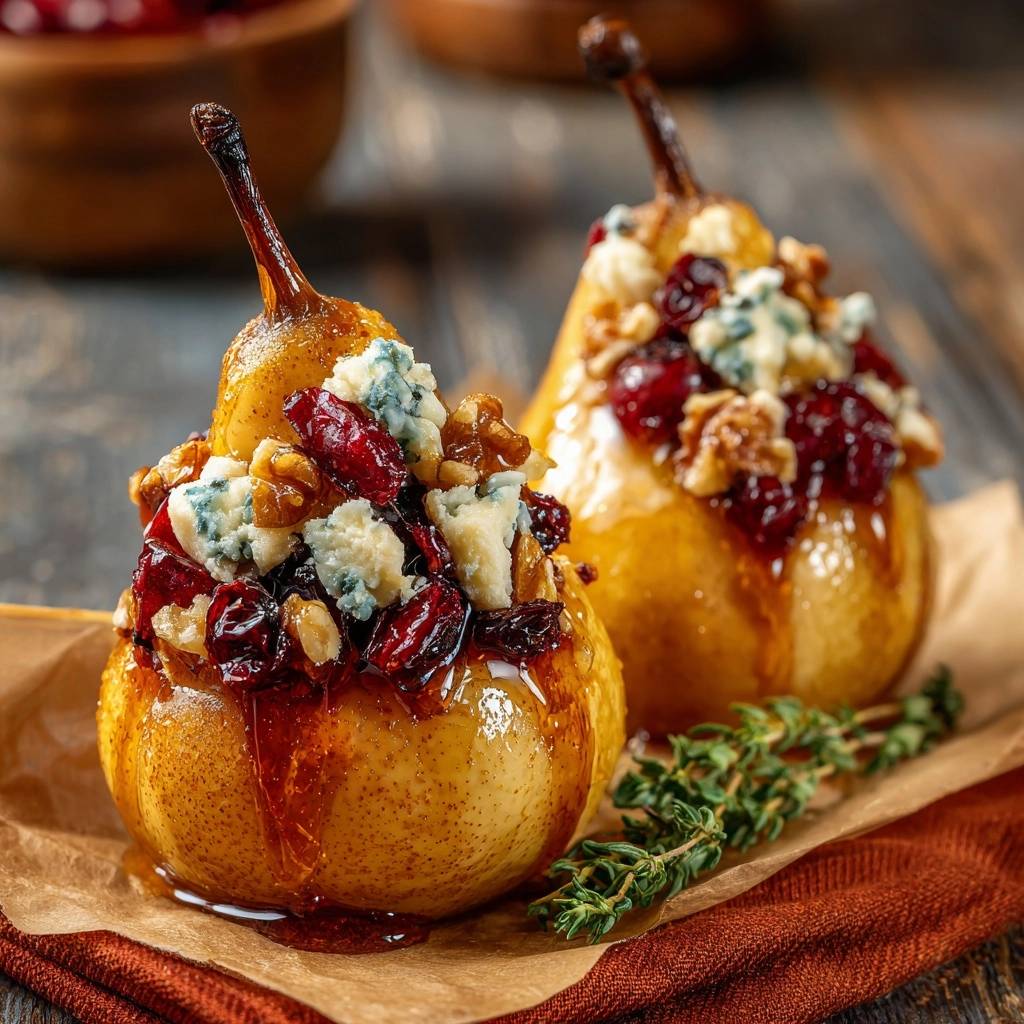
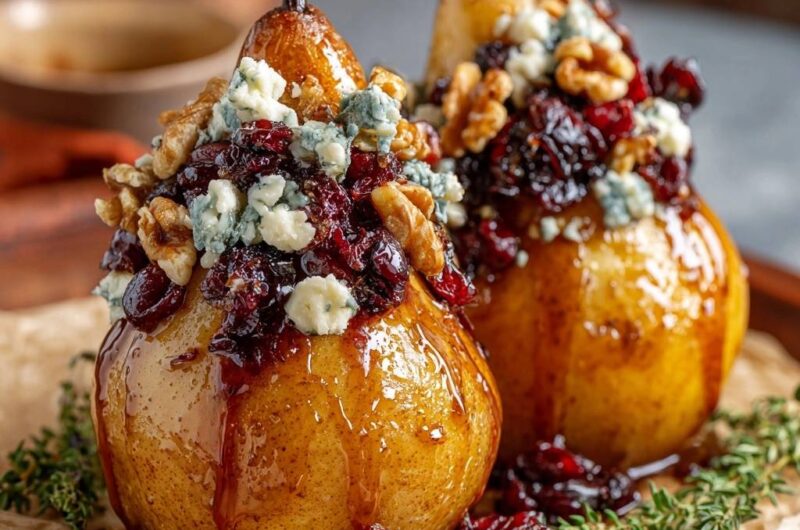
Imagine a dessert that blurs the line between sweet indulgence and savory sophistication. The first bite offers the crunch of honey-glazed walnuts, followed by the sharp, creamy tang of melted Gorgonzola, all resting on a warm, succulent pear. It’s a dish that feels like it belongs in a high-end bistro, yet it’s surprisingly simple to master at home.
Most people struggle with roasted fruit because it often collapses into a sad, watery puddle. We’ve all been there—expecting an elegant poached pear and getting something that looks like baby food. The secret to avoiding this mess lies in the “Upright Roast” method, which preserves the fruit’s natural shape while concentrating its sugars.
The real trick to success is using high heat and leaving the pear entirely intact. By roasting at 400°F and keeping the core inside, you create a structural vessel that stays firm and juicy. This high-temperature shock sears the exterior, ensuring the pear holds its elegant shape even as the cheese melts into every crevice.
The Science of the Upright Roast Method
Roasting fruit vertically changes the way heat interacts with the fibers. When you slice a pear in half and remove the core, you expose the delicate internal cells to direct heat, causing them to dump moisture and go mushy. By standing the pear upright and keeping it whole, the heat must penetrate the skin and the dense outer flesh first.
The core acts as a thermal stabilizer, supporting the “shoulders” of the fruit as they soften. This method ensures the pear remains a sturdy base for your toppings. The skin serves as a natural exoskeleton, holding the juices inside so the fruit steams in its own nectar while the outside caramelizes beautifully.
Why High Heat Prevents Fruit Breakdown
You might think a low and slow approach is better for fruit, but that’s a recipe for a texture disaster. At lower temperatures, the pectin—the “glue” that holds plant cells together—slowly dissolves, leading to a grainy, soft texture. High heat at 400°F works differently by triggering the Maillard reaction on the skin almost immediately.
This intense heat creates a caramelized exterior before the center has a chance to lose its integrity. It’s the same principle as searing a steak; you want a quick transformation on the surface while keeping the interior exactly where you want it. The result is a pear that is tender enough to cut with a spoon but firm enough to stand tall on the plate.
Selecting the Best Pears for Roasting
Not all pears are created equal when it comes to the oven. Bosc pears are the undisputed champions of roasting because of their dense, woodsy flesh and elegant, long necks. They hold their shape better than almost any other variety. Anjou pears are a decent runner-up, but they tend to be a bit juicier and softer, which can be tricky for upright roasting.
Avoid Bartlett pears for this specific recipe. While they’re delicious for eating raw, their high water content causes them to disintegrate the moment they hit high heat. When shopping, look for pears that are firm but yield just a tiny bit when you press near the stem. If the body of the pear feels soft, it’s already too ripe for roasting.
Essential Components for Honey Roasted Pears
Quality ingredients make or break a simple dish like this. Use raw, unfiltered honey if you can find it, as the deeper floral notes stand up better to the pungent cheese. The walnuts provide a necessary earthy crunch, but they need to be fresh; old walnuts can turn bitter when roasted, which ruins the balance of the honey.
Dried cranberries add a chewy, tart pop that cuts through the richness of the butter and cheese. I always recommend using unsalted butter for the walnut coating. Since Gorgonzola is naturally quite salty, using unsalted butter allows you to control the seasoning perfectly without the dish becoming overwhelming.
Choosing Your Gorgonzola: Dolce vs. Piccante
Gorgonzola comes in two main styles, and your choice will change the entire vibe of the dish. Gorgonzola Dolce is younger, sweeter, and much creamier. It melts into a luxurious sauce that pairs beautifully with the honey. If you’re serving this to guests who are wary of blue cheese, Dolce is the way to go.
Gorgonzola Piccante, on the other hand, is aged longer and has a much sharper, more assertive “bite.” It provides a stunning contrast to the sugary pears and honey. Whichever you choose, look for a brand that uses traditional microbial rennet if you’re following a diet that excludes animal-derived enzymes.
The Role of Balsamic Glaze and Honey
Honey is the primary sweetener here, and its viscosity helps the walnuts and cranberries stick to the pear’s curved surface. Clover honey is a great neutral choice, but wildflower honey adds a lovely complexity. The honey also helps the pear skin brown and develop those sought-after caramelized edges.
The balsamic glaze is the finishing touch that ties everything together. Don’t swap this for regular balsamic vinegar, which is too thin and acidic. The glaze is a reduction, meaning it’s thick, syrupy, and sweet. It clings to the fruit and cheese rather than running off and pooling at the bottom of the dish.
Step-by-Step: Preparing the Fruit Vessel
To get your pears to stand like soldiers, you need to perform a “sliver cut.” Take a sharp knife and slice a very thin, flat piece off the bottom of the pear. Be careful not to cut too deep into the core, or the juices will leak out during roasting. You just want a stable, flat base.
Keep the stems on! They aren’t just for looks; they actually help conduct a bit of heat into the neck of the pear. When mixing your walnut and cranberry topping, make sure every piece is thoroughly coated in the melted butter and honey. This mixture acts as a delicious “glue” that keeps the toppings from sliding off the fruit’s shoulders.
The Two-Stage Roasting Process
This recipe uses a two-stage approach to ensure every element is cooked perfectly. The first 15 minutes is the “Pre-Roast.” During this time, the pear begins to soften and the honey starts to bubble and soak into the skin. If you added the cheese now, it would overcook and separate into an oily mess before the pear was ready.
The second stage is the “Finishing Roast.” This is when you pile on the walnut mixture and the Gorgonzola. This 8 to 10-minute window is just enough time to toast the nuts and melt the cheese into a gooey, golden blanket. By the time the cheese is bubbling, the pear has reached that perfect “knife-tender” state.
Achieving the Perfect Walnut Toasted Texture
Watch the walnuts closely during the final minutes of roasting. You’re looking for them to turn a deep golden brown and release a rich, nutty aroma. The honey and butter coating protects them from the 400°F heat, allowing them to crisp up without burning.
If you notice the nuts browning too quickly, you can tent a small piece of foil over the tops of the pears. However, the moisture from the fruit usually provides enough of a buffer to prevent scorching. The goal is a satisfying crunch that contrasts with the soft, warm fruit underneath.
Flavor Variations and Ingredient Swaps
If you aren’t a fan of walnuts, pecans make an excellent substitute with their naturally buttery flavor. For a different fruit element, try swapping the dried cranberries for chopped dried figs or even golden raisins. Both offer a different kind of sweetness that pairs well with blue cheese.
For those who prefer to avoid honey, maple syrup is a fantastic alternative. It has a lower viscosity, so you might need to use a little less, but the earthy maple flavor is incredible with roasted pears. You can also experiment with different herbs; while thyme is classic, a tiny bit of chopped rosemary can add a sophisticated, savory edge.
What to Serve with Honey Roasted Pears
These pears are incredibly versatile. They work beautifully as a standalone dessert, but they also shine as part of a savory course. Try serving them alongside a bed of wild arugula or radicchio. The bitterness of the greens balances the sweetness of the honey and the richness of the Gorgonzola perfectly.
If you want to get really indulgent, serve them with a thick slice of toasted sourdough bread to soak up all the extra honey and melted cheese. They also make a stunning side dish for roasted chicken or a hearty grain salad. The key is to pair them with textures that are either very crunchy or very crisp to highlight the pear’s tenderness.
Troubleshooting Common Roasting Issues
If your pears are particularly top-heavy and keep tipping over, don’t panic. You can use a muffin tin to keep them upright, or simply crumple a small ring of aluminum foil to act as a “nest” for the base of each pear. This keeps them steady while they roast and ensures the toppings stay right where you put them.
Sometimes you might find that your pears are still a bit hard after the timer goes off. This usually happens if the fruit was very under-ripe. If this occurs, simply drizzle a tablespoon of water into the bottom of the baking dish, cover it loosely with foil, and roast for another 5-7 minutes. The steam will help soften the fruit without burning the cheese.
How to Fix a Toppling Pear
A toppling pear usually happens because the “sliver cut” wasn’t perfectly level. If a pear falls over mid-roast, use a pair of tongs to gently set it back up. If it continues to wobble, use a small piece of a walnut or a cranberry wedged under the low side to level it out. It’s a quick kitchen hack that saves the presentation!
Expert Tips for Plating and Presentation
Presentation is everything with a dish this elegant. When you drizzle the balsamic glaze, start at the very top near the stem and let it naturally drip down the sides. This creates those beautiful dark streaks that look so professional. Use a shallow white plate or a wooden board to make the vibrant colors of the pear and cranberries pop.
Always add your fresh thyme at the very last second. If you roast the thyme, it will turn black and lose its bright, lemony aroma. By placing the fresh sprigs around the base of the warm pear, the residual heat will release the essential oils, giving you a wonderful scent as you bring the dish to the table.
Frequently Asked Questions
Can I make these pears in advance?
Roasted pears are definitely best served fresh and warm from the oven. If they sit too long, the cheese can become rubbery and the pear may lose its structural integrity. However, you can prep the walnut and cranberry mixture up to two days in advance and store it in the fridge. When you’re ready to eat, just prep the pears and start roasting.
What if I cannot find Bosc pears?
If Bosc pears aren’t available, your next best choice is the Anjou pear. They are widely available and have a relatively firm texture. Just keep a close eye on them during the first roasting stage, as they might soften a few minutes faster than a Bosc. Avoid Bartlett or Comice pears, as they are far too soft for this upright method.
Is there a substitute for Gorgonzola?
Absolutely. If Gorgonzola is too strong for you, try a mild Roquefort or a creamy Danish Blue. For a completely different flavor profile that is still delicious, you could even use a thick slice of goat cheese (chevre). If you are looking for vegetarian options, always check the label to ensure the cheese uses vegetable-based rennet rather than animal enzymes.
How do I store leftovers?
You can store leftover roasted pears in an airtight container in the refrigerator for up to two days. While they won’t be as pretty the next day, they are delicious when cold. I love dicing up the cold leftovers and tossing them into a spinach salad or stirring them into a bowl of warm oatmeal for a gourmet breakfast.
Can I use frozen fruit for this recipe?
No, frozen pears will not work for this recipe. The freezing process ruptures the cell walls of the fruit, which means they will immediately collapse and turn into a puree when thawed and heated. For the “Upright Roast” method to work, you must use fresh, firm pears that have their cellular structure intact.
Honey Roasted Pears with Gorgonzola and Walnuts
Course: AppetizerCuisine: AmericanDifficulty: easy2
servings10
minutes25
minutes35
Minutes310
kcalAmerican
Ingredients
2 large Bosc pears (firm but ripe, with stems intact)
1/4 cup crumbled Gorgonzola or blue cheese
1/4 cup walnut halves
1/4 cup dried cranberries
3 tablespoons honey
1 tablespoon balsamic glaze
1 tablespoon unsalted butter, melted
Fresh thyme sprigs for garnish
Directions
- Preheat your oven to 400 degrees F. High heat is essential to sear the outside of the pear quickly, which prevents the internal fibers from breaking down into a mushy mess.
- Slice a tiny sliver off the bottom of each pear so they stand perfectly upright. Do not peel or core the pears; keeping them whole ensures they maintain the structural integrity seen in the image.
- In a small bowl, toss the walnuts and dried cranberries with the melted butter and 1 tablespoon of the honey. This ensures the toppings stick to the curved surface of the pear.
- Place the pears in a small baking dish. Drizzle the remaining honey over the skins. Roast for 15 minutes. This “pre-roast” softens the skin and begins the caramelization process.
- Remove from the oven. Carefully pile the honey-coated walnut and cranberry mixture onto the “shoulders” of the pears, pressing gently so they adhere to the sticky skin. Top the fruit mounds with the crumbled Gorgonzola.
- Return to the oven for 8 to 10 minutes. This allows the cheese to soften into the crevices of the fruit and the nuts to toast, while the pear remains upright and firm.
- Remove from the oven and immediately drizzle with the balsamic glaze, allowing it to drip down the sides. Garnish the base with fresh thyme sprigs and serve warm. The pear will be tender enough to slice with a knife but firm enough to hold its elegant, upright shape.
Notes
- The secret to the texture is the Upright Roast method. Keeping the skin on and roasting at 400 degrees F prevents the fruit from becoming mushy.