
For years, I perfected countless dessert recipes, but I remember struggling with classic bar desserts, especially when dealing with creamy fillings. The dreaded soggy crust was a persistent problem, particularly with something as rich as cheesecake bars. Through much experimentation, I finally cracked the code, and these Layered Pumpkin Cheesecake Bars are the ultimate testament to that delicious triumph!
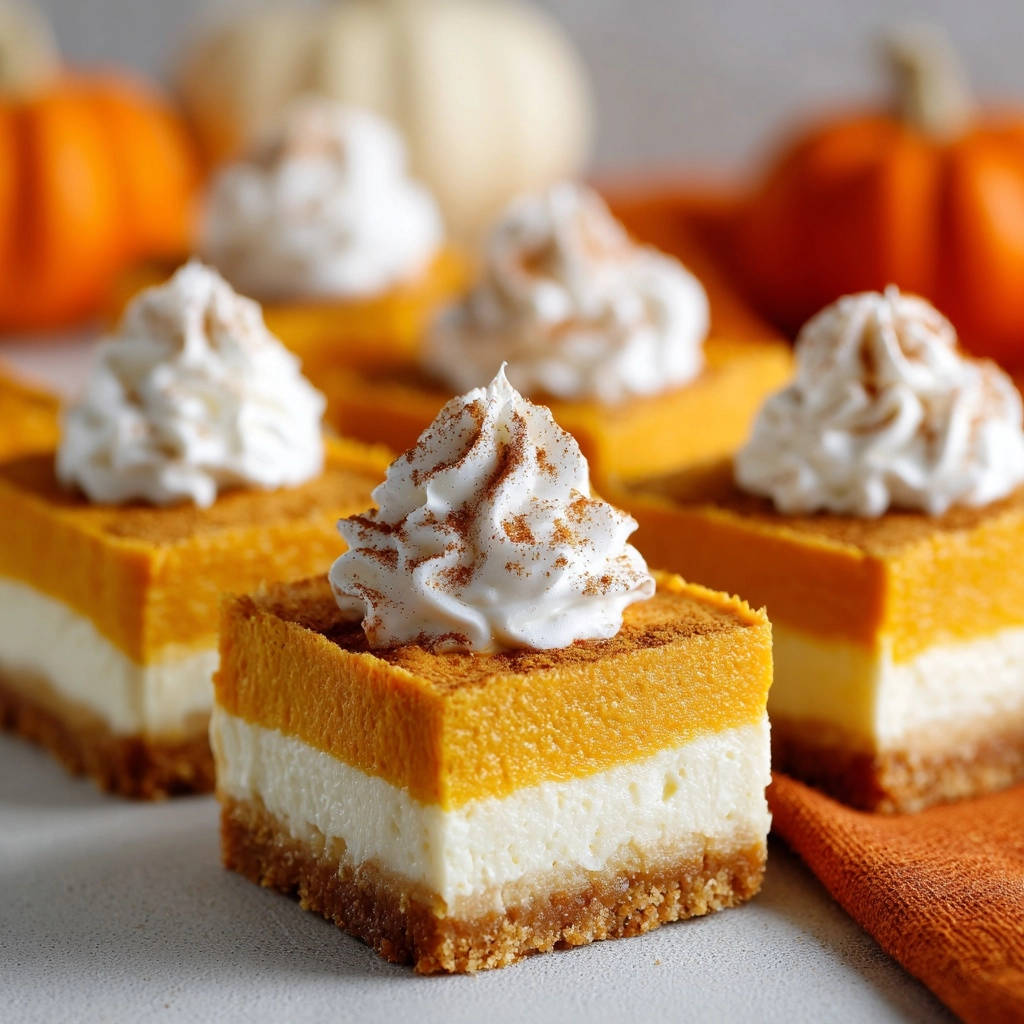
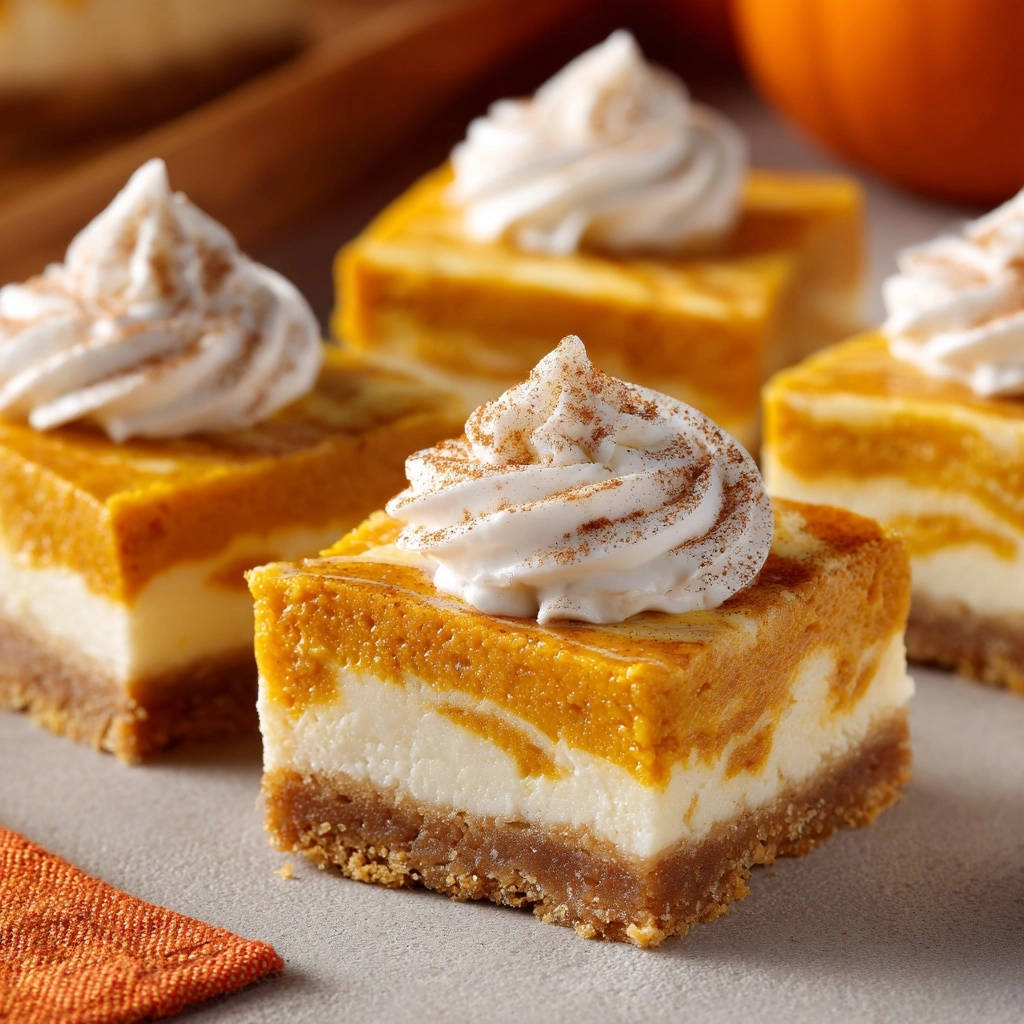
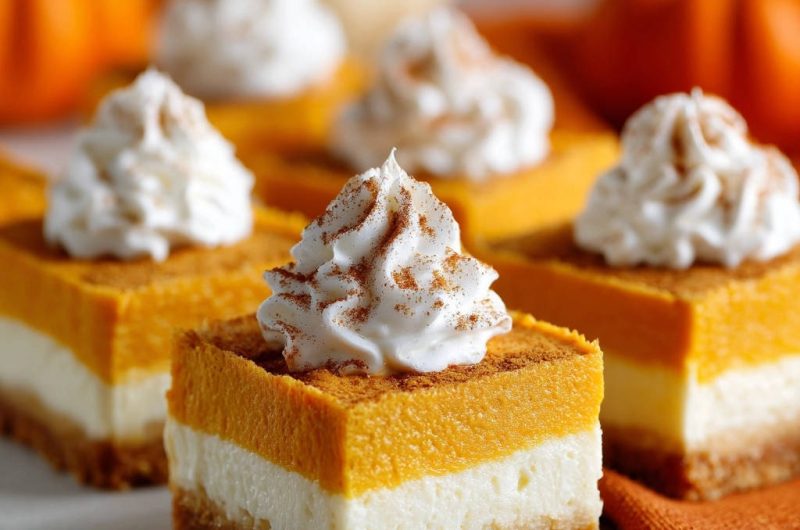
This recipe delivers layers of creamy pumpkin and tangy cheesecake atop a perfectly crisp graham cracker base, promising a truly exceptional autumn treat. Get ready to experience the ideal blend of textures and fall flavors, without a hint of that disheartening soggy bottom.
Why This Recipe is Your New Fall Favorite
These Layered Pumpkin Cheesecake Bars aren’t just another dessert; they’re a meticulously crafted experience. They bring together the best of fall flavors with foolproof techniques that guarantee success, even for novice bakers.
The “No Soggy Crust” Revelation: A Game Changer
The number one complaint with baked bar desserts is often a soggy crust. My secret weapon? A simple, yet incredibly effective pre-bake for the graham cracker base. This crucial step creates a protective barrier, ensuring your crust remains delightfully crisp, providing the perfect counterpoint to the creamy layers above.
Layers of Pure Bliss: Texture and Taste Perfection
Imagine: a buttery, crunchy graham cracker crust, followed by a smooth, subtly tangy classic cheesecake layer. On top, a creamy, spiced pumpkin layer, bursting with autumn warmth. Crowned with a light, airy whipped cream and a hint of cinnamon, these bars offer a symphony of textures and flavors in every single bite.
Simplicity Meets Stunning Presentation
While these Layered Pumpkin Cheesecake Bars look incredibly impressive, they are surprisingly straightforward to make. With clear, step-by-step instructions and practical tips, you can achieve a bakery-quality dessert that’s sure to wow your guests, without needing advanced baking skills.
Gathering Your Ingredients for Layered Pumpkin Cheesecake Bars
Success in baking begins with understanding your ingredients. Quality matters, and each component plays a vital role in achieving the perfect texture and flavor for these Layered Pumpkin Cheesecake Bars.
For the Unforgettable Graham Cracker Crust
Graham Cracker Crumbs: These form the foundation, providing a sweet, buttery crunch. Ensure they are finely crushed for an even base.
Granulated Sugar: A touch of sugar enhances the sweetness of the crumbs, complementing the richness of the butter.
Unsalted Butter, Melted: Butter binds the crumbs together, creating a firm, flavorful crust. Using unsalted butter allows you to control the overall saltiness.
Crafting the Creamy Cheesecake Core
Cream Cheese, Softened: This is non-negotiable for a smooth, lump-free cheesecake. Room temperature cream cheese blends beautifully without overmixing.
Granulated Sugar: Sweetens the tangy cream cheese, balancing the flavors.
Large Egg: The egg provides structure and richness, helping the cheesecake set properly.
Vanilla Extract: Pure vanilla extract deepens the flavor profile, adding a warm, aromatic note to the cheesecake layer.
The Essential Pumpkin Layer
Cream Cheese, Softened: Again, softened cream cheese is crucial for a perfectly smooth pumpkin layer.
Pumpkin Puree (Not Pie Filling): This is paramount! Pumpkin puree is simply cooked, mashed pumpkin, while pie filling contains added sugars and spices, which will throw off the recipe’s balance and texture.
Granulated Sugar: Sweetens the pumpkin layer to perfection.
Large Egg: Helps set the pumpkin layer, ensuring a clean distinction between the two creamy layers.
Pumpkin Pie Spice: The heart of the fall flavor! This blend of cinnamon, nutmeg, ginger, and cloves infuses the pumpkin layer with aromatic warmth.
Whipped Topping Perfection
Heavy Cream, Very Cold: The colder the cream, the quicker and stiffer it whips. This is key for a stable, fluffy topping.
Powdered Sugar: Sweetens the whipped cream without adding a grainy texture.
Vanilla Extract: Enhances the cream’s flavor, adding a subtle sweetness.
Ground Cinnamon or Nutmeg: For a beautiful finishing touch and an extra burst of fall aroma.
Essential Tools for Seamless Baking
Having the right equipment at hand makes the baking process smooth and enjoyable, ensuring optimal results for your Layered Pumpkin Cheesecake Bars.
Must-Have Kitchen Gadgets
An electric mixer (handheld or stand mixer) is invaluable for achieving silky smooth cream cheese layers and fluffy whipped cream. It ensures consistency and saves significant arm work.
Various mixing bowls are essential for preparing each layer separately, preventing flavor cross-contamination and allowing for efficient workflow.
Accurate measuring cups and spoons are critical for precise ingredient proportions, which is vital for the success of any baking recipe.
A simple whisk comes in handy for combining dry ingredients and light mixing tasks.
Pan Selection for Perfect Bars
An 8×8 inch baking pan is the ideal size for achieving the correct thickness and yield for these bars. Using a pan of this dimension ensures uniform baking.
Parchment paper with an overhang is your best friend for easy removal. This simple trick prevents sticking and allows you to lift the entire batch out of the pan effortlessly for clean slicing.
Step-by-Step: Creating Your Layered Pumpkin Cheesecake Bars Masterpiece
Prepping Your Pan & Preheat Pointers
Start by preheating your oven to 350 degrees F (175 C). Properly lining an 8×8 inch baking pan with parchment paper is crucial; ensure you leave an overhang on the sides. This thoughtful step will be your savior later, allowing you to lift the perfectly set bars from the pan with ease.
Building the Unbeatable Crust (and its Secret Step!)
In a medium bowl, combine your graham cracker crumbs, 1/4 cup granulated sugar, and melted butter. Mix thoroughly until every crumb is evenly moistened, resembling wet sand.
Press this mixture firmly and evenly into the bottom of your prepared pan. This creates a dense, sturdy base. Now, for the game-changing secret: pre-bake the crust in the preheated oven for 8-10 minutes. This forms a slightly crisp barrier, actively preventing the creamy layers from turning your crust soggy. Once baked, remove it and let it cool slightly while you prepare the next layer, and remember to reduce your oven temperature to 325 degrees F (160 C).
The Silky Smooth Cheesecake Layer
In a large bowl, using an electric mixer, beat the softened cream cheese until it’s completely smooth and creamy, with no lumps remaining. Gradually beat in the 1/2 cup granulated sugar until the mixture is light and fluffy.
Finally, beat in the egg and vanilla extract, mixing just until they are combined. Be careful not to overmix at this stage, as too much air can cause cracks later. Pour this smooth cheesecake mixture evenly over your pre-baked and cooled crust.
Bake this cheesecake layer at 325 degrees F (160 C) for 20-25 minutes, or until the edges appear set but the center still shows a slight wobble. This slight wobble is a good sign, indicating it’s cooked but not overbaked. Remove from the oven.
Infusing Pumpkin Perfection
While your cheesecake layer is baking, begin preparing the pumpkin layer in a clean large bowl. Beat the second portion of softened cream cheese until it’s smooth and velvety. This ensures a lump-free pumpkin layer.
Add the pumpkin puree (double-check it’s puree, not pie filling!), 1/2 cup granulated sugar, the second large egg, and the pumpkin pie spice. Beat everything until it’s uniformly combined and wonderfully smooth. Carefully and evenly pour this vibrant pumpkin mixture over the still-warm cheesecake layer.
The Art of Baking and Cooling
Return the pan to the 325 degrees F (160 C) oven and bake for an additional 25-30 minutes, or until the pumpkin layer is fully set and the edges look firm. The center should no longer wobble excessively.
Once baked, turn off the oven and immediately prop the oven door open slightly with a wooden spoon. Allow the bars to cool gradually in the oven for 30 minutes. This slow, gentle cooling process is a crucial trick to prevent cracking on the surface of your cheesecake.
After this gradual cool-down, remove the pan from the oven and let the bars cool completely at room temperature. Once they are no longer warm, cover the pan tightly with plastic wrap and refrigerate for at least 3 hours, or ideally overnight. Chilling is absolutely essential for the layers to fully set and firm up, allowing for perfectly clean, beautiful slices.
Whipping Up the Fluffy Topping
Just before you’re ready to serve, grab a cold bowl and cold beaters – chilling them briefly in the freezer can help. Pour in the very cold heavy cream, powdered sugar, and vanilla extract. Whip with your electric mixer until stiff peaks form, meaning the cream holds its shape beautifully when the beaters are lifted.
The Grand Finale: Slicing & Serving
Using the parchment paper overhang, carefully lift the chilled bars out of the pan. Place them on a cutting board. For neat portions, cut into 16 even squares (4×4 cuts).
Pipe or dollop a generous swirl of your freshly whipped cream on top of each bar. For that quintessential fall touch, lightly dust each with ground cinnamon or nutmeg. Serve these delightful Layered Pumpkin Cheesecake Bars immediately and store any remaining bars tightly covered in the refrigerator.
Chef’s Secrets for Flawless Layered Pumpkin Cheesecake Bars
Achieving perfection with your Layered Pumpkin Cheesecake Bars involves a few key insights that make all the difference.
The Chill Factor: Why Patience Pays Off
Resist the urge to cut into your bars too soon! The long refrigeration period, at least 3 hours and ideally overnight, is non-negotiable. This extended chill time allows the cheesecake and pumpkin layers to fully set and firm up, guaranteeing clean, neat slices without crumbling or smudging.
Temperature Control for Crack-Free Layers
Cheesecakes are sensitive to sudden temperature changes, which can lead to unsightly cracks. The gradual cooling process in the turned-off oven, with the door slightly ajar, helps your Layered Pumpkin Cheesecake Bars cool down slowly and evenly. Avoid moving them directly from a hot oven to a cold countertop or refrigerator too quickly.
Don’t Overmix!
Once you add the eggs to your cheesecake batter, mix only until just combined. Overmixing incorporates too much air, which can cause the cheesecake to puff up during baking and then crack as it cools. Gentle mixing ensures a dense, smooth, crack-free surface.
Ingredient Temperature Matters
Always ensure your cream cheese is properly softened to room temperature. This allows it to blend smoothly without lumps. Conversely, your heavy cream for the topping must be very cold; cold cream whips up faster and achieves stiffer, more stable peaks, resulting in a perfectly fluffy topping.
Troubleshooting Common Layered Pumpkin Cheesecake Bar Woes
Even experienced bakers encounter hiccups. Here are solutions to common issues you might face with Layered Pumpkin Cheesecake Bars.
My Crust is Still Soggy!
The most common culprit is skipping or rushing the pre-baking step. Ensure you pre-bake the graham cracker crust for the full 8-10 minutes. Also, press the mixture very firmly and evenly into the pan; a compact crust is less likely to absorb moisture.
My Cheesecake Layer Cracked!
Cracks typically occur due to overmixing the batter (introducing too much air), overbaking (drying out the cheesecake), or sudden temperature changes during cooling. Stick to the specified baking times, avoid overmixing once the egg is added, and use the gradual cooling method in the oven as instructed.
The Layers Aren’t Setting Properly
This is almost always due to insufficient chilling time. The bars absolutely need at least 3 hours in the refrigerator, and truly set best if chilled overnight. Patience is key for firm, distinct layers that slice beautifully. Ensure your oven temperature was accurate during baking as well.
My Whipped Cream Isn’t Stiff
The primary reason for loose whipped cream is cream that isn’t cold enough. Always use very cold heavy cream, and for best results, chill your mixing bowl and beaters in the freezer for 10-15 minutes before whipping. This cold environment helps the fat molecules emulsify and stiffen quickly.
Elevating Your Serving Experience
While delightful on their own, a few extra touches can transform your Layered Pumpkin Cheesecake Bars into an even more memorable dessert.
Creative Garnishes & Pairings
Beyond a simple dusting of cinnamon or nutmeg, consider drizzling each bar with a luscious caramel sauce or a sprinkle of chopped candied pecans. You could also add a few miniature chocolate chips or even a tiny dollop of whipped peanut butter for a contrasting flavor. For a festive touch, small fall-themed sprinkles add visual appeal.
Perfect Portions for Any Occasion
These bars are incredibly versatile for serving. Cut them into 16 standard squares for a party, or halve them into smaller bites for a dessert buffet. For a richer, more indulgent dessert, you can cut them into larger rectangles, perfect for a cozy evening treat with a cup of coffee or a glass of milk.
Storage & Make-Ahead Tips for Your Layered Pumpkin Cheesecake Bars
Efficient planning can make serving these delicious bars a breeze, and proper storage ensures you can enjoy them for days.
Keeping Them Fresh
Store leftover Layered Pumpkin Cheesecake Bars tightly covered with plastic wrap in the refrigerator. They will maintain their excellent flavor and texture for up to 3-4 days. For best results, add the whipped cream topping just before serving each portion, rather than on the entire batch if storing for more than a day.
Can You Freeze Them?
Yes, you can absolutely freeze these bars! For optimal results, freeze the bars without the whipped cream topping. Cut them into individual squares, then place them on a baking sheet and freeze until solid (about 2 hours). Once frozen, wrap each bar individually in plastic wrap, then place them in an airtight freezer-safe container or bag. They can be stored in the freezer for up to 1 month. Thaw in the refrigerator overnight before serving, adding fresh whipped cream.
Prepping Ahead of Time
The beauty of these Layered Pumpkin Cheesecake Bars is that they are perfect for making ahead. You can bake the entire batch, cool completely, and refrigerate overnight or even for up to 2 days before serving. This allows the flavors to meld and the layers to truly set. The whipped cream topping is best made fresh just before serving, but you can certainly prepare the other layers in advance, simplifying your baking day.
Frequently Asked Questions About Layered Pumpkin Cheesecake Bars
Here are answers to some common queries about making these delightful fall treats.
Can I use pumpkin pie filling instead of pumpkin puree?
No, it’s very important to use pure pumpkin puree, not pumpkin pie filling. Pumpkin pie filling is already sweetened and spiced, and its consistency is different. Using it would alter the sweetness level, spice balance, and potentially the texture of your cheesecake bars, leading to an unpredictable result.
How do I soften cream cheese quickly?
If you forgot to take your cream cheese out of the refrigerator, you can quickly soften it. Cut the cream cheese into 1-inch cubes and spread them on a plate. Microwave on high for 10-15 seconds; check and repeat in 5-second intervals until just soft. Alternatively, place the foil-wrapped blocks in a bowl of warm water for about 10-15 minutes.
Can I make these Layered Pumpkin Cheesecake Bars gluten-free?
Yes, you can easily adapt this recipe to be gluten-free. Simply substitute standard graham crackers with gluten-free graham crackers. The rest of the ingredients are naturally gluten-free, making it a straightforward swap.
What if I don’t have pumpkin pie spice?
No problem! You can easily make your own pumpkin pie spice blend. Combine 1 teaspoon ground cinnamon, 1/4 teaspoon ground nutmeg, 1/4 teaspoon ground ginger, and a pinch of ground cloves or allspice. This homemade blend will deliver that classic fall flavor.
Ready to Impress? Share Your Layered Pumpkin Cheesecake Bars Creation!
These Layered Pumpkin Cheesecake Bars are more than just a dessert; they’re a celebration of autumn, a testament to thoughtful baking, and a guaranteed crowd-pleaser. With the secret to a perfect, non-soggy crust now in your hands, you’re equipped to create an unforgettable treat.
Don’t wait until the leaves fully turn to embrace these incredible flavors. Bake a batch today, share them with loved ones, and savor every bite of this crisp-crusted, creamy, spiced perfection. We’d love to see your beautiful creations!
Layered Pumpkin Cheesecake Bars
Course: DessertCuisine: American CuisineDifficulty: easy16
bars30
minutes55
minutes240
minutesAmerican Cuisine
Ingredients
For the Graham Cracker Crust:
1 1/2 cups graham cracker crumbs
1/4 cup granulated sugar
6 tablespoons unsalted butter, melted
For the Cheesecake Layer:
8 ounces cream cheese, softened
1/2 cup granulated sugar
1 large egg
1 teaspoon vanilla extract
For the Pumpkin Layer:
8 ounces cream cheese, softened
1 cup pumpkin puree (not pie filling)
1/2 cup granulated sugar
1 large egg
1 1/2 teaspoons pumpkin pie spice
For the Topping:
1 cup heavy cream, very cold
2 tablespoons powdered sugar
1/2 teaspoon vanilla extract
Ground cinnamon or nutmeg for dusting
Directions
- Preheat your oven to 350 degrees F (175 C). Line an 8×8 inch baking pan with parchment paper, leaving an overhang on the sides to easily lift the bars out later.
- For the Crust (Your Secret Weapon Against Soggy Bases): In a medium bowl, combine the graham cracker crumbs, 1/4 cup granulated sugar, and melted butter. Mix until well combined and the crumbs are evenly moistened. Press the mixture firmly and evenly into the bottom of the prepared pan.
- Pre-Bake the Crust: Place the crust in the preheated oven and bake for 8-10 minutes. This crucial step creates a slightly crisp barrier that prevents the creamy layers from making the crust soggy. Remove from the oven and set aside to cool slightly while you prepare the cheesecake layer. Reduce oven temperature to 325 degrees F (160 C).
- For the Cheesecake Layer: In a large bowl, using an electric mixer, beat the 8 ounces softened cream cheese until smooth. Gradually beat in the 1/2 cup granulated sugar until creamy. Beat in the egg and vanilla extract until just combined. Do not overmix. Pour this mixture evenly over the pre-baked crust.
- Bake the cheesecake layer at 325 degrees F (160 C) for 20-25 minutes, or until the edges are just set but the center still has a slight wobble. Remove from the oven.
- For the Pumpkin Layer: While the cheesecake layer bakes, prepare the pumpkin layer. In a clean large bowl, beat the 8 ounces softened cream cheese until smooth. Add the pumpkin puree, 1/2 cup granulated sugar, egg, and pumpkin pie spice. Beat until well combined and smooth.
- Carefully pour the pumpkin mixture evenly over the baked cheesecake layer.
- Return the pan to the 325 degrees F (160 C) oven and bake for an additional 25-30 minutes, or until the pumpkin layer is set and the edges are firm.
- Once baked, turn off the oven and prop the oven door open slightly with a wooden spoon. Let the bars cool in the oven for 30 minutes. This gradual cooling helps prevent cracking.
- Remove the pan from the oven and let the bars cool completely at room temperature. Once cool, cover the pan tightly with plastic wrap and refrigerate for at least 3 hours, or preferably overnight. Chilling is essential for the layers to fully set and for clean slicing.
- For the Topping: Just before serving, in a cold bowl with cold beaters, whip the very cold heavy cream, powdered sugar, and vanilla extract until stiff peaks form.
- Lift the chilled bars from the pan using the parchment paper overhang. Cut into squares. Pipe or dollop a swirl of whipped cream on top of each bar and dust lightly with ground cinnamon or nutmeg. Serve immediately and store any leftovers in the refrigerator.
Notes
- Pre-baking the crust is crucial for preventing sogginess. Chilling for at least 3 hours (preferably overnight) is essential for the layers to fully set and for clean slicing.


