
Most people think braising is a one-way ticket to soggy, rubbery chicken skin. You’ve likely experienced it before: a pot of flavorful liquid that yields tender meat but leaves the skin looking pale and unappetizing. This recipe for Braised Lemon Herb Chicken and Potatoes changes that narrative by focusing on a specific high-heat technique that delivers the best of both worlds.
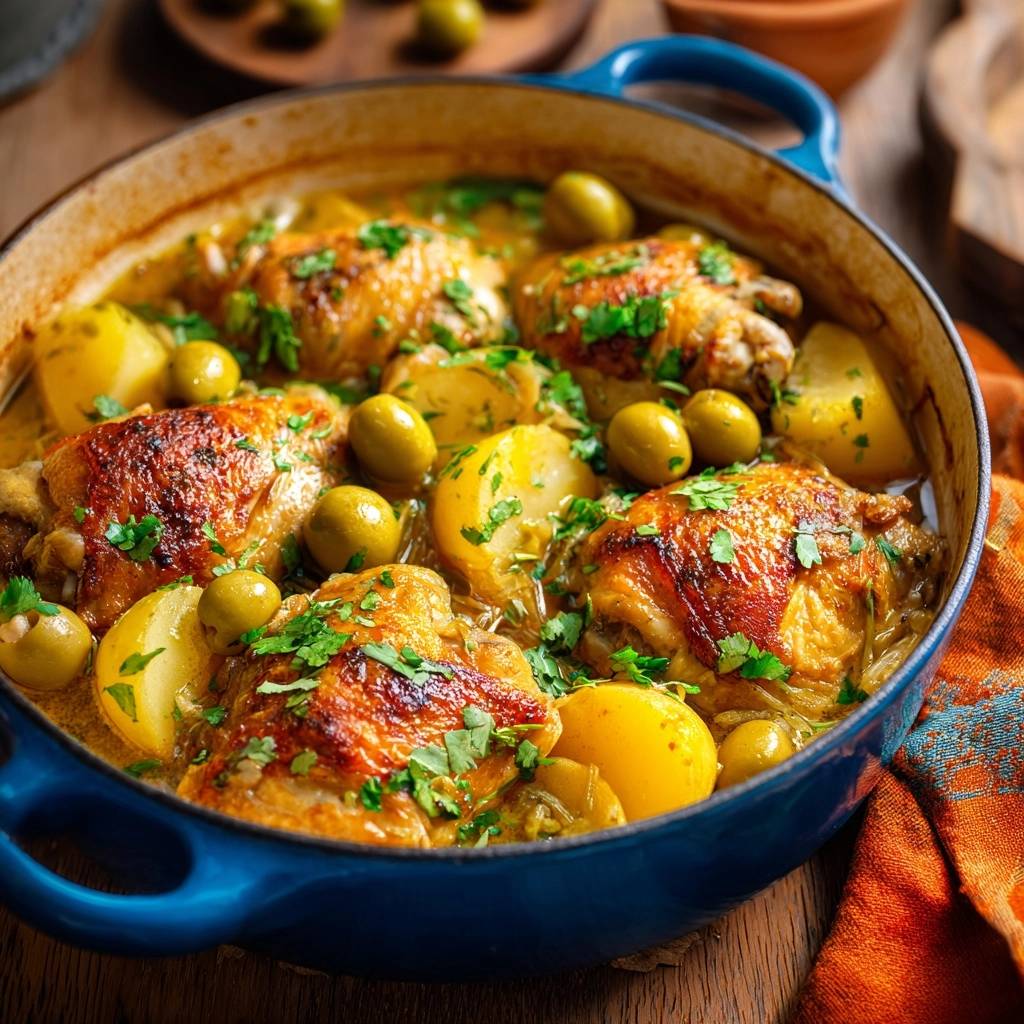
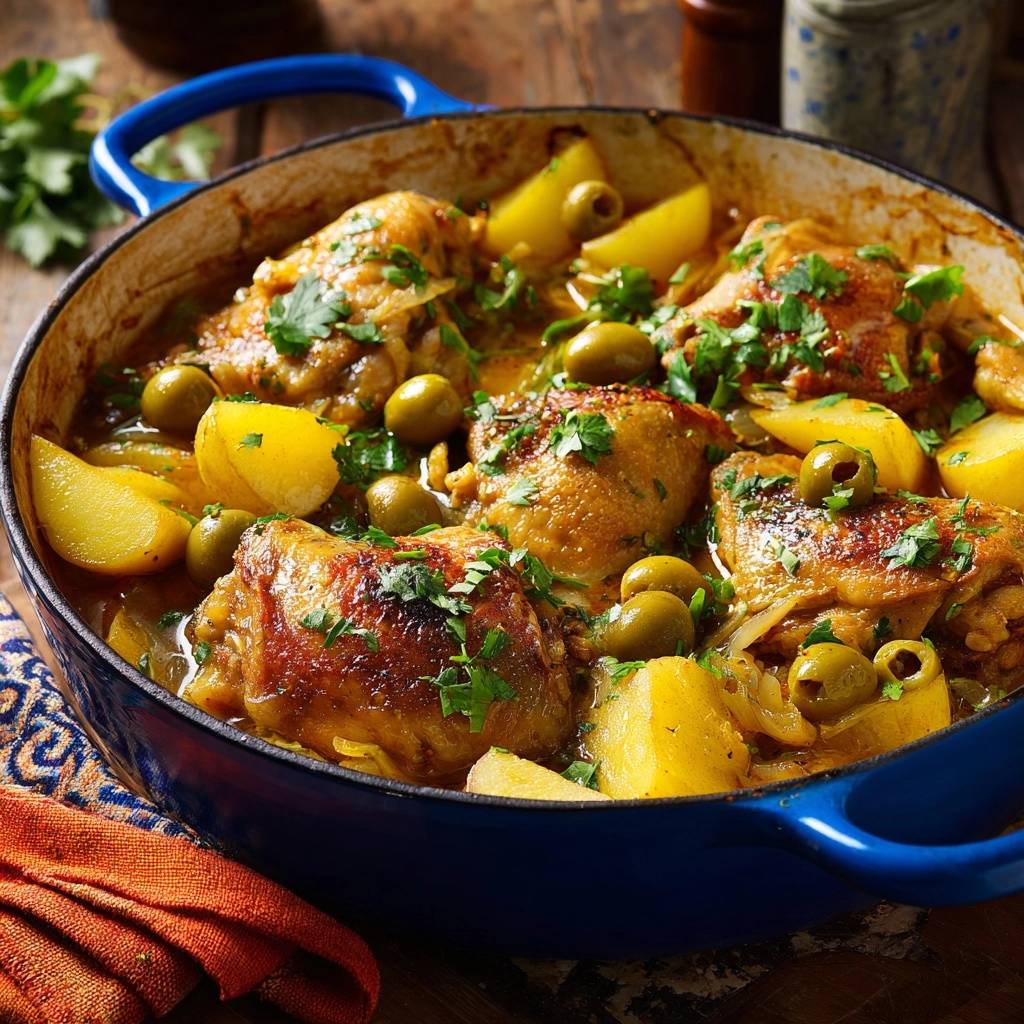
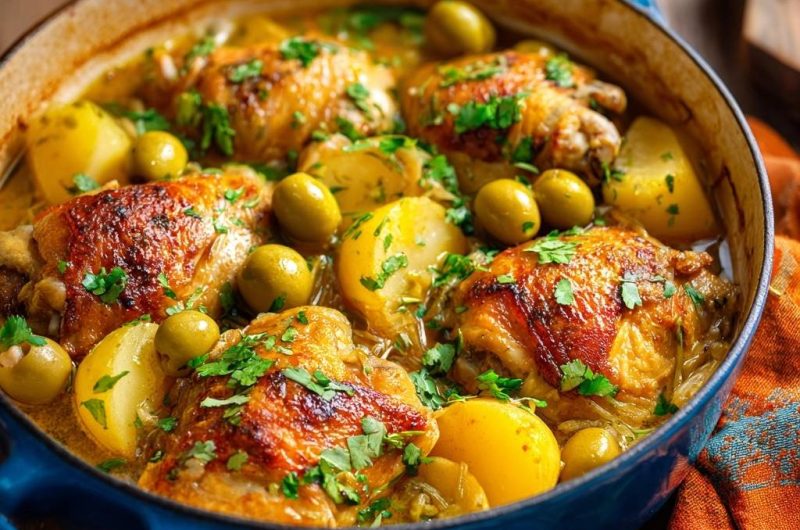
Imagine biting into a piece of chicken where the skin actually crackles, followed immediately by meat that has been poached to perfection in a bright, citrusy broth. The briny pop of Castelvetrano olives and the earthy aroma of oregano cut through the richness of the chicken fat. It’s a rustic, comforting meal that feels sophisticated because of the incredible textures at play.
The secret to this success lies in the liquid level and the “uncovered” rule. By keeping the chicken skin high and dry above the simmering broth, you allow the dry heat of the oven to act like a miniature rotisserie. I’ve found that even a quarter-inch too much liquid can ruin the crust, so precision during the assembly phase is your best friend here.
The Mechanics of the Anti-Soggy Braising Technique
Traditional braising usually involves a heavy lid and low heat, which creates a steam-filled environment. While that’s great for tough cuts of beef, it’s the enemy of skin-on poultry. This method utilizes a shallow braise in a 400°F oven, which creates a dual-zone cooking environment that works wonders on chicken thighs.
The bottom half of the chicken sits in a bath of lemon juice, chicken broth, and rendered fat. This liquid poaches the meat, keeping it incredibly juicy and infusing it with aromatics. Meanwhile, the top half of the chicken is exposed to the intense, dry circulating air of the hot oven. This preserves the Maillard reaction you started on the stovetop, ensuring the skin stays crisp.
Because we leave the pot uncovered, the liquid also reduces slightly as it cooks. This concentration of flavors turns a simple broth into a glossy, lip-smacking sauce. The high heat also helps the potatoes roast and braise simultaneously, giving them a creamy interior and slightly browned edges that soak up the lemon-butter sauce perfectly.
Essential Components for Braised Lemon Herb Chicken and Potatoes
Success starts with the right bird. You must use bone-in, skin-on chicken thighs for this dish. The bone acts as a heat conductor, ensuring the meat cooks evenly from the inside out, while the skin provides the fat necessary to flavor the entire pot. Chicken breasts will dry out long before the potatoes are tender, so stick with the thighs for the best results.
When it comes to the potatoes, Yukon Golds are the gold standard. They have a naturally buttery texture and a medium starch content that allows them to hold their shape during the 45-minute cooking process. If you use Russets, they tend to fall apart and turn the sauce into a grainy mash, which isn’t what we’re looking for in a refined braise.
The olives are another critical player. Castelvetrano olives are preferred because they are mild, buttery, and firm. They provide a gentle saltiness that complements the lemon without overpowering the herbs. If you can only find Kalamata, use them sparingly, as their sharp, vinegary bite can dominate the more delicate notes of the fresh parsley and oregano.
Finally, don’t underestimate the aromatics. Using dried oregano during the sauté phase allows its oils to bloom in the fat, while fresh parsley and lemon zest added at the very end provide a necessary hit of brightness. This layering of flavors ensures the dish tastes complex rather than one-dimensional.
Selecting the Right Cooking Vessel
The pan you choose is just as important as the ingredients. You need a wide, shallow heavy-bottomed skillet or a shallow Dutch oven (often called a braiser). A deep stockpot is a poor choice here because the high sides trap steam, which will inevitably soften the chicken skin you worked so hard to crisp up.
A heavy pan, like cast iron or thick stainless steel, is essential for heat retention. It provides an even sear during the initial browning phase and maintains a steady simmer once it hits the oven. If the pan is too crowded, the vegetables will steam instead of sauté, so ensure your vessel is wide enough to give the ingredients some breathing room.
Phase One: Achieving the Mahogany Sear
Before the chicken ever touches the pan, you must pat it extremely dry with paper towels. Any moisture on the surface of the skin will turn to steam, preventing that deep golden crust from forming. Once dry, season it generously with salt and pepper; the salt helps draw out even more surface moisture for a better crunch.
Heat your oil until it’s shimmering but not smoking. Place the chicken skin-side down and then—this is the hard part—don’t touch it. You need a solid 8 to 10 minutes of undisturbed contact with the heat. You’ll know it’s ready when the chicken releases easily from the pan and the skin is a deep, mahogany brown. If it sticks, it’s not ready yet.
Phase Two: Building the Flavor Base and Deglazing
After removing the chicken, you’ll be left with a pan full of liquid gold: rendered chicken fat. Toss your potatoes and onions directly into this. The onions will pick up the browned bits from the chicken, and the potatoes will start to develop a beautiful crust of their own as they soften.
Once the onions are translucent, add the garlic and oregano. Be careful not to burn the garlic; 60 seconds is usually enough to release its fragrance. Pour in your liquid to deglate the pan. Use a wooden spoon to scrape up every bit of “fond” from the bottom. Those little brown bits are concentrated flavor and are the secret to a world-class sauce.
Phase Three: The Critical Liquid Level Adjustment
This is the moment that determines the success of your dish. When you return the chicken to the pan, you must nestle it carefully between the potatoes. The liquid should come up about halfway through the chicken thighs. If you see the broth covering the skin, you’ve added too much liquid and need to remove some.
The skin must remain completely exposed to the air. Think of the chicken as sitting in a hot tub rather than going for a swim. Scatter the olives around the chicken pieces, ensuring they are partially submerged so they can release their brine into the sauce. Bring the whole thing to a gentle simmer on the stove before moving it.
Phase Four: The Uncovered Oven Finish
Slide the pan into your preheated 400°F oven without a lid. Over the next 25 to 30 minutes, the oven’s heat will finish cooking the chicken while the potatoes absorb the lemon-herb broth. The butter we added earlier will emulsify with the chicken juices, creating a rich, velvety sauce that coats the back of a spoon.
Check the chicken with a meat thermometer; you’re looking for 165°F, though thighs are very forgiving and stay juicy even up to 175°F. The potatoes should be fork-tender, meaning a knife slides in and out with zero resistance. If the skin needs an extra boost, you can leave it in for another five minutes, but usually, the high heat does the trick perfectly.
Troubleshooting Common Braising Obstacles
If you find that your liquid is evaporating too quickly in the oven, don’t panic. Simply splash in a little more chicken broth around the edges of the pan, being careful not to pour it over the chicken skin. This usually happens if your skillet is exceptionally wide or your oven runs a bit hot.
On the flip side, if your chicken skin looks a little soft when the meat is done, turn on the broiler for 2 minutes. Watch it like a hawk, as it can go from golden to burnt in seconds. This “broiler trick” is a great safety net for ensuring that shatteringly crisp texture every single time.
To prevent the garlic from burning during the initial sauté, make sure your potatoes and onions are already in the pan. The moisture from the onions lowers the surface temperature of the oil just enough to protect the delicate garlic. Also, always use whole olives; sliced olives can sometimes disintegrate and make the sauce look muddy.
Optimal Pairings for Lemon Herb Poultry
This dish is quite rich thanks to the chicken fat and butter, so it pairs beautifully with something bitter or acidic. A simple arugula salad with a sharp lemon vinaigrette provides a fresh contrast. Alternatively, sautéed broccoli rabe or garlicky kale can cut through the heartiness of the potatoes.
You will definitely want some crusty bread on the table. The sauce at the bottom of the pan is arguably the best part of the meal, and you’ll want to soak up every last drop of that lemon-butter goodness. A warm baguette or a piece of sourdough is the perfect tool for the job.
Expert Tips for Storage and Reheating
Leftovers will keep in an airtight container in the fridge for up to three days. However, the refrigerator is the enemy of crispy skin. When you’re ready to eat it again, avoid the microwave at all costs, as it will turn the chicken rubbery and the skin gummy.
The best way to reheat this dish is in an air fryer or a 350°F oven. Place the chicken and potatoes on a baking sheet and heat for about 10-12 minutes. This recrisps the exterior while gently warming the meat through. If the potatoes seem a little dry, a tiny splash of water in the pan can help create a bit of steam to soften them back up.
Frequently Asked Questions
Can I use chicken breasts instead of thighs?
You can, but it is much riskier. Chicken breasts are very lean and cook much faster than thighs. If you use them, you’ll need to cut the potatoes into smaller pieces so they cook faster, and you should check the internal temperature of the meat after 15 minutes in the oven. Thighs are highly recommended because they stay moist during the longer braising time required for the potatoes.
What can I substitute for the white wine?
If you prefer not to use wine, simply replace it with an equal amount of high-quality chicken broth. To mimic the acidity that wine provides, add an extra teaspoon of lemon juice or a small splash of white wine vinegar when you deglaze the pan. This ensures the sauce remains balanced and bright rather than just salty.
Do I need to peel the potatoes?
Peeling Yukon Gold potatoes results in a much creamier, more refined sauce because the starches from the outside of the potato can mix more easily with the broth. However, if you prefer a rustic look, you can leave the skins on. Just be sure to scrub them well. Note that the sauce might be slightly thinner if the potatoes are unpeeled.
How do I prevent the lemon from becoming bitter?
Bitterness usually comes from the white pith of the lemon or from boiling whole lemon slices for too long. This recipe uses lemon juice and zest added at different stages to avoid this. By adding the juice to the braising liquid and the fresh zest at the very end, you get all the bright citrus flavor without any of the harsh bitterness associated with cooked lemon rinds.
Braised Lemon Herb Chicken and Potatoes
Course: Main CourseCuisine: Mediterranean Inspired AmericanDifficulty: easy4
servings15
minutes45
minutes60
Minutes510
kcalMediterranean Inspired American
Ingredients
4 to 6 bone-in, skin-on chicken thighs
1.5 pounds gold potatoes, peeled and cut into large chunks
1 cup whole green olives (Castelvetrano preferred)
1 large yellow onion, thinly sliced
4 cloves garlic, minced
1.5 cups chicken broth
1/2 cup dry white wine (optional, or replace with more broth)
1 lemon, juiced and zested
2 tablespoons olive oil
1 tablespoon butter
1 teaspoon dried oregano
1/2 cup fresh parsley, roughly chopped
Salt and black pepper to taste
Directions
- Pat the chicken thighs extremely dry with paper towels. This is the first step to preventing soggy skin. Season both sides generously with salt and pepper.
- Heat olive oil in a large, wide heavy-bottomed skillet or shallow Dutch oven over medium-high heat. Place chicken skin-side down. Do not move them for 8 to 10 minutes. This creates a deep, mahogany-golden crust that will withstand the braising process.
- Remove chicken and set aside on a plate (skin-side up). In the same pan, add the potatoes and onions. Sauté for 5-7 minutes in the chicken fat until the onions soften and potatoes begin to take on color. Stir in the garlic and oregano for 1 minute.
- Pour in the white wine (if using) to deglaze, scraping the bottom of the pan to release the flavorful browned bits. Add the chicken broth, lemon juice, and butter. Stir to combine.
- Critical Step: Return the chicken to the pan, nestling the pieces between the potatoes. Ensure the liquid only reaches halfway up the sides of the chicken. The skin must remain completely above the liquid line. If you submerge the skin, it will turn gummy.
- Scatter the whole olives around the chicken. Bring the liquid to a simmer on the stovetop.
- Transfer the uncovered pan to a 400°F (200°C) oven. Bake for 25 to 30 minutes. Cooking uncovered allows the dry oven heat to further crisp the skin while the bottom half of the chicken poaches in the savory lemon broth.
- Once the potatoes are fork-tender and the chicken reaches an internal temperature of 165°F, remove from the oven. Garnish heavily with fresh parsley and lemon zest before serving directly from the pot.
Notes
- The critical secret to this dish is ensuring the liquid level never touches the chicken skin during the braising process to maintain maximum crispness.


