

Most blondies suffer from a disappointing identity crisis. They either emerge from the oven as dry, uninspired cake squares or, worse, a greasy mess with a soggy bottom that sticks to the parchment. A true Butterscotch Blondie Bar should be a masterclass in texture, featuring a dense, fudgy interior and a paper-thin, crackly top that shattered when you bite into it.
The secret to achieving that bakery-style finish isn’t just about the ingredients; it’s about controlling moisture and temperature. By focusing on the “Anti-Soggy” philosophy, we manage the water content in the butter and the aeration of the eggs to create a bar that is sturdy enough to hold but soft enough to melt. It’s the ultimate upgrade for anyone tired of mediocre tray bakes.
Expertise in blondie baking comes down to one specific realization: butter is your best friend, but its water content is your enemy. In this recipe, we use a browning technique to cook off excess moisture before the flour ever touches the fat. This ensures the base of your bar stays tight and fudgy rather than damp and oily. Once you master this moisture control, you’ll never go back to basic melted butter again.
The Chemistry of the Perfect Fudgy Texture
Achieving a dense, chewy blondie requires a specific understanding of the sugar-to-fat ratio. Unlike a cake, which relies on air bubbles and structure, a blondie thrives on weight. We intentionally use a high proportion of fat and sugar relative to the flour to keep the crumb tight. This prevents the “bready” texture that ruins so many homemade bars.
The choice of sugar is equally scientific. We use a heavy hand with dark brown sugar because it is hygroscopic, meaning it attracts and holds onto moisture. The molasses content in dark brown sugar doesn’t just add a deep, toffee-like flavor; it physically alters the protein structure of the flour to keep the bars soft for days. The small addition of granulated sugar is what provides the structural support for that iconic crackly crust.
Furthermore, we keep leavening agents to an absolute minimum. While a tiny pinch of baking powder helps the bars rise just enough to avoid being a brick, too much would turn them into a sponge. By keeping the lift low, the fats and sugars can emulsify into a rich, fudge-like consistency that defines a premium Butterscotch Blondie Bar.
Why Brown Butter Prevents Soggy Bottoms
Standard butter contains about 15% to 18% water. When you simply melt butter, that water remains in the batter, often sinking to the bottom during baking and creating a mushy, greasy layer. By browning the butter, you trigger the Maillard reaction, which toasts the milk solids and evaporates that excess water. This leaves you with 100% flavorful fat and toasted solids.
This process shifts the flavor profile from simple creaminess to a complex, nutty aroma that perfectly complements butterscotch. More importantly, removing that water means the flour can absorb the fat more efficiently. The result is a base that sets firmly in the oven, providing a sturdy foundation for the heavy butterscotch chips without becoming waterlogged.
Essential Components for Butterscotch Blondie Bars
Every ingredient in this recipe serves a structural purpose. You aren’t just mixing things in a bowl; you’re building a chemical emulsion. Using high-quality unsalted butter is non-negotiable because it allows you to control the salt levels. Since butterscotch chips are inherently very sweet and often contain their own sodium, starting with a blank slate of unsalted butter prevents the bars from becoming cloying or overly salty.
The vanilla extract also plays a massive role here. While it might seem like a background player, a full tablespoon is necessary to bridge the gap between the toasted notes of the brown butter and the sugary punch of the chips. It rounds out the flavors, making the butterscotch taste more like “toffee” and less like “candy.”
Selecting the Right Sugars and Fats
Dark brown sugar is the MVP of this recipe. While light brown sugar works in a pinch, the extra molasses in the dark variety provides the acidity needed to react with the tiny amount of baking powder. This creates a subtle chemical lift that keeps the dense center from feeling “heavy” on the palate. Always pack your brown sugar firmly into the measuring cup to ensure you’re getting the full moisture content required for that fudgy bite.
The Role of Room Temperature Eggs
Emulsification is the key to a smooth batter. If you add cold eggs to your warm brown butter, the fat will seize and create tiny clumps, leading to an uneven bake. Room temperature eggs incorporate seamlessly, allowing the fats and sugars to bind. This is vital for the two-minute whisking stage, which creates a meringue-like foam that rises to the top to form the crackly crust.
Flour and Leavening Specifics
All-purpose flour provides the perfect amount of protein for these bars. You want enough gluten to give the bars a “chew,” but not so much that they become tough like bread. We use exactly two cups to balance the high fat content. The salt is also critical; it cuts through the richness of the butterscotch, ensuring you can eat a whole square without feeling overwhelmed by sweetness.
Step-by-Step: Executing the Brown Butter Technique
The transition from raw ingredients to a professional-grade blondie happens in the saucepan. You must be attentive during the browning phase. Use a light-colored pan so you can actually see the color change. If you use a dark non-stick pan, you won’t be able to tell when the milk solids have turned amber, increasing the risk of burning the butter.
Phase 1: Achieving the Golden Amber Hue
As you heat the butter, it will first melt, then begin to pop and crackle as the water evaporates. Next, a thick foam will cover the surface. Stay close and keep whisking. Once the foam subsides slightly, you will see little brown specks at the bottom and smell a scent reminiscent of toasted hazelnuts. Immediately pour it into a bowl to stop the cooking; those specks are pure flavor gold.
Phase 2: Aerating the Batter for a Crackly Top
After mixing the sugars into the warm butter, you must let it cool slightly before adding the eggs. Once the eggs are in, don’t just stir—whisk vigorously. You are looking for the batter to change from a dark, grainy sludge to a pale, glossy, and smooth ribbon. This aeration is what separates a “home cook” blondie from a “bakery” blondie. It creates the delicate top layer that everyone loves.
Phase 3: The Gentle Fold
When it’s time for the dry ingredients, put the whisk away and grab a spatula. Overworking the flour at this stage will develop too much gluten, turning your fudgy bars into something rubbery. Fold the flour in with a slow, circular motion just until the last white streak disappears. This ensures the Butterscotch Blondie Bars remain tender and melt-in-your-mouth soft.
Precision Baking and the “Jiggle” Test
Overbaking is the most common reason blondies fail. If you wait until a toothpick comes out completely clean, you’ve already overbaked them. The bars will continue to cook for several minutes after they leave the oven due to the high heat retained in the pan. This is known as carry-over cooking.
Look for the “jiggle.” When you shake the pan gently, the edges should be firm and slightly pulled away from the parchment, but the center should still have a very slight wobble. This center will firm up into a dense, fudgy masterpiece as it cools. If the center is totally stiff in the oven, the bars will be dry once they reach room temperature.
Troubleshooting Common Blondie Failures
If your butterscotch chips all sank to the bottom, your batter was likely too thin or the butter was too hot when you added them. Ensure the batter has thickened during the whisking stage to provide enough “suspension” for the chips. Also, pressing the final half-cup of chips into the top of the batter manually ensures they stay visible and well-distributed.
If your bars are crumbling when you try to cut them, you are likely being too impatient. These bars need at least two hours to set. The fats need to solidify to create those clean, sharp edges. If the top is dull and matte instead of shiny, you probably didn’t whisk the eggs and sugar long enough to create the necessary meringue structure.
Storage and Texture Preservation
Butterscotch Blondie Bars are actually better on the second day. The flavors of the brown butter and molasses have time to meld and deepen overnight. To keep them fresh, store them in an airtight container at room temperature. If you leave them out on a plate, the edges will become hard and tooth-shattering rather than pleasantly chewy.
For the best texture, place a small piece of parchment paper between layers if you are stacking them. This prevents the fudgy centers from sticking together. They will stay perfectly fresh for up to four days, though they rarely last that long in most kitchens!
Freezing for Long-Term Freshness
These bars freeze beautifully because of their high fat content. Wrap individual squares tightly in plastic wrap, then place them in a heavy-duty freezer bag. This double-layer protection prevents freezer burn and keeps the butterscotch from absorbing other scents. When you’re ready to eat, let them thaw at room temperature for about an hour to regain their fudgy integrity.
Expert Tips for Professional Results
To get those perfectly straight, clean edges, use a parchment “sling.” Line the pan with two strips of parchment paper that hang over the sides. Once the bars are completely cool, you can simply lift the entire block out of the pan and slice them on a cutting board. This prevents the first corner piece from getting mangled as you try to wedge it out.
Another pro tip is to use a hot knife for slicing. Run your knife under hot water, wipe it dry, and make one clean slice. Wipe the knife clean and reheat it between every single cut. This prevents the fudgy center from sticking to the blade and tearing the bars, giving you those professional, sharp-edged squares every time.
Frequently Asked Questions
Can I use butterscotch morsels instead of chips?
Yes, you can use morsels, but be aware that different brands have different melting points. High-quality chips usually hold their shape better under heat, whereas cheaper morsels might melt into the batter. If you want those distinct “pockets” of butterscotch, look for chips that list cocoa butter or a similar fat high on the ingredient list.
How do I fix a greasy blondie base?
A greasy base usually happens because the butter wasn’t browned long enough to evaporate the water, or the oven temperature was too low. To prevent this, ensure your butter reaches that amber color with brown specks. Also, make sure your oven is fully preheated to 350 degrees F before the pan goes in, as a slow start can cause the fats to separate before the structure sets.
Can I add nuts or sea salt to this recipe?
Absolutely. Toasted pecans or walnuts are a fantastic addition. Add about half a cup of chopped nuts at the same time you fold in the butterscotch chips. To balance the intense sweetness of the butterscotch, a generous sprinkle of flaky sea salt on top immediately after the pan comes out of the oven is highly recommended. It adds a sophisticated crunch and cuts through the sugar.
Why is my parchment paper sticking?
Even with parchment paper, it is a good idea to lightly grease the bottom and sides of the pan with a little butter or cooking spray. This helps the parchment lay flat and ensures that any batter that sneaks behind the paper won’t stick. If the paper is sticking to the bars themselves, it usually means the bars are still too warm. Let them cool completely to room temperature before attempting to peel the paper away.
Butterscotch Blondie Bars
Course: DessertCuisine: AmericanDifficulty: easy16
bars15
minutes25
minutes40
Minutes245
kcalAmerican
Ingredients
1 cup (2 sticks) unsalted butter
1 1/4 cups packed dark brown sugar (for deep molasses flavor and moisture)
1/4 cup granulated sugar (for the crackly top)
2 large eggs, room temperature
1 tablespoon vanilla extract
2 cups all-purpose flour
1 teaspoon salt (to balance the sweet butterscotch)
1/2 teaspoon baking powder
1 1/2 cups butterscotch chips, divided
Directions
- Preheat your oven to 350 degrees F (175 degrees C). Line an 8×8 inch square baking pan with parchment paper, leaving an overhang on two sides for easy removal.
- Melt the butter in a light-colored saucepan over medium heat. Continue cooking, whisking constantly, until the butter foams, then turns a golden amber color with brown specks and smells nutty. Immediately remove from heat. This browning process cooks off water, preventing a soggy base.
- Pour the hot brown butter into a large heat-proof bowl. Whisk in the dark brown sugar and granulated sugar until well combined. Let the mixture cool for 5-8 minutes until warm to the touch but not hot.
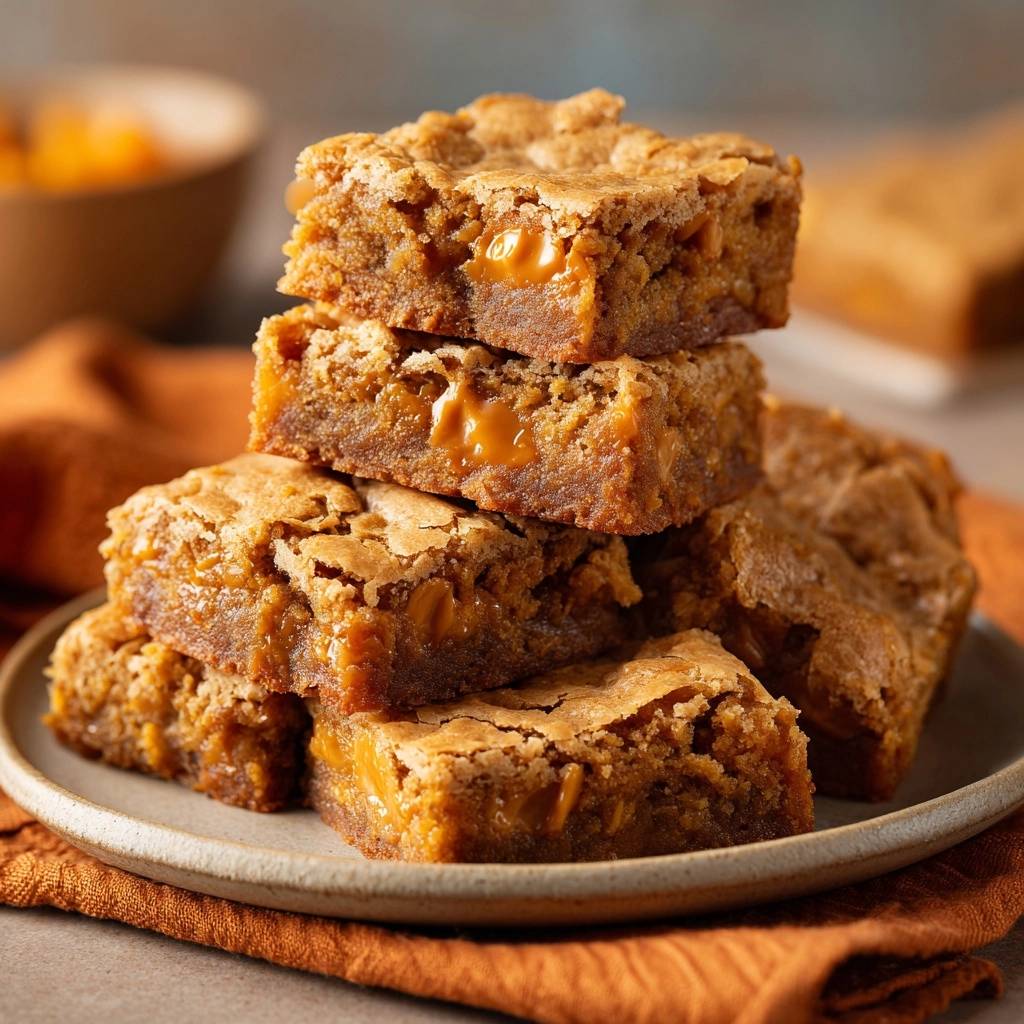
- Add the eggs one at a time, whisking vigorously after each addition. Continue to beat the mixture for 2 full minutes until it becomes pale, shiny, and slightly thickened. This aeration creates the thin, crackly crust seen in the image. Stir in the vanilla.
- Using a spatula, gently fold in the flour, salt, and baking powder. Mix just until no white streaks remain; do not overmix or the bars will become tough. Fold in 1 cup of the butterscotch chips.
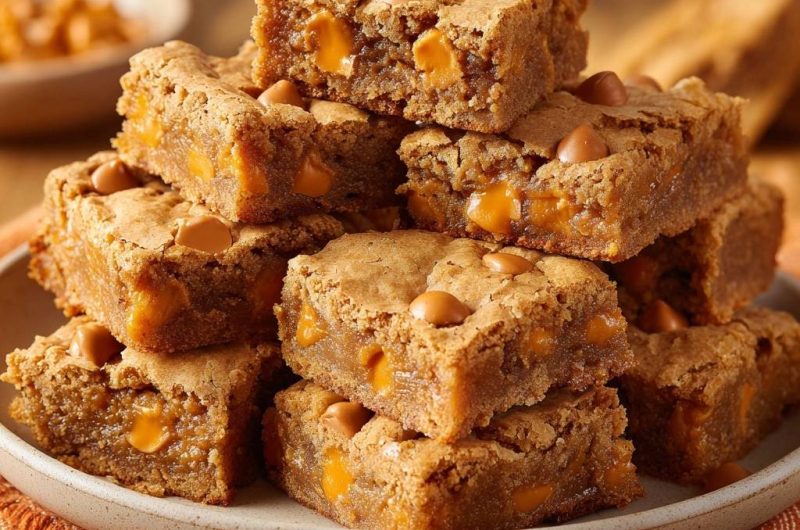
- Spread the thick batter into the prepared pan, smoothing the top. Press the remaining 1/2 cup of butterscotch chips evenly into the surface of the batter so they remain visible after baking.
- Bake for 22 to 26 minutes. To ensure the “Anti-Soggy” result, pull the bars out when the edges are set and pulling away slightly from the sides, but the center still has a very slight jiggle. A toothpick inserted into the center should come out with a few moist crumbs, but not wet batter.
- The most important step: Let the bars cool completely in the pan on a wire rack for at least 2 hours. This carry-over cooking time allows the fats to set and the bottom to firm up into a fudgy, dense crumb. Slice into 16 squares only once fully cooled to maintain the clean edges shown in the image.
Notes
- The browning process cooks off water to prevent a soggy base. Do not slice until fully cooled to ensure clean edges and a dense crumb.


