
Most people avoid making stuffed peppers because they’re tired of the “swimming pool” effect. You know exactly what I mean: you cut into a beautiful-looking pepper only to have a gush of flavorless vegetable water flood your plate. It turns the rice into mush and makes the beef feel greasy rather than savory.
The secret to a professional-grade result isn’t a fancy ingredient; it’s moisture management. By using the “Anti-Soggy Bottom Hack,” we address the water content inside the pepper walls before the filling ever touches the vegetable. This ensures the pepper stays tender-crisp while the filling remains tight and flavorful.
I’ve found that the real trick lies in the pre-roasting stage. When you steam the empty shells first, you force the pepper to release its internal liquid early. Draining that liquid away is the single most important step to achieving a sturdy, upright pepper that holds its shape from the oven to the dinner table.
Essential Components for Cheesy Beef Stuffed Peppers
Success starts with the right structural foundation. You need four large bell peppers, specifically looking for specimens with thick walls and wide cavities. These larger peppers act as a natural bowl, providing the stability needed to hold a heavy beef and rice mixture without collapsing under the heat of the oven.
For the protein, lean ground beef is your best friend here. I recommend a 90/10 or 93/7 blend. While higher fat percentages are great for burgers, they are disastrous for stuffed peppers because that rendered fat has nowhere to go. It simply pools at the bottom of the pepper, creating a heavy, oily mouthfeel that masks the brightness of the vegetables.
Tomato paste plays a dual role in this recipe. While it adds a concentrated umami punch, its primary job is acting as a thickening agent. It binds the tomato sauce and beef juices together, creating a cohesive filling that stays put. This prevents the “runny” filling that often plagues home-cooked versions of this classic dish.
Selecting the Right Bell Peppers
When you’re at the grocery store, color matters for more than just aesthetics. Red, yellow, and orange bell peppers are fully ripe, meaning they have a sweeter flavor profile and thicker, sturdier walls. Green peppers are technically unripened; they carry a more bitter, grassy note and tend to have thinner walls that can become flimsy when roasted.
Take a moment to “test drive” your peppers on the produce shelf. Look for peppers with four distinct bumps on the bottom rather than three. These “four-lobed” peppers have flatter bases, which means they will stand upright in your baking dish without tipping over and spilling their cheesy goodness everywhere.
The Role of Long-Grain White Rice
Pre-cooked long-grain white rice is a non-negotiable component of this filling. You might be tempted to throw raw rice in with the beef, but that leads to uneven textures and unpredictable moisture absorption. The rice acts as a culinary sponge, soaking up the savory juices from the beef and the acidity of the tomato sauce.
If possible, use rice that is still warm or freshly cooked. Warm rice grains are more flexible and have a slightly sticky surface that helps the filling bind together. Cold, day-old rice tends to stay individual and grainy, which can cause the filling to crumble apart when you slice into the pepper.
The Science of Moisture Control in Vegetables
Bell peppers are roughly 92% water. When you subject them to high heat, the cellular structure breaks down and the vacuoles release that stored liquid. If you stuff a raw pepper and bake it, that water is trapped inside the filling, which is exactly why so many recipes end up soggy and bland.
The pre-steam method is a technical workaround for this biological reality. By baking the empty peppers with a small amount of water under a foil seal for 15 minutes, you jumpstart the softening process. More importantly, you encourage the pepper to “weep” its excess water into the cavity before the beef is added.
Once you pull those peppers out of the oven, you’ll see a tablespoon or two of liquid sitting at the bottom of each shell. By discarding that “vegetable water” and patting the insides dry, you’ve effectively removed the primary cause of sogginess. This leaves you with a concentrated vegetable flavor and a perfect vessel for the beef.
Step-by-Step: Preparing the Pepper Shells
Start by slicing the tops off the peppers with a sharp knife. Instead of throwing those tops away, perform a “surgical” trim around the stem. Finely dice the remaining edible pepper flesh; this will be sautéed into your filling later, ensuring zero waste and adding an extra layer of sweetness to the beef mixture.
Reach inside the pepper and pull out the seed pod and the white membranes, also known as the ribs. These ribs can be slightly bitter and take up valuable real estate that should be filled with meat and cheese. A small spoon is a great tool for scraping the inside walls clean without piercing the skin.
Place the peppers upright in a baking dish that fits them snugly. If the dish is too large, the peppers might slide around. Adding that 1/4 cup of water to the bottom of the dish creates the steam environment needed to soften the skins. Cover the dish tightly with foil to trap that moisture for the initial 15-minute bake.
Developing Deep Flavor in the Beef Filling
To get the most out of your ground beef, you need to focus on the Maillard reaction. Don’t just cook the beef until it turns grey; keep it in the skillet until you see deep, brown, crispy bits forming. This caramelization is where the “meaty” flavor lives, and it provides a great textural contrast to the soft rice.
Once the beef is browned, you must drain the grease through a colander. Even lean beef produces some liquid fat, and removing it is vital for a clean-tasting dish. After returning the beef to the pan, sauté your onions, garlic, and reserved pepper tops until they are translucent and the moisture has evaporated.
Before adding the liquids, “bloom” your tomato paste and dried oregano in the center of the skillet for about a minute. This heat wakes up the essential oils in the herbs and mellows the metallic edge of the tomato paste. Once it smells fragrant and turns a shade darker, stir in the rice and tomato sauce to finish the filling.
Assembly: Packing the Cheesy Beef Stuffed Peppers
When it comes time to fill the peppers, don’t be afraid to use a little pressure. Use a spoon to pack the beef and rice mixture firmly into the bottom of each shell. Eliminating air pockets is crucial because those gaps can cause the pepper walls to buckle or collapse inward during the final stage of baking.
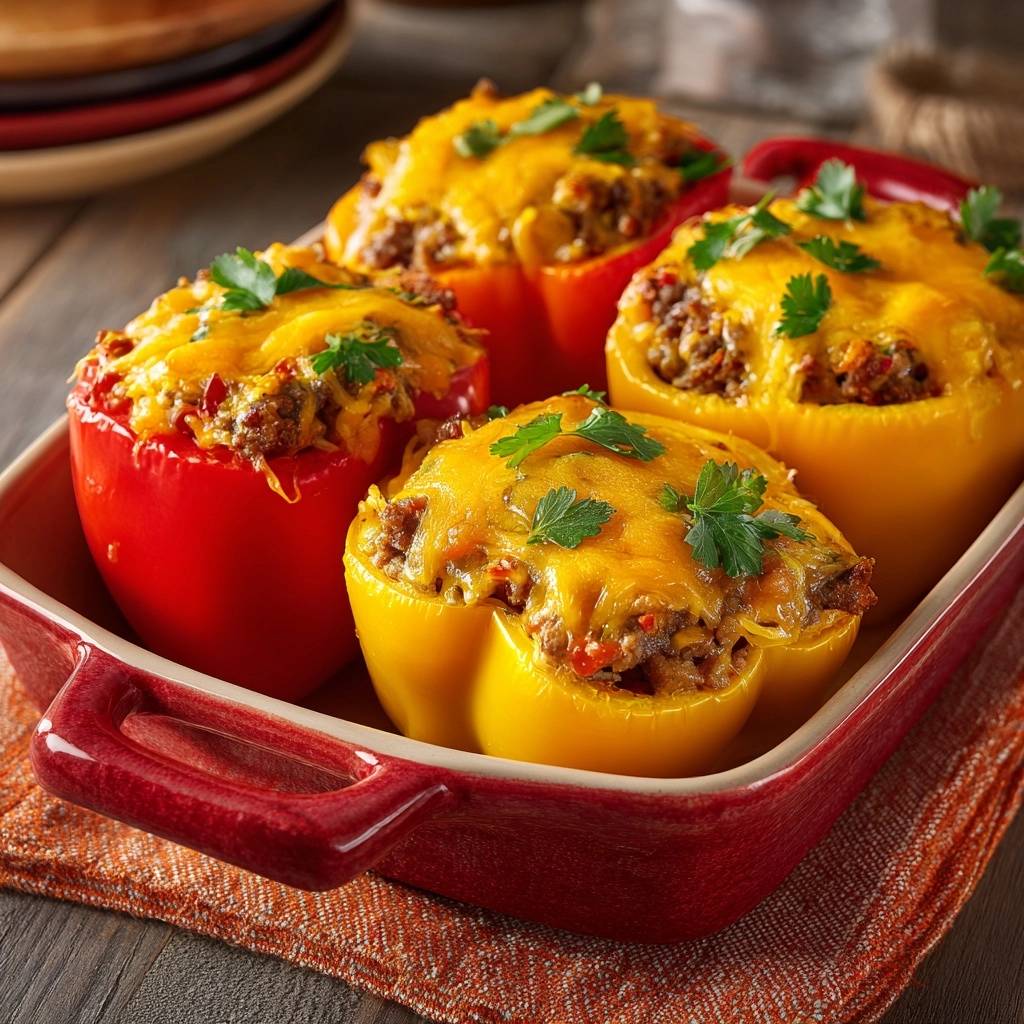
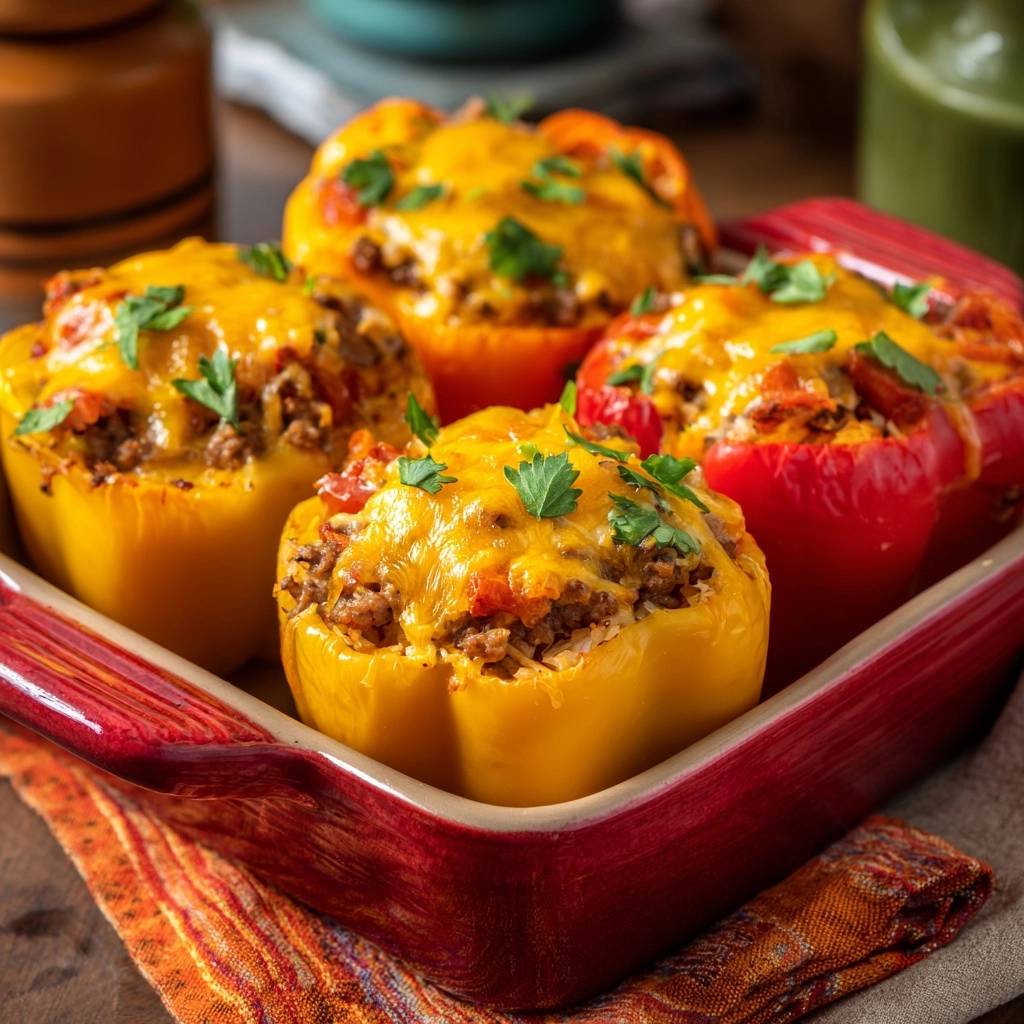
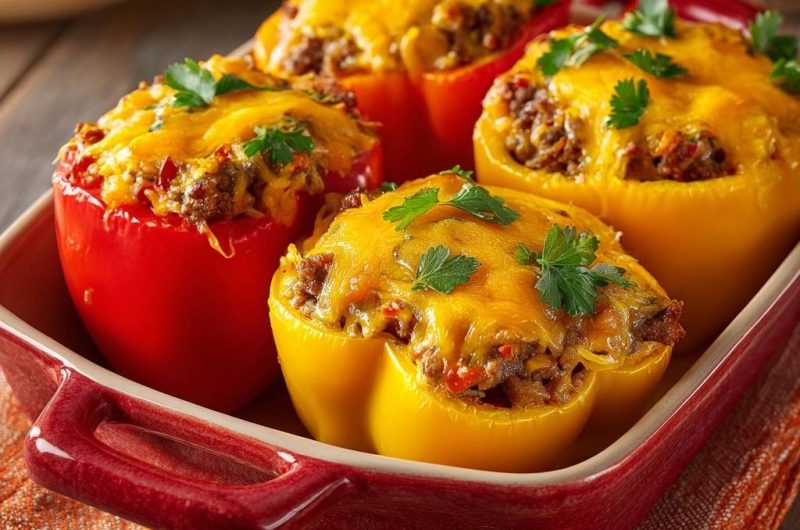
Fill the peppers all the way to the brim, then add your shredded cheddar. I like to use a “mounding” technique, where the cheese sits in a thick pile that extends slightly over the edges of the pepper. This creates a structural “lid” of melted cheese that seals the moisture inside the filling while the dry heat of the oven browns the exterior.
Sharp cheddar is the preferred choice here because its bold flavor stands up well to the sweetness of the peppers. If you use a mild cheese, it can get lost in the mix. Ensure the cheese is shredded coarsely so it melts into a thick, gooey layer rather than a thin, oily film.
The Two-Stage Baking and Broiling Process
The main bake happens at 375°F, which is the sweet spot for cooking. It is hot enough to finish softening the pepper walls but gentle enough that the beef filling doesn’t dry out. Since the beef and rice are already cooked, this 20-minute window is really about marrying the flavors together and melting the cheese.
The real transformation happens during the broiler finish. After the 20 minutes are up, switch your oven to the broiler setting. This direct, intense heat targets the proteins and sugars in the cheese. You aren’t just looking for melted yellow cheese; you want to see those beautiful, mahogany-colored toasted spots.
Stay right by the oven during this stage! The transition from “perfectly toasted” to “burnt” happens in a matter of seconds. Once the cheese is bubbly and shows those dark golden patches, pull them out immediately. The smell of toasted cheese and roasted peppers at this moment is absolutely incredible.
Avoiding Common Stuffed Pepper Mistakes
One of the biggest errors is using raw meat in the filling. People think it will save time, but it actually results in a greasy, grey mess and often leaves the onions crunchy and undercooked. Always brown and drain your meat first for the best texture and flavor profile.
Skipping the pre-roast is another common pitfall. If you put raw peppers in the oven with the filling, the peppers will still be tough and crunchy by the time the cheese is browned. Or, if you cook them long enough to soften, the filling will have turned into a watery soup. The pre-steam is your insurance policy.
Be careful with your sauce-to-rice ratio. If you use a very watery tomato sauce or too much of it, the rice won’t be able to absorb it all, leading to a “leaky” pepper. Stick to thick-style tomato sauces or crushed tomatoes, and always include the tomato paste to keep the mixture bound together.
Finally, don’t overfill the peppers with rice. While rice is a great filler, too much of it dilutes the savory beef flavor. The ratio should feel balanced, with the beef being the star of the show and the rice acting as the supporting texture that holds everything in place.
Flavor Variations and Ingredient Swaps
Once you master the moisture control technique, you can pivot this recipe in many directions. For a Mediterranean twist, swap the ground beef for ground lamb. Use the same browning and draining process, but replace the cheddar with a mix of mozzarella and crumbled feta. The salty feta pairs beautifully with the roasted peppers.
If you want a spicy version, incorporate diced jalapeños into the sauté step with the onions. Swap the sharp cheddar for a spicy pepper jack cheese. You can even add a dash of cayenne pepper to the beef mixture to give it a slow-building heat that cuts through the richness of the meat.
For those who prefer a different grain, quinoa works exceptionally well as a substitute for white rice. It has a nutty flavor and a slightly firmer texture. Just ensure the quinoa is fully cooked and fluffed before adding it to the skillet, as it absorbs liquid differently than traditional long-grain rice.
Make-Ahead Strategies and Freezing Instructions
You can easily prep these peppers up to 24 hours in advance. Follow the instructions through the assembly stage, but do not do the final bake. Cover the stuffed, unbaked peppers with plastic wrap and store them in the fridge. When you’re ready for dinner, just add 5-10 minutes to the baking time to account for the cold temperature.
If you want to freeze them, it is best to do so after the assembly but before the final bake. Wrap each stuffed pepper individually in plastic wrap and then place them in a freezer-safe bag. This prevents freezer burn and allows you to pull out just one or two peppers at a time for a quick meal.
To cook from frozen, let the peppers thaw completely in the refrigerator overnight. This slow thaw is crucial; it prevents “thermal shock,” which causes the vegetable cells to rupture and release water. Once thawed, bake them according to the recipe instructions, and they will taste just as fresh as the day you made them.
Optimal Side Dish Pairings
Since these peppers are quite hearty and contain both protein and starch, you want to pair them with high-texture, bright sides. A crisp arugula salad with a simple lemon vinaigrette is perfect. The peppery bite of the greens and the acidity of the lemon cut right through the richness of the beef and cheese.
Roasted garlic broccolini is another excellent choice. The charred florets provide a nice crunch that contrasts with the soft texture of the stuffed pepper. It also adds a pop of green to the plate, making the whole meal feel balanced and vibrant without being overly heavy.
Avoid heavy, starchy sides like mashed potatoes or mac and cheese. Since the peppers already feature a significant amount of rice, adding another heavy starch can make the meal feel sluggish. Stick to light, vegetable-forward sides that enhance the roasted flavors of the bell peppers.
Troubleshooting Your Stuffed Peppers
Why did my peppers fall over in the oven?
Peppers often tip over if the baking dish is too large or if the peppers have uneven bottoms. To fix this, you can use a smaller dish where the peppers support each other. Alternatively, you can create small “rings” out of crumpled aluminum foil to sit the peppers in, which acts as a stable base during the baking process.
Can I use brown rice instead of white?
Yes, you can certainly use brown rice, but keep in mind that it is less absorbent than white rice. Because brown rice has a bran layer, it won’t soak up the sauce as readily. I recommend increasing the tomato sauce by about two tablespoons to ensure the filling doesn’t feel dry or crumbly.
My cheese burned before the pepper was soft. What happened?
This usually happens if the pre-steam step was skipped or if the oven rack was positioned too high. If the pepper walls are still firm but the cheese is browning too fast, tent the dish with foil for the remainder of the bake. Next time, ensure you don’t skip the 15-minute initial steam with the water and foil.
How do I store leftovers without them getting soggy?
Store leftovers in an airtight container in the refrigerator for up to three days. To maintain the best texture, avoid the microwave, which can make the peppers rubbery. Instead, reheat them in an air fryer at 350°F for 5-7 minutes or in a toaster oven. This helps recrisp the cheese and keeps the pepper walls firm.
Can I use a different type of meat?
Ground turkey or ground chicken are great alternatives to beef. However, because these meats are much leaner, they can dry out quickly. If using poultry, I suggest adding an extra tablespoon of tomato paste or a splash of beef broth to the filling to maintain the moisture and richness that the beef usually provides.
Cheesy Beef Stuffed Peppers
Course: Main CourseCuisine: AmericanDifficulty: easy4
servings15
minutes45
minutes60
Minutes410
kcalAmerican
Ingredients
4 large bell peppers (red and yellow)
1 pound lean ground beef
1 small onion, finely diced
2 cloves garlic, minced
1/2 cup finely diced red bell pepper (from the tops of the peppers)
1 cup cooked white rice
1/2 cup tomato sauce (thick style)
1 tablespoon tomato paste
1 teaspoon dried oregano
1 teaspoon salt
1/2 teaspoon black pepper
2 cups shredded sharp cheddar cheese
Fresh flat-leaf parsley for garnish
Directions
- Preheat your oven to 375°F (190°C). Slice the tops off the peppers. Remove the seeds and ribs from the cavities. Finely dice the edible parts of the pepper tops to use in the filling.
- Place the empty peppers upright in a baking dish. Pour 1/4 cup of water into the bottom of the dish, cover tightly with foil, and bake for 15 minutes. This steams the peppers so they are tender but firm, and allows you to drain off the “vegetable water” before stuffing.
- While peppers pre-bake, brown the ground beef in a large skillet over medium-high heat. Once fully cooked, drain the grease thoroughly through a colander. This is vital to prevent a greasy, soggy base.
- In the same skillet, sauté the diced onion, garlic, and the diced pepper tops for 4 to 5 minutes until softened and any excess moisture has evaporated.
- Stir in the tomato paste and cook for 1 minute to caramelize. Add the cooked rice, tomato sauce, oregano, salt, and pepper. Stir well and simmer for 3 minutes. The mixture should be thick and bind together, not runny.
- Remove the peppers from the oven. Carefully lift them with tongs to pour out any liquid collected inside the shells, then discard the water from the bottom of the baking dish. Pat the inside of the peppers dry with a paper towel.
- Stuff each pepper generously with the beef and rice mixture, pressing down slightly to pack the filling.
- Top each pepper with a heavy, mounded layer of shredded cheddar cheese.
- Bake uncovered for 20 minutes. Then, turn the broiler on high for 2-3 minutes until the cheese is bubbly and shows the golden-brown toasted spots seen in the image.
- Garnish with whole fresh parsley leaves and serve immediately.
Notes
- The secret to the anti-soggy bottom is draining the beef in a colander and pre-roasting the peppers to remove excess vegetable water.


