
Nothing ruins a dessert faster than a soggy, mushy bottom. You’ve likely seen those beautiful layered brownie bites online, only to find that when you make them at home, the cheesecake sinks right into the raw brownie batter. This structural collapse creates a muddy texture that lacks the distinct, satisfying layers of a professional pastry. Most recipes fail because they ask you to bake both layers at once, which is a recipe for disaster.
The secret to a perfect bite lies in a specific par-baking technique. By giving the brownie base a head start in the oven, you create a firm, fudgy foundation that can actually support the weight of the creamy cheesecake. This method ensures that every single bite has a clear definition between the dark, rich chocolate and the tangy, velvety topping. It’s the difference between a messy kitchen experiment and a dessert that looks like it came from a high-end bakery.
I’ve found that the temperature of your ingredients is just as vital as the baking time. If you use cold cream cheese, you’ll end up with tiny white lumps that never quite melt away, no matter how hard you whisk. Always let your dairy sit on the counter for at least an hour. When the cream cheese is truly soft, it emulsifies perfectly with the sugar and egg, resulting in a silkiness that contrasts beautifully against the dense, chewy brownie base.
The Anatomy of a Perfect Layered Dessert
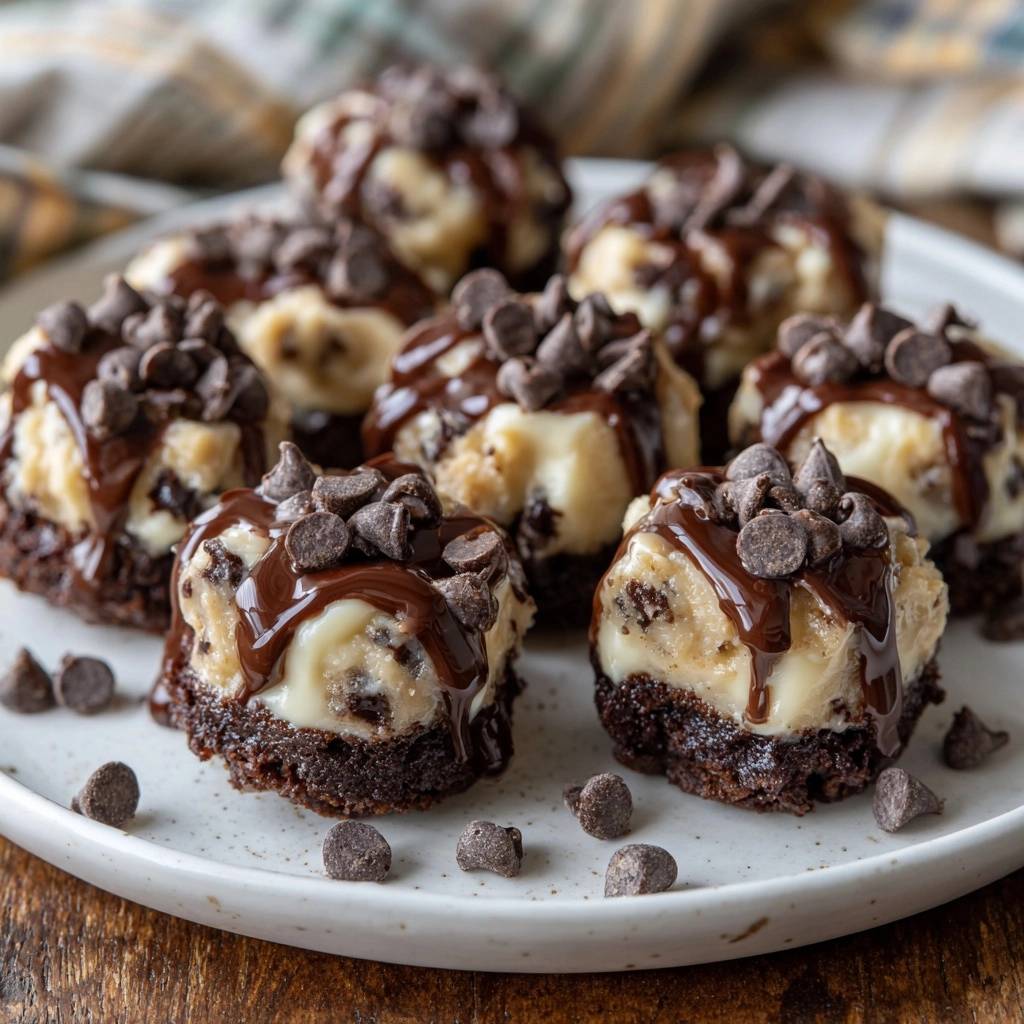
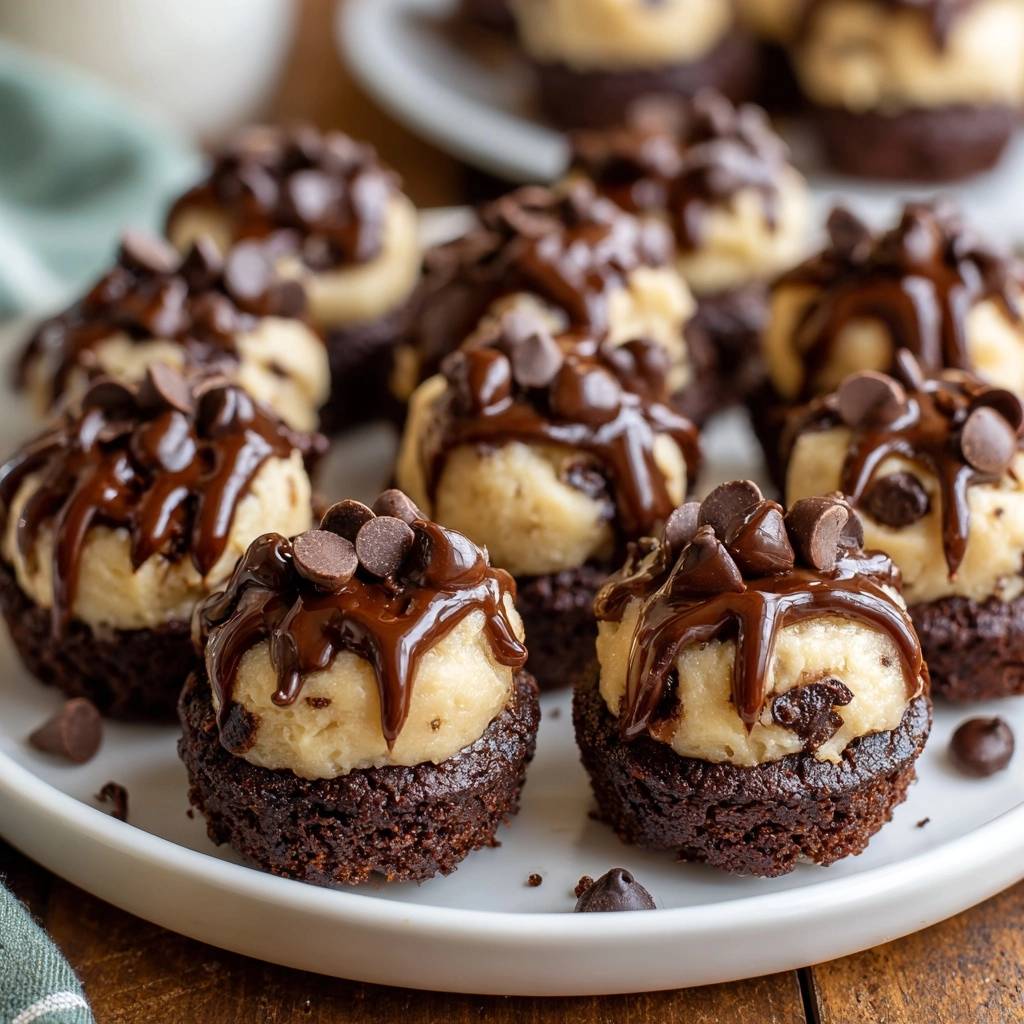
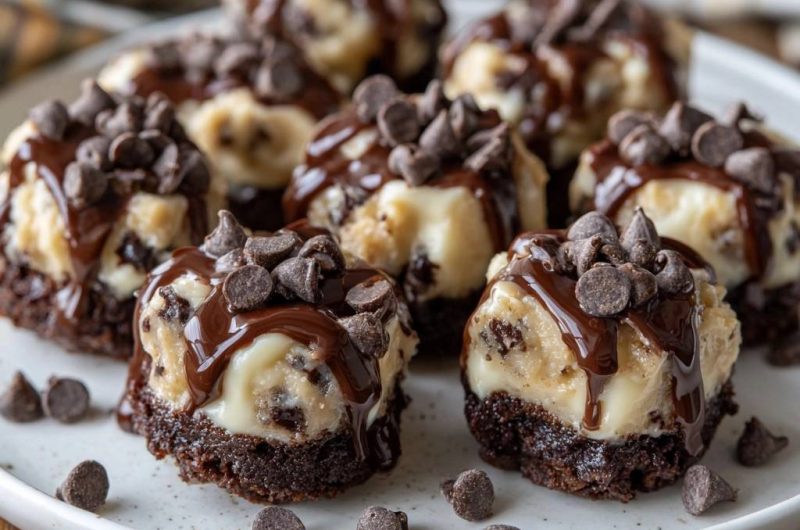
A truly great dessert should be a journey of textures. When you bite into these Chocolate Chip Cheesecake Brownie Bites, you first hit the snap of the hardened chocolate drizzle and the crunch of the mini chips on top. This gives way to the airy, cloud-like cheesecake layer that melts almost instantly on your tongue. Finally, you reach the fudgy brownie base, which provides a satisfying, chewy finish that anchors the entire experience.
Choosing a bite-sized format isn’t just about making them look cute for a party. This smaller surface area allows the edges of the brownie to caramelize slightly against the muffin tin, creating a structural “cup” for the filling. Unlike traditional bars that can get messy when sliced, these individual portions stay perfectly intact. They are the ultimate solution for party catering because they require no forks, no plates, and offer built-in portion control for your guests.
Essential Components for Chocolate Chip Cheesecake Brownie Bites
Quality ingredients are the backbone of this recipe. While it starts with a box mix, the way you handle the components determines the final result. I always recommend choosing a “Fudge” style brownie mix rather than a “Cake-like” one. Fudge mixes have a higher fat-to-flour ratio, which creates the dense, sturdy base needed to hold up the cheesecake without crumbling under the pressure.
The chocolate chips you choose also play a major role in the flavor profile. Semi-sweet chocolate is the gold standard here because it provides a sophisticated bitterness that cuts through the high sugar content of the brownie and the tang of the cream cheese. If you use milk chocolate, the dessert can become cloyingly sweet. Look for chips with a high cocoa butter content for the best melt and mouthfeel.
Selecting the Right Brownie Base
Different brands of brownie mix require varying amounts of oil and water, which can slightly alter your par-baking time. If your mix is particularly oily, you might need an extra minute of par-baking to ensure the “shelf” is set. To give a box mix a more artisanal flavor, try adding a teaspoon of espresso powder or a generous pinch of sea salt to the batter. These small additions deepen the chocolate notes and make the base taste completely homemade.
The Cream Cheese Filling Requirements
Softened cream cheese is non-negotiable for a professional finish. If you try to beat cold cream cheese, you’ll likely over-mix the batter while trying to get rid of the lumps. Over-mixing incorporates too much air, which causes the cheesecake to puff up like a soufflé in the oven and then crack as it cools. For the best results, the cream cheese should be so soft that you can easily press a finger all the way through the block with zero resistance.
The Science of the Anti-Soggy Bottom Secret
The physics of par-baking is what sets this recipe apart from the rest. When you bake the brownie batter alone for eight minutes, the heat begins to set the starches and proteins in the flour and eggs. This creates a semi-solid “crust” on the top of the brownie. Without this step, the heavy, moisture-rich cheesecake batter would simply sink through the raw brownie mix, leading to a blended, gummy mess that never fully sets.
Moisture migration is the enemy of a layered dessert. Raw cheesecake batter is full of liquid from the eggs and the moisture in the cheese. If this liquid seeps into unbaked brownie batter, it ruins the crumb structure and prevents the brownie from developing that classic fudgy chew. By par-baking, you create a thermal barrier. This “shelf” allows the cheesecake to sit proudly on top, baking into a distinct layer while the brownie finishes cooking underneath it.
Furthermore, this two-stage process allows the brownie to develop a deeper flavor. The initial blast of heat starts the Maillard reaction on the edges of the brownie, giving it a slight caramel note that complements the tang of the cheesecake. It’s a small technical change that yields a massive improvement in both the structural integrity and the flavor profile of the final product.
Step-by-Step: Preparing the Brownie Foundation
Start by preheating your oven to 350°F and prepping your mini muffin tin. While paper liners are convenient, I prefer generously greasing the tin with non-stick spray or butter. This allows the chocolate drizzle to flow down the sides of the bite later on, creating a much more professional look. When you fill the cups, stick strictly to the 1/3 full rule. It might look like a small amount, but the brownie will expand, and you need plenty of room for that generous cheesecake topper.
Technique: Mixing the Cheesecake and Chocolate Chips
When you move on to the cheesecake layer, use a gentle hand. Once the cream cheese and sugar are smooth, add the egg and vanilla. Use a spatula to “fold” the chocolate chips in rather than using a hand mixer. You want to stop mixing the very second the yellow streaks of the egg disappear. If you keep beating the mixture, you’ll whip in air bubbles that will expand in the oven and cause your cheesecake to collapse or “crater” once it hits the cool air.
The Two-Stage Baking Process
Timing is everything during the two-stage bake. After the first 8 minutes, the brownies should look matte around the edges but still appear slightly wet in the very center. Don’t worry if they deflate a bit when you take them out; that creates a perfect little well for your cheesecake filling. Quickly spoon the cheesecake mixture to the very top of each cup. You want that filling to be flush with the rim of the muffin tin for a full, decadent look.
For the final bake, use the “jiggle test.” After 12 to 15 minutes, the edges of the cheesecake should be firm and set, but the very center should still have a slight wobble when you gently shake the pan. This residual heat will finish the cooking process as the bites cool on the counter. If you wait until the center is completely stiff in the oven, the cheesecake will turn rubbery and lose its creamy, melt-in-your-mouth quality.
Cooling and Extraction Strategies
Patience is your best friend once the pan comes out of the oven. You must allow the bites to cool completely at room temperature before you even think about moving them. This thermal transition allows the fats in the brownie and the proteins in the cheesecake to stabilize. If you try to remove them while they’re warm, the layers might slide apart or the brownie might stick to the bottom of the tin.
For the cleanest release, pop the entire cooled pan into the fridge for 30 minutes. The cold air firms up the butter and oils in the brownie, making it much less likely to crumble. Run a thin, sharp knife or a small offset spatula around the edge of each bite. If you greased the pan well, they should pop out with a gentle nudge. This extra step ensures the sides of your bites are smooth and ready for the chocolate drizzle.
Finishing Touches: The Chocolate Drizzle and Topping
The final drizzle is what gives these bites their “wow” factor. I recommend using high-quality chocolate melting wafers rather than standard chocolate chips for the drizzle. Wafers are formulated with more cocoa butter, which gives them a beautiful shine and a satisfying “snap” when you bite into them. Melt them in short 30-second bursts in the microwave, stirring well between each interval to prevent the chocolate from scorching.
You can use a spoon to create a rustic drizzle, but for a professional look, a piping bag or a plastic zip-top bag with the corner snipped off works best. Move your hand in a quick, zig-zag motion across the bites. While the drizzle is still wet, immediately sprinkle the remaining chocolate chips on top. This ensures they stick firmly to the bite. A final hour in the fridge sets the drizzle and marries all the flavors together perfectly.
Avoiding Common Layering Mistakes
If you find that your cheesecake layer has sunk into the brownie despite par-baking, you likely over-beat the cheesecake mixture. Too much air causes it to rise and then fall, creating a hollow center. If the brownie base feels too hard or crunchy, you may have over-baked it during the first stage. Remember, it should still look a bit underdone when you pull it out at the 8-minute mark to account for the second trip into the oven.
Sometimes the chocolate drizzle can “seize” or become grainy if even a drop of water gets into the bowl. Ensure all your tools are bone-dry before melting the chocolate. If your drizzle looks dull, it might be because the chocolate was overheated. To fix a broken or messy drizzle, you can always add a few extra chocolate chips or even a dusting of cocoa powder to hide any imperfections. Most mistakes are easily covered with a little extra chocolate!
Make Ahead and Storage Logistics
These bites are actually better the next day. A full 24 hours in the refrigerator allows the moisture to redistribute, making the brownie even fudgier and the cheesecake more flavorful. Store them in a single layer in an airtight container. Because cheesecake is porous, it can easily absorb “fridge odors” like onions or garlic, so make sure your container has a very tight seal to keep the flavor pure and sweet.
Freezing for Long-Term Freshness
If you want to make these far in advance, they freeze beautifully. Place the finished bites on a parchment-lined baking sheet and freeze them for an hour until they are solid. Once they are firm, you can toss them into a freezer bag. This “flash-freezing” prevents them from sticking together. When you’re ready to eat, thaw them in the fridge. If the chocolate drizzle develops a white film (called bloom) from the cold, a quick 5-second zap in the microwave will bring back the shine.
Expert Tips for High-Volume Batching
If you’re making these for a big event, consistency is key. When using multiple racks in your oven, rotate the pans halfway through the baking time to ensure even heat distribution. Most home ovens have “hot spots,” and rotating the tins prevents one batch from burning while the other stays raw. If you have two 24-count tins, you can bake them side-by-side, but make sure there is at least an inch of space between the pans for the air to circulate.
Troubleshooting Your Brownie Bites
Can I use a homemade brownie recipe instead of a box?
Yes, you certainly can! However, you need to be mindful of the fat content. Homemade recipes with a very high butter or oil content may require an extra 2-3 minutes of par-baking to ensure the base is sturdy enough. Avoid “cakey” homemade recipes that use baking powder, as they will rise too much and leave no room for the cheesecake topping.
Why did my cheesecake layer crack?
Cracking is almost always caused by over-baking or over-mixing. If you beat too much air into the batter, it expands and then contracts, leading to cracks. Additionally, if you leave the bites in the oven until the cheesecake is completely stiff, the loss of moisture will cause the surface to split. Always pull them out when the center still has a slight jiggle.
Can I use milk chocolate instead of semi-sweet?
You can, but keep in mind that milk chocolate is significantly sweeter. Since the brownie base and the cheesecake filling already contain a good amount of sugar, using milk chocolate for the chips and the drizzle can make the dessert feel overwhelming. If you do use milk chocolate, consider adding a tiny pinch of sea salt to the top to balance the sweetness.
My bites are stuck in the pan; how do I save them?
If the bites won’t budge, the fats in the brownie have likely hardened and “glued” them to the tin. Try the warm towel trick: soak a kitchen towel in hot water, wring it out, and wrap it around the bottom of the muffin tin for 2 minutes. The gentle heat will soften the fats just enough to let the bites slide out easily with the help of a thin knife.
How long can these sit out at room temperature?
Because these bites contain cream cheese and eggs, they should not sit out for more than two hours. If you are serving them at a party, it is best to keep them chilled until right before serving. They actually taste best when slightly cool, as the cheesecake layer remains firm and the chocolate drizzle stays snappy.
Chocolate Chip Cheesecake Brownie Bites
Course: DessertCuisine: AmericanDifficulty: easy24
bites20
minutes25
minutes45
Minutes185
kcalAmerican
Ingredients
1 box (approx. 18 oz) fudge brownie mix plus ingredients required on box (typically eggs, oil, and water)
8 ounces cream cheese, softened to room temperature
1/3 cup granulated sugar
1 large egg
1/2 teaspoon vanilla extract
1 cup semi-sweet chocolate chips (divided: 1/2 cup for the batter, 1/2 cup for the topping)
1/2 cup semi-sweet chocolate melting wafers or high-quality baking chocolate
Directions
- Preheat your oven to 350°F (175°C). Generously grease a 24-count mini muffin tin with non-stick spray or butter.
- Prepare the brownie batter according to the package instructions. Fill each muffin cup only 1/3 of the way full.
- To prevent a soggy bottom, par-bake the brownie bases alone for exactly 8 minutes. This creates a structural crust that prevents the cheesecake from sinking into the raw batter.
- While the bases bake, prepare the cheesecake filling. In a medium bowl, beat the softened cream cheese and sugar until completely smooth and no lumps remain. Add the egg and vanilla, mixing just until combined. Fold in 1/2 cup of the chocolate chips.
- Remove the tin from the oven. The brownie centers may slightly deflate; this is normal. Immediately spoon the cheesecake mixture over the par-baked brownie bases, filling them to the very top of the muffin cups.
- Return the tin to the oven and bake for another 12 to 15 minutes. The cheesecake should be set around the edges but still have a very slight jiggle in the center.
- Allow the bites to cool completely in the pan at room temperature. Once cooled, run a thin knife around the edges to release them. For the cleanest removal and best texture, refrigerate the pan for 30 minutes before popping the bites out.
- Place the bites on a serving plate. Melt the chocolate wafers in the microwave in 30-second intervals, stirring until smooth. Using a spoon or piping bag, drizzle the melted chocolate generously over the tops of the bites, allowing it to drip down the sides as seen in the image.
- Immediately top the wet chocolate drizzle with the remaining 1/2 cup of chocolate chips so they adhere. Refrigerate for at least one hour before serving to allow the layers to fully firm up.
Notes
- For the cleanest removal and best texture, refrigerate the pan for 30 minutes before popping the bites out. Ensure cream cheese is at room temperature to avoid lumps in the cheesecake filling.


