
The secret to a world-class mac and cheese isn’t just about the amount of cheese you use, but how you handle the proteins in that cheese. Most home cooks struggle with a sauce that turns out grainy, oily, or thin, but the fix is surprisingly simple. By mastering the textural contrast between a velvety, tempered sauce and the shatter-like crunch of homemade fried onions, you can turn a basic comfort food into a professional-grade masterpiece.
You’ve likely experienced the frustration of a “broken” sauce where the fats separate from the solids, leaving a sandy texture on your tongue. This recipe solves that by focusing on temperature control and the specific geometry of the pasta. We use cavatappi, those beautiful corkscrew spirals, because they act like a trap for the sauce, ensuring every bite is loaded with creamy goodness rather than just sitting in a puddle at the bottom of the bowl.
The real pro tip here is the “off-heat” method for the cheese. If you keep the sauce bubbling while you add your cheddar, the high heat will cause the proteins to seize and tighten, which is exactly what creates that unwanted grit. By pulling the pan off the burner and letting the residual heat do the work, you guarantee a glossy, silky finish every single time. Trust me, once you see the difference, you’ll never go back to the stovetop-boil method again.
Essential Components for a Silky Cheese Sauce
To get that signature professional finish, you have to start with the right building blocks. First and foremost, you must grate your own cheese from a block. Pre-shredded bagged cheese is coated in potato starch or cellulose to keep the strands from sticking together in the bag. While that’s convenient for a taco, it’s the enemy of a smooth sauce because those anti-caking agents prevent the cheese from melting into a cohesive liquid.
Sharp cheddar provides the punchy, nostalgic flavor we all crave, while a bit of finely grated parmesan adds a salty, nutty depth. However, the sauce won’t reach its full potential if you use cold milk straight from the fridge. Cold dairy can cause the butter in your roux to seize up, leading to a lumpy base. By using room-temperature whole milk, you ensure a smooth transition as the liquid hits the hot flour and butter mixture.
The choice of pasta is just as functional as it is aesthetic. Cavatappi is the superior choice here because its ridges and hollow center provide maximum surface area. This allows the sauce to cling to the outside and fill the inside of each noodle. If you can’t find cavatappi, look for large shells or campanelle, which offer similar “sauce-trapping” capabilities to keep the dish from feeling dry.
The Role of Fat and Flour in the Roux
A perfect cheese sauce starts with a blond roux, which is a simple 1:1 ratio of butter to flour. You want to melt the butter over medium heat and whisk in the flour until it forms a thick paste. It’s vital to cook this mixture for exactly two minutes; this is just enough time to cook out the “raw” flour taste without letting the butter brown. If you undercook it, your sauce will taste like dough, but if you overcook it, you’ll lose the thickening power needed for a heavy cheese sauce.
Why Freshly Grated Cheese Prevents Grittiness
The science of a smooth sauce comes down to emulsification. When you grate a fresh block of sharp cheddar, you are working with pure fats and proteins that are ready to bond with your milk base. Because there are no added starches or preservatives on the surface of the cheese, it melts at a lower, more consistent temperature. This results in a glossy, uniform sauce that feels like silk on the palate rather than a sandy, separated mess.
Technique: Achieving the Perfect Onion Crunch
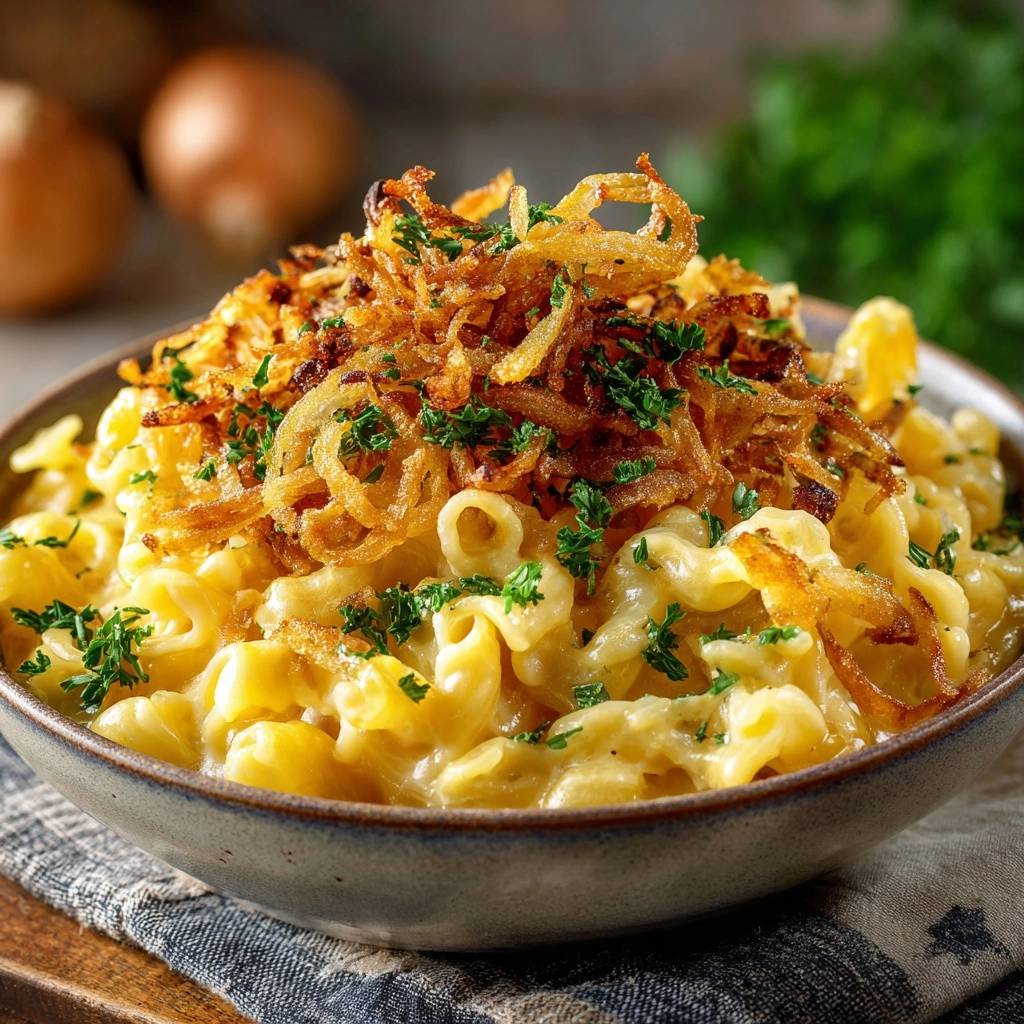
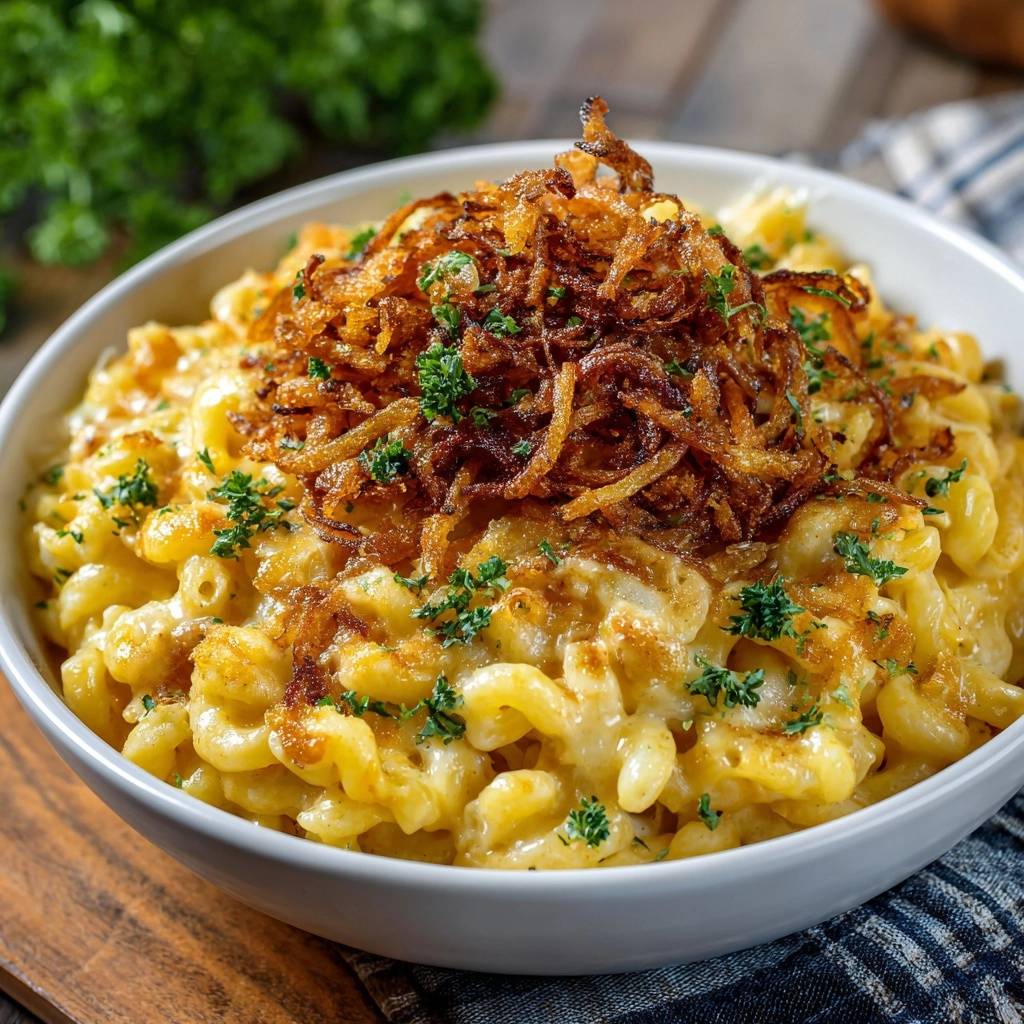
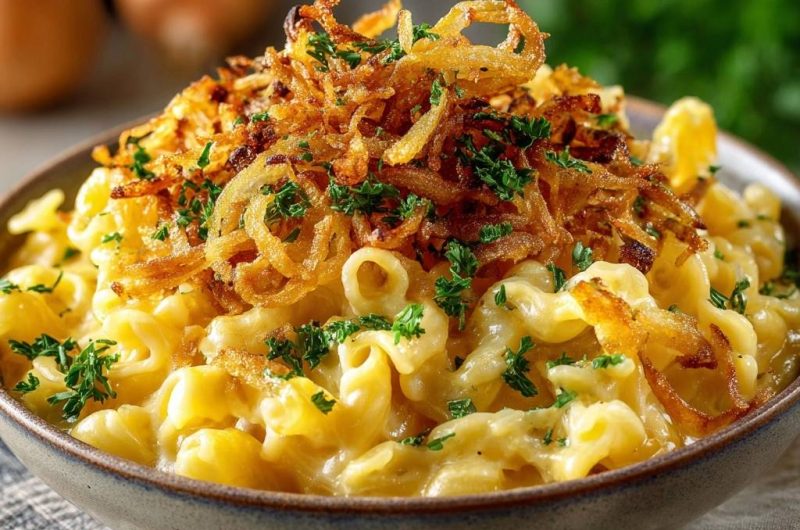
The crispy onion topping isn’t just a garnish; it’s the essential textural counterpoint to the soft, rich pasta. To get that “shatter-like” crunch that stays crispy even when sitting on top of a steaming bowl of noodles, we use a specific blend of all-purpose flour and cornstarch. While flour provides the bulk of the coating, cornstarch is the secret weapon because it interferes with gluten development, resulting in a more brittle and delicate crust.
When you toss the onions in this mixture, make sure you separate the rings thoroughly. Every single surface needs to be dusted so the moisture from the onion is locked inside while the outside fries into a golden shell. This creates a barrier that prevents the onions from becoming limp or soggy. You’re looking for a deep golden brown color, which indicates that the sugars in the onion have caramelized and the coating has fully dehydrated into a crisp flake.
Slicing for Uniformity and Even Frying
Consistency is the most important factor when frying onions. If you have some thick rings and some paper-thin ones, the thin ones will burn to a bitter crisp before the thick ones even start to soften. Use a mandoline or a very sharp chef’s knife to get the rings as thin as possible. Uniform slices ensure that every piece of onion finishes cooking at the exact same time, giving you a pile of perfectly even, golden-brown toppings.
Temperature Control for Golden-Brown Results
Maintaining your oil at 350°F is non-negotiable for a clean, non-greasy fry. If the oil is too cold, the onions will soak up the fat like a sponge and become heavy. If it’s too hot, the flour coating will burn before the onion inside has a chance to soften. Once they come out of the oil, hit them with a pinch of salt immediately. The heat helps the salt crystals adhere to the surface, ensuring every bite is seasoned to perfection.
Step-by-Step: Building the Creamy Mac and Cheese
Building this dish is all about timing and sequence. You want to have all your ingredients measured and ready before you turn on the stove. Because the sauce comes together quickly once the milk is added, being prepared prevents the roux from burning or the pasta from overcooking while you’re busy shredding cheese or measuring spices.
Phase 1: Preparing the Pasta and Toppings
Start by boiling your cavatappi in heavily salted water. The “minus one minute” rule is crucial here; you want the pasta to be slightly firmer than al dente. This is because the noodles will continue to cook and absorb moisture once they are folded into the hot cheese sauce. If you cook them to full tenderness in the water, they will turn mushy and lose their shape by the time you serve the dish.
Phase 2: The Gradual Milk Incorporation
Once your roux is ready, begin adding the room-temperature milk. Do not pour it all in at once! Start with a tiny splash and whisk vigorously until a thick paste forms. Repeat this process, adding a little more milk each time. This “velouté-style” approach ensures that the flour particles are evenly distributed, creating a stable emulsion that won’t break or become lumpy as it thickens into a creamy base.
Phase 3: The Off-Heat Melting Method
This is the most critical step for a professional result. Once your milk base is thick enough to coat the back of a spoon, remove the pan from the heat entirely. Let it sit for about 60 seconds. This slight drop in temperature is the “safety zone” for the cheese. Fold in the shredded cheddar and parmesan one handful at a time. The residual heat is more than enough to melt the cheese into a glossy, flowing sauce without stressing the proteins into a grainy texture.
Troubleshooting Your Macaroni and Cheese Sauce
If your sauce feels a bit too thick after adding the cheese, don’t panic. You can easily thin it out by adding a tablespoon of warm milk or a splash of the reserved pasta cooking water. Whisk it in gently until you reach your desired consistency. The starch in the pasta water actually helps stabilize the sauce, making it even creamier.
In the rare event that your sauce looks like it’s starting to separate or “break,” you can often save it with vigorous whisking and a tiny bit of heat. However, the best way to avoid this is to ensure you never let the sauce come to a boil once the cheese has been added. If it looks oily, it usually means the heat was too high, and adding a splash of cold milk while whisking can sometimes bring the emulsion back together.
Flavor Variations and Ingredient Swaps
While sharp cheddar is the classic choice, you can easily elevate the flavor profile by swapping in different cheeses. Gruyère or Fontina are excellent choices if you want a more sophisticated, nutty melt. If you like a bit of a kick, try replacing the smoked paprika with chipotle powder or adding a diced jalapeño to the butter while you’re making the roux.
For a more traditional French-inspired flavor, add a tiny pinch of freshly grated nutmeg to the sauce. It doesn’t make the dish taste like dessert; instead, it enhances the creaminess of the dairy and adds a subtle complexity that makes people wonder what your “secret ingredient” is. You can also swap the parsley garnish for chives or scallions for a sharper, onion-forward finish.
Make-Ahead Strategies and Storage Tips
Mac and cheese is best served fresh, but you can certainly handle leftovers with care. The sauce will naturally thicken and be absorbed by the pasta as it sits in the fridge. When reheating, add a splash of milk to the bowl before microwaving or heating on the stovetop. This extra moisture helps “loosen” the sauce and restores that creamy mouthfeel that is often lost during cooling.
The crispy onions should always be stored separately in an airtight container at room temperature. If you put them in the fridge with the pasta, they will absorb the moisture from the sauce and lose their crunch instantly. To refresh the onions the next day, you can pop them in a toaster oven for 2 minutes to bring back that signature “shatter” before topping your reheated mac.
Optimal Pairings for a Rich Pasta Dish
Because this dish is incredibly rich and decadent, you want to pair it with something that offers a bright, acidic contrast. A simple arugula salad tossed in a sharp lemon vinaigrette is the perfect companion. The bitterness of the greens and the acidity of the lemon cut right through the heavy cheese sauce, cleansing your palate between bites.
Roasted vegetables also work beautifully, especially those with a bit of char. Try roasted broccolini with plenty of garlic or charred Brussels sprouts with a drizzle of balsamic glaze. These earthy, slightly bitter sides balance the sweetness of the fried onions and the richness of the cheddar, making the entire meal feel more balanced and complete.
Expert Tips for Professional Results
Firstly, always salt your pasta water like the sea. This is your only chance to season the actual noodle, and it makes a massive difference in the final flavor of the dish. Secondly, use the “back of the spoon” test for your sauce. Dip a metal spoon into the sauce and run your finger through it; if the line stays clean and the sauce doesn’t run, it’s thick enough to hold up to the pasta.
Thirdly, don’t skip the dry mustard powder. Even if you don’t like mustard, a small amount acts as a flavor “bridge” that heightens the sharpness of the cheddar without making the dish taste like mustard. Finally, always use a heavy-bottomed saucepan. Thin pots have hot spots that can easily scorch the milk or the roux, which will ruin the flavor of your entire sauce with a burnt aftertaste.
How should I store and reheat leftovers?
Store the mac and cheese in an airtight container in the refrigerator for up to 3 to 4 days. To reheat, place a portion in a microwave-safe bowl and add 1 to 2 tablespoons of milk. Cover and heat in 30-second intervals, stirring in between, until creamy and hot. Store the fried onions separately in a dry container at room temperature to keep them from getting soggy.
Why did my cheese sauce turn out grainy or sandy?
Grittiness usually happens for two reasons: using pre-shredded bagged cheese or overheating the sauce. Bagged cheese contains cellulose which doesn’t melt smoothly. Additionally, if you add cheese to a boiling liquid, the proteins clump together. Always use freshly grated cheese and add it to the sauce after you have removed the pan from the heat source.
Can I use a different type of pasta?
Yes, you can substitute cavatappi with other shapes like elbow macaroni, large shells, or penne. The key is to choose a pasta with ridges or a hollow center so the sauce has plenty of places to cling. Avoid long, thin noodles like spaghetti, as they don’t hold the heavy cheese sauce as well and can result in a messy eating experience.
What can I use if I don’t have cornstarch for the onions?
If you don’t have cornstarch, you can use all-purpose flour for the entire coating. However, the onions might be slightly less “shattery” and a bit more bread-like. Another great alternative is rice flour, which provides an incredibly light and crispy texture similar to tempura. Ensure the onions are sliced very thin regardless of the coating you choose.
Is there a way to make the sauce even richer?
For an ultra-decadent version, you can replace one cup of the whole milk with heavy cream. You can also experiment with adding a dollop of cream cheese or a splash of evaporated milk. These additions increase the fat content and provide extra stabilizers, which can make the sauce even more resistant to breaking while adding a velvety, luxurious mouthfeel.
Can I bake this mac and cheese?
This specific recipe is designed for the stovetop to maintain maximum creaminess. If you choose to bake it, undercook the pasta by 2 to 3 minutes and add an extra half-cup of milk to the sauce, as it will thicken significantly in the oven. Top with the fried onions only during the last 5 minutes of baking to prevent them from burning.
Creamy Mac and Cheese with Crispy Fried Onions
Course: Main CourseCuisine: AmericanDifficulty: easy4
servings15
minutes25
minutes40
Minutes620
kcalAmerican
Ingredients
1 pound cavatappi (corkscrew) pasta
3 cups sharp cheddar cheese, freshly shredded (avoid pre-shredded bagged cheese)
1/2 cup parmesan cheese, finely grated
3 cups whole milk, room temperature
4 tablespoons unsalted butter
1/4 cup all-purpose flour
1 teaspoon garlic powder
1/2 teaspoon smoked paprika
1/2 teaspoon dry mustard powder (optional, for depth)
Salt and black pepper to taste
2 large yellow onions, sliced into very thin rings
1/2 cup all-purpose flour (for onion coating)
1/4 cup cornstarch (for onion coating)
Vegetable oil for frying
1/2 cup fresh parsley, finely chopped for garnish
Directions
- Prepare the crispy onions: In a bowl, whisk together the 1/2 cup flour and 1/4 cup cornstarch. Toss the thinly sliced onion rings in the mixture until separated and well coated. Heat one inch of vegetable oil in a heavy skillet to 350°F. Fry the onions in small batches for 2-3 minutes until deep golden brown. Drain on paper towels and salt immediately while hot.
- Boil the pasta: Cook the cavatappi in a large pot of heavily salted water for 1 minute less than the package directions for al dente. Drain and set aside.
- Create the roux: Melt the butter in a large, heavy-bottomed saucepan over medium heat. Whisk in the 1/4 cup flour and cook for 2 minutes, whisking constantly, to remove the raw flour taste without browning the butter.
- Build the sauce: Slowly drizzle in the room temperature milk one splash at a time, whisking vigorously after each addition. This gradual process is essential for a lump-free, stable sauce. Once all milk is added, whisk in the garlic powder, smoked paprika, dry mustard, salt, and pepper. Simmer for 3-5 minutes until the sauce is thick enough to coat the back of a spoon.
- The “No-Grit” Technique: Remove the pan from the heat entirely. Let the sauce sit for 60 seconds to drop slightly in temperature. Add the shredded cheddar and parmesan one handful at a time, folding gently with a spatula until completely melted and glossy. Do not return to the heat, as high heat causes cheese proteins to seize and become grainy.
- Combine: Fold the cooked pasta into the silky cheese sauce until every spiral is fully coated. If the sauce appears too thick, add a tablespoon of warm milk to reach your desired consistency.
- Serve: Divide the mac and cheese into bowls. Pile a generous amount of crispy fried onions on top and finish with a heavy sprinkle of fresh chopped parsley to match the visual brightness of the dish.
Notes
- Avoid pre-shredded bagged cheese as the anti-clumping agents can cause a grainy texture. Ensure milk is at room temperature and remove the sauce from heat before adding cheese to maintain a glossy finish.


