
You’ve likely experienced the disappointment of a roasted potato that looks golden on top but turns out mushy, greasy, or stuck to the pan. It’s a common kitchen heartbreak that usually stems from trapped moisture and a lack of surface tension. This recipe changes that narrative by focusing on a shattering crunch that holds its own against any main course.
The secret to this “Anti-Soggy Bottom” philosophy isn’t just high heat; it’s a deliberate two-step texture process. We use par-boiling to create a starchy exterior and a pressurized coating of Panko and Parmesan to build a structural crust. When these potatoes hit the plate, you’ll notice a distinct contrast between the loud, golden shell and the buttery, melt-in-your-mouth center.
If you want to guarantee success, the most important tip is to use Yukon Gold potatoes. Their medium starch content allows them to hold their shape while the edges fray perfectly during the “roughing up” stage. This creates a natural adhesive for your cheese mixture, ensuring every bite is heavily encrusted rather than just lightly dusted.
The Science of Starch: Why These Potatoes Crunch
Achieving a world-class crunch requires more than just luck; it requires the Maillard reaction and proper starch gelatinization. When you par-boil the potatoes, the heat breaks down the exterior pectin, which is the “glue” holding the vegetable cells together. This process allows the internal starches to migrate to the surface, creating a fuzzy, mashed-potato-like layer on the outside of each round.
This starchy slurry is the most important part of the recipe because it acts as a natural, edible adhesive. Instead of using heavy batters or eggs, which can become rubbery in the oven, we rely on this starch to grab onto the Parmesan and Panko. As the potatoes roast at 425°F, the moisture evaporates from this layer, leaving behind a dehydrated, ultra-crisp lattice of cheese and breadcrumbs.
Furthermore, the Parmesan cheese undergoes its own transformation. As the fats in the cheese render out, they essentially shallow-fry the Panko crumbs in place. This creates a pressurized crust that stays attached to the potato rather than flaking off. The result is a structural crunch that remains rigid even as the potato cools slightly on the serving platter.
Essential Components for Crispy Parmesan Roasted Potatoes
Quality ingredients are the foundation of this dish, and the texture of your Parmesan is non-negotiable. You must use “finely grated” Parmesan—the kind that looks like a sandy powder—rather than long shreds. This maximizes the surface area, allowing the cheese to melt into every nook and cranny of the roughed-up potato surface for a more uniform crust.
Panko breadcrumbs are another essential component because they are larger and airier than traditional breadcrumbs. They act like tiny heat conductors, creating air pockets within the crust that prevent it from becoming a solid, dense mass. This lightness is what gives the potatoes that “shattering” quality when you bite into them.
For the fat, choose a high-smoke point olive oil or melted butter. Since we are roasting at a high temperature, you need a fat that won’t burn or turn bitter. If you want the richest flavor, clarified butter is an excellent choice, as it provides the milk-solid taste without the risk of scorching in the 425°F environment.
Selecting the Right Potato Variety
Yukon Golds are the undisputed champions for this specific chemical reaction. They sit right in the middle of the starch spectrum, offering more creaminess than a Russet but more structural integrity than a red potato. This balance is vital because you want the interior to feel like velvet against the jagged exterior.
Avoid waxy varieties like red-skinned or new potatoes for this method. Their low starch content means they won’t “rough up” properly in the pot, leaving you with a smooth surface that the Parmesan coating can’t grip. If you use a waxy potato, the crust will likely slide right off in the oven, leaving you with a naked potato and a pile of burnt cheese.
The Role of Aromatics and Seasoning
You might be tempted to use fresh minced garlic, but I strongly advise against it here. Fresh garlic has a high sugar and moisture content, meaning it will burn and turn acrid long before the potatoes are finished roasting. Garlic powder and onion powder provide a deep, savory base that distributes evenly through the breading without the risk of scorching.
Kosher salt is also superior to table salt for this application. The larger grains provide a better tactile experience and help draw out any remaining surface moisture during the roasting process. It seasons the potato deeply without making the crust taste overly salty or chemical.
Pre-Roasting Ritual: The Par-Boil and Steam-Dry Phase
The first critical phase starts with a cold water bath. Always start your potatoes in cold salted water rather than dropping them into boiling water. This ensures the potato cooks evenly from the outside in, preventing the exterior from turning to mush before the center is tender. You only need about 6 to 8 minutes of simmering once the water hits a boil.
Once drained, the “Steam-Dry” technique is your best friend. Moisture is the absolute enemy of a crunch. By letting the potatoes sit in the hot colander for two minutes, the residual heat evaporates the surface water. You’ll see the potatoes turn from shiny and wet to matte and pale; that’s the signal that they are ready for the next step.
Finally, give the pot a vigorous shake for about 10 seconds. You aren’t trying to mash them, but you want the edges to look “fuzzy.” This creates the starchy surface area needed to bond with your Parmesan mixture. If the potatoes look too smooth, the coating won’t have anything to hold onto, and you’ll lose that signature crust.
The Pressurized Coating Technique
When it’s time to coat, don’t just toss the potatoes in the bowl. You need to use a pressurized approach. Take each potato round and press the flat side firmly into the Panko-Parmesan mixture. You want to physically force the breading into the starchy “fuzz” you created during the shaking phase.
I recommend coating only the two flat sides of the potato rounds. This allows the curved edges to breathe and crisp up independently, while the flat surfaces develop a thick, concentrated crust. It also prevents the potatoes from becoming too heavy or dense, maintaining a balance between the vegetable and the breading.
A perfectly encrusted potato should look like it has a thick, dry “puck” of seasoning on both sides. Don’t worry if it looks like a lot of breading; much of the volume will compress as the cheese melts and the Panko toasts. This heavy coating is what creates the “Anti-Soggy” barrier between the potato and the pan.
Thermal Shock: Utilizing the Pre-Heated Baking Sheet
One of the biggest mistakes people make is putting cold potatoes on a cold pan. By pre-heating your baking sheet in the 425°F oven, you create a “thermal shock” the moment the potatoes touch the metal. You should hear a loud, aggressive sizzle as soon as they hit the oil.
This immediate sear does two things: it prevents the cheese from sticking to the metal and it starts the frying process instantly. If the pan is cold, the cheese will slowly melt and bond to the baking sheet, causing the crust to tear off when you try to flip them. A hot pan ensures the crust sets upward and outward.
Be extremely careful when handling the hot oil and metal. Use a heavy-duty oven mitt and work quickly but calmly. Drizzle the oil across the hot surface and use a spatula to nudge the potatoes into place. The goal is to get them all down while the pan is at its maximum temperature.
Step-by-Step: Roasting for Maximum Texture
The roasting process takes about 35 minutes, divided into two distinct stages. The first 20 minutes is the “Quiet Phase.” During this time, do not touch, move, or peek at the potatoes. The crust needs this uninterrupted heat to set and harden against the potato surface. If you flip too early, the coating will be soft and will likely fall apart.
After 20 minutes, use a thin metal fish spatula to flip them. A thin spatula is vital because it can slide under the crust without blunt-forcing it off the potato. You’ll see a beautiful, pale golden color starting to form. Flip them all over and return them to the oven for the final 10 to 15 minutes.
You are looking for a deep, mahogany gold color. The cheese should look toasted and the Panko should be dark brown but not black. If the cheese looks pale, keep them in for another few minutes. The “Deep Golden Brown” stage is where the flavor is most concentrated, as the sugars in the potato and the proteins in the cheese have fully caramelized.
Troubleshooting Common Texture Issues
If your potatoes are sticking to the pan, it usually means one of two things: you didn’t use enough oil, or the pan wasn’t hot enough when the potatoes were added. To fix this mid-roast, let them cook a few minutes longer; often, the crust will “release” itself from the pan once it becomes sufficiently crisp and dry.
Soggy bottoms are almost always caused by overcrowding. If the potatoes are touching each other, they will trap steam between them, which softens the crust. Ensure there is at least half an inch of space around each round. If you have too many potatoes for one pan, use two pans rather than cramming them together.
If you notice the cheese is browning too fast while the potato center is still hard, your oven calibration might be off. You can tent the pan loosely with foil for the last 5 minutes, but be careful. Foil traps steam, so only do this if the crust is in danger of burning before the potato is creamy.
Flavor Variations and Herb Substitutions
While fresh basil adds a lovely, peppery brightness at the end, you can easily swap the flavor profile. If you prefer earthy tones, toss some fresh rosemary or thyme into the oil on the baking sheet. These hardy herbs can withstand the high heat and will infuse the oil with a woody aroma that permeates the potato crust.
For a bit of heat, add a half-teaspoon of red pepper flakes to the Panko mixture. This “Spicy Parmesan” version is incredible when paired with a cooling dip. You can also add a teaspoon of smoked paprika to the breading for a deep, smoky color and a flavor that mimics outdoor grilling.
If you want a Mediterranean twist, add some fresh lemon zest to the potatoes right as they come out of the oven. The residual heat will release the lemon oils, providing a sharp, citrusy contrast to the salty Parmesan. This version works particularly well if you are serving the potatoes alongside grilled fish or lamb.
Optimal Pairings for Roasted Potatoes
These potatoes are so crunchy and flavorful that they can easily steal the show, so pair them with main courses that have a softer texture. A juicy roasted chicken or a pan-seared steak provides a great contrast. The creamy interior of the potato acts almost like a built-in side of mash, while the crust provides the texture.
They also pair beautifully with grilled Mediterranean vegetables like zucchini or bell peppers. If you want to go the extra mile, serve them with a side of garlic aioli or a lemon-tahini drizzle. The acidity in these sauces cuts through the richness of the Parmesan and the olive oil, making each bite feel fresh.
Because these potatoes are quite salty and savory, they work best with mains that aren’t overly breaded. Avoid serving them with fried chicken or other heavy crusts, as the textures will compete. Instead, look for proteins that are grilled, roasted, or braised to let the “shattering crunch” of the potatoes stand out.
Expert Tips for Preparation and Service
Timing is everything with this dish. You must serve these potatoes immediately while the crust is at its peak crispness. As they sit, the moisture from the creamy interior will slowly migrate outward, eventually softening the crust. If you have to wait a few minutes, keep them in a warm oven on a wire rack to allow air to circulate.
Be aware of “Carry-over Cooking.” The potatoes will continue to cook for a minute or two after they leave the oven. This is why we pull them when they are deep golden brown; the heat trapped inside the crust will finish softening the very center of the Yukon Gold, ensuring that perfect buttery texture.
Never cover the finished dish with foil or a tight lid. This is the fastest way to ruin your hard work. The steam will be trapped instantly, turning your “Anti-Soggy” crust into a damp, soft mess. If you are transporting them to a potluck, keep the container open until the very last second to let the steam escape.
Can You Make These Ahead of Time?
Roasted potatoes are notoriously difficult to make ahead because they lose their crunch as they cool. However, if you have leftovers, do not use the microwave. The microwave will make the potato rubbery and the crust soggy. Instead, use an “Air Fryer Refresh” by popping them in at 375°F for 3 to 5 minutes.
If you don’t have an air fryer, a hot toaster oven or a standard oven at 400°F will work. Place them back on a wire rack so the heat can hit the bottom of the crust. This will re-crisp the Parmesan and Panko, bringing back about 90% of the original texture. It’s the only way to save that signature crunch.
Scaling the Recipe for Crowds
When cooking for a large group, remember the “One Layer Rule.” Airflow is the primary driver of the crunch. If you double the recipe, you must use two separate baking sheets. If you try to pile the potatoes on top of each other, they will steam rather than roast, and you’ll end up with a pan of mush.
If you are using two pans, rotate them halfway through the cooking time (when you do the flip). Most ovens have “hot spots,” and the top rack usually cooks faster than the bottom. Swapping the pans ensures that both batches reach that deep golden brown color at the same time, so everyone gets a perfect serving.
How do I store leftovers and do they freeze well?
Store any leftover potatoes in an airtight container in the refrigerator for up to 3 days. I do not recommend freezing these potatoes. The freezing and thawing process breaks down the cellular structure of the potato, making the interior grainy and the Parmesan crust unpleasantly soft. For the best experience, eat them within 24 hours of roasting.
Why did my potato crust fall off during roasting?
This usually happens if the potatoes weren’t “roughed up” enough after par-boiling or if the pan wasn’t hot enough. The starchy “fuzz” created by shaking the pot acts as the glue. If the potato surface is too smooth, there’s nothing for the Panko to grab. Additionally, if you flip the potatoes too early before the cheese has had time to set and harden, the crust will stick to the pan instead of the potato.
Can I use a different type of cheese or flour?
You can substitute the Parmesan with another hard, aged cheese like Pecorino Romano or Manchego, provided it is finely grated. Do not use soft cheeses like mozzarella, as they will simply melt and become greasy rather than crisp. If you need a gluten-free option, you can substitute the Panko with gluten-free breadcrumbs or even crushed pork rinds for a similar texture.
Why are my potatoes still hard in the middle?
This is a sign that the par-boiling step was too short or the potato rounds were cut too thick. Ensure you start with cold water and let them simmer for at least 6 minutes once the water boils. The edges should be tender enough that a fork can pierce them with just a little resistance. If they are still hard after roasting, your oven temperature might be running low, so check it with an oven thermometer.
Can I use fresh herbs during the roasting process?
Hard herbs like rosemary, thyme, or oregano can be added to the roasting pan during the last 15 minutes of cooking. However, soft herbs like basil, parsley, or cilantro should only be added after the potatoes are out of the oven. The high heat of a 425°F oven will turn soft herbs black and bitter, stripping away their fresh flavor.
Crispy Parmesan Roasted Potatoes
Course: Side DishCuisine: AmericanDifficulty: easy4
servings15
minutes35
minutes50
Minutes265
kcalAmerican
Ingredients
2 lbs Yukon Gold potatoes, peeled and cut into 1-inch thick rounds
1/2 cup Panko breadcrumbs
1/2 cup freshly grated Parmesan cheese (finely grated)
4 tablespoons olive oil or melted butter, divided
1 teaspoon garlic powder
1/2 teaspoon onion powder
1/2 teaspoon kosher salt
1/4 teaspoon black pepper
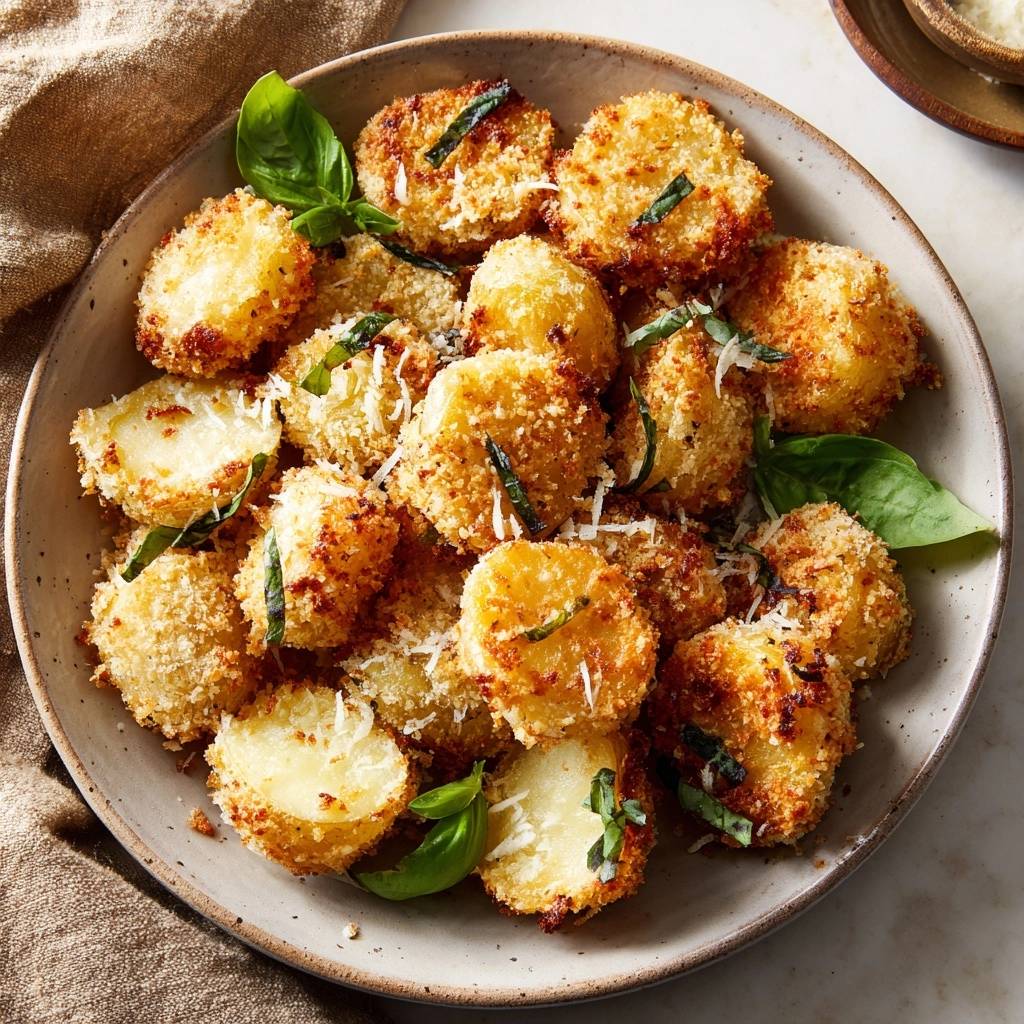
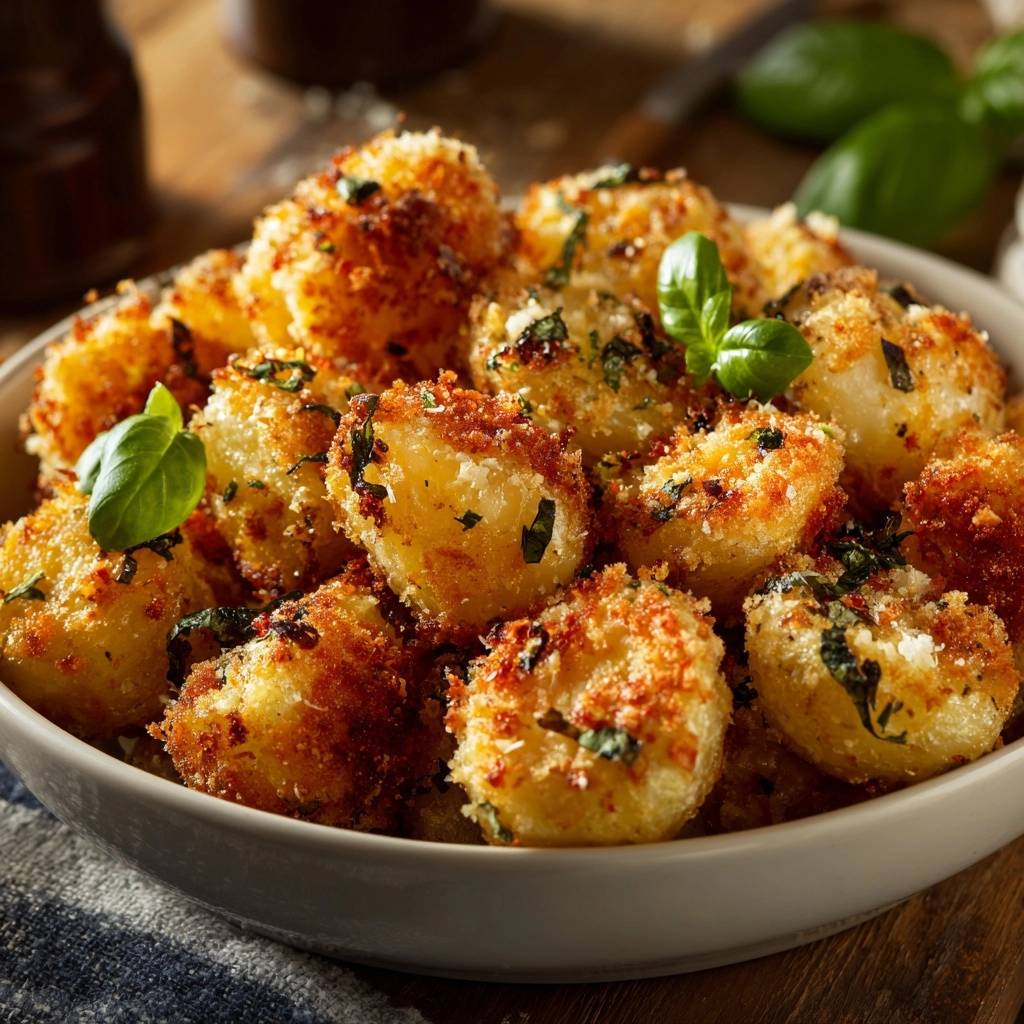
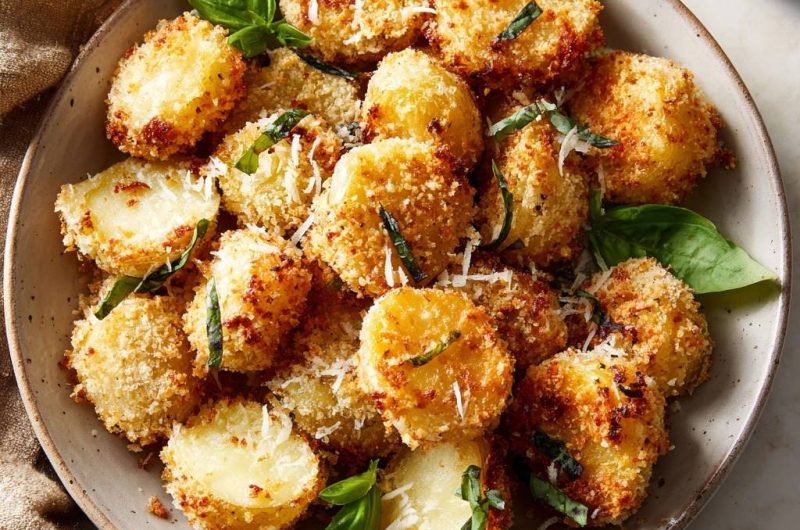
1/4 cup fresh basil leaves, chiffonade (thinly sliced)
Extra shaved Parmesan for garnish
Directions
- Preheat your oven to 425°F (220°C). Place a large, rimmed baking sheet inside the oven while it heats. A screaming hot pan is essential for an immediate sear.
- Place the potato rounds in a large pot and cover with cold salted water. Bring to a boil, then reduce heat and simmer for 6-8 minutes. The potatoes should be tender on the edges but still firm in the center.
- Drain the potatoes thoroughly and let them steam-dry in the colander for 2 minutes. Return them to the dry pot and shake vigorously for 10 seconds. This “roughs up” the exterior, creating a starchy mash on the surface that acts as glue for the crust.
- In a wide, shallow bowl, combine the Panko, finely grated Parmesan, garlic powder, onion powder, salt, and pepper.
- Drizzle 2 tablespoons of olive oil over the potatoes in the pot and toss to coat. One by one, press each potato round firmly into the Panko-Parmesan mixture, ensuring the flat sides are heavily encrusted.
- Carefully remove the hot baking sheet from the oven. Drizzle the remaining 2 tablespoons of oil over the surface of the hot pan.
- Place the potatoes onto the pan (you should hear a loud sizzle). Roast for 20 minutes.
- Carefully flip the potatoes using a thin metal spatula to keep the crust intact. Roast for another 10-15 minutes until the coating is deep golden brown and the centers are creamy.
- Remove from the oven and immediately toss with the fresh basil chiffonade. Garnish with extra shaved Parmesan and serve immediately while the crust is at its peak crispness.
Notes
- The secret is the screaming hot pan and the roughing up of the potato surface after boiling to create a starchy glue for the cheese and breadcrumb mixture.


