
Most people know this dish as the ultimate comfort food, a staple at potlucks and family gatherings across the Intermountain West. However, the tragedy of many potato casseroles is the dreaded “soggy bottom,” where the potatoes turn into a watery, indistinct mush under a layer of cheese. You want a side dish that holds its own on the plate, offering a contrast between a velvety sauce and distinct, tender potato chunks.
The secret to elevating this classic from a cafeteria-style mash to a gourmet side dish lies in moisture management. By moving away from frozen bags of hash browns and focusing on fresh tubers, you gain total control over the final texture. We’re going to transform the way you think about this casserole by treating the potatoes with the same respect you’d give a high-end gratin.
The real game-changer here is the “Steam-Drying” technique. Most home cooks move straight from the boiling pot to the mixing bowl, trapping hot steam inside the sauce. I’ve found that letting the par-boiled potatoes air-dry on a flat surface for just a few minutes ensures the cream sauce clings to the potato rather than sliding off into a puddle of water. It’s a small step that makes a massive difference in the structural integrity of your bake.
The Science of Texture in Potato Casseroles
Choosing the right potato is the first step in preventing a culinary disaster. While Russets are great for fluffy mashed potatoes, they tend to disintegrate when baked in a heavy cream sauce. Yukon Golds are the superior choice here because they possess a medium-starch content and a naturally buttery flavor. They hold their shape beautifully during the par-boiling process, providing that “bite” that makes a casserole feel substantial.
When you par-boil the potatoes, you’re initiating a process called starch retrogradation. By partially cooking the starch granules and then cooling them slightly during the drying phase, the surface of the potato becomes more stable. This creates a porous but firm exterior that bonds perfectly with the sour cream and soup base. Instead of the potatoes releasing water into the sauce as they bake, they actually absorb the flavors of the aromatics.
Air-drying the potatoes after draining them is a non-negotiable step for the best results. As the surface moisture evaporates, the starch on the outside of the cube becomes slightly tacky. This tackiness acts like a natural glue, ensuring that every inch of the potato is coated in that savory, cheesy mixture. If you skip this, the residual water will thin out your sauce, leaving you with a soup rather than a casserole.
Essential Components for Crispy Topped Funeral Potatoes
Quality ingredients are the backbone of this recipe, and it starts with the cheese. While pre-shredded mild cheddar is convenient, it’s often coated in potato starch to prevent clumping in the bag. This extra starch can make your sauce feel gritty. I always recommend grating a block of Sharp White Cheddar. It offers a sophisticated, tangy punch that cuts through the richness of the sour cream, and it melts into a much smoother consistency.
The condensed cream of chicken soup might seem old-school, but it serves a vital purpose as a stabilizer. It contains emulsifiers that keep the fats from the butter and sour cream from separating during the 45-minute bake. Without it, you’d likely end up with a layer of yellow oil sitting on top of your potatoes. It provides a consistent, savory base that ties the dairy and the spices together into a unified sauce.
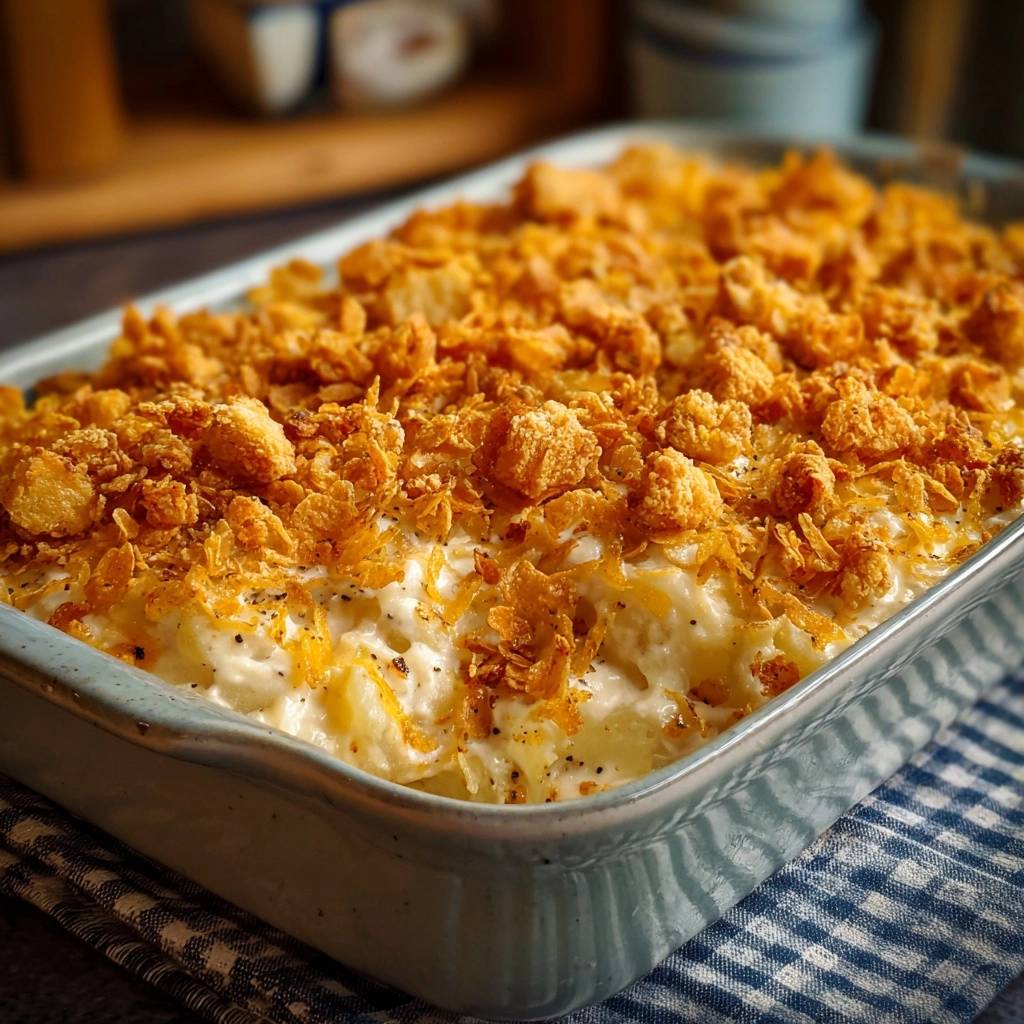
For the topping, the texture of your cornflakes is everything. You want to lightly crush them by hand so you have a variety of sizes. If you pulverize them into a fine powder, they will absorb the butter and turn into a soggy paste. By keeping larger, jagged pieces, you create more surface area. These “craggy peaks” catch the heat of the oven, resulting in a shatteringly crisp crust that provides the perfect textural foil to the soft potatoes underneath.
Selecting the Right Dairy and Aromatics
Always reach for full-fat sour cream when making this dish. Low-fat or fat-free versions contain more water and stabilizers that can break down or curdle under high heat. The high fat content in the real deal ensures a silky, luscious mouthfeel that doesn’t break. It provides that signature tang that balances the salty notes of the chicken soup and cheese.
You might be tempted to sauté fresh onions and garlic, but in this specific casserole, powders are actually better. Fresh aromatics release moisture as they cook, which can contribute to a runny sauce. Onion and garlic powder provide a concentrated, savory flavor that distributes evenly throughout the entire dish without changing the hydration levels of the cream base.
Phase One: The Par-Boil and Steam-Dry Technique
Start your potatoes in a pot of cold, salted water rather than dropping them into boiling water. This ensures that the cubes cook evenly from the center out to the edges. If you start with boiling water, the outsides will turn to mush before the insides are even warm. You’re looking for an “al dente” texture—the edges should be soft enough for a fork to pierce, but the center should still offer some resistance.
Once you drain the potatoes, don’t just leave them in a pile. Spread them out on a large baking sheet in a single layer. You’ll see steam rising off them immediately; this is exactly what you want. Let them sit for about 8 minutes until they no longer look wet. This “dry-out” phase is the secret weapon that guarantees your casserole will have a thick, rich sauce instead of a watery mess at the bottom of the pan.
Phase Two: Constructing the Cream Base and Folding
When you’re ready to combine your ingredients, whisk the liquid components together first until they are completely smooth. You want the sour cream, soup, and melted butter to be a single, cohesive emulsion before the potatoes ever enter the bowl. This prevents you from having to over-stir the mixture later, which is a common mistake that leads to gummy potatoes.
Use a rubber spatula to gently fold the potatoes and cheese into the cream base. Think of it like folding egg whites into a cake batter. You want to lift from the bottom and turn the mixture over until just combined. If you stir too vigorously, you’ll break the cell walls of the Yukon Golds, releasing excess starch that will turn your silky sauce into a thick, gluey paste. Keep those cubes intact!
Phase Three: Engineering the Shatter-Crisp Cornflake Crust
The topping is the crown jewel of this dish, and it requires a specific ratio of fat to flake. Toss your crushed cornflakes with the melted butter until every single piece is glistening. This fat coating acts as a heat conductor in the oven, essentially “frying” the flakes as the casserole bakes. If the flakes are dry, they will simply toast; if they are properly buttered, they will shatter when you bite into them.
When you apply the topping, don’t press it down into the potatoes. Sprinkle it loosely and unevenly. You want to create little mountains and valleys of cornflakes. The peaks will get extra dark and crunchy, while the valleys will stay slightly more tender. This variation in texture is what makes the topping so addictive. It should look like a rugged landscape of golden-brown goodness.
Baking Parameters for Optimal Golden Color
Position your oven rack in the center to ensure the heat circulates evenly around the ceramic dish. If it’s too high, the cornflakes will burn before the potatoes are hot; too low, and the bottom might scorch. You’re looking for the sauce to be vigorously bubbling around the edges of the pan. This bubbling indicates that the cheese has fully melted and the starches in the soup have thickened to their maximum potential.
The hardest part of this recipe is the 15-minute rest after you pull it out of the oven. Don’t skip this! Just like a lasagna, this casserole needs time to “set.” As it cools slightly, the starches stabilize and the sauce thickens. If you scoop into it immediately, the sauce will run all over the plate. After 15 minutes, you’ll get a clean, distinct scoop that holds its shape perfectly.
Troubleshooting Common Casserole Issues
If you notice your sauce looks oily or has separated, it’s usually due to the temperature being too high or using low-fat dairy. Ensure your oven is calibrated correctly. If the cheese starts to “oil off,” it means the protein structure has collapsed. Using a high-quality, hand-grated sharp cheddar and full-fat sour cream is the best insurance policy against a greasy finish.
Sometimes the cornflake topping might start browning too quickly before the center of the casserole is hot. If you see the flakes reaching a deep mahogany color early on, simply tent the dish loosely with a piece of aluminum foil. This reflects the direct heat while allowing the potatoes to continue cooking. Just make sure the foil doesn’t touch the buttered flakes, or they might stick.
If your potatoes end up crunchy, they were likely cut into pieces larger than one inch or weren’t par-boiled long enough. Consistency is key when cubing your Yukon Golds. If you have some large chunks and some tiny ones, they won’t cook at the same rate. Aim for uniform one-inch cubes to ensure every bite is perfectly tender and creamy.
Flavor Variations and Ingredient Swaps
While the classic version is hard to beat, you can easily customize the flavor profile without ruining the texture. For a bit of a kick, try folding in a small can of diced green chiles or a teaspoon of smoked paprika. These additions provide a smoky depth that pairs beautifully with the sharp white cheddar. Just ensure any added vegetables are patted dry to maintain that anti-soggy integrity.
If you find yourself without cornflakes, crushed buttery crackers are a popular alternative. They provide a different kind of crunch—more of a melt-in-your-mouth saltiness compared to the structural snap of cornflakes. Regardless of the topping you choose, the rule remains the same: toss them in plenty of melted butter and keep the pieces large enough to provide a distinct texture.
Make-Ahead Strategies and Storage Logistics
You can easily prep the components of this dish a day in advance. Par-boil and dry the potatoes, then store them in an airtight container in the fridge. You can also whisk the cream base together and keep it chilled. However, do not combine the potatoes and the sauce until you are ready to bake, as the potatoes will continue to release moisture into the sauce as they sit, which can lead to sogginess.
Leftovers should be stored in an airtight container in the refrigerator for up to three days. When reheating, avoid the microwave if you want to preserve the crunch. Instead, place a portion in a small oven-safe dish and bake at 350°F for about 10 to 15 minutes. This helps the cornflake topping regain its crispness. If you must use a microwave, the topping will become chewy, though the flavor will still be excellent.
Ideal Pairings for a Hearty Potato Side
Because these potatoes are incredibly rich and creamy, they pair best with lean proteins that offer a bit of acidity or char. Roasted chicken with a lemon-herb rub is a fantastic choice, as the citrus cuts through the heavy dairy. Grilled vegetables, like asparagus or charred broccoli, also provide a fresh, bitter contrast that balances the savory depth of the casserole.
This dish is a heavy hitter, so you don’t need many other starchy sides. A simple green salad with a sharp vinaigrette is often all you need to round out the meal. The goal is to let the Crispy Topped Funeral Potatoes be the star of the show, providing that ultimate “hug in a bowl” feeling that only the best comfort food can deliver.
Frequently Asked Questions
Can I use frozen hash browns instead of fresh Yukon Golds?
You can, but it significantly increases the risk of a soggy casserole. Frozen potatoes release a lot of water as they thaw and bake. If you must use them, choose the cubed variety rather than shredded, and make sure to thaw them completely and pat them very dry with paper towels before mixing them into the cream base.
Why is my cornflake topping chewy instead of crunchy?
This usually happens if the cornflakes weren’t thoroughly coated in butter or if they were crushed into a fine dust. The butter is what allows the flakes to “fry” in the oven’s heat. Additionally, if you store the casserole with a lid while it’s still hot, the trapped steam will soften the crust. Always let it cool uncovered for a bit.
Can I substitute the sour cream with Greek yogurt?
While you can use full-fat Greek yogurt, be aware that it is more prone to curdling at high temperatures due to its lower fat and higher protein content. It also has a much sharper tang. If you decide to swap, use a 5% fat yogurt and be careful not to overbake the dish, as the heat can cause the yogurt to break.
How do I scale this recipe for a large crowd without losing the texture?
When doubling the recipe, use two separate 9×13 inch dishes rather than one giant, deep pan. If the casserole is too deep, the potatoes in the middle will steam and become mushy before the edges are done. Keeping the depth consistent ensures that the heat penetrates evenly and the “anti-soggy” drying technique remains effective for the whole batch.
Crispy Topped Funeral Potatoes
Course: Side DishCuisine: AmericanDifficulty: easy10
servings15
minutes45
minutes60
Minutes340
kcalAmerican
Ingredients
2 pounds Yukon Gold potatoes, peeled and cubed into 1-inch pieces
2 cups sour cream
1 can (10.5 oz) condensed cream of chicken soup
1/2 cup unsalted butter, melted
1 teaspoon onion powder
1 teaspoon garlic powder
1/2 teaspoon salt
1/2 teaspoon black pepper
2 cups shredded sharp white cheddar cheese
3 cups cornflakes, lightly crushed (not pulverized)
4 tablespoons unsalted butter, melted (for the topping)
Directions
- Preheat your oven to 350°F (175°C) and grease a 9×13 inch ceramic or glass baking dish.
- Place the potato cubes in a large pot of cold, salted water. Bring to a boil and cook for exactly 5 to 7 minutes. The potatoes must be “al dente”-fork-tender on the edges but still firm in the center.
- Drain the potatoes thoroughly in a colander. Spread them out on a clean baking sheet or leave them in the colander for 5 to 8 minutes to allow all surface steam to evaporate. This “dry-out” phase is the secret to preventing a soggy casserole.
- In a large mixing bowl, whisk together the sour cream, cream of chicken soup, 1/2 cup melted butter, onion powder, garlic powder, salt, and pepper until completely smooth.
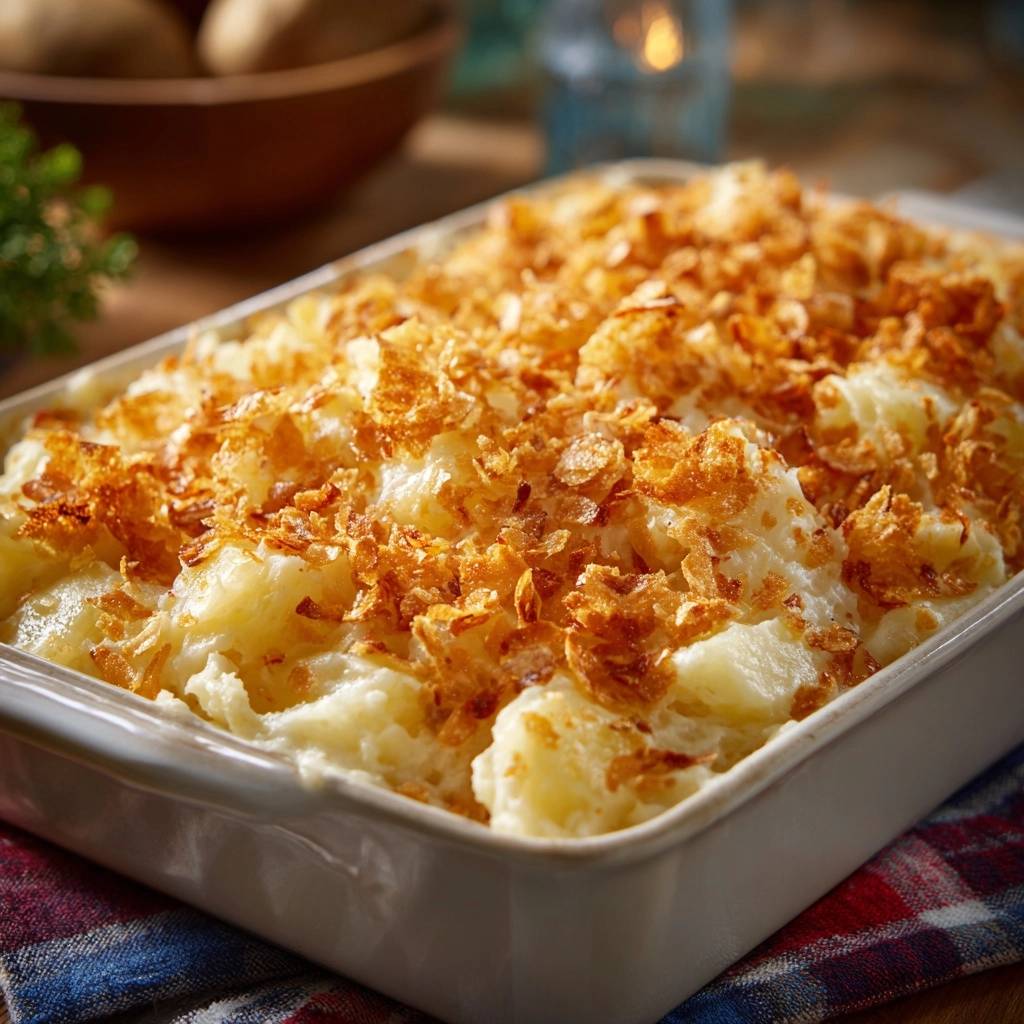
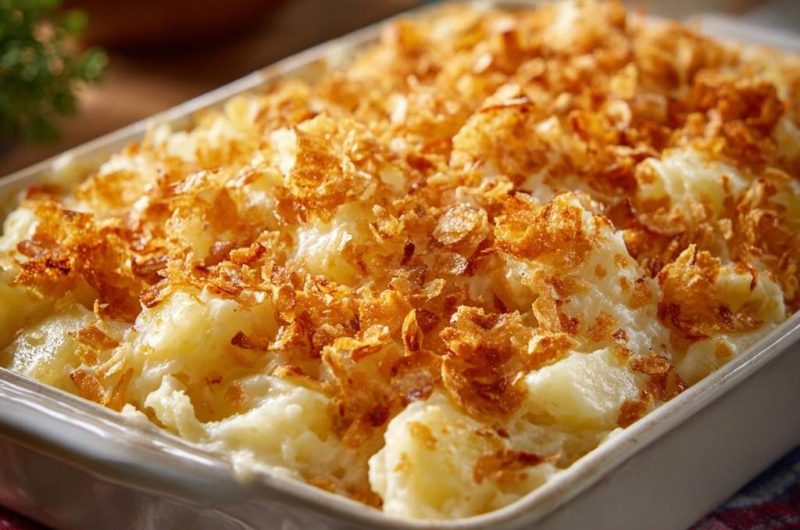
- Gently fold the steam-dried potatoes and the shredded cheese into the cream mixture using a rubber spatula. Do not overwork the mixture; you want the cubes to remain intact to match the chunky texture shown in the image.
- Spread the mixture evenly into the prepared baking dish.
- In a separate bowl, toss the crushed cornflakes with the 4 tablespoons of melted butter until every flake is glistening. Sprinkle this generously over the top in a thick, uneven layer to create the craggy, golden peaks seen in the photo.
- Bake on the center rack for 40 to 45 minutes until the sauce is bubbling at the edges and the cornflake topping has turned a deep, toasted golden brown.
- Remove from the oven and let the casserole rest for 10 to 15 minutes before serving. This allows the starches to set and the sauce to thicken, ensuring a clean, distinct scoop.
Notes
- The secret to preventing a soggy casserole is the dry-out phase after boiling the potatoes. Ensure the potatoes are al dente and allowed to steam dry for 5 to 8 minutes before mixing with the cream base.


